background image

CP3005 – User Guide Rev. 1.8 

 
www.kontron.com 


// 105 


13.2.6.


Boot Setup Menu 

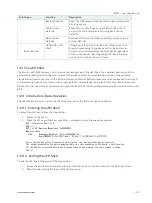
The Boot Setup menu provides sub-screens and functions for boot configuration and shows the boot device priority 
order. 

Figure 44: Boot Setup 


Table 62: Boot Setup Menu Sub-Screens and Functions   

Sub-Screen 

Function 

Description 

Boot Configuration 

Setup Prompt 
Timeout 

Bootup 
NumLockState 

[Off] 

Quiet Boot 

[Enabled/Disabled] 

Fast Boot 

[Enabled/Disabled] 

Boot Mode Select 

[UEFI] 

Boot Option  

Boot option #1..11 

[UEFI: Hard Disk] 

UEFI Application Boot 
Priorities 

Boot option #1 

[UEFI: Built-in EFI Shell] 


Summary of Contents for Kontron CP3005 Series

Page 1: ... USER GUIDE www kontron com 1 CP3005 User Guide Rev 1 8 Doc ID 1064 4245 ...

Page 2: ...CP3005 User Guide Rev 1 8 www kontron com 2 This page has been intentionally left blank ...

Page 3: ...table for the specified use without further testing or modification Kontron expressly informs the user that this user guide only contains a general description of processes and instructions which may not be applicable in every individual case In cases of doubt please contact Kontron This user guide is protected by copyright All rights are reserved by Kontron No part of this document may be reprodu...

Page 4: ...lely responsible for compliance with all legal regulatory safety and security related requirements concerning your products You are responsible to ensure that your systems and any Kontron hardware or software components incorporated in your systems meet all applicable requirements Unless otherwise stated in the product documentation the Kontron device is not provided with error tolerance capabilit...

Page 5: ...dule in chapter 7 1 WIBU chip in chapter 2 6 2020 August 24 hjs 1 8 Word2016 issues chapter CPCI connector added CP3005 V introduced 2021 March 23 hjs Terms and Conditions Kontron warrants products in accordance with defined regional warranty periods For more information about warranty compliance and conformity and the warranty period in your region visit http www kontron com terms and conditions ...

Page 6: ...es Kontron to provide exceptional peace of mind to build and maintain successful products For more details on Kontron s service offerings such as enhanced repair services extended warranty Kontron training academy and more visit http www kontron com support and services services Customer Comments If you have any difficulties using this user guide discover an error or just want to provide some feed...

Page 7: ...ribed by the law may endanger your life health and or result in damage to your material ESD Sensitive Device This symbol and title inform that the electronic boards and their components are sensitive to static electricity Care must therefore be taken during all handling operations and inspections of this product in order to ensure product integrity at all times HOT Surface Do NOT touch Allow to co...

Page 8: ...before performing any work on this product Earth ground connection to vehicle s chassis or a central grounding point shall remain connected The earth ground cable shall be the last cable to be disconnected or the first cable to be connected when performing installation or removal procedures on this product Special Handling and Unpacking Instruction ESD Sensitive Device Electronic boards and their ...

Page 9: ...duct then re pack it in the same manner as it was delivered Special care is necessary when handling or unpacking the product See Special Handling and Unpacking Instruction Quality and Environmental Management Kontron aims to deliver reliable high end products designed and built for quality and aims to complying with environmental laws regulations and other environmentally oriented requirements For...

Page 10: ...6 Technical Specification 23 2 7 Standards 25 3 Functional Description 27 3 1 Processor 27 3 2 Integrated Processor Graphics Controller 27 3 3 Chipset 28 3 4 System Memory 28 3 5 Watchdog Timer 28 3 6 Battery 29 3 7 Flash Memory 29 3 7 1 SPI Boot Flash for uEFI BIOS 29 3 7 2 M 2 Flash Module 29 3 8 Trusted Platform Module 29 3 9 Board Interfaces 30 3 9 1 CompactPCI Interface 30 3 9 1 1 Board Funct...

Page 11: ...vision Register BREV 49 4 3 11 Geographic Addressing Register GEOAD 50 4 3 12 Watchdog Timer Control Register WTIM 50 4 3 13 Board ID Low Byte Register BIDL 52 4 3 14 LED Configuration Register LCFG 52 4 3 15 LED Control Register LCTRL 53 4 3 16 General Purpose Output Register GPOUT 53 4 3 17 General Purpose Input Register GPIN 54 5 Power Considerations 55 5 1 CP3005 Voltage Ranges 55 5 2 Start Up...

Page 12: ...e Interfaces 77 9 5 1 USB Interfaces 77 9 5 2 VGA Interface 77 9 5 3 Gigabit Ethernet Interface 77 9 5 4 COM Interface 77 9 5 5 Peripheral Control Interface 78 9 5 6 SATA Interfaces 78 9 5 7 Rear I O Interface on CompactPCI Connector rJ2 79 10 CP RIO3 04S Rear Transition Module 81 10 1 Overview 81 11 SATA SSD Flash Module 82 12 Installation 83 12 1 Safety 83 12 2 Board Installation 83 12 2 1 Stand...

Page 13: ...Recovery 110 13 5 3 Determining the Active Flash 111 14 Technical Support 112 14 1 Warranty 112 14 2 Returning Defective Merchandise 112 Appendix A List of Acronyms 114 About Kontron Member of the S T Group 115 List of Tables Table 1 CP3005 Main Specifications 23 Table 2 CP3005 Main Standards 25 Table 3 Features of the Processors Supported on the CP3005 27 Table 4 Features of the Processors Graphi...

Page 14: ... LEDs 65 Table 46 Serial Port Connector J8 Pinout 67 Table 47 MMEXT XMC02 Module Specifications 69 Table 48 Watchdog WD and Overtemperature TH Status LEDs 71 Table 49 Integral Ethernet LEDs 71 Table 50 General Purpose LEDs 71 Table 51 CP RIO3 04 Rear Transition Module Specifications 74 Table 52 Serial Port Connectors J2 COMB and J3 COMA Pinout 78 Table 53 Peripheral Control Connector J13 Pinout 78...

Page 15: ...View 72 Figure 22 M 2 Connector 73 Figure 23 XMC Interface 73 Figure 24 CP RIO3 04 4HP and 8HP Front Panels 75 Figure 25 CP RIO3 04 4HP Rear Transition Module Layout 76 Figure 26 CP RIO3 04 8HP Rear Transition Module Layout 77 Figure 27 Rear I O CompactPCI Connector rJ2 79 Figure 28 M 2 Connector 82 Figure 29 4HP CP3005 with mSATA Flash Module 85 Figure 30 HP CP3005 with MMEXT05 Module 86 Figure 3...

Page 16: ...ctPCI CPU blade with 2 4 or 6 core CPU options Based on 8th and 9th Gen Intel CoreTM technology Processors are Xeon E 2176M 6C 2 7 GHz 45 W ECC CoreTM i5 8400H 4C 2 5 GHz 45 W Xeon E 2276ML 6C 2 0 GHz 25 W ECC CoreTM i3 9100HL 4C 1 6 GHz 25 W ECC Celeron G4930E 2C 2 4 GHz 35 W ECC Up to 32 GB DDR4 2400 2666 memory via 2x SODIMM sockets M 2 module options for onboard data storage TPM support Up to ...

Page 17: ...CP3005 User Guide Rev 1 8 www kontron com 17 Figure 1 CompactPCI Board CP3005 ...

Page 18: ...module provides a M 2 socket for a SATA SSD flash type 2280 For further information about the MMEXT XMC02 module refer to Chapter 8 2 2 1 CP RIO3 04 Rear I O Module 4HP 8HP and CP RIO3 04S The CP RIO3 04 rear I O module has been designed for use with the CP3005 board from Kontron and provides comprehensive rear I O functionality For further information about the CP RIO3 04 rear I O module with 4HP...

Page 19: ...CP3005 User Guide Rev 1 8 www kontron com 19 2 3 Block Diagram The following diagram provides additional information concerning board functionality and component layout Figure 2 Block Diagram ...

Page 20: ...og Status General Purpose LEDs LED3 0 red green red green General Purpose POST Code Note If the General Purpose LEDs 3 0 are lit red during boot up a failure is indicated before the uEFI BIOS has started Integral Ethernet LEDs ACT green Ethernet Link Activity SPEED orange 1000BASE T Ethernet Speed SPEED green 100BASE TX Ethernet Speed SPEED off ACT on 10BASE T Ethernet Speed ...

Page 21: ... 5 Board Layout Figure 4 4HP CP3005 Board Layout Top View without heatspreader Number Item Number Item 1 Processor 5 M 2 Card 2 SO DIMM Sockets 6 SATA Connector 3 PCH 7 CPCI Connector 4 Battery Intel Core Xeon Intel PCH M 2 Connector 1 2 4 3 5 6 7 ...

Page 22: ...CP3005 User Guide Rev 1 8 www kontron com 22 Figure 5 4HP CP3005 Board Layout Bottom View Number Item 1 DIP Switch SW1 1 M 2 Connector ...

Page 23: ...memory with ECC and without ECC respectively running at 2400 MT s 1 2 V on two SODIMM sockets BIOS Flash 2x 16 MB SPI boot flash chips for two separate uEFI BIOS images Customized EEPROM I C EEPROM with 64 kbit Config Memories for Ethernet interfaces i210 16 Mbit SPI Flash Interfaces CompactPCI 32 bit 66MHz PCI interface with dedicated PCIe to PCI bridge System controller operation 3 3V or 5V sign...

Page 24: ...igh Definition Audio HDA COM1 with Extension module MMEXT05 2x SATA 6 Gbit s SATA Gen 3 1x USB3 0 with Extension module MMEXT05 LPC 1x PCIe x1 Sockets Front Panel connectors VGA one 15 pin D Sub connector USB two type A connectors Ethernet two 8 pin RJ 45 connectors Onboard connectors 2x Mezzanine connector for a I O extension module 1x 7 pin standard SATA connector 1x SATA M 2 socket key M for 22...

Page 25: ...gement assembly option on request Miscellaneous Temperature Range Operational Standard 0 C to 60 C Extended E1X 40 C to 70 C Storage 40 C to 85 C without hard disk and without battery Battery 3 0 V lithium battery for RTC with battery socket Battery type UL approved BR2032 Temperature ranges Operational load 20 C to 85 C typical refer to the battery manufacturer s specifications for exact range St...

Page 26: ...68 2 29 Test parameters 15 g acceleration 11 ms shock duration half sine 500 number of shocks per direction 6 directions 5 s recovery time Customers desiring to perform further environmental testing of the CP3005 must contact Kontron for assistance prior to performing any such testing Boards without conformal coating must not be exposed to a change of temperature which can lead to condensation as ...

Page 27: ...GHz 6 MB 25 W 100 C UHD Graphics 630 Celeron G4930E 2 2 2 4 GHz 2 MB 35 W 100 C UHD Graphics 610 3 2 Integrated Processor Graphics Controller The 8th gen Intel Core i5 Xeon processor includes a highly integrated processor graphics controller delivering high performance 3D and 2D graphics capabilities The integrated processor graphics controller provides with Extension module MMEXT05 three digital ...

Page 28: ...TDP 3 W SATA Ports 8 3 4 System Memory The CP3005 supports a dual DDR4 memory interface with one SO DIMM socket per channel The sockets support the following system memory features Table 6 System Memory Feature Remark Socket 2x SO DIMM DDR4 Memory Module Size 4 GB 8 GB 16 GB 3 5 Watchdog Timer The CP3005 provides a Watchdog timer that is programmable for a timeout period ranging from 125 ms to 409...

Page 29: ...OS images a standard SPI boot flash and a recovery SPI boot flash The fail over mechanism for the uEFI BIOS recovery can be controlled via the DIP switch SW1 switch 2 The uEFI BIOS code and settings are stored in the SPI boot flashes Changes made to the uEFI BIOS settings are available only in the currently selected SPI boot flash Thus switching over to the other SPI boot flash may result in opera...

Page 30: ...istors are used 3 9 1 2 Board Functionality when Installed in Peripheral Slot Passive Mode In a peripheral slot the board receives power but does not communicate on the CompactPCI bus all CompactPCI signals are isolated 3 9 1 3 Front Rear I O Configuration The CP3005 is available in two versions CP3005 front I O version CP3005 rear I O version Please ensure that the correct version is stated on th...

Page 31: ...CP3005 allows for hot swapping of peripheral boards with hot swap capability when the CP3005 is installed in the system slot The CP3005 itself is not hot swappable when inserted in a system slot When inserted in a peripheral slot the CP3005 is hot pluggable 3 9 1 5 Power Ramping On the CP3005 a special power controller is used to ramp up the onboard supply voltages This is done to avoid transients...

Page 32: ...er J2 arbitration clock and optionally rear I O interface functionality The CP3005 is designed for a CompactPCI bus architecture and the board is capable of driving up to seven CompactPCI slots with individual arbitration and clock signals The CompactPCI standard is electrically identical to the PCI local bus However these systems are enhanced to operate in rugged industrial environments and to su...

Page 33: ...lot Pinout Pin Z A B C D E F 25 NC 5V REQ64 ENUM 3 3V 5V GND 24 NC AD 1 5V V I O AD 0 ACK64 GND 23 NC 3 3V AD 4 AD 3 5V AD 2 GND 22 NC AD 7 GND 3 3V AD 6 AD 5 GND 21 NC 3 3V AD 9 AD 8 M66EN C BE 0 GND 20 NC AD 12 GND V I O AD 11 AD 10 GND 19 NC 3 3V AD 15 AD 14 GND AD 13 GND 18 NC SERR GND 3 3V PAR C BE 1 GND 17 NC 3 3V RSV RSV GND PERR GND 16 NC DEVSEL PCIXCAP V I O STOP LOCK GND 15 NC 3 3V FRAME...

Page 34: ...nout Pin Z A B C D E F 25 NC 5V 3 3V 5V GND 24 NC 5V V I O GND 23 NC 3 3V 5V GND 22 NC GND 3 3V GND 21 NC 3 3V GND 20 NC GND V I O GND 19 NC 3 3V GND GND 18 NC GND 3 3V GND 17 NC 3 3V RSV RSV GND GND 16 NC V I O GND 15 NC 3 3V BDSEL GND 14 12 Key Area 11 NC GND GND 10 NC GND 3 3V GND 9 NC NC GND GND 8 NC GND V I O GND 7 NC GND GND 6 NC CPCI_PRESENT 3 3V GND 5 NC NC NC RST GND GND 4 NC NC HEALTHY V...

Page 35: ...GND 4 NC V I O RSV RSV RSV RSV GND 3 NC CLK4 GND GNT3 REQ4 GNT4 GND 2 NC CLK2 CLK3 SYSEN GNT2 REQ3 GND 1 NC CLK1 GND REQ1 GNT1 REQ2 GND The 64 bit CompactPCI signals are not used on the board and the 64 bit control and address signals are not terminated to V I O 3 9 2 3 Optional Rear I O Interface The CP3005 board provides optional rear I O connectivity for peripherals When the rear I O module is ...

Page 36: ... CP3003 Thus rear I O modules designed for these boards can also be used with the CP3005 Table 10 Rear I O CompactPCI Connector J2 Pinout CP3005 Rear I O Vers Pin Z A B C D E F 22 NC GA4 GA3 GA2 GA1 GA0 GND 21 NC CLK6 GND USBA USBB USBA_PWR_ 5V GND 20 NC CLK5 GND USBA USBB USBB_PWR_ 5V GND 19 NC GND GND PWR_BTN PWR_SLP S3 RIO_3 3V GND 18 NC COMA_RXD COMA_DCD COMA_DTR GPI1 COMB_CT S COMA_CTS GND 17...

Page 37: ...backplane itself or within a rear I O module Failure to comply with the above will result in damage to your board Table 11 CompactPCI Rear I O Connector J2 Signals Signal Description COMAx COMA port LVTTL 3 3 V COMBx COMB port LVTTL 3 3 V GPI GPO General purpose input general purpose output signal GPIO_CFG0 GPIO or COMB configuration IPx Gigabit Ethernet copper port SATAx SATA port USBx USB interf...

Page 38: ...Ds Function on the CP3005 LED Color State Function TH LED red green Off Power failure Green Board in normal operation Red CPU has reached maximum allowable operating temperature and the performance has been reduced Red blinking CPU temperature above 125 C CPU has been shut off In this event all General Purpose LEDs LED3 0 are blinking red as well WD LED red green OFF Watchdog inactive Green Watchd...

Page 39: ...neral Purpose green uEFI BIOS POST bit 2 and bit 6 red green LED1 red Hardware reset General Purpose or Port 80 Default General Purpose green uEFI BIOS POST bit 1 and bit 5 red green LED0 red uEFI BIOS boot failure General Purpose or Port 80 Default General Purpose green uEFI BIOS POST bit 0 and bit 4 red green The bit allocation for Port 80 is the same as for the POST code How to read the 8 Bit P...

Page 40: ...ace for connection to a monitor The VGA interface is implemented as a standard HD15 VGA connector J4 on the front panel 3 9 6 Serial Ports The CP3005 provides two serial ports COMA available either on the CompactPCI rear I O connector 3 3V LVTTL or on the MMEXT05 extension module COMB on the CompactPCI rear I O connector 3 3V LVTTL COMA and COMB are fully compatible with the 16C550 controller and ...

Page 41: ...xtension module 8HP Two SATA 3 Gb s ports on the CompactPCI rear I O interface All six SATA interfaces provide high performance RAID 0 1 5 10 functionality 3 9 9 Debug Interface The CP3005 provides several onboard options for hardware and software debugging such as Four bicolor general purpose LEDs LED0 to LED3 which indicate hardware failures uEFI BIOS POST codes and user configurable outputs One...

Page 42: ... the currently saved uEFI BIOS settings ON Clear the uEFI BIOS settings and use the default values The default setting is indicated by using bold fonts To clear the uEFI BIOS settings and the passwords proceed as follows 1 Set DIP switch SW1 switch 4 to the ON position 2 Apply power to the system 3 Wait 30 seconds and then remove power from the system During this time period no messages are displa...

Page 43: ...ation Register LCFG 0x291 LED Control Register LCTRL 0x292 General Purpose Output Register GPOUT 0x293 General Purpose Input Register GPIN 4 3 1 Status Register 0 STAT0 The Status Register 0 holds general common status information Table 19 Status Register 0 STAT0 Address 0x280 Bit 7 6 5 4 3 2 1 0 Name Reserved BBEI BFSS R N A DIP4 DIP3 DIP2 DIP1 Access R R R R R R Reset 0 0 N A N A N A N A Bitfiel...

Page 44: ...Register 1 holds board specific status information Table 20 Status Register 1 STAT1 Address 0x281 Bit 7 6 5 4 3 2 1 0 Name C66EN Reserved R 000 CSYS CENUM CFAL CDEG Access R R R R R Reset N A N A N A N A N A Bitfield Description 7 C66EN CPCI PCI speed M66EN signal 0 33 MHz 1 66 MHz 3 CSYS CPCI system slot identification SYSEN signal 0 Installed in a system slot 1 Installed in a peripheral slot 2 C...

Page 45: ...e Control Register 1 holds a series of bits defining general common configuration functions Table 22 Control Register 1 CTRL1 Address 0x283 Bit 7 6 5 4 3 2 1 0 Name SRST VRST TRST CRST Res SCOMA Res Res Access R W R R W R W R R W R R Reset 1 1 1 0 0 not avai lable 0 0 Reset value is depending on the board version ordered Default is low 0 when CP3005 Rear I O version is ordered But when a CP3005 fr...

Page 46: ...s for non volatile devices Table 23 Device Protection Register DPROT Address 0x284 Bit 7 6 5 4 3 2 1 0 Name SWP Reserved R 000 SFWP JMP2 BSWP SSWP Access R R W R R R W Reset 0 0 0 0 0 Bitfield Description 7 SWP System write protection status 0 Onboard non volatile memory devices not write protected 1 Onboard non volatile memory devices write protected 2 JMP2 System write protection via configurati...

Page 47: ...o this bit clears it 2 FPRS Front panel push button reset status MMEXT05 MMEXT05 CMC02 0 System reset not generated by front panel reset 1 System reset generated by front panel reset Writing a 1 to this bit clears it 1 CPRS CompactPCI reset status PRST signal 0 System reset not generated by CompactPCI reset input 1 System reset generated by CompactPCI reset input Writing a 1 to this bit clears it ...

Page 48: ... CPCI fail signal interrupt configuration FAL signal 0 IRQ5 disabled 1 IRQ5 enabled 5 CEICF CPCI enumeration signal interrupt configuration ENUM signal 0 IRQ5 disabled 1 IRQ5 enabled 4 CDICF CPCI derate signal interrupt configuration DEG signal 0 IRQ5 disabled 1 IRQ5 enabled 1 0 WICF Watchdog interrupt configuration 00 Disabled 01 IRQ5 10 Reserved 11 Reserved 4 3 8 Status Register 2 STAT2 The Stat...

Page 49: ...2 1 0 Name BIDH R 0xB4 Access Reset Bitfield Description 7 0 BIDH Board identification CP3005 0xB480 The Board ID Low Byte Register is located at the address 0x28D 4 3 10 Board and PLD Revision Register BREV The Board and PLD Revision Register signals to the software when differences in the board and the Programmable Logic Device PLD require different handling by the software It starts with the va...

Page 50: ... Bitfield Description 7 WTE WTE Watchdog timer expired status bit 0 Watchdog timer has not expired 1 Watchdog timer has expired Writing a 1 to this bit resets it to 0 6 5 WMD Watchdog mode 00 Timer mode 01 Reset mode 10 Interrupt mode 11 Cascaded mode dual stage mode 4 WEN WT R Watchdog enable Watchdog trigger control bit 0 Watchdog timer not enabled Prior to the Watchdog being enabled this bit is...

Page 51: ... 1 This bit can be polled by the application and handled accordingly Once a Watchdog timeout occurs the Watchdog is deactivated WEN bit gets reset to 0 To continue using the Watchdog write a 1 to the WTE bit to reset it and then restart the Watchdog using WEN Reset mode This mode is used to force a hard reset in the event of a Watchdog timeout In addition the WTE bit is not reset by the hard reset...

Page 52: ...iguration for the front panel General Purpose LEDs Table 32 LED Configuration Register LCFG Address 0x290 Bit 7 6 5 4 3 2 1 0 Name Reserved LCON Access R R W Reset 0000 0000 Bitfield Description 3 0 LCON LED3 0 configuration 0000 POST Mode LEDs build a binary vector to display the Port 80 value 0001 General Purpose Mode LEDs are controlled via the LCTRL register 0010 1111 Reserved Beside the confi...

Page 53: ...e LED Configuration Register are configured in General Purpose Mode The status of certain LEDs can be obtained by writing a Get LEDX command where x is the LED number color bits are ignored followed by a simple read 4 3 16 General Purpose Output Register GPOUT The General Purpose Output Register holds the general purpose output signals of the rear I O CompactPCI connector J2 This register can only...

Page 54: ... transition module configuration signal on the CompactPCI connector J2 Table 35 General Purpose Input Register GPIN Address 0x293 Bit 7 6 5 4 3 2 1 0 Name Reserved R 000 GPI4 GPI3 GPI2 GPI1 GPI0 Access R R R R R Reset 1 1 1 1 1 Bitfield Description 4 0 GPI4 0 General purpose input signals 3 3V LVTTL 0 Input low 1 Input high The CP3005 provides pull up resistors on the rear I O signal pins GPI 4 0 ...

Page 55: ...on range of the voltage Typically 5 ms to 15 ms There must be a smooth and continuous ramp of each DC output voltage from 10 to 90 of the regulation band The slope of the turn on waveform shall be a positive almost linear voltage increase and have a value from 0 V to nominal Vout 5 3 Power Up Sequence The 5 VDC output level must always be equal to or higher than the 3 3 VDC output during power up ...

Page 56: ...ed using the following processors Xeon E 2176M 2 7 GHz Core i5 8400H 2 5 GHz Celeron G4930E 2 4 GHz Xeon E 2276ML 2 0 GHz Core i3 9100HL 1 6 GHz The power consumption was measured using the following configurations Work load uEFI Shell CPU is booted and stands without a running application in the shell For this measurement the processor cores were active the graphics controller was in idle state n...

Page 57: ... E 2276ML 2 0 GHz Core i3 9100HL 1 6 GHz 12 V 5 V 2 5 W 2 5 W 2 4 W 2 6 W 2 6 W 3 3 V 4 3 W 3 9 W 4 7 W 4 2 W 4 1 W Total 6 8 W 6 4 W 7 1 W 6 8 W 6 7 W Table 39 Workload Typical Nominal Voltage Xeon E 2176M 2 7 GHz Core i5 8400H 2 5 GHz Celeron G4930 2 4 GHz Xeon E 2276ML 2 0 GHz Core I3 9100HL 1 6 GHz 12 V 5 V 33 W 21 W 8 0 W 19 5 W 9 8 W 3 3 V 4 3 W 4 W 4 6 W 4 2 W 4 2 W Total 37 3 W 25 0 W 12 6...

Page 58: ...bitrarily divided on the 3 3 V and 5 V VPWR voltage lines XMC modules are based on 3 3 V power along with variable power VPWR defined as either 5 V or 12 V in the ANSI VITA 42 0 200x XMC Switched Mezzanine Card Auxiliary Standard specification On the CP3005 the VPWR is configured to 5 V The following table indicates the current of a XMC module Table 41 XMC Module Current Voltage Continuous Current...

Page 59: ...k For other racks or housings the available airflow will differ The maximum ambient operating temperature must be determined for such environments 6 1 How to read the Temperature Diagrams Select a specific CPU and choose a specific working point For a given flow rate there is a maximum airflow input temperature ambient temperature provided Below this operating point thermal supervision will not be...

Page 60: ...e i5 8400H Processor measured by Intel PTU Tool Coffee Lake H 1 4 Figure 9 Ambient Temperature for Xeon E 2176M Processor measured by Intel PTU Tool Coffee Lake H 1 4 Package power is measured on a Windows 10 system with Workload all cores 70 Gfx Workload idle or high and turbo off ...

Page 61: ...3 9100HL Processor measured by Intel PTU Tool Coffee Lake H 1 7 Figure 11 Ambient Temperature for Xeon E 2276ML Processor measured by Intel PTU Tool Coffee Lake H 1 7 Package power is measured on a Windows 10 system with Workload all cores 70 Gfx Workload idle or high and turbo off ...

Page 62: ...onal interfaces such as Two DisplayPorts One Gigabit Ethernet port One USB 3 0 port One COM port RJ 45 connector One Reset switch One SATA activity LED One onboard M 2 card socket Socket 3 SATA based Key M Add In Card type 2280 One onboard SATA HDD SSD connector for connecting a 2 5 SATA HDD SSD Battery socket If a CP3005 configuration contains a MMEXT05 module the battery module must not be used ...

Page 63: ...for connecting high speed I O extension connector to the MMEXT05 to the CP3005 LEDs Switches HDD LED One LED green monitors SATA HDD SSD activity Front Panel Switch Reset button guarded General Power Consumption Power consumption without hard disk M 2 card and peripheral devices connected 2 9 W calculated not measured Temperature Range Operational 0 C to 60 C Standard 40 C to 70 C Extended with su...

Page 64: ...CP3005 User Guide Rev 1 8 www kontron com 64 7 3 MMEXT05 Module Functional Block Diagram Figure 12 MMEXT05 Module Functional Block Diagram ...

Page 65: ...tus LEDs LED Status WD green Watchdog Status TH red green Overtemperature Status Table 44 Integral Ethernet LEDs LED Status ACT green Ethernet Link Activity SPEED green orange off Ethernet Speed Table 45 General Purpose LEDs LED Status LED0 3 red green red green General Purpose POST Code If the General Purpose LEDs 0 3 are lit red during boot up a failure is indicated before the uEFI BIOS has star...

Page 66: ...CP3005 User Guide Rev 1 8 www kontron com 66 7 5 MMEXT05 Module Layout Figure 14 MMEXT05 Module Layout for 8HP Board Version Top View 1 Battery 2 M 2 SATA 3 2 5 SATA HDD 1 2 3 ...

Page 67: ...dard type A USB 3 0 connector J7 Boards with a USB 3 0 flash drive installed on the front panel USB 3 0 port have been found to slightly exceed the electromagnetic interference limits If permanent USB 3 0 type external storage is required to be connected to the USB 3 0 port it is recommended to use an external hard disk drive 7 6 4 Serial Port J8 One PC compatible serial RS 232 port COM is availab...

Page 68: ... is available on the MMEXT05 The socket is keyed in the M position There is one position for the mounting screw accepting 2280 sizes of M 2 modules Figure 16 M 2 Connector 7 6 6 SATA Interface J6 The MMEXT05 extension module provides one 29 pin standard SATA connector J6 for connection to 2 5 SATA HDD SSD Figure 17 SATA Connector ...

Page 69: ...cations Table 47 MMEXT XMC02 Module Specifications Features Specifications Onboard Interfaces XMC XMC interface for support of one x8 x4 or x1 PCI Express 2 0 XMC module via a standard XMC connector J1 M 2 One M 2 Socket 3 SATA based Key M for 2280 SSD Add In Cards Board to Board Two board to board connectors One 60 pin high speed PCI Express extension connector J5 One 120 pin high speed I O exten...

Page 70: ...CP3005 User Guide Rev 1 8 www kontron com 70 8 3 MMEXT XMC02 Module Functional Block Diagram Figure 18 MMEXT XMC02 Module Functional Block Diagram ...

Page 71: ... Status LEDs LED Status WD green Watchdog Status TH red green Overtemperature Status Table 49 Integral Ethernet LEDs LED Status ACT green Ethernet Link Activity SPEED green orange off Ethernet Speed Table 50 General Purpose LEDs LED Status LED0 3 red green red green General Purpose POST Code If the General Purpose LEDs 0 3 are lit red during boot up a failure is indicated before the uEFI BIOS has ...

Page 72: ...om 72 8 5 MMEXT XMC02 Module Layout Figure 20 MMEXT XMC02 Module Layout for 8HP Board Version Top View 1 XMC Interface 2 M 2 Interface J2 Figure 21 MMEXT XMC02 Module Layout for 8HP Board Version Bottom View 3 Board to Board Interface 1 2 3 ...

Page 73: ...ion for the mounting screw accepting 2280 sizes of M 2 modules Figure 22 M 2 Connector 8 6 2 XMC Interface The MMEXT XMC02 uses one x8 PCI Express 2 0 interface operating at up to 5 0 GT s and compliant with the ANSI VITA 42 0 and ANSI VITA 42 3 specifications It provides one standard XMC connector J1 for connection to an XMC module The MMEXT XMC02 supports XMC modules with a maximum power consump...

Page 74: ...ces USB 2 0 Two USB 2 0 type A connectors J11 and J12 VGA One VGA interface implemented as a 15 pin D Sub connector J7 Ethernet Two Gigabit Ethernet interfaces implemented as a dual RJ 45 connector without LEDs J10A B Serial Two onboard RS 232 serial ports with full modem support COMA COM1 and COMB COM2 implemented as 10 pin onboard connectors J2 COMA and J3 COMB on the 4HP version 9 pin D Sub con...

Page 75: ...CP3005 User Guide Rev 1 8 www kontron com 75 Features Specifications Dimensions 100 mm x 80 mm Board Weight 4HP 120 grams 8HP 150 grams 9 3 Front Panels Figure 24 CP RIO3 04 4HP and 8HP Front Panels ...

Page 76: ...CP3005 User Guide Rev 1 8 www kontron com 76 9 4 CP RIO3 04 Rear Transition Module Layout Figure 25 CP RIO3 04 4HP Rear Transition Module Layout ...

Page 77: ...e both interfaces are indicated on the front Ethernet connector The interface provides automatic detection and switching between 10Base T 100Base TX and 1000Base T data transmission Auto Negotiation Auto wire switching for crossed cables is also supported Auto MDI X 9 5 4 COM Interface The CP RIO3 04 rear transition module provides two identical COM ports for connection to RS 232 devices On the 8H...

Page 78: ...n module via the peripheral control connector J13 The following table provides pinout information for the peripheral control connector J13 Refer to the module layout for connector and pin locations Table 53 Peripheral Control Connector J13 Pinout Pin Signal Description I O 1 GND Signal ground 2 PWR_5VSTDBY 5V standby power optional I 3 RSV Reserved 4 VCC5V Power 5V O 5 RSV Reserved 6 VCC3V3 Power ...

Page 79: ...bove will result in damage to your board Figure 27 Rear I O CompactPCI Connector rJ2 Table 54 Rear I O CompactPCI Connector rJ2 Pinout Pin Z A B C D E F 22 NC NC NC NC NC NC GND 21 NC NC GND USBA bi USBB bi USBA_PWR_ 5V in GND 20 NC NC GND USBA bi USBB bi USBB_PWR_ 5V in GND 19 NC GND GND PWR_BTN out PWR_SLP S3 in RIO_3 3V in GND 18 NC COMA_RXD out COMA_DCD out COMA_DTR in COMB_CT S out COMA_CTS o...

Page 80: ... SATABRX out GND 4 NC NC RIO_5V in VGA_DDC_CL K in GPIO_CFG 0 out GND GND 3 NC NC GND NC NC NC GND 2 NC NC NC NC NC NC GND 1 NC NC NC NC NC NC GND The RIO_XXX signals are power supply INPUTS to supply the rear I O module with power These pins MUST NOT be connected to any other power source either within the backplane itself or within a rear I O module Failure to comply with the above will result i...

Page 81: ...nals of main board front panel connectors are routed to the module interface To support the rear I O feature a 3U CompactPCI backplane with rear I O support is required The CP RIO3 04S rear transition module provides the following interfaces Two Gigabit Ethernet ports without LED signals One COM port One VGA analog port Two SATA ports CompactPCI rear I O Power Management More detailed information ...

Page 82: ...rd as well as the 8HP extensions MMEXT05 and MMEXT XMC02 are equipped with M 2 connectors to carry SATA SSD flash modules Specification Size 22x42 mm base board 22x80 mm on MMEXT05 and MMEXT XMC02 Keying B or M Type S single sided or D double sided Height from 1 to 4 Figure 28 M 2 Connector ...

Page 83: ...m controller or as an autonomous CPU board in a CompactPCI peripheral slot When installed in the system slot the CP3005 provides all required functions for supporting the hot swapping of peripheral boards which are capable of being hot swapped In this configuration the CP3005 itself is not hot swappable When installed in a CompactPCI peripheral slot the CP3005 operates autonomously meaning that it...

Page 84: ...rd from the system particular attention must be paid to the components which may be hot such as heat sink etc To remove the CP3005 from a system proceed as follows 1 Ensure that no power is applied to the system before proceeding 2 Disconnect any interfacing cables that may be connected to the board 3 Unscrew the front panel retaining screws 4 Unlock the ejector handle 5 Disengage the board from t...

Page 85: ...3005 Peripheral Devices The CP3005 is designed to accommodate various peripheral devices such as USB devices SATA devices a M 2 card etc The following figures show the placement of modules and peripheral devices on the CP3005 Figure 29 4HP CP3005 with mSATA Flash Module ...

Page 86: ...CP3005 User Guide Rev 1 8 www kontron com 86 Figure 30 HP CP3005 with MMEXT05 Module Figure 31 CP3005 8HP with MMEXT XMC02 Module ...

Page 87: ... or SATA device The SATA connector on the CP3005 provides only a data connection The power for this device must be supplied by a separate connector For further information refer to the respective documentation of the device SATA device fail message at boot up may be a bad cable or lack of power going to the drive 12 3 2 2 5 HDD SSD Installation One 2 5 SATA HDD SSD may be connected to the CP3005 T...

Page 88: ...C02 prior to installation of the CP3005 with the MMEXT XMC02 in a system Before installing an XMC module on the CP3005 equipped with an MMEXT XMC02 extension module ensure that the safety requirements on page 83 are observed Failure to comply with the instruction below may cause damage to the board or result in improper system operation To install an XMC module on the CP3005 equipped with an MMEXT...

Page 89: ...CP3005 User Guide Rev 1 8 www kontron com 89 Figure 33 Screws Securing the XMC Module to the MMEXT XMC02 Extension Module Figure 34 CP3005 Board with MMEXT XMC02 Extension Module and XMC Module ...

Page 90: ...h may arise from the handling of these cables connecting or disconnecting Kontron disclaims all liability for damages or injuries resulting from failure to comply with the above Remove the front panel by unscrewing the following screws that are retaining the front panel to the CP3005 board 2 Search for the location of the above mentioned screws a and b near the VGA connector on the front panel c a...

Page 91: ...ppropriate documentation provided with the XMC module 12 3 4 SATA M 2 Card Installation A SATA Flash module may be connected to the CP3005 via the onboard connector J12 This optionally available module must be physically installed on the CP3005 prior to installation of the CP3005 in a system During installation it is necessary to ensure that the SATA Flash module is properly seated The following f...

Page 92: ...ery Module 1 with washer 2 Figure 37 Battery Module with two screws 3 and two washers 2 Be aware that the two washers of the battery module are after the mounting procedure at the same place The washers are important for the right position of the module 1 2 2 3 ...

Page 93: ...he M 2 card and M 2 holder 4 The M 2 card pops up Grasp it by the edges and slide it out Figure 38 Removing a M 2 Card 12 3 4 3 Installing a M 2 Card To install a M 2 card 1 Align the connector on the M 2 with the connector on the board Make sure the slits are aligned with the protrusions on the connector 2 Insert the M 2 card into the connector on the server board 3 Install the washer 4 Secure th...

Page 94: ...e used either on the MMEXT05 extension module or on the rear I O It is not possible to use any of the above mentioned interfaces on the front or the MMEXT05 extension and on the rear I O simultaneously On the MMEXT05 there is a third Ethernet port which is working all time 12 4 Battery Replacement The CP3005 RTC may be backed up using a single 3 0 V coin cell lithium battery from one of two possib...

Page 95: ... 5 A Setup menu will appear The CP3005 uEFI BIOS Setup program uses a hot key based navigation system A hot key legend bar is located on the bottom of the Setup screens The following table provides information concerning the usage of these hot keys Table 56 Navigation Hot Key Description The Left and Right Arrow keys are used to select a major Setup screen For example Main Screen Advanced Screen C...

Page 96: ... frame displays all available functions Functions that can be configured are displayed in blue Functions displayed in gray provide information about the status or the operational configuration The right frame displays an Item Specific Help window providing an explanation of the respective function 13 2 1 Main Setup Menu Figure 40 Main Setup The manual describes the disabled expert mode Upon enteri...

Page 97: ...lect the system date using the Up and Down Arrow keys Enter the new values through the keyboard or press to increment decrement values Use Tab to switch between date elements System Time HH MM SS The time is in 24 hour format For example 5 30 A M appears as 05 30 00 and 5 30 P M as 17 30 00 Change the system time select the system time using the Up and Down Arrow keys Enter the new values through ...

Page 98: ...0 UEFI Spec Version TCG_2 Physical Presence Spec Version 1 3 TPM 20 Interface Type CRB Device Select Auto ACPI Settings Enable ACPI Auto Configuration Enabled Disabled Enable Hibernation Enabled Disabled Lock Legacy Resources Enabled Disabled S3 Video Repost Enabled Disabled Smart Settings Smart Self Test Enabled Disabled Serial Port Console Redirection COM0 Console Redirection Enabled Disabled CO...

Page 99: ...rt Enabled Disabled Board UART Configuration Serial Port 1 Configuration Serial Port Enabled Disabled Change Settings Auto Serial Port 2 Configuration Serial Port Enabled Disabled Change Settings Auto Board Configuration and I O Routing Expert Mode Enabled Disabled Enable automatic update Enabled Disabled Shell Timeout config 5 sec Com A Extension VGA Port Configuration Front Eth A Front Eth B Fro...

Page 100: ...bled Disabled Primary Display Auto Select PCIE Card Auto External Gfx Card Primary Display Configuration Internal Graphics Auto GTT Size 8 MB Aperture Size 256 MB PSMI Support Enabled Disabled DVMT Pre Allocated 32M DVMT Total Gfx Mem 256M Intel Graphics Pei Display Peim Enabled Disabled VDD Enable Enabled Disabled PM Support Enabled Disabled PAVP Enable Enabled Disabled Cdynmax Clamping Enable En...

Page 101: ...Enable Root Port Auto Max Link Speed Auto PEG0 Slot Power Limit Value 75 PEG0 Slot Power Limit Scale 1 0x PEG0 Physical Slot Number 1 Enable Root Port Auto Max Link Speed Auto PEG1 Slot Power Limit Value 75 PEG1 Slot Power Limit Scale 1 0x PEG1 Physical Slot Number 2 Enable Root Port Auto Max Link Speed Auto PEG2 Slot Power Limit Value 75 PEG2Slot Power Limit Scale 1 0x PEG2 Physical Slot Number 3...

Page 102: ... Mask HDD Unlock Enabled LED Locate Enabled Port 4 Enabled Spin Up Device Disabled SATA Device Type Solid State Drive USB Configuration xDCI Support Disabled USB PHY Sus Well Power Gating Enabled USB2 0 Port1 Front Panel lower Enabled USB2 0 Port8 WIBU Enabled USB2 0 Port9 Front Panel upper Enabled Security Configuration RTC Memory Clock Disabled BIOS Lock Disabled Force Unlock on all GPIO Pads Di...

Page 103: ...ription Read only field Administrator Password Sets changes or clears the Administrator Password To set a password enter it twice and acknowledge by pressing Return User Password Sets changes or clears the User Password To set a password enter it twice and acknowledge by pressing Return Secure Boot Secure Boot Disabled Secure Boote Mode Custom Restore Factory Keys Key Management Factory Key Provis...

Page 104: ...y startup the user will be asked for the password Both User and Administrator passwords are set Either the User or the Administrator password is required for booting the system as well as for entering the Setup menu If the User password is entered here limited access to the Setup is granted Entering the Administrator password provides full access to all Setup entries 13 2 5 Remember the Password I...

Page 105: ...riority order Figure 44 Boot Setup Table 62 Boot Setup Menu Sub Screens and Functions Sub Screen Function Description Boot Configuration Setup Prompt Timeout 1 Bootup NumLockState Off Quiet Boot Enabled Disabled Fast Boot Enabled Disabled Boot Mode Select UEFI Boot Option Boot option 1 11 UEFI Hard Disk UEFI Application Boot Priorities Boot option 1 UEFI Built in EFI Shell ...

Page 106: ... and finally resets the system automatically This function continues the boot process as long as no option was altered that requires a reboot Discard Changes and Exit Discards all changes made within the Setup then exits the uEFI BIOS Setup This function continues the boot process Save Changes and Reset Saves all changes made within the Setup to flash and resets the system Discard Changes and Rese...

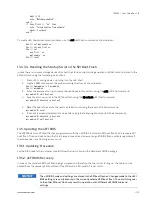
Page 107: ...om the EFI and Framework Open Source Community homepage http sourceforge net projects efi shell files documents Please note that not all shell commands described in the EFI Shell Command Manual are provided by the Kontron uEFI BIOS 13 3 1 Introduction Basic Operation The uEFI Shell forms an entry into the uEFI boot order and is the first boot option by default 13 3 1 1 Entering the uEFI Shell To e...

Page 108: ...ed startup script If the shell is launched by the boot process it executes a shell script stored in the flash If the shell script terminates the shell will continue the boot process However the shell script can also contain any other boot command kjtag Programs an onboard device via the JTAG interface knvram Manages the NVRAM to restore the system s default settings Since all uEFI settings are sto...

Page 109: ...our choice To create a startup shell script simply save the script on the root of any FAT formatted drive attached to the system To copy the startup script to the flash use the kbootscript uEFI Shell command In case there is no mass storage device attached the startup script can be generated in a RAM disk and stored in the SPI boot flash using the kmkramdisk uEFI Shell command 13 4 3 Examples of S...

Page 110: ... 5 Reset the board to execute the newly installed script using the reset uEFI Shell command myramdisk reset 6 If a script is already installed it can be edited using the following kbootnsh uEFI Shell commands myramdisk kbootnsh g boot nsh myramdisk edit boot nsh 13 5 Updating the uEFI BIOS The CP3005 has two SPI boot flashes programmed with the uEFI BIOS a standard SPI boot flash and a recovery SP...

Page 111: ... 1 8 www kontron com 111 13 5 3 Determining the Active Flash Sometimes it may be necessary to check which flash is active On the AMI Aptio based uEFI BIOS the information is available using the kboardinfo uEFI Shell command ...

Page 112: ...ron Kontron cannot be held responsible for any loss or damage caused to the equipment received without an RMA number The buyer accepts responsibility for all freight charges for the return of goods to Kontron s designated facility Kontron will pay the return freight charges back to the buyer s location in the event that the equipment is repaired or replaced within the stipulated warranty period Fo...

Page 113: ...ping considering shock and ESD protection Goods returned to Kontron Europe GmbH in non proper packaging will be considered as customer caused faults and cannot be accepted as warranty repairs 4 Include the RMA Number with the shipping paperwork and send the product to the delivery address provided in the RMA form or received from Kontron RMA Support ...

Page 114: ...MI Over LAN IOT Internet of Things IPMI Intelligent Platform Management Interface KCS Keyboard Controller Style KVM Keyboard Video Mouse MEI Management Engine Interface NCSI Network Communications Services Interface PCIe PCI Express PECI Platform Environment Control Interface PICMG PCI Industrial Computer Manufacturers Group RTC Real Time Clock SEL System Event Log ShMC Shelf Management Controller...

Page 115: ...dard products and tailor made solutions based on highly reliable state of the art embedded technologies Kontron provides secure and innovative applications for a variety of industries As a result customers benefit from accelerated time to market reduced total cost of ownership product longevity and the best fully integrated applications overall For more information please visit http www kontron co...

Reviews: