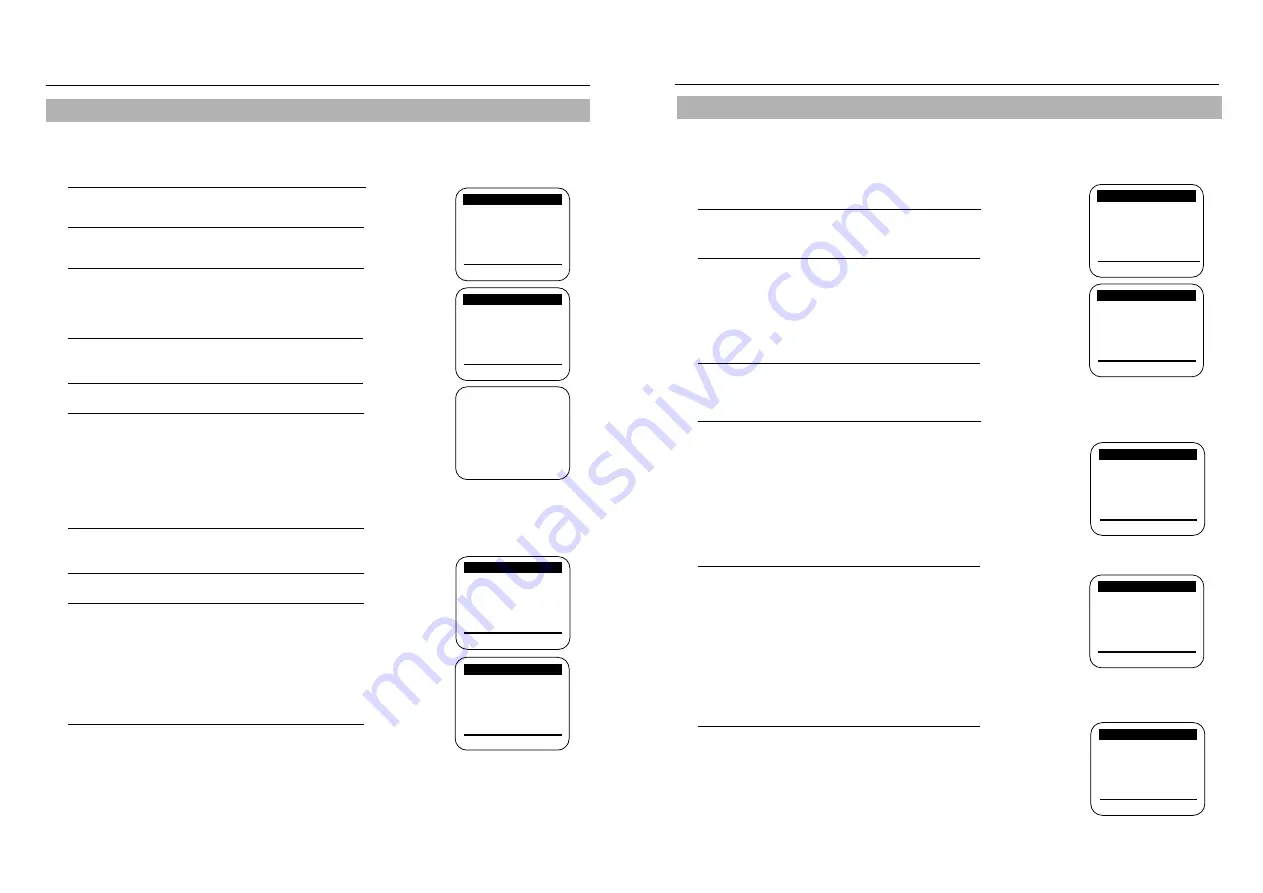
Samsung VR9260 Owner'S Manual Download Page 8

11

10

VCR Setup

Tape length 

1

Press the MENU button on the remote control. Press

to select VCR Function Setup, then press 

.

2

Press 

to select the video cassette length. 

This information is usually printed on the tape box. 
The menu cycles through: T120, T160 or T180.  
Once the type of cassette is set, the VCR can
display the amount of time remaining on the tape
when you press the DISPLAY button.

3

Press the MENU button when you are finished.

Auto play

Access the “VCR FUNCTION SETUP” menu as

described above. Press 

▼ 

to set the cursor to “Auto

play”, then press 

to set ON or OFF.  When “Auto play”

is ON, the VCR will automatically begin playing a video
tape when it is inserted, as long as the safety tab of the
cassette has been removed . Press the MENU button on
the remote control when you are finished.

Auto repeat

Access the “VCR FUNCTION SETUP” menu.

Press the 

▼ 

and 

buttons to set “Auto repeat” ON or

OFF. In the VCR FUNCTION SETUP “Auto repeat” sets
the VCR to play a tape repeatedly [unless a tape control
is activated (stop, fast forward or rewind)] . Press the
MENU button on the remote control when you are
finished.

Auto power off

Access the “VCR FUNCTION SETUP” menu.

Press 

▼ 

and 

to set “Auto power off” to 1Hr or 2Hr. 

“Auto power off ” sets the VCR to turn off automatically.

Note: VCR will shut off 1 or 2 hours after the last button is pressed.

Tape length:           [T120]
Auto play:                 [ON]
Auto repeat:          [OFF]
Auto power off:       [OFF]
VCR output CH:      [3CH]

[

%

/

]

[MENU/EXIT]

Tape length:           [T120]
Auto play:                 [ON]
Auto repeat:            [OFF]
Auto power off:       [OFF]
VCR output CH:      [3CH]

[

%

/

]

[MENU/EXIT]

Tape length:           [T120]
Auto play:                 [ON]
Auto repeat:           [OFF]
Auto power off:       [OFF]
VCR output CH:      [3CH]

[

%

/

]

[MENU/EXIT]

Tape length:           [T120]
Auto play:                 [ON]
Auto repeat:        

[OFF]

Auto power off:       [OFF]
VCR output CH:      [3CH]

[

%

/

]

[MENU/EXIT]

VCR FUNCTION SETUP

VCR FUNCTION SETUP

VCR FUNCTION SETUP

VCR FUNCTION SETUP

Timer recording
Clock set/adjust
Channel setup  

VCR function setup

Language/Lengua/Langue

[

%

/

]

[MENU/EXIT]

MAIN MENU

To make all of the VCR’s features available, set the VCR functions before playing or recording a tape. 

VCR Functions

1

With the VCR on, press the MENU button. 
Press 

▼ 

and 

to select “Channel setup.” 

2

If you have a cable system hooked up to your VCR,

leave CABLE TV displayed in the Ant/Cable screen.

3

If you have an antenna hooked up to your VCR, press

until  ANTENNA appears. Press the MENU button

when you have selected the correct signal source. 

Memorizing the Channels

1

Press the MENU button. Press 

▼ 

and 

to select 

“Channel Setup.”

2

Press 

▼ 

and 

to start Auto channel memory function. 

3

Your VCR will begin memorizing all available channels.

To interrupt, press the MENU button on the remote
control. When the channel number on screen stops
changing, the VCR has finished.

Setting the Channels

1

Press the MENU button. Press 

▼ 

and 

button to select

“Channel Setup.”

2

Press 

▼ 

and 

button to select “Channel Add/Delete.”

3

Press two number buttons or press CH/TRK

▼▲ 

for

the channel you want to add or delete. For numbers
over 100, press the 100 button on the remote control
first.

For example : To add channel 7, press 0 then 7.
For example : To delete channel 121, press the 100 button, 

then 2 and 1.

4

To ADD the selected channel:  Press 

button on the

remote control. 
To DELETE the selected channel: Press 

➛!

button on

the remote control.

When you have finished, press the MENU button twice.

Once the VCR memorizes all the available channels, you can use the CH/TRK

▼ ▲ 

buttons to select channels.

Setting the Source

Before the VCR can memorize available channels, you must set the signal source for your VCR. 

Adding or Deleting Memorized Channels

You can add or delete channels that have been memorized with the Automatic Channel Memory function. The Auto
Channel Memory function must be performed before Channel Add/Delete can be used.

Note: •  A deleted channel can be accessed with the number buttons, but the CH/TRK

▼▲ 

buttons skip past it. 

•  To add the LINE input to channel memory, select LINE using the INPUT SEL button on the remote 

control, then press 

button on the remote control. 

VCR Setup

Ant/Cable:      [CABLE TV]

Auto channel memory

Channel add/delete

[

%

/

]

[MENU/EXIT]

CHANNEL SETUP

CHANNEL SETUP

Ant/Cable:      [CABLE TV]
Auto channel memory

Channel add/delete

[

%

!

/

]

[MENU/EXIT]

CHANNEL SETUP

Select channel: 

[ 01]

and press [

] to ADD

press [

] to DELETE

[

%

!

/

➛❿

]

[MENU/EXIT]

CHANNEL ADD/DELETE

Ant/Cable:      [CABLE TV]

Auto channel memory
Channel add/delete

[

%

/

]

[MENU/EXIT]

Memorizing           CH 02

. . . . . please wait . . . . .

Summary of Contents for VR9260

Page 1: ...eo Cassette Recorder Owner s Manual VR9260 As an ENERGY STAR Partner Samsung Electronics America Inc has determined that this product or product model meets the ENERGY STAR guidelines for energy efficiency ...

Page 2: ...oduct does not operate normally by following the operating instructions Adjust only those controls that are covered by the operating instructions as an improper adjustment of other controls may result in damage and will often require extensive work by a qualified technician to restore the product to its normal operation e If the product has been dropped or damaged in any way f When the product exh...

Page 3: ...he VCR receives a Hi Fi broadcast VCR TIMER SH UT TL E REP LAY F A DV SKI P TV VCR PRE V C H REC RE C S P E E D I N P U T S E L AUDIO SEARCH E X I T C L E A R D I S P L A Y POW ER EJE CT CH TRK VCR TV A T RK ENT ER ME NU SL OW VOL 100 PSC 1 5V 1 5V Owner s Manual Remote Control AC59 00024M Batteries for remote 2AA AC43 12002J RF Cable AC39 42001J Owner s Manual AC68 01687A Registration Card AD68 0...

Page 4: ...d 30 seconds In still mode press to advance one frame REPLAY Press to repeat last 5 seconds of tape during playback 100 Press to select channels higher than 100 followed by up to two additional number buttons TV VCR Press to switch between TV and VCR source or to activate Lock function ENTER Press to save the OSP data of TV PREV CH Press to see the previous channel REC Press to start VCR recording...

Page 5: ...and signals including VCRs TVs stereo equipment digital video components antenna and cable signals Rear Panel 75 ohm round antenna lead 300 ohm flat antenna lead with adapter Cable Antenna IN TO VCR VCR OUT TO TV Antenna Connection If your outside antenna cable is a 300 ohm flat feeder use an adapter to connect the antenna to the VCR input terminal You can purchase an adapter at an electronics sto...

Page 6: ...oes not light press the TV VCR button on the remote control to turn it on Selecting the On Screen Language Timer recording Clock set adjust Channel setup VCR function setup Language Lengua Langue MENU EXIT MENU MAIN MENU VCR Setup External Stereo Connections Out to Audio System Connecting your stereo VCR to an external amplifier and speakers can improve the sound quality The sound from the VCR can...

Page 7: ...first Coordinated Universal Time information it finds If the time is not correct select another time zone Daylight Savings Time If you select AUTO the VCR sets the clock using the DST information broadcast in the signal channel If you select YES Daylight Savings Time is observed Spring The clock changes forward one hour on the first Sunday in April Autumn The clock changes back one hour on the las...

Page 8: ...Press and to select Channel setup 2 If you have a cable system hooked up to your VCR leave CABLE TV displayed in the Ant Cable screen 3 If you have an antenna hooked up to your VCR press until ANTENNA appears Press the MENU button when you have selected the correct signal source Memorizing the Channels 1 Press the MENU button Press and to select Channel Setup 2 Press and to start Auto channel memo...

Page 9: ...60 seconds three times to skip ahead 90 seconds and four times to skip ahead 120 seconds Slow Motion Press the SLOW or button while a cassette is playing for slow motion Press the SLOW buttons repeatedly to vary slow motion speed from 1 5 to1 30 of normal playback Press the PLAY button twice to resume normal viewing Replay Press the REPLAY button when a video is playing at normal speed or in slow ...

Page 10: ... made by old VCRs If the VCR has trouble finding a mark it is probably because the cassette was recorded on a VCR without VISS If you want to index two programs in a row set your VCR to stop Then start recording each program Pause has no effect on index marks 1 Scan and play Use scan and play when you don t know exactly where a program is located on a cassette tape 1 Press for forward scan or for ...

Page 11: ...ontrol or the front of the VCR the number of times that corre sponds to length of record time you desire see chart below The Record length time appears on the screen 3 The VCR will turn off automatically at the end of the recording time To stop an OTR recording in progress press the POWER button on the remote control or on the front of the VCR RECORD Display Record time Press once Record Not timed...

Page 12: ...t setting 3 Repeat step 2 to set start time end time date and record speed Date can be set for one time daily or weekly recording See below 4 Press the MENU button to complete programming the timer recording Stop the VCR or turn the power off The timer indicator comes on the VCR The VCR will automatically turn on and begin recording at the time you have set To stop a timer recording press the VCR ...

Page 13: ...ften last longer and provide a better picture Rewind your cassettes all the way so that the tape is not at a midpoint This can extend the life of a cassette tape Do not touch or splice the tape This can damage the tape and playing such a tape can damage your VCR Do not take apart any cassette you plan to use again Do not put any object inside a video cassette case and do not clean inside the casse...

Page 14: ...biar la velocidad durante la reproducción VCR Presione para alternar entre la fuente de VCR TV Presione para alternar entre la fuente de TV A TRK Presione para adjustar automática mente el seguimiento de casete PSC Presione para ajustar el agudez de la imagen durante la reroducción CH Presione para cambiar canales TRK Presione para ajustar el seguimiento de la señal de video durante la repro ducci...

Page 15: ...na exterior es un cable plano de ali mentación de 300 ohms un transformador de acople se debe conectar antes de la terminal ed entrada del VCR Usted puede comprar este transformador en cualquier tienda que venda productos electrónicos Reproducción de cintas de videocasete 1 Encienda el TV e inserte un casete en el VCR Presione PLAY si es necesario Si el indicador de VCR en el panel frontal no se i...

Page 16: ...ivered new in the original carton to the original consumer purchaser is warranted by SAMSUNG against manufacturing defects in materials and workmanship for a limited warranty period of Ninety 90 Days Labor and One 1 Year Parts This limited warranty begins on the original date of purchase and is valid only on products purchased and used in the United States To receive warranty service the purchaser...

Page 17: ... AMERICA INC HEADQUARTERS 105 Challenger Road Ridgefield Park N J 07660 0511 TEL 1 800 SAMSUNG SERVICE DIVISION 400 Valley Road Suite 201 Mount Arlington NJ 07856 1 800 SAMSUNG 1 800 726 7864 Printed in China AC68 01687A ...

Reviews: