background image

55

Screen Setup

4

4 Screen Setup

4.5

Game Mode

Configure the product screen settings for game mode. Use this feature when playing games on a PC or 

when a game console such as PlayStation™ or Xbox™ is connected.


This menu is not available when 

Smart ECO Saving

 is set.

This menu is not available when 

Eye Saver Mode

 is enabled.

The functions available on the monitor may vary depending on the model. Refer to the actual 

product.


4.5.1

Configuring Game Mode

1

Press any button on the front of the product to display the Function Key Guide. Next, press [

to display the corresponding menu screen.

2

Press [

] to move to 

PICTURE

 and press [

] on the product.

3

Press [

] to move to 

Game Mode

 and press [

] on the product.

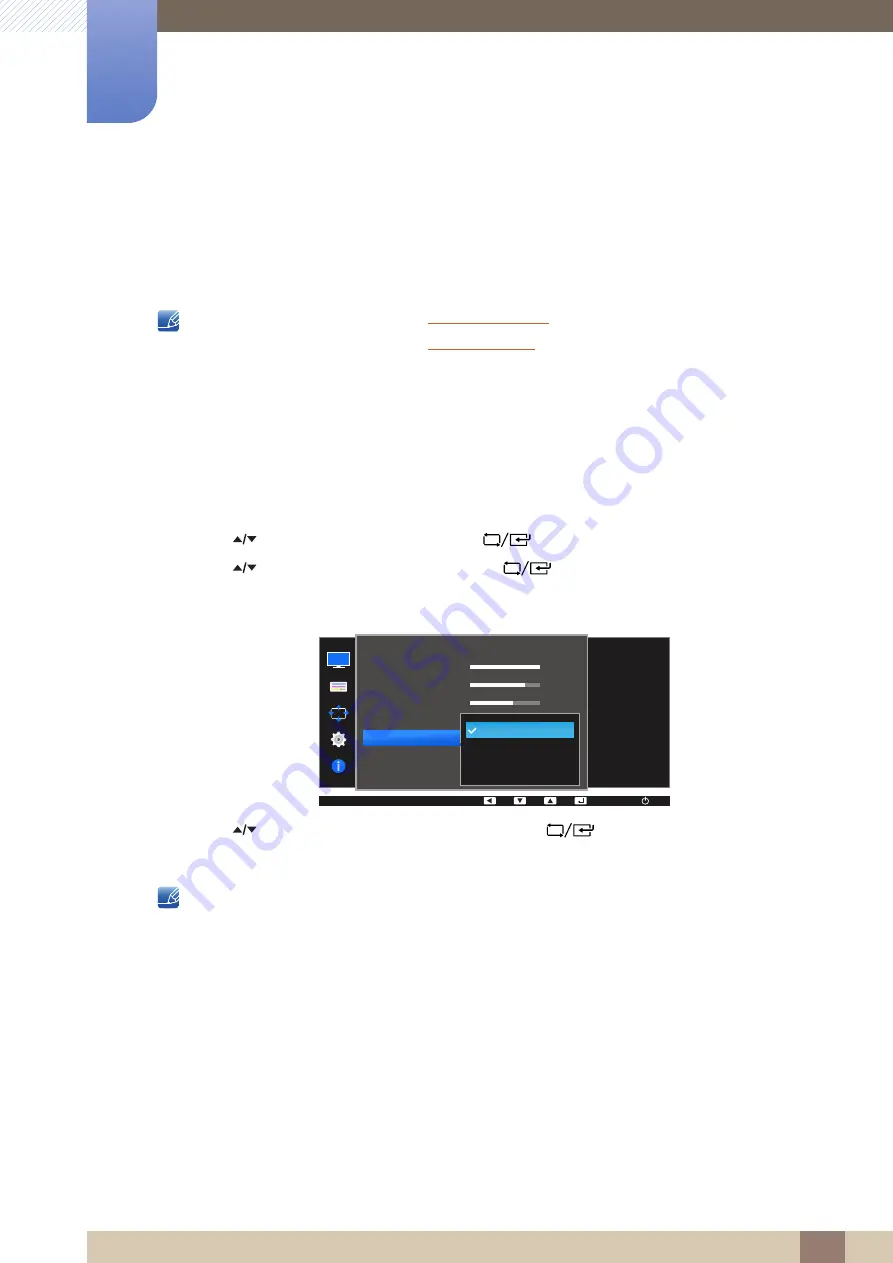
The following screen will appear.

4

Press [

] to move to the option you want and press [

].

5

The selected option will be applied.


When the monitor turns off, enters power-saving mode or changes input sources, 

Game Mode


turns 

Off

 even if it is set to 

On

.

If you want to keep 

Game Mode

 enabled all the time, select 

Always On

.


MENU


100

75

60

Off

Custom

Off

Optimizes image 
settings for playing 
games.

AUTO

Off

On

Always On

Brightness

Contrast

Sharpness

Eye Saver Mode

Game Mode

SAMSUNG

M A G I CBright

SAMSUNG

M A G I CAngle

PICTURE

AUTO

AUTO

Summary of Contents for TC222L

Page 1: ...User manual TC222L TC242L The color and the appearance may differ depending on the product and the specifications are subject to change without prior notice to improve the performance ...

Page 2: ... product PREPARATIONS 19 Checking the Contents 19 Checking the Components 20 Parts 20 Frontal Buttons 22 Rear View 23 Side View 24 Installation 24 Attaching the Stand 25 Adjusting the Product Tilt and Height 25 Rotating the Monitor 26 Installing a Wall mount Kit or Desktop Stand 28 Anti theft Lock USING THE SOFTWARE 29 Using IGEL OS common 29 General System Information 30 Using IGEL OS Sessions 30...

Page 3: ...EVICE 46 Before Connecting 46 Pre connection Checkpoints 46 Connecting and Using a PC 46 Connection Using the D SUB Cable Analog Type 47 Connecting to a Dual Monitor 48 Connecting to Headphones 48 Connecting a Microphone 49 Connecting the Power 50 Setting Optimum Resolution SCREEN SETUP 51 Brightness 51 Configuring Brightness 52 Contrast 52 Configuring Contrast 53 Sharpness 53 Configuring Sharpnes...

Page 4: ...ze 61 H Position V Position 61 Configuring H Position V Position 62 Coarse 62 Adjusting Coarse 63 Fine 63 Adjusting Fine CONFIGURING TINT 64 Red 64 Configuring Red 65 Green 65 Configuring Green 66 Blue 66 Configuring Blue 67 Color Tone 67 Configuring the Color Tone Settings 68 Gamma 68 Configuring Gamma RESIZING OR RELOCATING THE SCREEN 69 Language 69 Changing the Language 70 Menu H Position Menu ...

Page 5: ...ring Off Timer 77 Configuring Eco Timer 79 Key Repeat Time 79 Configuring Key Repeat Time INFORMATION MENU AND OTHERS 80 INFORMATION 80 Displaying INFORMATION 81 Configuring Brightness Contrast and Sharpness from the Initial Screen TROUBLESHOOTING GUIDE 82 Requirements Before Contacting Samsung Customer Service Center 82 Testing the Product 82 Checking the Resolution and Frequency 82 Check the fol...

Page 6: ...able Of Contents Table Of Contents 6 APPENDIX 90 Responsibility for the Pay Service Cost to Customers 90 Not a product defect 90 A Product damage caused by customer s fault 90 Others 91 Terminology INDEX ...

Page 7: ...he Video Electronics Standards Association Ownership of all other trademarks is attributed to their due owner Icons used in this manual An administration fee may be charged if either a an engineer is called out at your request and there is no defect in the product i e where you have failed to read this user manual b you bring the unit to a repair center and there is no defect in the product i e wh...

Page 8: ...e by the plug and do not touch the cable with wet hands Otherwise an electric shock may result 3 Wipe the monitor screen using a clean soft and dry cloth Do not apply a cleaning agent that contains alcohol solvent or surfactant to the monitor Do not spray water or detergent directly on the product 4 Wet a soft and dry cloth in water and wring thoroughly to clean the exterior of the monitor 5 Conne...

Page 9: ...ge the product Be sure to allow the amount of space as shown below or greater when installing the product The exterior may differ depending on the product Precautions for storage Be sure to contact Samsung Customer Service Center if the inside of the monitor needs cleaning Service fee will be charged 10 cm 3 93 inches 10 cm 3 93 inches 10 cm 3 93 inches 10 cm 3 93 inches 10 cm 3 93 inches ...

Page 10: ...at high voltage is present inside It is dangerous to make any kind of contact with any internal part of this product This symbol alerts you that important literature concerning operation and maintenance has been included with this product Warning A serious or fatal injury may result if instructions are not followed Caution Personal injury or damage to properties may result if instructions are not ...

Page 11: ... wet hands Otherwise an electric shock may result Insert the power plug all the way in so it is not loose An unstable connection may cause a fire Connect the power plug to a grounded power socket type 1 insulated devices only An electric shock or injury may result Do not bend or pull the power cable with force Do not weigh the power cable down with a heavy object Damage to the cord may result in a...

Page 12: ... to the product when an issue occurs Power to the product cannot be completely cut off with the power button Hold the plug when disconnecting the power cable from the power socket An electric shock or fire may result DO NOT PLACE CANDLES INSECT REPELLANTS OR CIGARETTES ON TOP OF THE PRODUCT DO NOT INSTALL THE PRODUCT NEAR HEAT SOURCES Otherwise a fire may result Avoid installing the product in a n...

Page 13: ...ve Otherwise the product lifespan may be reduced or a fire may result Do not install the product within the reach of young children The product may fall and injure children Edible oil such as soybean oil can damage or deform the product Do not install the product in a kitchen or near a kitchen counter Take care not to drop the product when moving it Otherwise product failure or personal injury may...

Page 14: ... Contact Samsung Customer Service Center for repair To move the product first disconnect all the cables from it including the power cable Otherwise the power cord may be damaged and a fire or electric shock may result If the product generates a strange noise a burning smell or smoke remove the power cable immediately and contact Samsung Customer Service Center An electric shock or fire may result ...

Page 15: ...ay result Do not use or keep combustible spray or an inflammable substance near the product An explosion or fire may result Ensure the vents are not blocked by tablecloths or curtains Otherwise a fire may result from an increased internal temperature Do not insert a metallic object a chopstick coin hair pin etc or inflammable object paper match etc into the vent or ports of the product If water or...

Page 16: ...riorate Do not put AC DC power adapters together Otherwise a fire may result Remove the plastic bag from the AC DC power adapter before you use it Otherwise a fire may result Do not let water enter the AC DC power device or get the device wet An electric shock or fire may result Avoid using the product outdoors where it can be exposed to rain or snow Be careful not to get the AC DC power adapter w...

Page 17: ...e fatigue will be relieved Do not touch the screen when the product has been turned on for an extended period of time as it will become hot Store the small accessories used with the product out of reach of children Exercise caution when adjusting the product angle or stand height Otherwise children s fingers or hands may become stuck and injured Tilting the product excessively may cause it to fall...

Page 18: ... look slightly downward at the screen Keep your eyes directly in front of the screen Adjust the angle so light does not reflect on the screen Keep your forearms perpendicular to your upper arms and level with the back of your hands Keep your elbows at about a right angle Adjust the height of the product so you can keep your knees bent at 90 degrees or more your heels attached to the floor and your...

Page 19: ...e product if any item is missing The pictures may look different from the actual components Components Components may vary depending on the country Quick Setup Guide Warranty card Not available in some locations Regulatory guide AC DC power adapter Detachable Power cable Only provided with the detachable AC DC power adapter Stand base ...

Page 20: ...utton for 10 seconds Disable To unlock the locked OSD control press the button for more than 10 seconds If the OSD control is locked Brightness and Contrast can be adjusted Eye Saver Mode is available INFORMATION can be viewed The Eye Saver Mode function can be used by pressing the button The Eye Saver Mode is available even when the OSD control is locked Press to enable or disable Eye Saver Mode ...

Page 21: ...urning the Display on and off Pressing the power button for more than 4 seconds forces the product to shut down The power indicator will be lit when the product is operating normally To reduce power consumption it is best to remove the power cable when you will not be using the product for an extended period of time Function Key Guide Press one of the buttons on the monitor Function Key Guide will...

Page 22: ...ce to improve quality Port Description Connects to the AC DC power adapter Connects to a Monitor device using the DVI or DVI to RGB cable Connect to a network using the LAN cable Connect to a USB device Installation of a USB driver may be needed depending on the USB device Contact the USB device manufacturer for more information Speaker LAN DVI I OUT DC 14V ...

Page 23: ...Connect to an audio output device such as headphones Connect to a microphone Connect to a USB device Compatible with a USB cable version 3 0 or lower Source devices can be charged using these USB ports Installation of a USB driver may be needed depending on the USB device Contact the USB device manufacturer for more information Connects to a PC device using the D SUB cable RGB IN MIC MIC RGB IN ...

Page 24: ...notice to improve quality Place a protective cloth or cushion on a flat surface Next place the product with the face down on top of the cloth or cushion Insert the stand base into the stand in the direction of the arrow Do not remove the fixing pin until you are finished attaching the stand Fasten the screw tightly using a screwdriver or coin into the bottom of the stand base After installing the ...

Page 25: ...sides of the product and avoid using excessive force to prevent damage The rotation and height adjustment has a certain tolerance Stay within the tolerances when rotating or adjusting the height of the product 1 3 3 Rotating the Monitor You can rotate your monitor as shown below Be sure to fully extend the stand before rotating the monitor If you rotate the monitor without fully extending the stan...

Page 26: ...from the power socket Place a protective cloth or cushion on a flat surface Next place the product with the face down on top of the cloth or cushion Unfasten the screw from the back of the product Lift and detach the stand Installing a Wall mount Kit or Desktop Stand Attach the wall mount kit or desktop stand here Bracket sold separately 1 A 2 B 3 4 A B ...

Page 27: ...desktop stand using excessive force The product may get damaged or fall and cause personal injury Samsung shall not be held liable for any damage or injury caused by using improper screws or attaching the wall mount kit or desktop stand using excessive force Samsung shall not be held liable for any product damage or personal injury caused by using a wall mount kit other than the one specified or f...

Page 28: ...arately To lock an anti theft locking device 1 Fix the cable of your anti theft locking device to a heavy object such as a desk 2 Put one end of the cable through the loop on the other end 3 Insert the locking device into the anti theft lock slot at the back of the product 4 Lock the locking device An anti theft locking device can be purchased separately Refer to the user guide provided with your ...

Page 29: ...eneral System Information Within the Application Launcher the Information page has important system data such as the firmware version licensed services and hardware specifications Details of the current network configuration with the IP address and device name are also provided ...

Page 30: ...itrix XenDesktop XenApp Legacy ICA Sessions If a session is created or edited you can change the ICA session settings if they differ from the global settings The primary source of further information on Citrix connections should always be the relevant Citrix documentation This manual provides only general configuration tips ...

Page 31: ... the entire desktop as if logging on at the server itself As a result all applications rights and settings contained in the user s profile the local server profile are available If one of the published applications is selected the session is opened in a window which contains just one application The session is ended if you close this application You can also manually enter the IP address or the ho...

Page 32: ...authentication for the session Enables single sign on for this ICA session if Log on to the thin client with AD Kerberos is configured Because the user name and password are temporarily stored when logging on to the thin client they no longer need to be entered again when launching a session User Name Password Domain A user name password and domain for the ICA session can be entered here These det...

Page 33: ...er is unavailable the next browser will be queried Please note that multiple farms can be searched You can specify addresses for multiple server farms Click on Use Citrix XenApp Service Page to obtain settings from the server Configure published applications via the Citrix XenApp service page Logging on and off Menu path Setup Sessions Citrix XenDesktop XenApp Citrix StoreFront Web Interface Logon...

Page 34: ...window and the color mode The local task bar can be configured so that it remains visible during a full screen session Keyboard Allows you to specify the keyboard layout scan codes and the direct connection between keyboard input and the Windows Server Mapping Allows you to specify the audio output device local remote and determine how key strokes and clipboard content are handled The mapping of s...

Page 35: ... order to do this Otherwise the terminal server logon window will be displayed so you can enter a user name and password If the local logon is used see above the thin client s logon window will be shown If the Pass Through Authentication option is enabled the session with the local logon data for the terminal user e g from the domain logon is used However this setting will be overridden by the Loc...

Page 36: ...ructions regarding server configuration can also be found on the Microsoft website TS RemoteApp Step by Step Guide On the client side only a few parameters need to be configured after enabling the RemoteApp mode Please note that the name of the application to be launched must be preceded by two pipe characters e g Excel 2 2 4 Horizon Client Sessions Menu path Setup Sessions Horizon Client Horizon ...

Page 37: ...hether the session contains a desktop or an individual application Possible values Desktop The session contains a desktop Application The session contains an individual application Desktopname Specifies a name for the desktop This option is available if Session Type is set to Desktop Application Application that is launched during the session This option is available if Session Type is set to Appl...

Page 38: ... following multimedia formats and codecs out of the box Ogg Vorbis Ogg Theora WAV FLAC The following codecs are licensed via the separately available Multimedia Codec Pack Supported Formats Supported Codecs With License AVI MPEG ASF restricted under Linux WMA WMV restricted under Linux MP3 MP3 WMA stereo WMV 7 8 9 MPEG 1 2 MPEG4 H 264 Without License OGG WAV FLAC Vorbis Theora WAV FLAC ...

Page 39: ...art is to be delayed As soon as you have set up a Media Player session of your own it will appear in the structure tree under the Media Player Sessions directory Your own session in turn contains three folders Playback Options and Desktop Integration Playback Menu path Setup Sessions Media Player Media Player Sessions Session Name Playback Under Medium File give the path of the file which is to be...

Page 40: ...GEL Universal Desktop Linux firmware features a number of tools for network analysis These include Devices information Ping Netstat Traceroute Lookup Devices Information This tool provides information regarding the status of the network device used This includes MAC and IP address Link speed Various interface statistics bytes transferred errors etc ...

Page 41: ...ath Setup User Interface Display Make sure that all screens connected to the thin client support the color setting Color Depth Allows you to select the desktop color depth The following options are available 16 bits per pixel High Color 65 000 colors 24 bits per pixel True Color 16 7 million colors ...

Page 42: ... activate the Display Data Channel in order to share information between the system and the screen If screen problems should occur enable and disable the DDC setting in the Options by way of a test DDC is enabled by default and the native resolution supported by the screen is determined automatically Screen configuration Extended screen connected to Samsung Linux thin client TC222L or TC242L can b...

Page 43: ...eparately for the logon dialog and the locked screen Example configuration of a screen lock General The screen can be locked via taskbar or desktop icons or using hotkey Ctrl Shift L Options The screen lock starts automatically after 5 minutes without user action at the thin client The screen lock can be stopped by entering a user password or administrator password Taskbar The locked screen does n...

Page 44: ... 5 1 LAN Interfaces Menu path Setup Network LAN Interfaces Click on Network LAN Interfaces in the client setup Choose either automatic network setup with the protocols DHCP and BOOTP or manual network configuration in order to set the thin client for each network interface ...

Page 45: ...rmission Default access permissions for hotplug storage devices Possible values Read Write Read only Enable dynamic client drive mapping If this option is enabled hotplug storage devices are automatically added and removed during ICA sessions and RDP sessions Before you mechanically disconnect the hotplug storage device from the thin client safely remove it To do this click on in the taskbar If th...

Page 46: ...ck of the product you want to connect 3 2 Connecting and Using a PC Select a connection method suitable for your PC Connecting parts may differ in different products 3 2 1 Connection Using the D SUB Cable Analog Type Do not connect the power cable before connecting all other cables Ensure you connect a source device first before connecting the power cable 1 Connect the D SUB cable to the RGB IN po...

Page 47: ...B IN on another monitor using a DVI or DVI to D SUB cable 2 Connect the AC DC power adapter to the product and a power socket Next turn on the power switch on the PC For details refer to 3 2 5 Connecting the Power The DVI I OUT port can be used only to connect to a dual monitor Connect to the DVI I OUT port to display the same picture on another monitor such as the projector For presentation purpo...

Page 48: ...nsure you connect a source device first before connecting the power cable 1 Connect an audio output device headphones to on the back of the product 3 2 4 Connecting a Microphone Do not connect the power cable before connecting all other cables Ensure you connect a source device first before connecting the power cable 1 Connect the microphone to MIC on the back of the product MIC ...

Page 49: ...nt products The exterior may differ depending on the product Power connection using detachable AC DC power adapter Connect the power cable to the AC DC power adapter Then connect the AC DC power adapter to the DC 14V port on the back of the product Next connect the power cable to the power outlet The input voltage is switched automatically DC 14V ...

Page 50: ...to the optimum value 1 Press to move to the language you want and press 2 To hide the information message press If the optimum resolution is not selected the message will appear up to three times for a specified time even when the product is turned off and on again The optimum resolution can also be selected in Control Panel on your PC Return English The optimal resolution for this monitor is as f...

Page 51: ...ons available on the monitor may vary depending on the model Refer to the actual product 4 1 1 Configuring Brightness 1 Press any button on the front of the product to display the Function Key Guide Next press to display the corresponding menu screen 2 Press to move to PICTURE and press on the product 3 Press to move to Brightness and press on the product The following screen will appear 4 Adjust ...

Page 52: ... 1 Configuring Contrast 1 Press any button on the front of the product to display the Function Key Guide Next press to display the corresponding menu screen 2 Press to move to PICTURE and press on the product 3 Press to move to Contrast and press on the product The following screen will appear 4 Adjust the Contrast using the buttons 5 The selected option will be applied SAMSUNG MAGIC MENU SAMSUNG ...

Page 53: ...duct 4 3 1 Configuring Sharpness 1 Press any button on the front of the product to display the Function Key Guide Next press to display the corresponding menu screen 2 Press to move to PICTURE and press on the product 3 Press to move to Sharpness and press on the product The following screen will appear 4 Adjust the Sharpness using the buttons 5 The selected option will be applied SAMSUNG MAGIC SA...

Page 54: ...inland Low Blue Light Content standards The functions available on the monitor may vary depending on the model Refer to the actual product 4 4 1 Configuring Eye Saver Mode 1 Press any button on the front of the product to display the Function Key Guide Next press to display the corresponding menu screen 2 Press to move to PICTURE and press on the product 3 Press to move to Eye Saver Mode and press...

Page 55: ...splay the Function Key Guide Next press to display the corresponding menu screen 2 Press to move to PICTURE and press on the product 3 Press to move to Game Mode and press on the product The following screen will appear 4 Press to move to the option you want and press 5 The selected option will be applied When the monitor turns off enters power saving mode or changes input sources Game Mode turns ...

Page 56: ...he corresponding menu screen 2 Press to move to PICTURE and press on the product 3 Press to move to Bright and press on the product The following screen will appear Custom Customize the contrast and brightness as required Standard Obtain a picture quality suitable for editing documents or using Internet Cinema Obtain the brightness and sharpness of TVs suitable for enjoying video and DVD content D...

Page 57: ...s on the product 3 Press to move to Angle and press on the product The following screen will appear Off Select this option to view directly in front of the product Lean Back Mode 1 Select this option to view from a place slightly lower than the product Lean Back Mode 2 Select this option to view from a place lower than Lean Back Mode 1 Standing Mode Select this option to view from a place higher t...

Page 58: ...58 Screen Setup 4 4 Screen Setup Custom Lean Back Mode 1 will be applied by default if Custom is selected 4 Press to move to the option you want and press 5 The selected option will be applied ...

Page 59: ...product 4 8 1 Configuring SAMSUNG MAGIC Upscale 1 Press any button on the front of the product to display the Function Key Guide Next press to display the corresponding menu screen 2 Press to move to PICTURE and press on the product 3 Press to move to Upscale and press on the product The following screen will appear Comparing with Mode1 Mode2 has a stronger effect 4 Press to move to the option you...

Page 60: ...e to PICTURE and press on the product 3 Press to move to Image Size and press on the product The following screen will appear Auto Display the picture according to the aspect ratio of the input source Wide Display the picture in full screen regardless of the aspect ratio of the input source 4 Press to move to the option you want and press 5 The selected option will be applied MENU Choose the size ...

Page 61: ...Next press to display the corresponding menu screen 2 Press to move to PICTURE and press on the product 3 Press to move to H Position or V Position and press The following screen will appear 4 Press to configure H Position or V Position 5 The selected option will be applied MENU AUTO AUTO Off Wide 50 50 2200 0 Image Size H Position V Position Coarse Fine SAMSUNG MAGICUpscale PICTURE Move the image...

Page 62: ...front of the product to display the Function Key Guide Next press to display the corresponding menu screen 2 Press to move to PICTURE and press on the product 3 Press to move to Coarse and press on the product The following screen will appear 4 Adjust the Coarse using the buttons 5 The selected option will be applied MENU AUTO AUTO Adjust the screen frequency Off Wide 50 50 2200 0 Image Size H Pos...

Page 63: ...y Guide Next press to display the corresponding menu screen 2 Press to move to PICTURE and press on the product 3 Press to move to Fine and press on the product The following screen will appear 4 Adjust the Fine using the buttons 5 The selected option will be applied MENU AUTO AUTO Off Wide 50 50 2200 0 Image Size H Position V Position Coarse Fine SAMSUNG MAGICUpscale PICTURE AUTO AUTO Fine tune t...

Page 64: ...A higher value will increase the intensity of the color 5 1 1 Configuring Red 1 Press any button on the front of the product to display the Function Key Guide Next press to display the corresponding menu screen 2 Press to move to COLOR and press on the product 3 Press to move to Red and press on the product The following screen will appear 4 Adjust the Red using the buttons 5 The selected option w...

Page 65: ... Function Key Guide Next press to display the corresponding menu screen 2 Press to move to COLOR and press on the product 3 Press to move to Green and press on the product The following screen will appear 4 Adjust the Green using the buttons 5 The selected option will be applied MENU COLOR Red Green Blue Color Tone Gamma 50 50 50 Normal Mode1 Adjust the green saturation level Values closer to 100 ...

Page 66: ... Function Key Guide Next press to display the corresponding menu screen 2 Press to move to COLOR and press on the product 3 Press to move to Blue and press on the product The following screen will appear 4 Adjust the Blue using the buttons 5 The selected option will be applied MENU Red Green Blue Color Tone Gamma 50 50 50 Normal Mode1 AUTO Adjust the blue saturation level Values closer to 100 mean...

Page 67: ... press on the product The following screen will appear Cool 2 Set the color temperature to be cooler than Cool 1 Cool 1 Set the color temperature to be cooler than Normal mode Normal Display the standard color tone Warm 1 Set the color temperature to be warmer than Normal mode Warm 2 Set the color temperature to be warmer than Warm 1 Custom Customize the color tone 4 Press to move to the option yo...

Page 68: ...y the Function Key Guide Next press to display the corresponding menu screen 2 Press to move to COLOR and press on the product 3 Press to move to Gamma and press on the product The following screen will appear 4 Press to move to the option you want and press 5 The selected option will be applied SAMSUNG MAGIC MENU 50 50 50 Normal Mode1 Red Green Blue Color Tone Gamma AUTO Adjust the middle level o...

Page 69: ...ging the Language 1 Press any button on the front of the product to display the Function Key Guide Next press to display the corresponding menu screen 2 Press to move to MENU SETTINGS and press on the product 3 Press to move to Language and press on the product The following screen will appear 4 Press to move to the language you want and press 5 The selected option will be applied MENU MENU SETTIN...

Page 70: ...screen 2 Press to move to MENU SETTINGS and press on the product 3 Press to move to Menu H Position or Menu V Position and press The following screen will appear 4 Press to configure Menu H Position or Menu V Position 5 The selected option will be applied MENU Language Menu H Position Menu V Position Display Time Transparency English 100 1 20 sec On Move the menu position to the left or right AUTO...

Page 71: ...nt of the product to display the Function Key Guide Next press to display the corresponding menu screen 2 Press to move to MENU SETTINGS and press on the product 3 Press to move to Display Time and press on the product The following screen will appear 4 Press to move to the option you want and press 5 The selected option will be applied MENU English 100 2 20 sec On Language Menu H Position Menu V ...

Page 72: ...ss to display the corresponding menu screen 2 Press to move to MENU SETTINGS and press on the product 3 Press to move to Transparency and press on the product The following screen will appear 4 Press to move to the option you want and press 5 The selected option will be applied MENU MENU SETTINGS English 100 1 20 sec On Language Menu H Position Menu V Position Display Time Transparency Configure t...

Page 73: ...ress to move to SETUP RESET and press on the product 3 Press to move to Reset All and press on the product The following screen will appear 4 Press to move to the option you want and press 5 The selected option will be applied MENU SETUP RESET Off Acceleration Reset All Smart Eco Saving Off Timer Plus Key Repeat Time AUTO Return all the settings for the product to the default factory settings AUTO...

Page 74: ...unction Key Guide Next press to display the corresponding menu screen 2 Press to move to SETUP RESET and press on the product 3 Press to move to Smart Eco Saving and press on the product The following screen will appear Off Deactivate the Smart Eco Saving function On The power consumption will automatically be reduced by about 10 over the current setting The reduction of power consumption depends ...

Page 75: ...o Off Timer Plus and press on the product 4 Press to move to Off Timer and press on the product 5 Press to move to Off Timer and press on the product The following screen will appear Off Deactivate the off timer so that the product does not power off automatically MENU SETUP RESET Off Acceleration Reset All Smart Eco Saving Off Timer Plus Key Repeat Time Set the monitor to automatically turn off a...

Page 76: ...d press on the product The following screen will appear 6 Press to configure Turn Off After 7 The selected option will be applied The off timer can be set within a range of 1 to 23 hours The product will automatically power off after the specified number of hours This option is only available when Off Timer is set to On For products for the market in some regions the Off Timer is set to automatica...

Page 77: ... power off feature The product will not power off while in power saving mode if this feature is deactivated On Activate the eco timer so that the product powers off automatically when it has been in power saving mode for a specified period of time 6 Press to move to the option you want and press 7 The selected option will be applied MENU SETUP RESET Off Acceleration Reset All Smart Eco Saving Off ...

Page 78: ...Timer and press on the product 5 Press to move to Eco Off After and press on the product The following screen will appear 6 Press to configure Eco Off After 7 The selected option will be applied The Eco timer can be set between 10 and 180 minutes The product will automatically power off after the specified time has elapsed This option is only available when Eco Timer is set to On MENU Eco Timer AU...

Page 79: ...nu screen 2 Press to move to SETUP RESET and press on the product 3 Press to move to Key Repeat Time and press on the product The following screen will appear Acceleration 1 sec or 2 sec can be selected If No Repeat is selected a command responds only once when a button is pressed 4 Press to move to the option you want and press 5 The selected option will be applied MENU Off Acceleration Auto Rese...

Page 80: ...uide Next press to display the corresponding menu screen 2 Press to move to INFORMATION The current input source frequency and resolution will appear The displayed image may differ depending on the model MENU INFORMATION Client 67 5kHz 60Hz NN x Optimal Mode x 60Hz PICTURE COLOR MENU SETTINGS SETUP RESET INFORMATION AUTO AUTO INFORMATION Analog 67 5kHz 60Hz PP x Optimal Mode x 60Hz PICTURE COLOR M...

Page 81: ...is in Cinema or Dynamic Contrast mode This menu is not available when Game Mode is enabled Sharpness This menu is not available when Bright is in Cinema or Dynamic Contrast mode This menu is not available when Upscale is in Mode1 or Mode2 This menu is not available when Game Mode is enabled 1 Press any button on the front of the product when no menu screen is displayed to display the Function Key ...

Page 82: ...iagnosis test 1 Power off both the PC and product 2 Disconnect the cables from the product 3 Power on the product 4 If the message Check Signal Cable appears the product is working normally If the screen remains blank check the PC system video controller and cable 9 1 2 Checking the Resolution and Frequency For a mode that exceeds the supported resolution refer to 10 2 Standard Signal Mode Table t...

Page 83: ...ing and Using a PC The screen is not clear The screen is blurry Adjust Coarse page 62 and Fine page 63 Remove any accessories video extension cable etc and try again Set the resolution and frequency to the recommended level Refer to 10 2 Standard Signal Mode Table The screen appears unstable and shaky Check that the resolution and frequency for the PC are within the range of resolution and frequen...

Page 84: ...urn to normal operating mode Issues Solutions There is no sound Check the connection of the audio cable or adjust the volume Check the volume The volume is too low Adjust the volume If the volume is still low after turning it up to the maximum level adjust the volume on your PC sound card or software program Issues Solutions A beeping sound is heard when my PC is booting If a beeping sound is hear...

Page 85: ...or and adjust Refresh rate under Monitor settings Windows Vista Go to Control Panel Appearance and Personalization Personalization Display Settings Advanced Settings Monitor and adjust Refresh rate under Monitor settings Windows 7 Go to Control Panel Appearance and Personalization Display Screen Resolution Advanced settings Monitor and adjust Refresh rate under Monitor settings Windows 8 Go to Set...

Page 86: ...gs Control Panel Appearance and Personalization Display Adjust Resolution and adjust the resolution How do I set power saving mode Windows XP Set power saving mode in Control Panel Appearance and Themes Display Screen Saver Settings or BIOS SETUP on the PC Windows ME 2000 Set power saving mode in Control Panel Display Screen Saver Settings or BIOS SETUP on the PC Windows Vista Set power saving mod...

Page 87: ...SS 21 5 inches 54 6 cm 24 CLASS 23 5 inches 59 8 cm Display area 476 64 mm H x 268 11 mm V 18 8 inches H x 10 6 inches V 521 28 mm H x 293 22 mm V 20 5 inches H x 11 5 inches V Power Supply This product supports 100 240 V Since the standard voltage may differ from country to country please check the label on the back of the product Environmental considerations Operating Temperature 50 F 104 F 10 C...

Page 88: ...from the PC does not belong to the standard signal modes the screen may be blank even though the power LED turns on In such a case change the settings according to the following table by referring to the graphics card user manual Model Name TC222L TC242L Synchronization Horizontal Frequency 31 80 KHz Vertical Frequency 56 75 Hz Resolution Optimum Resolution 1920 x 1080 60 Hz Maximum Resolution 192...

Page 89: ...allows you to view natural pictures The repeat frequency is called vertical frequency or refresh rate and is indicated in Hz MAC 1152 x 870 68 681 75 062 100 000 VESA 1280 x 720 45 000 60 000 74 250 VESA 1280 x 800 49 702 59 810 83 500 VESA 1280 x 1024 63 981 60 020 108 000 VESA 1280 x 1024 79 976 75 025 135 000 VESA 1440 x 900 55 935 59 887 106 500 VESA 1600 x 900 RB 60 000 60 000 108 000 VESA 16...

Page 90: ... If customer requests software installation and setup for the product If a service technician removes cleans dusts or foreign materials inside of the product If customer requests an installation additionally after purchasing a product through home shopping or online A Product damage caused by customer s fault Product damage caused by customer s mishandling or wrong repair If a product damage is ca...

Page 91: ...rom darker areas to brighter areas on the screen Changes to the screen brightness are expressed with black and white variation and grey scale refers to the medium area between black and white Changing the grey scale through Gamma adjustment will change the medium brightness on the screen Scanning rate Scanning rate or refresh rate refers to the frequency of screen refreshes Screen data is transmit...

Page 92: ... the number of horizontal pixels and vertical pixels that form a screen It represents the level of display detail A higher resolution displays a greater amount of information on the screen and is suitable for performing multiple tasks at the same time E g A resolution of 1920 x 1080 consists of 1920 horizontal pixels horizontal frequency and 1080 vertical lines vertical resolution Plug Play The Pl...

Page 93: ... 68 General 87 Green 65 I Image Size 60 INFORMATION 80 Installation 24 K Key Repeat Time 79 L Languagey 69 O Off Timer Plus 75 P Parts 20 Q Q A 85 R Red 64 Requirements Before Contacting Samsung Customer Service Center 82 Reset All 73 Responsibility for the Pay Service Cost to Customers 90 S Safety Precautions 10 SAMSUNG MAGIC Angle 57 SAMSUNG MAGIC Bright 56 SAMSUNG MAGIC Upscale 59 Sharpness 53 ...

Page 94: ...Index Index 94 U Using IGEL OS Accessories 40 Using IGEL OS common 29 Using IGEL OS Devices 45 Using IGEL OS Network 44 Using IGEL OS Sessions 30 Using IGEL OS User Interface 41 ...

Reviews: