


27
English
Basic Features
System Menu
¦
Setting the Time
MENU
m
→
System
→
ENTER
E
Time
■
Clock
: Setting the clock is for using various timer features
of the LED display.
✎
The current time will appear every time you press the
INFO
button.
✎
If you disconnect the power cord, you have to set the
clock again.
Clock Mode (Auto / Manual)
x
Auto
: Set the current time automatically using the time
from a digital channel.
✎
The antenna must be connected in order to set
the time automatically.
x
Manual
: Set the current time manually.
✎
Depending on the broadcast station and signal,
the auto time set up may not be correct. In this
case, set the time manually.
Clock Set
: Set the Day, Month, Year, Hour and Minute
manually.
✎
Available only when
Clock Mode
is set to
Manual
.
✎
You can set the Day, Month, Year, Hour and Minute
directly by pressing the number buttons on the
remote control.
Time Zone
(
Auto
/
Manual
) (depending on the country):
Select your time zone.
✎
This function is only available when the
Clock Mode
is set to
Auto
.
–
GMT(GMT-3:00~GMT-1:00 / GMT /
GMT+1:00~GMT+ 12:00):
Selects your time
zone.
✎
This function is only available when the
Time
Zone
is set to
Manual
.
–
DST
(Daylight Saving Time) (
Off / On
): Switches
the Daylight Saving Time function on or of off.
✎
This function is only available when the
Time
Zone
is set to
Manual
.
Using the Sleep Timer
■
Sleep Timer
t
: Automatically shuts off the LED
display after a preset period of time. (30, 60, 90, 120, 150
and 180 minutes).
✎
To cancel
Sleep Timer
, select
Off
.
Setting the On / Off Timer
■
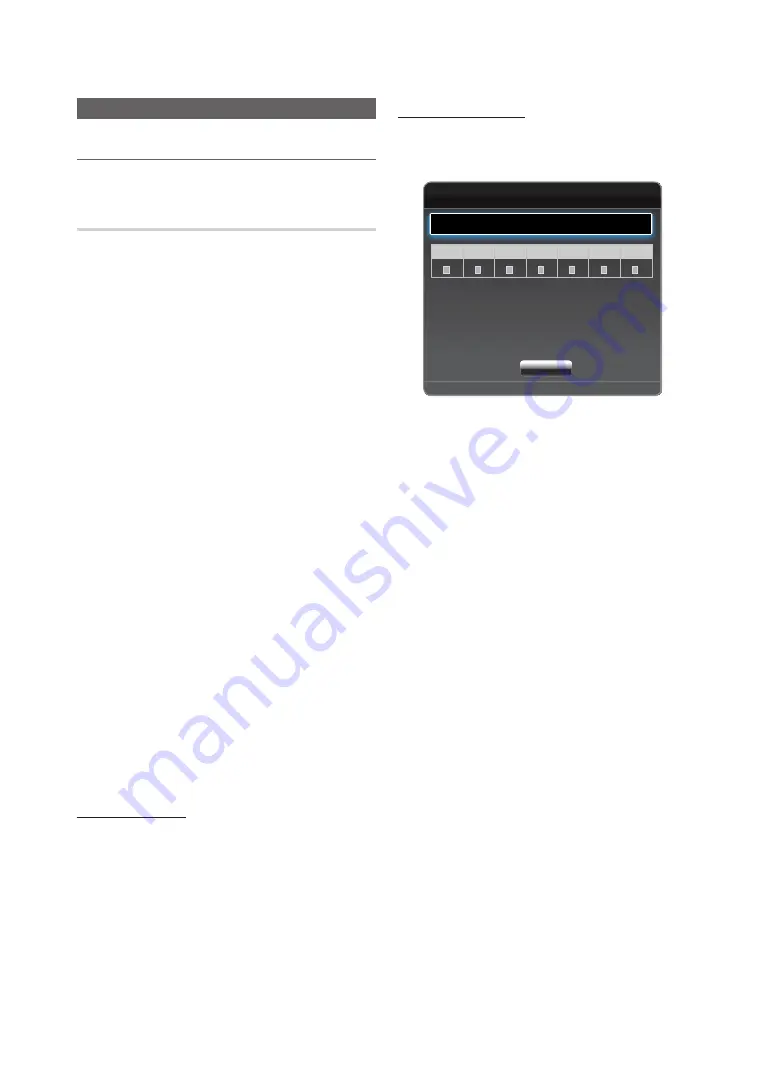
On Timer
On Timer 1 / On Timer 2 / On Timer 3
: Three different on
timer settings can be made. You must set the clock first.
On Timer 1
Setup Off
Time
0:00
Volume
20
Source
TV
Aerial
DTV
Channel
1
Sun
Mon
Tue
Wed
Thu
Fri
Sat
R
Return
Close
Setup
: Select
Off
,
Once
,
Everyday
,
Mon~Fri
,
Mon~Sat
,
Sat~Sun
or
Manual
to set at your convenience. If you
select
Manual
, you can set up the day you want to activate
the timer.
✎
The
c
mark indicates the day you've selected.
Time
: Set the hour and minute.
Volume
: Set the desired volume level.
Source
: Select a desired input source when the LED
display is turned on automatically. (
USB
can be selected
only when a USB device is connected to the LED display)
Aerial
(when the
Source
is set to
TV
): Select
ATV
or
DTV
.
Channel
(when the
Source
is set to
TV
): Select the desired
channel.
Music
/
Photo
(when the
Source
is set to
USB
): Select a
folder in the USB device containing music or photo files to
be played when the LED display is turned on automatically.
✎
NOTE
x
If there is no music file on the USB device or the
folder containing a music file is not selected, the
Timer function does not operate correctly.
x
When there is only one photo file in the USB, the
Slide Show will not play.
x
If a folder name is too long, the folder cannot be
selected.
x
Each USB you use is assigned its own folder.
When using more than one of the same type of
USB, make sure the folders assigned to each USB
have different names.
x
It is recommended that you use a USB memory
stick and a multi card reader when using
On
Timer
.
x
The
On Timer
function may not work with USB
devices with a built-in battery, MP3 players, or
PMPs made by some manufacturers because
these devices take a long time to be recognized.