background image

DRAFT 

Internal Use Only

Section 4:  Contacts 31

Contact Entry Options

1. 

From the Contacts screen, tap an entry to reveal the 

Contact Overview Screen

. This screen contains Name, 

contact numbers, email, and linked contact information. 

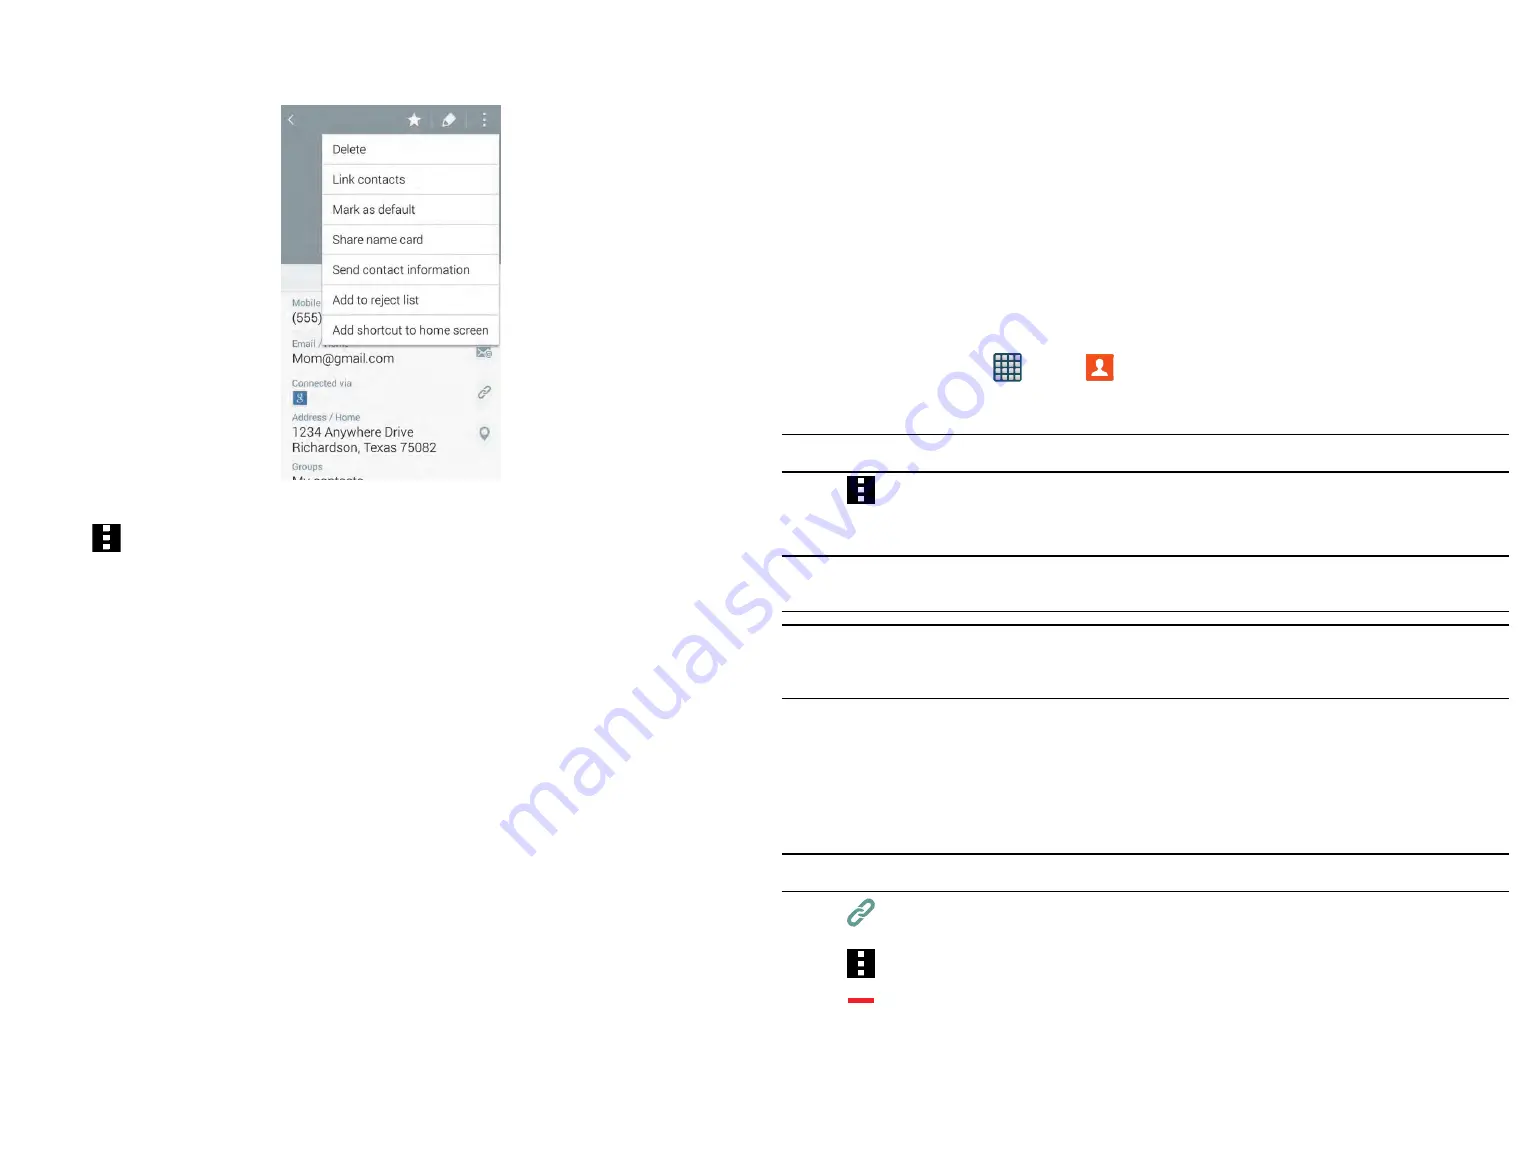
Contact Overview Screen

2. 

Tap 


Menu

 to reveal the context menu specific to this entry.

3. 

Tap an available option:


Delete

: Allows you to delete the currently active entry.


Link contacts

: Allows you to link the current contact to another current contact.


Mark as default

: Allows you to mark one entry in a contact record to use as the default (

page 32

).


Share name card

: Allows you to send contact information as an attachment using an available option  

(

page 32

).


Send contact information

: Alows you select specific elements of an existing contact (name, Mobile number, 

email, etc..) and send them to a recipient via a text message. This option does not send the entire Contact 
entry but only selected elements.


Add to reject list

: Allows you to add an entry’s number to the reject list.


Add shortcut to home screen

: Adds a shortcut to the current Contacts entry to an available screen location.

Linking Contact Information

Most people now maintain multiple email accounts, social networking logins, and other similar account information. 
For example, a Facebook account login name might differ from a corporate email account login because they are 
maintained separately and for different groups of people.

This device can synchronize with multiple accounts. When you synchronize your phone with those accounts, each 
account creates a separate contact entry in the Contacts list.

If one of your contacts (Amy Smith) has a regular email account that you maintain in Gmail, but also has a 
Facebook account under her maiden and married name, as well as a Video! chat account, when you merge those 
accounts into your Contacts list you can join all of her entries and view the information in one record.

Joining contact information makes sending messages easy. You can select any account email address or 
information all from one screen, versus searching multiple, individual screens to locate the desired account 
information.

Next time you synchronize your device with your accounts, any updates contacts make to email account names, 
email addresses, etc. automatically update in your contacts list.

1. 

From the Home screen, tap 


Apps 

g


Contacts

2. 

Tap a contact name (the name you want to link to another entry) to reveal the 

Contact entry’s Overview 

Screen

.

Note: 

Typically this is the same contact with a different name or account information.

3. 

Tap 


Menu


g


Link contacts

.

4. 

Tap the second contact entry (the entry in which to link) and select 

Done

. The second contact is now 

linked with the first and the account information is merged into one screen. 

Note: 

The information is still maintained in both entries, but displays in one record for easier viewing when you 
link the contacts.

Important! 

It is the first contact image that is displayed for both, and the first contact’s name that is used. 
For example: If Amy (original entry) is joined with Julie (second entry). Julie seems to disappear and 
only Amy remains. Tap the Amy entry (showing the Amy image) to view both.

5. 

Tap the main linked contact to view the contact information you linked. The contacts and information 
displays with an icon next to the contact name to indicate what type of account information is contained in 
the entry.

Unlinking a Contact

1. 

From the Contacts screen, tap a contact name (the account name from which you want to unjoin an entry). This 
reveals the details for entry.

Note: 

Typically this is the same contact with a different name or account information.

2. 

Tap 


Link

 within the 

Connected via 

area.

– or – 

Tap 


Menu


g


Unlink contacts

.

3. 

Tap 

 next to the entry you want to unjoin and select 

OK

. The contacts are “unlinked” or separated 

and no longer display in the merged record screen. Both contacts now go back to being separately 
displayed.

Summary of Contents for SM-G386T

Page 1: ...Confidential FCC Approval Document for SM G386T FCC ID A3LSMG386T 9 User Manual SAMSUNG ELECTRONICS CO LTD SM G386T 2014 06 04 1 SM G386T 2014 06 04 1...

Page 2: ...nt has been sent to you as a draft and for informational purposes only The document should only be used for internal purposes and may not be distributed outside of Samsung except to Samsung s carrier...

Page 3: ...BENEFITS Modification of Software SAMSUNG IS NOT LIABLE FOR PERFORMANCE ISSUES OR INCOMPATIBILITIES CAUSED BY YOUR EDITING OF REGISTRY SETTINGS OR YOUR MODIFICATION OF OPERATING SYSTEM SOFTWARE USING...

Page 4: ...of Google Inc Wi Fi is a registered trademark of the Wireless Fidelity Alliance Inc LTE is a trademark of ETSI Swype and the Swype logos are trademarks of Swype Inc 2010 Swype Inc All rights reserved...

Page 5: ...formation 32 Synchronizing Contacts 32 Display Options 33 Additional Contact Options 33 Groups 33 The Favorites Tab 34 Section 5 Messages 35 Types of Messages 35 Creating and Sending Messages 35 Messa...

Page 6: ...ions and Gestures 80 Cloud 81 Backup and Reset 81 Backing up Your Data Before Factory Reset 82 Language and Input 83 Date and Time 85 Safety assistance 85 Accessories 85 Battery Usage 85 Power saving...

Page 7: ...nnovative methods or useful shortcuts Warning Brings to your attention important information to prevent loss of data or functionality or even prevent damage to your phone Text Conventions This manual...

Page 8: ...ot on the inside of the device 3 Orient the card with the gold strips facing down 4 Carefully slide the microSD card into the card socket until it clicks into place Important Be sure to align the gold...

Page 9: ...first time Note If the charger is incorrectly connected damage to the accessory port will occur therefore voiding the device s warranty To connect a USB cable to the device 1 Connect the USB cable to...

Page 10: ...t you can make or receive calls Note The display language is preset to English at the factory To change the language use the Language menu For more information refer to Language and Input on page 83 T...

Page 11: ...et up voicemail Note Voicemail setup may be different depending on your network 1 From the Home screen tap Phone and then touch and hold the key until the device dials your voicemail service You may b...

Page 12: ...of Google Mobile Services Gmail Google Maps Google Hangouts etc Multiple Messaging Options Text Picture Video Messaging and Google Hangouts Corporate and Personal Email Music Player with multitasking...

Page 13: ...on page 85 13 Indicator icons shows the information needed to operate your phone such as the received signal strength phone battery level time unread Emails missed calls etc 14 Front Facing Camera al...

Page 14: ...nt call is minimized Displays your current battery charge level Icon shown is fully charged Displays when the current battery is 100 percent charged When the battery is 100 percent an icon will be sho...

Page 15: ...ng used as a Mobile HotSpot feature is active and communicating For more information refer to Mobile HotSpot on page 67 Displays when the Wi Fi calling feature is active Minutes used while connected t...

Page 16: ...Screen Delete Notification Panel The Notification area indicates new message events data sync status new messages calendar events call status etc You can expand this area to display the Notification...

Page 17: ...ant Your device can only contain at most seven screens and at least one screen To add a screen 1 Navigate to an available screen containing an open area then press and hold Recent until the Edit Home...

Page 18: ...from the current screen To place a widget onto a different screen 1 Touch and hold the widget until it becomes transparent 2 Slowly drag it past the edge of the screen until the adjacent page appears...

Page 19: ...ens on page 16 Motion Navigation and Activation The device comes equipped with the ability to assign specific functions to certain device actions that are detected by both the accelerometer and gyrosc...

Page 20: ...2 Speak into the device s microphone and watch your text being entered on screen 3 If the text is incorrect tap DELETE Using the Samsung Keyboard This QWERTY keyboard can be used to enter text in eith...

Page 21: ...r tap to toggle capitalization All lowercase Displays when the next character is entered in lowercase Initial Uppercase Displays when the first character of each word is entered as uppercase but all s...

Page 22: ...on places a call to the recipient Running a Call in the Background If you exit the current call screen and return to the Home screen you are visually notified that you are still on an active call by t...

Page 23: ...ber to either a new or existing Contacts entry Send message Send the current caller a text message while still maintaining the current call active Speed dial Access the Speed dialing setting menu wher...

Page 24: ...create pauses longer than two seconds by entering multiple 2 second pauses 4 Tap Call Wait Dialing Inserting a Wait into your dialing sequence means that the phone waits until it hears a dial tone be...

Page 25: ...t sound left and Adapt sound right Placing a Call on Hold You can place the current call on hold whenever you want If your network supports this service you can also make another call while a call is...

Page 26: ...eature You must be on the cellular network to use the manage feature When you have two participants in a multi party session it might be necessary to place one of those participants on hold so that a...

Page 27: ...ed calls Note You can also view missed calls from within the Notifications area Select and tap the Missed call entry to open the Logs screen Call logs Caller Overview 1 Create Contact Contact Details...

Page 28: ...Logs tab 2 Tap Menu g Delete g Select all g Done 3 Tap OK to continue with the erasure or Tap Cancel to stop the current process Call Duration 1 From the Home screen tap Phone g Logs tab 2 Tap Menu g...

Page 29: ...wn as Work or Outlook contacts are those contacts that are intended to be shared with either an Exchange Server or from within Microsoft Outlook Add new account lets you create a new account type Choo...

Page 30: ...te and store the new entry or Tap Cancel to delete the current entry Adding a Number to an Existing Contact 1 From the Home screen tap Apps g Contacts 2 Tap a contact name from the list and tap Edit 3...

Page 31: ...ge location and SIM card or SD card Contacts to display Allows you to choose to display All contacts those on your Device SIM card or only display contacts that are part of a Customized list Note Othe...

Page 32: ...of her entries and view the information in one record Joining contact information makes sending messages easy You can select any account email address or information all from one screen versus searchi...

Page 33: ...oth to use this feature 3 Tap the Bluetooth device in which to send this name card Bluetooth forwards the namecard to the recipient Copying Contact Information Copying Contact Information to the SIM C...

Page 34: ...roups Family Friends or Work or a user created group Creating a New Caller Group 1 From the Home screen tap Apps g Contacts 2 Tap Groups g Add new group 3 Tap the Group name field and use the on scree...

Page 35: ...green check mark If an entry contains multiple phone numbers each must be selected individually 4 Tap Done 5 Type your message and tap Send The Favorites Tab The Favorites tab is a list of the phone...

Page 36: ...ient area and selecting Delete 4 Add more recipients by tapping either the Enter recipients field or and selecting recipients 5 Tap the Enter message field and use the on screen keypad to enter a mess...

Page 37: ...text message reply templates For more information refer to Quick Responses on page 39 Add recipient Allows you to enter additional recipients to the message Insert smiley Allows you to add insert smil...

Page 38: ...or phrase in which to search then tap 3 All messages that contain the entered search string are displayed Messages Settings To configure the settings 1 From the Messages screen tap Menu g Settings 2...

Page 39: ...igned to receive wireless emergency alerts from the Commercial Mobile Alerting System CMAS which may also be known as the Personal Localized Alerting Network PLAN If your wireless provider has chosen...

Page 40: ...essage alerts when you receive an important email Your phone s Email application lets you access and manage multiple email accounts simultaneously in one convenient location There are currently three...

Page 41: ...later and continue the email 9 Tap Delete to discard the current email 10 Once complete tap Send Configuring Email Settings 1 From the Home screen tap Apps g Email 2 Select an account and tap Menu g...

Page 42: ...your company s Exchange server Setting Up a Microsoft Exchange Email account 1 From the Home screen tap Apps g Email Note If you have already set up an email account and want to add an additional ema...

Page 43: ...ibrate activates a vibration when a new email message is received 5 Tap the More settings field to access additional options Account name displays your uniquely created account display name Always Cc...

Page 44: ...e screen tap Apps g Camera or From the Lock screen swipe across the on screen camera icon to launch the camera application 2 Using the device s main display screen as a viewfinder adjust the image by...

Page 45: ...low lying areas or in poor weather conditions Your location may appear on your photos when you upload them to the Internet To avoid this deactivate the GPS tag setting Storage location Select the mem...

Page 46: ...ture is activated 7 Tap Stop to stop the recording and save the video file to your Camera folder or Tap Pause to pause the recording 8 Once the file has been saved tap the image viewer then tap Play t...

Page 47: ...ch to beam screen tap the reduced image preview to begin the transfer 6 When prompted separate the two devices Camera Gallery Options The Gallery is where you can access the Gallery of stored camera i...

Page 48: ...The Gallery The Gallery is where you view photos and play back videos For photos you can also perform basic editing tasks view a slideshow set photos as wallpaper or caller image and share as a pictu...

Page 49: ...ted applications User downloaded apps will be uninstalled but core applications can only be disabled Tap to remove the selected app Hide apps Allows you to temporarily hide selected apps within your A...

Page 50: ...eck mark indicates a selection 6 Tap Weather to activate this option A check mark indicates selection 7 Tap Lock time zone to lock event time based on your current user selected time zone Select a tim...

Reviews: