


COLOR DOME CAMERA
User’s Manual
10
COLOR DOME CAMERA
User’s Manual
11
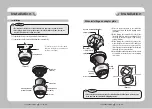
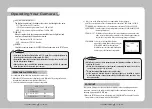
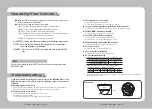
1) Separate the dome cover by counterclockwise rotation.
2) Separate the shield case by pulling from the camera body.
• The installation should be done by qualified service personnel or system installers.
• If the ceiling material is not strong enough to hold the installation screws, the camera
may fall off. Reinforce the ceiling as needed.
Notes
* To install the dome cover on the camera
body, turn the latches in locking direction
as shown in the figure 1.
Locking direction
(Clockwise)
Latch
Locking direction
[Figure-1]
Main Body
(Camera)
Shield Case
Dome cover
Unlocking direction
(Counterclockwise)
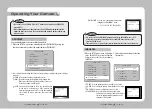
Installation
Installation
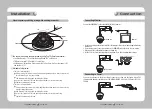
When installing on a adapter plate
1) Place the bracket provided on the installation
surface and fix it with the M4 tapping screws
(provided).
2) When placing the camera body on the plate,
insert the plate pin into the mounting hole on
the body as shown in figure-1 and fix it by
turning clockwise.
3) When placing the camera body on the plate,
make sure the power and the BNC cables pass
through their respective designated holes.
(When placing the cable through its side, thread
it through the hole at the bottom.)
4) After installation and adjustment of the camera
are complete, secure the dome cover by turning
it clockwise.
[Figure-1]
Locking direction
Plate pin
Unlocking direction
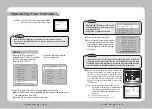
• Please locate an arrow on bracket for installing direction that you wish to observe
Area and then fix it with the M4 tapping screws.
Notes
Unlocking
direction
M4 tapping
screw (provided)
Dome cover
adapter plate
An arrow for installing directions
CAMERA
Locking
direction
Installation