background image

E

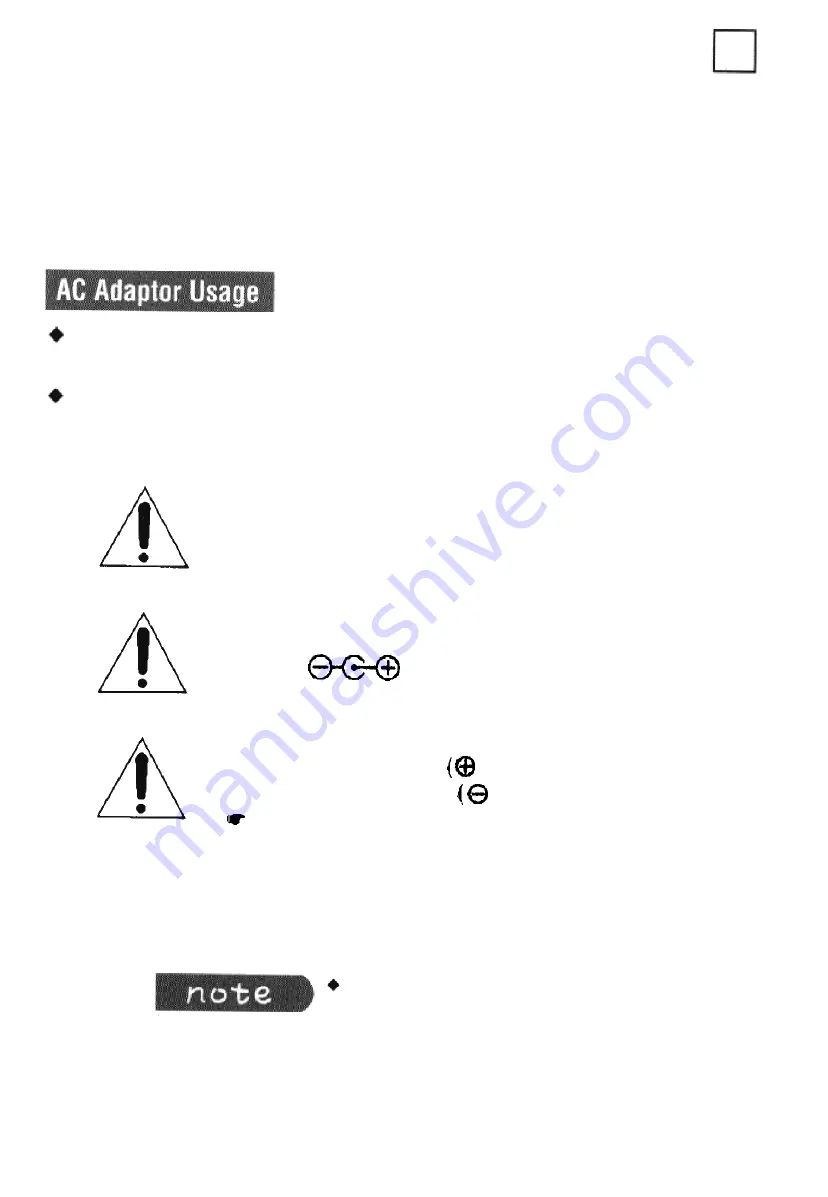
It is generally not necessary to use an AC adaptor ; however, for your

convenience, a DC input jack has been provided.

This camera will accept many commercially available AC adaptors.

You must purchase the AC adaptor separately.

The output of the AC adaptor must be 6V DC

and it must be rated at 500mA or higher.

The polarity of the AC adaptor output must be
correct : 

The AC adaptor must have the following plug size :

- 1.7mm inside diameter 

 end)

-  4.0mm outside diameter   

 end)

 ElAJ class 2 standards

Using an AC adaptor will power the camera
but will not charge the batteries.

18

Summary of Contents for SDC-33

Page 1: ...SDC 33 Digital Still Camera User s Guide E For Windows 3 1 and Windows 95 ...

Page 2: ...antly take a picture load the picture onto your PC and output it immediately through your monitor or printer Clean high quality picture Large image storage capacity A progressive scanning CCD image sensor with 350 thousand pixels is used to render vivid and clear pictures The built in 4MB internal flash memory will hold up to 45 high quality Standard or 180 reduced size Economy pictures 1 ...

Page 3: ...iends Compact and portable design The combination of small size and lightweight design make it perfect to carry in your pocket Contents Getting started Features 1 Precautions 3 Safety Instructions 5 Location of Controls 7 Getting Started 9 Battery insertion 9 Operation Basic Picture Taking 11 Setting Picture Mode 13 Timer Photography 14 Deleting Pictures 15 Connecting to your PC 17 AC Adaptor Usag...

Page 4: ...r les chocs électriques introduire la lame la plus large de la fiche dans la bome correspondante de la prise et pousser jusqú au fond This symbol is intended to alert the user to the presence of uninsulated dangerous voltage within the product s enclosure that may be of sufficient magnitude to constitute a risk of fire or electric shock This symbol is intended to alert the user to the presence of ...

Page 5: ...ration between the equipment and receiver Connect the equipment into an outlet on a circuit different from that to which the receiver is connected Consult the dealer or an experienced radio TV technician for help WARNING The connection of a non shielded equipment interface cable to this equipment will invalidate the FCC Certification of this device and may cause interference levels that exceed the...

Page 6: ...dicated on the label If you are not sum of the type of power supply at your home consult your appliance dealer or local power company The CAMERA is intended to be operated from battery power or other sources refer to the operating instructions ACCESSORIES Do not place this CAMERA on an unstable cart stand tripod bracket or table The CAMERA may fall causing serious injury to a child or adult and se...

Page 7: ...ting instructions Improper adjustment of other controls may result in damage and will often require extensive work by a qualified technician to restore the CAMERA to its normal operation d If the CAMERA has been dropped or the cabinet has been damaged e When the CAMERA exhibits a distinct change in performance this indicates a need for service 11 REPLACEMENT PARTS When replacement parts are requir...

Page 8: ... Taken Timer page 14 Picture Mode page 13 STD Total 45 pictures ECO Total 180 pictures Battery level indicator pages 9 10 Delete indicator pages 15 16 Timer lamp page 14 Operation ready indicator Viewfinder RS 232C port page 17 DC input jack page 18 7 ...

Page 9: ...E Picture Mode button page 13 Timer button page 14 Delete button pages 15 16 Shutter Power switch Battery cover pages 9 10 Tripod mounting hole 8 ...

Page 10: ...ertion 1 Locate the battery cover on the bottom of the camera and push it open In the direction of the arrow Thread the thin end of the strap into the hole on the side of the camera and loop the large end of the strap around it as shown in the figure 9 ...

Page 11: ...the cover and push it in the direction of the arrow making sure the lock snaps With 4 new AA alkaline batteries you can take more than 200 pictures under normal conditions Do not mix different types of batteries Replace all 4 batteries at the same time do not mix old and new batteries 10 ...

Page 12: ...off E Basic Picture Taking 1 Turn the camera ON by pushing the power switch in the direction of the arrow The display panel and Operation Ready lamp will light Push the power switch in the direction of the arrow again 11 ...

Page 13: ...ter The timer lamp will flash one time The operation ready indicator will flash and the display panel will show Pro r i You can then take the next picture Auto Shut off If you do not operate the camera for more than 3 minutes 10 minutes when hooked up to a PC the camera automatically turns itself off to save battery power 12 ...

Page 14: ... your needs Press the Pic Mode button The button toggles between STD and ECO You can switch freely between the 2 settings Use this setting for highest quality pictures 640 x 480 image resolution Camera can store up to 45 images Use this setting to take a larger quantity of pictures 320 x 240 image resolution Can store up to 180 images 13 ...

Page 15: ...Timer button again to cancel Press the Shutter The timer icon on the display panel and the timer lamp will flash The picture will be taken automatically in 10 seconds If no operation is performed for 30 sec after pressing the Timer button the timer function is automatically canceled The timer function cannot be canceled after pressing the Shutter 14 ...

Page 16: ...s memory To delete one by one starting from last picture taken 1 2 Keep the Delete button pressed for more than 2 seconds The DEL icon will flash Press the Shutter Pictures Remaining will increase by one and Pictures Taken will decrease by one You can press the shutter again to erase more pictures ...

Page 17: ...ill flash Press the Shutter The Pictures Remaining will return to the initial total and the Pictures Taken in box will be reset to zero To exit the Delete mode press the Delete button again If no operation is performed for 30 seconds after entering the Delete mode the delete mode will be automatically cancelled 16 ...

Page 18: ...e back of your PC of the PC cable to the Connect to the 9 pin serial Serial port on the port RS 232C If your PC only has a 25 pin serial port available you must use a Female DB25 to Male D89 serial port adaptor Camera Before making any connections to the PC turn the camera power off first 17 ...

Page 19: ...ptors You must purchase the AC adaptor separately The output of the AC adaptor must be 6V DC and it must be rated at 500mA or higher The polarity of the AC adaptor output must be correct The AC adaptor must have the following plug size 1 7mm inside diameter end 4 0mm outside diameter Q end D ElAJ class 2 standards Using an AC adaptor will power the camera but will not charge the batteries 18 ...

Page 20: ...ws 95 and Windows 3 1 How to install the Twain Driver 1 2 3 4 Insert the disk labeled Twain Driver into your floppy disk drive A or B Choose the appropriate disk for your operating system For Windows 95 Click the Start button on the Windows Taskbar For Windows 3 1 Choose File from the top menu Choose Run from the menu Type in the following in the dialog box and hit Enter example a setup or b setup...

Page 21: ...stallation 6When you see the Finish box Click on Finish to complete the Twain Driver installation The above screens describe the installation process for Windows 95 The screens for Windows 3 1 will look slighty different but the overall process will be similar 20 ...

Page 22: ...deo board with monitor set 16 bit High color or 24 bit True color CD ROM DRIVE How to install the Application software 1 Insert the Application software CD ROM into your CD ROM drive 2For Windows 95 Click the Start button on the Windows Taskbar For Windows 3 1 Choose File from the top menu 3 Choose Run from the menu 4Type in the following in the dialog box and hit Enter For Windows 95 example d se...

Page 23: ... Windows 3 1 the application software and the following screens shown will be that of iPhoto Plus iPhoto Express screen iPhoto Express screen On some systems steps 2 4 above are skipped and you will automatically be taken to step 5 upon insertion of the CD ROM It is recommended that you go through the guided tour option available towards the end of the installation process iPhoto Express only 22 ...

Page 24: ...tart the Application software example iPhoto Express image editor Choose Acquire from the File menu Then click on Select Source For iPhoto Plus choose Source from the File menu When you see the following box click on OK Choose Acquire from the File menu Then Click on Image When you see following box click on Acquire Acquire Image Box For iPhoto Plus only the first part of step 4 is nesessary 23 ...

Page 25: ...e image editor other than the one supplied with this camera as long as it is Twain compliant However depending on your PC s system resources some application software may not function properly The above steps to download images may vary depending on the application software used For Windows 3 1 If you have less than 16MB of RAM you may not be able to download all the pictures at once Download a fe...

Page 26: ...ing downloaded Load To download the selected image s from the camera to the PC s Application software Exit To exit this Dialog Box takes you back to the Application software Select All Select all images at once Deselect All Deselect all images at once PgUp Page up Scrolls up the Thumbnail page one page at a time PgDn Page down Scrolls down the Thumbnail page one page at a time 25 ...

Page 27: ...lt is 56 000 bps Update Updates thumbnails of shots taken from this Dialog Box Delete Delete the selected image Shot To take shots from this Dialog Box Timer Sets the camera into the self timer photography mode Mode Sets the picture resolution mode Battery To check the battery level of the camera The Shot Timer and Mode buttons replicate the Shutter Timer and Pic Mode buttons on the camera 26 ...

Page 28: ... old batteries with new ones 4 The camera memory is full Transfer the images to your PC and delete the images from the camera 4 Check for proper connection between the camera and PC Then try powering the camera off and back on again If the display still appears contact your nearest authorized Samsung service center Power the camera off and back on again If the display still appears contact your ne...

Page 29: ...ist towel to remove the stain Then wipe off the moisture with a soft lint free cloth or lens cleaning tissue To store Keep the camera in a cool dry place Never use an air gun to dust off the lens The surface of the lens may be damaged Do not use harsh abrasive cleaners Keep away from humidity and chemicals 28 ...

Page 30: ... not power on 4 Check that the batteries are inserted properly See pages 9 10 The images cannot be transferred to the PC 4 Check that the PC cable is connected properly See page 17 The camera suddenly shuts off 4 You may have not operated the camera for the last 3 minutes See page 12 29 ...

Page 31: ...olors Memory 4MB internal flash Image capacity Standard STD 45 images Economy ECO 180 images Compression Standard JPEG Lens Fixed focusing F 4 0 f 6 0 mm equivalent to 43mm on a 35mm camera Range 100cm 3 3 feet infinity I Viewfinder Separate optical Shutter Auto electronic 1 4 1 8000 second Exposure system Auto exposure Color balance Automatic White Balance Sensitivity ISO 100 30 ...

Page 32: ... alkaline batteries Power 6V DC when using AC adaptor not supplied Output 6 0 V DC 500mA Jack 4mm 1 7mm I Power consumption 3 0W Battery life More than 200 images using new alkaline batteries Dimensions 115 W x 75 H x 38 D mm 4 1 2 x 3 x 1 1 2 inch Net weight 140g 4 9 oz without batteries Operating temperature 0 40 C 32 104 F Windows is a registered trademark of Microsoft Corporation iPhoto Expres...

Page 33: ...e It must be presented to the authorized service center EXCLUSIONS WHAT IS NOT COVERED This warranty does not cover damage due to accident fire flood and or other acts of God misuse incorrect line voltage improper installation improper or unauthorized repairs commercial use or damage that occurs in shipping Exterior and interior finish lamps and glass are not covered under this warranty Customer a...

Page 34: ...ce center is the customer s responsibility The original dated sales receipt must be retained by the customer and is the only acceptable proof of purchase It must be presented to the authorized service center at the time service is requested EXCLUSIONS WHAT IS NOT COVERED This warranty does not cover damage due to accident fire flood and or other acts of god misuse incorrect line voltage improper i...

Page 35: ...llowing 1 Download only a few images at a time 2 Save those downloaded images 3 Then download more images If an error occurs white downloading 1 Exit the TWAIN DRIVER screen 2 ACQUIRE the thumbnails again Remember that the maximum number of images that the Application software can open at a given time depends on the amount of free memory available The Application software also needs to keep some b...

Page 36: ......

Page 37: ...Memo E 34 ...

Page 38: ...THIS CAMERA IS MANUFACTURED BY FOR SERVICE ASSISTANCE AND THE LOCATION OF THE NEAREST A S C PLEASE CALL 1 800 SAMSUNG 1 800 726 7864 CODE NO AD68 10793C ...

Reviews: