Samsung SCC-C7325 User Manual Download Page 9

English – 

9

ENG

Introduction

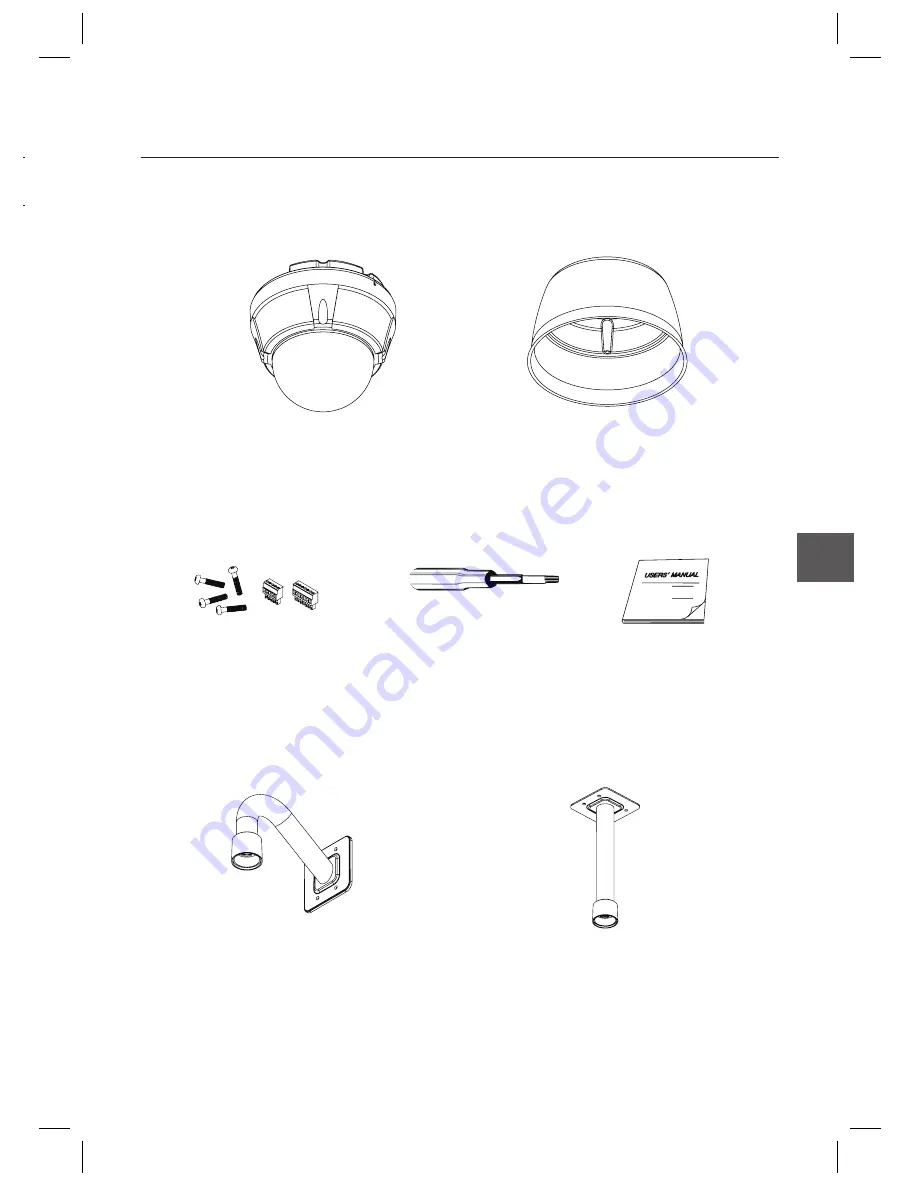
Product & Accessories (SCC-C7325)

Main Product

Accessory

Mount Bracket Option


Main Body 

Sun Shield Housing

Terminal Block


Torx Screw Driver

Manual


Ceiling Mount Bracket (SADT-732CM)

Wall Mount Bracket (SADT-732WM)

Summary of Contents for SCC-C7325

Page 1: ...ser manual SCC C6323 SCC C6325 SCC C7325 imagine the possibilities Thank you for purchasing this Samsung product To receive more complete service please register your product at www samsung com global register ENG FRE GER SPA ITA ...

Page 2: ...e fire When installing the camera fasten it securely and firmly A falling camera may cause personal injury Do not place conductive objects e g screwdrivers coins metal things etc or containers filled with water on top of the camera Doing so may cause personal injury due to fire electric shock or falling objects Do not install the unit in humid dusty or sooty locations Doing so may cause fire or el...

Page 3: ... move or reinstall it Remove the power plug from the outlet when then there is a lightning Neglecting to do so may cause fire or damage to the product Keep out of direct sunlight and heat radiation sources It may cause fire Install it in a place with good ventilation Avoid aiming the camera directly towards extremely bright objects such as sun as this may damage the CCD image sensor Apparatus shal...

Page 4: ...ovided plug does not fit into your outlet consult an electrician for replacement of the obsolete outlet Protect the power cord from being walked on or pinched particularly at plugs convenience receptacles and the point where they exit from the apparatus Only use attachments accessories specified by the manufacturer Use only with cart stand tripod bracket or table specified by the manufacturer or s...

Page 5: ...unt Bracket SCC C7325 16 Installation using Wall Mount Bracket SCC C7325 17 Cabling 19 Operation Check points before operation 21 Preset and Pattern Function Pre Check 21 Starting OSD Menu 21 Reserved Preset 21 Preset 22 Auto Pan 22 Pattern 22 Scan 23 Schedule 23 Other Functions 23 OSD Display of Main Screen 24 General Rules of Key Operation for Menu 25 Main Menu 25 System Information 25 Display S...

Page 6: ... Privacy Zone Mask Setup 26 Motion Setup 26 Function Setup 27 PRESET Setup 28 Auto Pan Setup 29 Pattern Setup 30 Scan Setup 30 Schedule Setup 32 Camera Setup 33 System Setup 34 System Initialize 36 Specifications Specifications 38 Dimension 41 Contents ...

Page 7: ...n Scan functions This enables for camera to move a combinations of those functions repetitively Max 4 Masks are settable independently to protect privacy zone The mask is arbitrary sized rectangular and locate any location in view space 7 rules of Schedule can be assigned by day and time Appropriate actions such as Home Preset Auto Pan Pattern Scan can be defined for each rule Also it is possible ...

Page 8: ...cessory Main Body Surface Mount Bracket Product Accessories SCC C6325 Main Product Accessory Main Body Surface Mount Bracket G Screw Plastic Anchor 4Pcs Screw Plastic Anchor 4Pcs Manual Terminal Block Torx Screw Driver Surface Mount Gasket Manual Mount Bracket Option Please use SADT 937WM for this purpose Ú ...

Page 9: ...ntroduction Product Accessories SCC C7325 Main Product Accessory Mount Bracket Option Main Body Sun Shield Housing Terminal Block Torx Screw Driver Manual Ceiling Mount Bracket SADT 732CM Wall Mount Bracket SADT 732WM ...

Page 10: ...ket or on the ceiling with ceiling mount bracket Separating Slit Using a coin you can separate upper part lower body of the dome Dome Cover Do not detach protection vinyl from dome cover before finishing all installation process to protect dome cover from scratches or dust DIP Switch Adjusts camera ID and protocols Cable Duct When you want to install the camera on the surface of hard ceiling you n...

Page 11: ...y of the camera is going to be assembled again in the last stage Do not use this bracket with wall mount bracket or ceiling mount bracket Lockup Screw Fixes main unit brackets like surface wall and ceiling Cabling Terminal Block During installation Power Video Communication Alarm Input cables are connected on to this cabling terminal block DIP Switch Adjusts camera ID and protocols Main Unit Surfa...

Page 12: ...atches or dust Sun Shield Housing Lockup Screw Fixes main unit brackets like surface wall and ceiling Cabling Terminal Block During installation Power Video Communication Alarm Input cables are connected on to this cabling terminal block DIP Switch Adjusts camera ID and protocols Main Unit Surface Mount Bracket Back of Main Unit Sun Shield Housing Main Body Dome Cover Lockup Screw Cabling Terminal...

Page 13: ...FF Auto Protocol ON OFF OFF OFF Pelco D OFF ON OFF OFF Pelco P ON ON OFF OFF Samsung If you set the protocol as Auto Protocol camera will automatically recognize the kind of Protocol Auto Protocol supports Pelco D and Samsung Protocol If you want to control using DVR or system keyboard their protocol must be identical to camera Otherwise you can not control the camera If you changed camera protoco...

Page 14: ...TION USING SURFACE MOUNT ON THE CEILING SCC C6323 Setup DIP Switch see previous page Screw surface mount bracket to ceiling with 4 screws Placing lower body to Surface Mount bracket The cable must be properly handled into hole of bracket or side of lower body Make sure stopper pin of bracket pin is located the rightmost side of lower body groove as shown in the picture Press the dome and turn cloc...

Page 15: ...nication power cable properly see next section SCC C6325 To pass cables to upside of ceiling please make about ũ60mm hole on the ceiling panel Screw surface mount bracket to ceiling with 4 screws Wire cables to terminal block and connect the terminal blocks to main unit ...

Page 16: ... bracket with 4 lock up screws Detach protection vinyl from dome cover INSTALLATION USING CEILING MOUNT BRACKET SCC C7325 Install ceiling mount bracket on the ceiling using 4 screws provided Turn sunshield clockwise after locating it in the pipe head of ceiling mount properly ...

Page 17: ...ain unit Then fix the main unit with sunshield with 4 screws Detach protection vinyl from dome cover INSTALLATION USING WALL MOUNT BRACKET SCC C7325 Use the 4 screws provided to secure the wall mount bracket to the wall Turn sunshield clockwise after locating it in the pipe head of wall mount properly ...

Page 18: ...INI SMART DOME CAMERA Installation After wiring cables to terminals plug the terminals into the bottom of main unit Then fix the main unit with sunshield with 4 screws Detach protection vinyl from dome cover C ...

Page 19: ...al Voltage DC 12V AC 24V BNC Video 1 Black IN COM 2 Yellow IN 1 3 Brown IN 2 4 Red Relay Out 5 Orange Relay Out Controller DVR IrDA Sensor Door Switch Sensors Lamp Relay Out Dual Voltage DC 12V AC 24V Controller DVR BNC Video Relay Out Relay Out IrDA Sensor Door Switch Sensors Lamp Relay Out ...

Page 20: ...sor Input It is noted that short circuit between GND and Input pin means alarm activation If you want to use Alarm Input the types of sensor must be selected in OSD menu The sensor types are Normal Open and Normal If sensor type is not selected properly the alarm can be activated reversely Normal Open N O Sensor output is turned ON when sensor is activated Normal Close N C Sensor output is turned ...

Page 21: ...put function can be configured for each application Enter Menu Go Preset 95 RESERVED PRESET Description Some Preset numbers are reserved for direct access to specific functions in OSD menu These direct commands via preset provide quick execution of various functions using keyboard controller as well as simplify the interface with DVR and IP equipments Function Go Preset 95 Enters into OSD menu Go ...

Page 22: ...d as the 1st point is same as the preset assigned as the 2nd point camera turns on its axis by 360 in CW Clockwise direction and then it turns on its axis by 360 in CCW Counterclockwise direction Speed can be set up from 1 sec to 180 sec Set Auto Pan To set Auto Pan use OSD menu Run Auto Pan Method1 Run Auto Pan Auto Pan NO Enter Method2 Go Preset Auto Pan NO 140 ex Run Auto Pan 2 Go Preset 142 De...

Page 23: ...ll be kept regardless of blackout The initial time and day setup is essential to proper Schedule function Set Schedule Use OSD Menu to create a Schedule Run Schedule Use OSD Menu of Schedule Master Enable Delete Schedule Use OSD Menu to delete OTHER FUNCTIONS Preset Lock This function is made to protect preset data from unauthorized overwriting If Preset Lock is ON Preset save command using Hot Ke...

Page 24: ...on instead of auto focusing manual focus data stored when it is created will be applied as soon as camera arrives to the preset This is helpful to get well focused image in a short time OSD DISPLAY OF MAIN SCREEN P T Z INFORMATION Current Pan Tilt angle in degree zoom magnification and a compass direction Camera ID Current Camera ID Address Action Title Followings are possible Action Titles and th...

Page 25: ...ETUP Configure Camera related functions and data SYSTEM SETUP Configure for Basic system setup SYSTEM INITIALIZE Initializes system configuration and sets all data to factory default configuration SYSTEM INFORMATION FIRMWARE VER Shows current firmware version of camera COLOR SYSTEM Shows current analog video system of the camera PROTOCOL Shows current Protocol for PTZ control BAUD RATE Shows curre...

Page 26: ...ystick or arrow buttons to adjust mask size Left Right Adjusts mask width Up Down Adjusts mask height It is noted that during PAN TILT control like jog action the object behind the privacy mask can be disclosed in a short period of time To hide a certain zone completely regardless of high speed PT motions it is recommended that the size of mask must be 20 bigger than original target size MOTION SE...

Page 27: ...f Park Enable is set to ON camera runs assigned function automatically if there is no PTZ command during assigned Wait Time PARK ENABLE ON OFF WAIT TIME 5 seconds 4 hour The time is displayed with hh mm ss format and you can change this by 1 min unit PARK ACTION HOME PRESET PATTERN AUTO PAN SCAN Ex If HOME is selected for Park Action camera will move to home position when there is no PTZ command d...

Page 28: ...INED shows on monitor EDIT PRESET SCENE Redefine current Preset scene position i e PTZ EDIT PRESET LABEL Edits Label to show on monitor when preset runs MAX 10 alphabets are allowed CLEAR PRESET CANCEL OK Delete current Preset data CAM ADJUST GENERAL SPECIAL WB White Balance and AE Auto Exposure can be set up independently for each preset There are 2 modes General mode Special mode The General mod...

Page 29: ...AUTO PAN SETUP AUTO PAN SETUP APAN NO 1 1ST POS NOT USED 2ND POS NOT USED APAN SPEED 30 SEC CLEAR APAN CANCEL BACK EXIT APAN Number 1 8 Selects Auto Pan number to edit If a selected Auto Pan has not defined NOT USED is displayed in 1st Position and 2nd Position 1ST POSITION PRESET 1 128 2ND POSITION Set up the 2 position for Auto Pan function If a selected preset is not defined UNDEFINED will be d...

Page 30: ...f controller or run preset function to memorize the path mostly curve path in a selected pattern The total memory size and the rest memory size is displayed in the form of bar Maximum 1200 communication commands can be stored in a pattern EDIT PATTERN 1 NEAR SAVE FAR DELETE 0 0 X1 N To save data and exit press NEAR or ENTER key To cancel recording and delete record data press FAR key SCAN SETUP SC...

Page 31: ...epresents preset speed 2 360 when preset is selected It should be the number of repetition 1 255 when Pattern or Auto Pan is selected for Action Set up items such as Action NO Dwell and OPT EDIT SCAN 1 NO ACTION NO DWELL OPT 1 PRESET 1 00 03 360 2 NONE 3 NONE 4 NONE 5 NONE SAVE MOVE CURSOR CANCEL CHANGE VAL After finishing setting up an Action press NEAR or ENTER key to one upper level menu Step M...

Page 32: ...LE SETUP MASTER ENABLE ON DAY TIME ACT NO ON 1 MON 00 00 HOM OFF 2 UNDEFINED 3 UNDEFINED 4 UNDEFINED 5 UNDEFINED 6 UNDEFINED 7 UNDEFINED BACK The meaning of each value DAY Days MON TUE WED THU FRI SAT SUN WKD Weekday ALL All days Everyday TIME 24hour Format ACT PRS Preset AUP Auto Pan PTN Pattern SCN Scan HOM Home ON OFF Decide to make this rule effective or not If you finish a rule press NEAR or ...

Page 33: ...can be set up manually RED ADJUST 10 60 BLUE ADJUST 10 60 Auto Exposure Setup AE SETUP BACKLIGHT OFF DAY NIGHT AUTO1 BRIGHTNESS 25 IRIS AUTO SHUTTER ESC AGC NORMAL DNR MIDDLE SENS UP OFF BACK EXIT BACKLIGHT OFF LOW MIDDLE HIGH Sets Backlight Compensation DAY NIGHT AUTO1 AUTO2 DAY NIGHT AUTO1 exchanges Day Night mode faster than AUTO2 BRIGHTNESS 0 100 Adjusts brightness of images Iris Shutter Speed...

Page 34: ...e day is automatically calculated when you set the date TIME Time is displayed in HH MM SS format DATE TIME SETUP After you press the NEAR or ENTER key each field can be selected by Left Right keys and the values in the field are changed using Up Down keys To save the updated data press the NEAR or ENTER key again It is noted that the range of date setup is limited from 01 JAN 2000 to 31 DEC 2037 ...

Page 35: ...ons of functions such as preset pattern scan auto pan and privacy zone mask will be shifted based on changed Home position Set Home Position When you replace the camera block or the orientation of camera is changed due to maintenance operations it is very difficult to maintain same pan orientation Therefore all function data depending on pan orientation such as preset pattern scan auto pan and pri...

Page 36: ... Display Configuration CLEAR CAMERA SET Initializes Camera Configuration CLEAR MOTION SET Initializes Motion Configuration CLEAR FUNCTION SET Deletes Preset Data Auto Pan Data Pattern Data Scan Data and Schedule Data REBOOT CAMERA Reboots Zoom Camera module REBOOT SYSTEM Reboots Smart Dome Camera Initial Configuration Table Display Configuration Camera ID ON PTZ Information AUTO Action Title AUTO ...

Page 37: ...O Digital Zoom ON Image Flip OFF White Balance AUTO Back Light OFF Day Night AUTO1 Brightness 25 IRIS AUTO Shutter ESC AGC NORMAL DNR MIDDLE SENS UP OFF Function Data Preset 1 128 Undefined Auto Pan 1 8 Undefined Pattern 1 4 Undefined Scan 1 8 Undefined Schedule 1 7 Undefined ...

Page 38: ... White Balance Auto Manual Red Blue Gain Adjustable BLC Low Middle High Off DNR Low Middle High Off Pan Tilt Range Pan 0 360 Endless Tilt 0 90 Pan Tilt Speed Preset 360 sec Manual 0 05 360 sec proportional to zoom Auto Pan 1 180 sec Preset 127 Preset Label Camera Image Setting Pattern 4 Pattern 1200 commands about 5 minute Pattern Auto Pan 8 Auto Pan Scan 8 Scan 20 action entities per Scan Other F...

Page 39: ...n Adjustable BLC Low Middle High Off DNR Low Middle High Off Pan Tilt Range Pan 0 360 Endless Tilt 0 180 Auto Flip Mode 90 Normal Pan Tilt Speed Preset 360 sec Manual 0 05 360 sec proportional to zoom Auto Pan 1 180 sec Preset 127 Preset Label Camera Image Setting Pattern 4 Pattern 1200 commands Pattern about 5 minute in normal operations Auto Pan 8 Auto Pan Scan 8 Scan 20 action entities per Scan...

Page 40: ...LC Low Middle High Off DNR Low Middle High Off Pan Tilt Range Pan 0 360 Endless Tilt 0 180 Auto Flip Mode 90 Normal Pan Tilt Speed Preset 360 sec Manual 0 05 360 sec proportional to zoom Auto Pan 1 180 sec Preset 127 Preset Label Camera Image Setting Pattern 4 Pattern 1200 commands Pattern about 5 minute in normal operations Auto Pan 8 Auto Pan Scan 8 Scan 20 action entities per Scan Other Functio...

Page 41: ...English 41 ENG Specifications DIMENSION Unit mm SCC C6323 SCC C6325 PIPE THREAD ...

Page 42: ...42 10X MINI SMART DOME CAMERA Specifications Unit mm Wall Mount Bracket SCC C7325 Ceiling Mount Bracket ...

Page 43: ...o the environment or human health from uncontrolled waste disposal please separate these items from other types of waste and recycle them responsibly to promote the sustainable reuse of material resources Household users should contact either the retailer where they purchased this product or their local government office for details of where and how they can take these items for environmentally sa...

Reviews: