background image

33

Troubleshooting Guide

Chapter  09

Requirements Before Contacting Samsung 

Customer Service Center


― Before calling Samsung Customer Service Center, test your product as follows. If the problem persists, 

contact Samsung Customer Service Center.

Testing the Product

Check if your product is operating normally by using the product test function.
If the screen is turned off and the power indicator blinks even though the product is properly connected 
to a PC, perform a self-diagnosis test.

Power off both the PC and product.

Disconnect the cables from the product.

Power on the product.

If the message 

Check Signal Cable

 appears, the product is working normally.


― If the screen remains blank, check the PC system, video controller and cable.

Checking the Resolution and Frequency

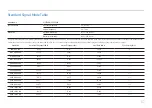
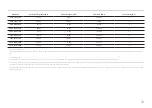
For a mode that exceeds the supported resolution(refer to 

Standard Signal Mode Table

), the message 

Not Optimum Mode

 will appear for a short time.


― The displayed resolution may vary, depending on the computer system settings and cables.

Check the following.

Installation issue (PC mode)

The screen keeps switching on and off.

Check the cable connection between the product and PC, and ensure the connectors are locked.

Blank spaces are found on all four sides of the screen when an HDMI or HDMI-DVI cable is connected 
to the product and PC.

The blank spaces found on the screen have nothing to do with the product.
Blank spaces on the screen are caused by the PC or graphics card. To resolve the problem, adjust the 
screen size in the HDMI or DVI settings for the graphics card.
If the graphics card settings menu does not have an option to adjust the screen size, update the 
graphics card driver to the latest version.
(Please contact the graphics card or computer manufacturer for further details about how to adjust 
the screen settings.)

Screen issue

The power LED is off. The screen will not switch on.

Check that the power cable is connected properly.

The message 

Check Signal Cable

 appears.

Check that the cable is properly connected to the product.
Check that the device connected to the product is powered on.

Summary of Contents for S22E348A

Page 1: ...without the authorization of Samsung Electronics is prohibited Trademarks other than that of Samsung Electronics are owned by their respective owners S22E348A S24E348A An administration fee may be cha...

Page 2: ...tand 15 Removing the Stand 16 Connecting and Using a Source Device Pre connection Checkpoints 17 Connecting and Using a PC 17 Connection Using the D SUB Cable Analog Type 17 Connection Using the DVI C...

Page 3: ...me 30 Source Detection 30 Information 31 Installing the Software Easy Setting Box 32 Troubleshooting Guide Requirements Before Contacting Samsung CustomerService Center 33 Testing the Product 33 Check...

Page 4: ...you want to clean the inside of the product Service fee will be charged Safety Precautions Caution RISK OF ELECTRIC SHOCK DO NOT OPEN Caution TO REDUCE THE RISK OF ELECTRIC SHOCK DO NOT REMOVE COVER O...

Page 5: ...g Do not use a damaged power cord or plug or a loose power socket Do not use multiple products with a single power socket Do not touch the power plug with wet hands Insert the power plug all the way i...

Page 6: ...roduct within the reach of young children The product may fall and injure children Edible oil such as soybean oil may damage or distort the product Keep the product away from oil pollution And do not...

Page 7: ...m power off the product and remove the power cable Do not drop objects on the product or apply impact Do not move the product by pulling the power cord or any cable If a gas leakage is found do not to...

Page 8: ...e product upside down or move it by holding the stand The product may fall and become damaged or cause an injury Looking at the screen too close for an extended period of time can deteriorate your eye...

Page 9: ...verMode function can be used by pressing the button The Eye SaverMode is available even when the OSD control is locked Press to enable or disable Eye SaverMode The items below are not available if the...

Page 10: ...Guide may vary depending on the function or product model Refer to the actual product Reverse Side The color and shape of parts may differ from what is shown Specifications are subject to change with...

Page 11: ...00 The displayed image may differ depending on the model Brightness This menu is not available when SAMSUNG MAGICBright is set to Dynamic Contrast mode This menu is not available when Smart Eco Saving...

Page 12: ...nter of the product and adjust the height carefully The rotation and height adjustment has a certain tolerance Stay within the tolerances when rotating or adjusting the height of the product Rotating...

Page 13: ...king device into the anti theft lock slot at the back of the product 4 Lock the locking device An anti theft locking device can be purchased separately Refer to the user guide provided with your anti...

Page 14: ...onal injury Samsung shall not be held liable for any damage or injury caused by using improper screws or attaching the wall mount kit or desktop stand using excessive force Samsung shall not be held l...

Page 15: ...xt place the product with the face down on top of the cloth or cushion Do not remove the fixing pin until you are finished attaching the stand Insert the stand base into the stand in the direction of...

Page 16: ...over the table to protect the product and place the product onto the cloth so that the front of the product faces downwards 2 Turn the connecting screw at the bottom of the stand base to separate it 3...

Page 17: ...cting the power cable Connecting the power cable during connection may damage the product Check the types of ports at the back of the product you want to connect Connecting and Using a PC Select a con...

Page 18: ...o the DVI port on the computer The DVI IN terminal is supplied for the digital DVI dedicated models only Connection Using the DVI HDMI Cable DVI IN The DVI IN terminal is supplied for the digital DVI...

Page 19: ...19 Connecting the Power POWER IN To use the product connect the power cable to a power outlet and the POWER IN port on the product The input voltage is switched automatically...

Page 20: ...Use the USB cable to connect a USB device to the port on the monitor 3 The use procedures are as the same as those for using an external device connecting to the PC You can connect and use a keyboard...

Page 21: ...ptimum resolution and frequency for this product by installing the corresponding drivers To install the latest version of the product driver download it from the Samsung Electronics website at http ww...

Page 22: ...ontrast Sharpness Eye Saver Mode Game Mode Adjust the brightness level Values closer to100 mean a brighter screen 100 75 60 Off Off Custom Off The displayed image may differ depending on the model Con...

Page 23: ...d This menu is not available when Smart Eco Saving is enabled This menu is not available when Game Mode is enabled This menu is not available when Eye SaverMode is enabled This menu is not available w...

Page 24: ...ils and the vividness of the picture The function has more obvious effects on low resolution pictures This menu is not available when SAMSUNG MAGICBright is set to Cinema or Dynamic Contrast mode This...

Page 25: ...is a contrast ratio degradation HDMI Black Level may not be compatible with some source devices The HDMI Black Level feature is only activated at a certain AV resolution such as 720P and1080P H Positi...

Page 26: ...actual product Red Adjust the value of the color red in the picture Range 0 100 A highervalue will increase the intensity of the color 50 50 50 COLOR Red Green Blue Color Tone Gamma Adjust the red sa...

Page 27: ...dard color tone Warm1 Set the color temperature to be warmer than Normal mode Warm 2 Set the color temperature to be warmer than Warm1 Custom Customize the color tone When the external input is connec...

Page 28: ...U SETTINGS Language Menu H Position Menu V Position Display Time Transparency Set the menu language English 100 1 20 sec On The displayed image may differ depending on the model Menu H Position Menu V...

Page 29: ...eturn all the settings forthe product to the default factory settings The displayed image may differ depending on the model Smart Eco Saving The Smart Eco Saving function reduces power consumption by...

Page 30: ...product will automatically power off after the specified time has elapsed This option is only available when Eco Timer is set to On PC AV Mode Set PC AV Mode to AV The picture size will be enlarged Th...

Page 31: ...n View the current input source frequency and resolution PICTURE COLOR MENU SETTINGS SETUP RESET INFORMATION INFORMATION LS S N HDMI kHz Hz x Optimal Mode x Hz The displayed image may differ depending...

Page 32: ...sy Setting Box icon may not appear depending on the computer system and the product specifications If the shortcut icon does not appear press the F5 key Restrictions and Problems with the Installation...

Page 33: ...esolution may vary depending on the computer system settings and cables Check the following Installation issue PC mode The screen keeps switching on and off Check the cable connection between the prod...

Page 34: ...ust Brightness and Contrast Screen color is inconsistent Change the COLOR settings The colors on the screen have a shadow and are distorted Change the COLOR settings White does not really look white C...

Page 35: ...00 Go to Control Panel Display Settings and adjust the resolution Windows Vista Go to Control Panel Appearance and Personalization Personalize Display Settings and adjust the resolution Windows 7 Go t...

Page 36: ...n condensing Storage Temperature 4 F 113 F 20 C 45 C Humidity 5 95 non condensing Plug and Play This monitor can be installed and used with any Plug and Play compatible systems Two way data exchange b...

Page 37: ...a case change the settings according to the following table by referring to the graphics card user manual Resolution Horizontal Frequency kHz Vertical Frequency Hz Pixel Clock MHz Sync Polarity H V IB...

Page 38: ...lled horizontal frequency Horizontal frequency is measured in kHz Vertical Frequency Repeating the same picture dozens of times per second allows you to view natural pictures The repeat frequency is c...

Page 39: ...m If customer requests software installation and setup for the product If a service technician removes cleans dusts or foreign materials inside of the product If customer requests an installation addi...

Page 40: ...ranty Samsung guarantee that replacement parts will be available for 5 years after the end of production After 5 years in the event that the Samsung s service center has run out of replacement parts a...

Reviews: