background image

Refrigerator

user manual

imagine

 the possibilities

Thank you for purchasing this Samsung product.
To receive more complete service,  
please register your product at

www.samsung.com/register

RS26DDA**

ENGLISH SPANISH

Free Standing Appliance

Summary of Contents for RS26DDA Series

Page 1: ...r manual imaginethe possibilities Thank you for purchasing this Samsung product To receive more complete service please register your product at www samsung com register RS26DDA ENGLISH SPANISH Free Standing Appliance ...

Page 2: ...ce maker in the freezer provides space for pizza etc Door Alarm Beep sound reminds you the door is open Vegetable Crisper Optimized humidity control keeps vegetables fruits fresh Compact Ice Maker Water Filtration System Digital Display and Temperature Control 2_ features For easy future reference write the model and serial number down You will find your model number on the left bottom side of the...

Page 3: ...sult in severe personal injury or death CAUTION Hazards or unsafe practices that may result in minor personal injury or property damage Do NOT attempt Do NOT disassemble Do NOT touch Follow directions carefully Unplug the power plug from the wall socket Make sure the refrigerator is grounded to prevent electric shock Call the contact center for help Note These warning signs are here to prevent inj...

Page 4: ...ord may cause short circuit fire and or electric shock Do not use aerosols near the refrigerator Aerosols used near the refrigerator may cause an explosion or fire The water supply to this refrigerator must only be installed connected by a suitably qualified person and connect to a potable water supply only In order to operate the ice maker properly water pressure of 20 125 psi is required WARNING...

Page 5: ...pervised to ensure that they do not play with the appliance Do not let children hang on the door A serious injury may occur Do not let children enter inside of the refrigerator There is a risk of children entrapment Do not insert your hands into the bottom area under the appliance Any sharp edges may cause personal injury Do not let children step on drawer s cover The drawer may break and cause th...

Page 6: ...do not disassemble Lamp Cover and LED Lamp by yourself Please contact your service agents If any dust or water is in refrigerator pull out power plug and contact your Samsung Electronics service center Otherwise there is a risk of fire SEVERE WARNING SIGNS FOR USING CONT D Do not store pharmaceuticals products scientific materials or temperature sensitive products in the refrigerator Products that...

Page 7: ...ent Wrap the food up properly or place it in airtight containers before putting it into the refrigerator Do not store food which goes bad easily at low temperature such as bananas melons Use only the ice maker provided with the refrigerator Your appliance is frost free which means there is no need to manually defrost your appliance as this will be carried out automatically Temperature of frozen fo...

Page 8: ...re Please contact your local authorities in regard to the environmentally safe disposal of this product Ensure that none of the pipes on the back of the refrigerator are damaged prior to disposal WARNING Sum of area of refrigerator storage racks is 115 20 dm Sumof area of freezer storage racks is 64 04 dm Time to get the hottest point 9 C from 18 C in the designated compartment like three stars 8 ...

Page 9: ...ady to install the refrigerator 11 Setting up the refrigerator 16 Leveling the refrigerator 17 Making minor adjustment to the doors 18 Checking the water dispenser line 18 Installing the water line 21 Checking the control panel 22 Using the control panel 24 Using the ice and cold water dispenser 25 Storing food 27 Removing the freezer fridge accessories 28 Cleaning the refrigerator 29 30 Troublesh...

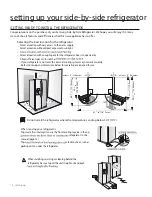
Page 10: ...pen easily Allow su cient space to install the r If your refrigerator is not level the internal cooling system may not work correctly Refer to drawing and dimensions below for overall space required for use Do not install the refrigerator where the temperature can drop below 50 F 10 C When moving your refrigerator To pr re the front leveling legs are in the up refrigerator in the manual page 15 To...

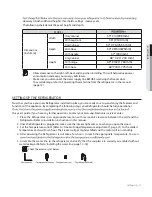
Page 11: ...d be fully operational this user s guide If you have any further questions contact your Samsung Electronics service center 1 Place the Refrigerator in an appropriate location with reasonable clearance between the wall and the Refrigerator Refer to installation instructions in this manual 2 Once the Refrigerator is plugged in make sure the interior light comes on when you open the doors 3 Set the T...

Page 12: ...les out from the right side door The handles are included in the package 2 shorter part 3 Note To best conceal the connection points Assemble the handles with the mounting screws facing each other OK OK setting up your side by side refrigerator OPTIONAL ...

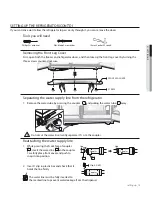
Page 13: ...the coupler 2 and pulling the water tube 1 away Reattaching the water supply line 1 While pressing the fr ont face of coupler 2 insert the water line 1 in the coupler Carefully place front cover and push to snap it into position 2 Insert 1 clip in plastic bac and check that it holds the line firmly The water line must be fully inserted to the marked line to pr event water leakage fr om the dispens...

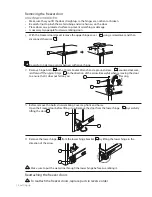
Page 14: ...e arrow Be careful when removing the door to ensure that it does not fall on you Open the Freezer door before lifting it up Remove the door from the lower hinge 6 by carefully lifting the door 7 Remove the lower hinge 8 from the lower hinge bracket 9 by lifting the lower hinge in the direction of the arrow Make sure to put the water line through the lower hinge before assembling it Reattaching the...

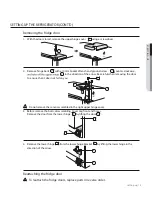
Page 15: ...g the door to ensure that it does not fall on you Do not remove the sensor assembled in the right upper hinge cover 3 Remove the door from the lower hinge 6 by lifting the door 7 4 Remove the lower hinge 8 from the lower hinge bracket 9 by lifting the lower hinge in the direction of the arrow Reattaching the fridge door To reattach the fridge doors replace parts in reverse order CAUTION CAUTION 1 ...

Page 16: ...Open both the freezer and fridge doors and then take off the front leg cover by turning the three screws counter clockwise When the Freezer part is lower than the Fridge part Insert a flat blade screwdriver into a slot on the Freezer Leg then turn it clockwise When the Fridge part is lower than the Freezer part Insert a flat blade screwdriver into a slot on the Fridge Leg then turn it clockwise Re...

Page 17: ...of the bolt 2 When you release the nut 1 make sure that you use the hex wrench provided 3 to loosen the bolt 2 in a counter clockwise direction You should then be able to unscrew the nut 1 2 erence between the doors by turning the bolt 2 clockwise or counter clockwise When you turn clockwise the door will move up 3 After adjusting the doors turn the nut 1 clockwise until it reaches the lower end o...

Page 18: ...rator is properly filled To do this press the water dispenser lever until the water runs from the water outlet Water line installation kits are include with unit You can find it in freezer drawer INSTALLING THE WATER DISPENSER LINE Parts for water line Installation Connecting to the water supply line 1 First shut off the main water supply line 2 Locate the nearest cold drinking water line 3 Follow...

Page 19: ...have to repair or disassemble the water line cut o 6 5mm of the plastic tubing to make sure you get a snug leak free connection Before being used the leakage in these places should be examined Samsung Warranty does not cover WATER LINE INSTALLATION It will be done at customer s charge unless the retail price includes installation cost Please contact Plumber or Authorized Installer for the installa...

Page 20: ...nto the line It should pose no problem to operation Check the amount of water supplied to the ice tray 1 Lift up and pull out the Ice maker bucket in the freezer 2 When you press the Test button for 3 seconds om the water supply tap Put a bowl before you press the test button and check to make sure the amount of water is correct see the illustration If the water level is too low the ice cubes will...

Page 21: ...Water button to get water from the dispenser Press and hold the Water to r Fridge Hold 3 sec for Power Cool Press the Fridge button to set the Fridge temperatur e between cold and coldest Press and hold the Fridge button for 3 seconds to activate Power Cool function which speeds up the cooling pr ocess in the r efrigerator To deactivate the secondary functions such as Power Fr eeze Ice Of f Power ...

Page 22: ...ec for Power Freeze button again for 3 seconds to cancel the Power Freeze function When you use this function the energy consumption of the refrigerator may increase Remember to tur when you do not need it and return the freezer to your original temperature setting Child Lock This icon will light up when you activate the Lock function In this case you will not be able to use the control panel If y...

Page 23: ...TING CAUTION If the refrigerator s water supply line is not connected and water is not being supplied to the refrigerator the refrigerator will make unusual noises if the ice maker is on or if you push the water dispenser lever To stop the noises press the Ice Type button until the Ice Off icon lights up at least 3 seconds indicating that the ice maker is off If the water line is connected and you...

Page 24: ...The dispensed water is cool not icy cold No Ice Select this if you want to turn the Water befor event water from splashing out Using the ice dispenser Press the Ice Type button to select the type of ice you want Place your cup under the ice outlet and push gently against the dispenser pad Make sure the glass is in line with the dispenser to prevent the ice from bouncing out When cubed ice is selec...

Page 25: ...compartments we have created to keep your food fresher longer Remember in order to prevent odor penetration to the ice stored food should be wrapped securely and as airtight as possible Because these following operating instructions cover various models your refrigerator may er from those described in this manual operating_25 CAUTION 1 2 3 4 7 8 6 5 9 02 OPERATING ...

Page 26: ...lass Shelf Designed to be crack resistant They can be used to store food and drinks Circular marks on the glass surface are a normal phenomenon and can usually be wiped clean with a damp cloth Snack Bin Can be used to store deli items separately Dairy Bin Can be used to store smaller dairy items like butter or margarine yogurt or cream cheese bricks Bottles should be stored tightly together so tha...

Page 27: ...ull the shelf out as far as it goes Then lift it up and remove it Wire Shelf Glass Shelf 3 Drawer Pull the drawers out fully then slightly lift it up to remove the drawers Drawer Fruit Vegetable Drawer 4 Snack Bin Remove the drawer by holding the handle pulling the drawer out and then lifting up the back side of the drawer bottom smoothly with the other hand cleaning and maintaining_27 03 CLAENING...

Page 28: ...en wiped dry with a soft cloth To keep your appliance looking its best the exterior should be polished once or twice a year Do not use Benzene Thinner or Clorox for cleaning They may damage the surface of the appliance and can create a risk of fire Cleaning the rubber door seals If the rubber door seals are dirty the doors may not close properly and the refrigerator will not operate efficiently Ke...

Page 29: ...l c r e t n u o c 0 9 r e t l i f r e t a w e h t n r u T 2 3 4 Tur 5 press Water button on the display part for 3 seconds and check if it turns into blue cleaning and maintaining_29 U N LO C K LO CK LOCK U N LO C K LO C K LOCK U N L O C K L O C K LOCK U N L O C K LOCK LOCK 03 CLANING AND MAINTAINING ...

Page 30: ...oor open for a long time Ice is not dispensing Did you wait for 12 hours after installation of the water supply line before making ice Is the water line connected and the shut o valve open Did you manually stop the ice making function Make sure Ice T ype is set to Cubed or Crushed Is ther e any ice blocked within the ice maker bucket Is the freezer temperature too warm Try setting the freezer temp...

Page 31: ...wiring diagram wiring diagram_31 05 WIRING DIAGRAM ...

Page 32: ...hey purchased this product or their local government of for details of where and how they can take this item for environmentally safe recycling Business users should contact their supplier and check the terms and conditions of the purchase contract This product should not be mixed with other commercial wastes for disposal COUNTRY Custom Care Center WEBSITE ARGENTINE 0800 333 3733 www samsung com a...

Page 33: ...or manual de usuario imagine las posibilidades Gracias por adquirir un producto Samsung Para recibir un servicio más completo registre su producto en www samsung com register ESPAÑOL Artefacto automático RS26DDA7 ...

Page 34: ...or que proporciona espacio para pizzas etc s Alarma de puerta Una alarma sonara cuando la puerta quede abierta s Vegetable Crisper Optimizado control de temperatura que mantiene vegetales y frutas frescas s Máquina de hielos compacta s Sistema de filtración de agua s Pantalla y control de temperatura digital 2_ Características Para facilitar futuras consultas escriba el modelo y número de serie a ...

Page 35: ...que ayuda e información online en www samsung com ADVERTENCIA Prácticas peligrosas o inseguras que pueden ocasionar lesiones físicas graves o peligro de muerte PRECAUCIÓN Prácticas peligrosas o inseguras que pueden ocasionar lesiones físicas leves o daños materiales NO intentar NO desmontar NO tocar Cumplir expresamente las instrucciones Desconectar el cable de alimentación de electricidad de la p...

Page 36: ...r corto circuito o incendio s O INSTALE ESTE ARTEFACTO EN UN LUGAR H MEDO ACEITOSO DONDE HAYA POLVO EXPUESTO dirECTAMENTE AL RAYO DEL SOL O AL AGUA GOTAS DE LLUVIA s O COLOQUE EL rEFRIGERADOR EN UN LUGAR EXPUESTO DIrECTAMENTE LA LUZ SOLAR O AL CALOR DE LAS ESTUFAS O A LAS resistencas de otrOS ELECTrODOMØSTICOS s O CONECTE EL ELECTrODOMØSTICO A UN TOMA CORRIENTE M LTIPLE EL refrigerador debe CONECT...

Page 37: ...ANOS EN LA PARTE INFERIOR DEL refrigerador Algún bordo afilado puede causarle lesiones personales s O DEJE QUE LOS NI OS PISEN LA CUBIERTA DEL CAJ N El cajón se puede romper y hacer que se resbale s O LLENE DEMASIADO EL rEFRIGERADOR DE ALIMENTOS Al abrir la puerta un elemento puede caerse y causar lesiones personales o daños materiales s TENGA EN CUENTA EL TIEMPO DE ALMACENAMIENTO Y LAS FECHAS DE ...

Page 38: ...EL INTERIOR DEL REFRIGERADOR A MENOS QUE SEA DE UN TIPO RECOMENDADO POR EL FABRICANTE s O UTILICE DISPOSITIVOS MECÈNICOS U OTROS MEDIOS PARA ACELERAR EL PROCESO DE DESCONGELACI N DISTINTOS DE LOS RECOMENDADOS POR EL FABRICANTE s O DA E EL CIRCUITO REFRIGERANTE s O DESARME O REPARE EL REFRIGERADOR USTED MISMO Corre el riesgo de causar un incendio mal funcionamiento y o algún daño personal ADVERTENC...

Page 39: ... manera apropiada o colóquelos en recipientes herméticos antes de colocarlos en el refrigerador No almacene alimentos que se echan a perder con facilidad a bajas temperaturas como bananas melones etc Utilice solamente la máquina para hacer hielo provista con el refrigerador Este artefacto es no frost lo que significa que no hay necesidad de descongelarlo manualmente ya que lo hará de manera automá...

Page 40: ...HAR EL PRODUCTO r r r Saque las puertas Deje los estantes en lugar de forma que los niños no puedan entrar fácilmente r r r r r r r r r r r r r r r r ADVERTENCIA NOTAS APLICABLES SOLO PARA ECUADOR Tiempo para alcanzar el punto más caliente 9 C desde 18 C en el compartimiento designado como tres estrellas 8 2 h 2 Sumatoria del área de las parrillas de almacenamiento refrigerador es de 115 20 dm2 Su...

Page 41: ...dor 16 Nivelando el refrigerador 17 Ajustes en las puertas 18 Revisión de la toma del despachador de agua 18 Instalación de la toma de agua 21 Revisión del panel de control 22 Uso del panel de control 24 Uso del despachador de hielos y agua fría 25 Almacenaje de alimentos 27 Desmontaje de los accesorios de refrigerador y Congelador 28 Limpieza del refrigerador 29 o de agua 30 Solución de problemas...

Page 42: ...amente Guiarse con dibujo y dimensiones abajo descritas para calcular el espacio total a usarse No instale el refrigerador en lugares donde la temperatura sea menor a 50 F 10 C Cuando mueva el refrigerador Para evitar daños al piso asegúrese de que las patas de nivelación localizadas en la parte delantera se encuentren arriba del piso Referirse a Nivelación derefrigerador en el manual Pág 17 Para ...

Page 43: ...ntes su refrigerador debe ser completamente operacional Si no el primer punto a revisar es la toma de electricidad o revise la sección de contacto con su centro de servicio de Samsung Electronics 1 Coloque el refrigerador en un lugar apropiado con la separación razonable entre la pared y el refrigerador Revisar las instrucciones de instalación en este manual 2 Una vez que conecte el refrigerador c...

Page 44: ...lación de las manijas 1 Tome la manija fuera de la puerta lateral derecha Las manijas estan incluidas en el interior del refrigerador OK OK instalación de su refrigerador side by side con la parte más corta frente OPCIONAL ...

Page 45: ...lador 2 separando la manguera 1 del agua No corte la línea de agua Sepárelo suavemente del acoplador Volviendo a fijar la línea de suministro de agua 1 Mientras presiona la cara interior del acoplad or 2 inserte la línea de agua 1 en el acoplador Ponga cuidadosamente la cubierta y empuje para encajarla a presión hacia la posición 2 Inserte 1 abrazadera en una bolsa deplástico y compruebe que sujet...

Page 46: ...orario y sacar la bisagra superior 5 de que no caiga sobre ti Retire la puerta de la bisagra inferior 6 con cuidado levante la puerta 7 Retire la bisagra inferior 8 del soporte inferior de la bisagra 9 levante la bisagra inferior en Asegúrese de colocar la tubería del agua a través de la bisagra inferior antes de ensamblar Para colocar la puerta del congelador reemplazar las piezas en orden invers...

Page 47: ...a para asegurarse de que no caiga sobre ti No quite el sensor ensamblado en la cobertura de la bisagra superior derecha 3 Retire la puerta de la bisagra Inferior 6 con cuidado levante la puerta 7 4 Retire la bisagra inferior 8 del soporte inferior de la bisagra 9 levante la bisagra inferior en dirección de la fecha Para colocar la puerta del refrigerador reemplazar las piezas en orden inverso PREC...

Page 48: ...ón retirar la cubierta frontal desatornillar los tres tornillos en sentido anti horario Cuando la puerta del congelador es más baja que la del refrigerador Inserte un desarmador de punta plana en una ranura de la base niveladora del Congelador y gire en sentido anti horario Cuando la puerta del refrigerador es más baja que la del congelador Inserte un desarmador de punta plana en una ranura de la ...

Page 49: ...e la tuerca 1 asegúrese de usar una llave hexagonal 3 para aflojar el perno 2 en sentido anti horario A continuación deberá de ser capaz de quitar la tuerca 1 con los dedos 2 Ajuste la diferencia de la altura entre las puertas girando el perno 2 en sentido horario o sentido anti horario Cuando usted gire en sentido horario la puerta se moverá hacia arriba 3 Después de ajustar las puertas gire la t...

Page 50: ...alanca del dispensador de agua hasta que el líquido salga a través de la salida Los conjuntos de instalación de la línea de agua están incluidos con la unidad Puede encontrarlos en la gaveta de la nevera INSTALACIÓN DE LA LÍNEA DE AGUA DEL DISPENSADOR Piezas de instalación de la línea de agua Conexión de la línea de suministro de agua 1 Primero corte la línea de suministro de agua principal 2 Loca...

Page 51: ...co para asegurarse una conexión cómoda y sin fugas Antes de ser usada deberá chequearse que no haya fugas en estos lugares La garantía de Samsung no cubre la INSTALACIÓN DE LA LÍNEA DE AGUA Se realizará con cargo al consumidor a menos que el precio incluya los costes de instalación Póngase en contacto con un fontanero o instalador autorizado para realizar la instalación si fuera necesario Si se pr...

Page 52: ...podría gotear Esto significa que aún queda aire la toma Revisé la cantidad de agua suministrada a la bandeja de hielos 1 Levante y extraiga la cubierta de la Máquina de hielo en el congelador 2 Al pulsar el botón de prueba durante 3 segundos el contenedor de cubitos de hielo se llena con agua del suministro de agua del grifo Ponga un recipiente antes de pulsar el botón de prueba y de verificatión ...

Page 53: ...tenga oprimido el botón Water por 3 segundos despues de cambiar el o de agua para r o Fridge Hold 3 sec for power Cool Oprima el botón Fridge para ajustar la temperatura en refrigerador entre fría y más fría Mantenga oprimido el botón Fridge por 3 segundos para activar la función de Power Cool esta función aumenta la velocidad de enfriamiento en el refrigerador Para desactivar las funciones secund...

Page 54: ...astantes mantenga presionado el botón de Freezer Hold 3 sec for Power Freezer otra vez por 3 segundos para cancelar esta función Cuando usted use esta función el consumo de energía del refrigerador puede incrementarse Recuerde apagar esta función cuando no la necesite y regrese el congelador a su temperatura establecida Child Lock Este icono prenderá cuando active la función de Lock En este caso u...

Page 55: ...hielo de tipo indica el tipo de hielo que se encuentra actualmente elegido En este caso el hielo no se producirá 02 OPERACION Si la línea de agua que suministra al refrigerador no está conectada y el agua no ha empezado a suministrarse al refrigerador éste hará ruidos inusuales si la fábrica de hielos está prendida o si presiona el despachador de agua Para detener los ruidos presione el boton Ice ...

Page 56: ...ua más fría con hielo despacha primero el hielo en tu vaso después llenalo con agua para prevenir salpicar Usando el despachado de hielo Presiona el botón Ice Type para seleccionar el tipo de hielo que quieras Coloca tu vaso bajo la salida de hielo y presiona nuevamente despacio el PAD del dispenser Asegúrate de que el vaso esté alineado con el despachador para prevenir que el hielo rebote Cuando ...

Page 57: ...nalizados que hemos creado para mantener fresca tu comida más tiempo Recuerda con el fin de prevenir la penetración de olor en el hielo la comida almacenada debe ser envuelta de forma segura y tan hermética como sea posible Porque las siguientes instrucciones de operación abarcan varios modelos tu refrigerador puede diferir de los descritos en este manual PRECAUCIÓN 1 2 3 4 7 8 6 5 9 02 OPERACION ...

Page 58: ...as grandes y contenedores Parrillas de Vidrio Diseñadas para ser resistente a las grietas Pueden ser usadas para almacenar comida y bebidas Las marcas circulares sobre la superficie del vidrio son un fenómeno normal y pueden ser limpiadas con un trapo húmedo Compartimientos de Botanas Pueden ser usados para almacenar artículos delicados por separado Compartimientos de lácteos Pueden ser usados par...

Page 59: ...spués levante y quite Parrilla Metálica Parrilla de Vidrio 3 Cajón Jale los cajones completamente después ligeramente levante y quite los cajones cajón cajón de frutas y verduras 4 Compartimiento de Botanas Quite el cajón sosteniéndolo del mango jale el cajón hacia fuera y después levante suavemente con la otra mano el lado de abajo del fondo del cajón limpieza y mantenimiento de su refrigerador s...

Page 60: ...ave y después secadas con un trapo suave Para mantener la mejor apariencia de tu aparato el exterior debe ser pulido una o dos vece por año No use Benceno Thinner o Clorox para el limpiado Pueden dañar la superficie de su aparato y crear un riesgo de incendio Limpiando el sello de las Puertas Si el sello de goma de la puerta esta sucio las puertas no pueden cerrar apropiadamente y el refrigerador ...

Page 61: ... m s a l a o i r a r t n o c o d i t n e s n e 0 9 a u g a e d o r t l i f l e a r i G 2 ro de agua de la car ro 3 ro de agua dentro de la car ro 4 ro de agua 90 en sentido de las manecillas del reloj 5 ro de agua presiona el botón Water sobre la parte del display U N LO C K LO CK LOCK U N LO C K LO C K LOCK U N L O C K L O C K LOCK U N L O C K LOCK LOCK 03 LIMPIEZA Y MANTENIMIENTO ...

Page 62: ...ntes de hacer hielo Está la línea de agua conectada y abierto la llave de la válvula Detuviste manualmente la función de hacer hielo Asegúrate que Ice Type está colocado en Cubed or Crusher Hay algo de hielo bloqueando dentro del cubo de la máquina de hielos La temperatura del congelador es muy cálida Intenta escoger una temperatura más baja del congelador Escuchas burbujeo deagua en el refrigerad...

Page 63: ...diagrama de circuito diagrama de circuito_31 05 DIAGRAMA DE CIRCUITO ...

Page 64: ...lado con otros desechos comerciales para su eliminación Code No DA68 02557F 02 Comuníquese con SAMSUNG WORLD WIDE Si desea formular alguna pregunta o comentario en relación con los productos de Samsung comuníquese con el centro de atención al cliente de SAMSUNG PAÍS CENTRO DE ATENCIÓN A CLIENTES SITIO WEB ARGENTINA 0800 333 3733 www samsung com ar BRASIL 0800 124 421 4004 0000 www samsung com br C...

Reviews: