background image

9

6SHFL¿FDWLRQV

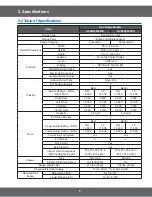
7DEOHRI6SHFL¿FDWLRQV

Items

Gas Range Models

NX58H5650WS

NX58H5600SS

Range Type

Freestanding Gas

Range Color

Black and Stainless Steel

Range Category

Convection

Conventional

Overall Dimensions

Width

30 in. (76.2 cm)

Height

45.8 in. (116.2cm)

Depth

23.7 in. (60.2cm)

Controls

Cooktop

Front-Top Control Knobs

Oven

SoftTouch

Display

SKY BLUE Digital LED

Digital Electronic Clock

Yes

Electronic Door Lock

Yes

Audible Preheat Signal

Yes

Cooktop

Surface Burner Type

Open-Port

# of Surface Burners

5

Best

Better

Burner Ratings – BTUs

Right Front

NG

18,000

LP

14,500

NG

17,000

LP

12,500

Right Rear

5,000

4,000

5,000

4,000

Left Front

15,000

11,500

15,000

10,000

Left Rear

9,500

7,500

9,500

7,500

Center Oval

9,500

7,500

9,500

7,500

Oven

Capacity

5.8 cu.ft

5.8 cu.ft

# of Oven Burners

2

Upper Burner Rating – BTUs

Best

Better

NG

13,500

LP

11,500

NG

13,500

LP

11,500

Lower Burner Rating – BTUs

18,000

15,000

18,000

15,000

Convection Fan System

Yes

Yes

# of Racks

3

2

Oven Light

Yes

Self-Cleaning

Yes

Interior Oven Dimensions 

:LGWK[+HLJKW['HSWK

[[LQ

[[

[[LQ

[[

Drawer

Type

Warming

Storage

Electric Warming Element

Yes (600 Watt)

No

Range Weight, Net

213 lbs. (97kg)

192 lbs. (87kg)

Required Electrical Supply

120-V, 60-Hz, 15- or 20-amp AC

Required Gas 

Supply

Natural Gas (NG)

5–13 in. WC

Liquid Propane (LP)

10–13 in. WC

Summary of Contents for NX58H5600SS

Page 1: ...GAS RANGES 1 Precautions 6SHFL FDWLRQV 3 Disassembly and Reassembly 4 Troubleshooting 5 PCB Diagrams 6 Wiring Diagrams GAS RANGES CONTENTS MODELS AND MODEL CODES NX58H5650WS NX58H5600SS VERSION VER 00 VER 01 VER 02 ...

Page 2: ... 12 Replacing the Handle Door 24 3 13 Replacing the Glass Inner 25 3 14 Replacing the Warming drawer NX58H5650WS 26 3 15 Replacing the Storage drawer NX58H5600SS 28 3 16 Replacing the Burner Broil 29 3 17 Replacing the HOT SURFACE IGNITOR HSI of the BURNER BROIL NOZZLE Broil Burner and HOLDER Broil BURNER 30 3 18 Replacing the Burner Bake 31 3 19 Replacing the HOT SURFACE IGNITOR HSI of the BURNER...

Page 3: ...3 RQWHQWV 6 Wiring Diagram 70 6 1 Wiring Diagram 70 ...

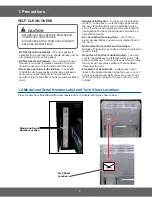
Page 4: ...es to the appliance should be turned off and or disconnected when the range is being serviced or repaired WARNING 7R DYRLG ULVN RI GHDWK RU VHYHUH SHUVRQDO LQMXU IURP HOHFWULFDO VKRFN GLVFRQQHFW SRZHU EHIRUH ZRUNLQJ on servicing the appliance 7R DYRLG ULVN RI GHDWK VHYHUH SHUVRQDO LQMXU RU SURSHUW GDPDJH IURP UH RU H SORVLRQ WXUQ RII WKH JDV supply before working on servicing the appliance IF YOU ...

Page 5: ...ING ELEMENT Burners heating element and surfaces may be hot even though they are dark in color Interior surfaces of an oven become hot enough to cause burns During and after use do not touch or let FORWKLQJ RU RWKHU ÀDPPDEOH PDWHULDOV FRQWDFW burners heating element grates or interior VXUIDFHV RI RYHQ XQWLO WKH KDYH KDG VXI FLHQW time to cool Other surfaces of the appliance may become hot enough t...

Page 6: ...ers of different sizes 6HOHFW XWHQVLOV KDYLQJ ÀDW ERWWRPV ODUJH HQRXJK WR FRYHU WKH VXUIDFH EXUQHU ÀDPHV 7KH XVH RI XQGHUVL HG XWHQVLOV ZLOO H SRVH D SRUWLRQ RI WKH VXUIDFH EXUQHU ÀDPHV WR GLUHFW FRQWDFW DQG PD result in ignition of clothing Proper relationship of XWHQVLO WR EXUQHU ZLOO DOVR LPSURYH HI FLHQF Never Leave Surface Burners Unattended at High Heat Settings RLORYHUV FRXOG LJQLWH RU H WL...

Page 7: ...f or disconnect appliance from electrical and gas supplies and have the appliance serviced by a licensed technician Use Care When Opening Door Let hot air or steam escape before you remove or replace food in the oven Do Not Heat Unopened Food Containers Buildup of pressure may cause container to burst and UHVXOW LQ LQMXU Keep Oven Vent Ducts Unobstructed The oven vent is located above the left rea...

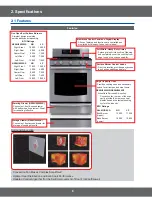
Page 8: ...in the industry BTU Ratings ALL MODELS NG LP Broil Burner Upper 13 500 11 500 Bake Burner Lower 18 000 15 000 Warming Drawer NX58H5650WS Convenient front Access drawer with bottom heating element Great for reheating leftovers Storage Drawer NX58H5600SS Convenient front access drawer for storage of cooking utensils Five Open Port Surface Burners Simplest design promotes serviceability and cleanabil...

Page 9: ... Front NG 18 000 LP 14 500 NG 17 000 LP 12 500 Right Rear 5 000 4 000 5 000 4 000 Left Front 15 000 11 500 15 000 10 000 Left Rear 9 500 7 500 9 500 7 500 Center Oval 9 500 7 500 9 500 7 500 Oven Capacity 5 8 cu ft 5 8 cu ft of Oven Burners 2 Upper Burner Rating BTUs Best Better NG 13 500 LP 11 500 NG 13 500 LP 11 500 Lower Burner Rating BTUs 18 000 15 000 18 000 15 000 Convection Fan System Yes Y...

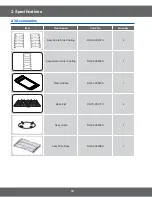
Page 10: ...essories Item Description Code No Quantity Assy Grate Side Coating DG94 00937A 2 Assy Grate Center Coating DG94 00938A 1 Plate Griddle DG61 00563A 1 Rack Flat DG75 01001C 2 Assy Grate DG94 00939A 1 Assy Wire Rack DG94 00908A 1 ...

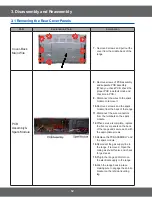
Page 11: ... LDWLRQ CAUTION When you work on the gas range be careful when handling sheet metal parts Sharp edges may be present and you can cut yourself if you are not careful Parts SODQDWLRQ 3KRWR SODQDWLRQ Cover Wire LT RT Cover Wire LT Cover Wire RT 1 Turn off the electrical supply going to the range 2 Shut off the gas shut off valve in the gas supply line to the range 3 Pull the range away from the wall ...

Page 12: ... it 10 Remove 2 screws and the spark module from the back of the range 11 Disconnect the wire connectors from the terminals on the spark module 12 When service is complete replace the YH cover panels on the back of the range and secure each with the appropriate screws 13 Replace the PCB ASSEMBLY and the spark module 14 Reconnect the gas supply line to the range if removed Open the main gas shut of...

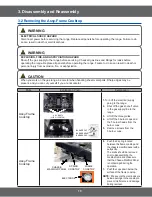
Page 13: ... not careful Parts SODQDWLRQ 3KRWR SODQDWLRQ Assy Frame Cooktop ASSYGRATE 2SIDE 1 CENTER BURNER CAP BURNER HEAD BURNER CUP 1 Turn off the electrical supply going to the range 2 Shut off the gas shut off valve in the gas supply line to the range 3 Lift off the three grates 4 Lift off the 5 burner caps and the 5 burner heads from the burner cups 5 Remove screws from the 5 burner cups Assy Frame Cook...

Page 14: ...heet metal parts Sharp edges may be present and you can cut yourself if you are not careful Parts SODQDWLRQ 3KRWR SODQDWLRQ Knob Pull the control knob straight off 1 Turn off the electrical supply going to the range 2 Shut off the gas shut off valve in the gas supply line to the range 3 Open the door or Remove it 4 Pull burner control knobs straight off to remove them from the valve shafts Chassis...

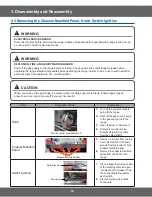
Page 15: ...ges may be present and you can cut yourself if you are not careful Parts SODQDWLRQ 3KRWR SODQDWLRQ Switch Ignition SWITCH IGNITION 1 Turn off the electrical supply going to the range 2 Shut off the gas shut off valve in the gas supply line to the range 3 Remove the ASSY FRAME COOKTOP knob and the chassis manifold panel 4 Place D QJHU EHKLQG HDFK VLGH RI WKH switch ignition and pull it straight out...

Page 16: ... gas range be careful when handling sheet metal parts Sharp edges may be present and you can cut yourself if you are not careful Parts SODQDWLRQ 3KRWR SODQDWLRQ Locking Clip Electrode Locking Clip Electrode Burner Cup Tube Injector 1 Turn off the electrical supply going to the range 2 Shut off the gas shut off valve in the gas supply line to the range 3 Remove the frame cooktop 4 Using a tubing wr...

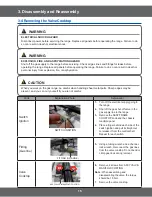
Page 17: ...nal on the spark module 7 To UHPRYH WKH JDV RUL FH SODFH the burner cup in a vise and UHPRYH WKH RUL FH ZLWK D LQFK socket wrench 8 When service is complete Install WKH JDV RUL FH LQ WKH QHZ EXUQHU cup NOTE The new burner cup must be the same size as the one removed 9 Reconnect the electrode to the new burner cup and replace the burner cup in the reverse order ...

Page 18: ...areful Parts SODQDWLRQ 3KRWR SODQDWLRQ Assy Tube Manifold ASSY BRACKET B URNER BOX 1 Turn off the electrical supply going to the range 2 Shut off the gas shut off valve in the gas supply line to the range 3 Remove the oven door and the cooktop 4 Remove the control knob and the chassis manifold panel 5 Remove the ASSY tube manifold using a tubing wrench Assy Door Latch ASSY Door Latch Bracket Latch...

Page 19: ...e gas range be careful when handling sheet metal parts Sharp edges may be present and you can cut yourself if you are not careful Parts SODQDWLRQ 3KRWR SODQDWLRQ Switch Door Plunger SWITHCH DOORPLUNGER 1 Turn off the electrical supply going to the range 2 Shut off the gas shut off valve in the gas supply line to the range 3 Open the oven door 4 Carefully pull out the switch door plunger switch fro...

Page 20: ...QMXU IURP H SORVLRQ UH RU DVSK LDWLRQ CAUTION When you work on the gas range be careful when handling sheet metal parts Sharp edges may be present and you can cut yourself if you are not careful Parts SODQDWLRQ 3KRWR SODQDWLRQ Assy Lamp Bulb 1 Turn off the electrical supply going to the range 2 Shut off the gas shut off valve in the gas supply line to the range 3 Remove the rear cover panel 4 Open...

Page 21: ... Sharp edges may be present and you can cut yourself if you are not careful Parts SODQDWLRQ 3KRWR SODQDWLRQ Upper Oven Burner Shield and Upper Oven Burner SENSOR THERMISTER CONNECTOR 1 Turn off the electrical supply going to the range 2 Shut off the gas shut off valve in the gas supply line to the range 3 Open the oven door and remove the racks from inside the oven 4 Disconnect the sensor thermist...

Page 22: ...s range be careful when handling sheet metal parts Sharp edges may be present and you can cut yourself if you are not careful Parts SODQDWLRQ 3KRWR SODQDWLRQ Gasket Door 1 Open the oven door to its fully down position 2 Pull the ends of the gasket out of the liner holes 3 Pull the oven door gasket clips out of the holes until all of the clips are removed 4 When the service is complete Insert gaske...

Page 23: ...H RU DVSK LDWLRQ CAUTION When you work on the gas range be careful when handling sheet metal parts Sharp edges may be present and you can cut yourself if you are not careful Parts SODQDWLRQ 3KRWR SODQDWLRQ Door Removal 1 Fully open the door 2 Pull the hinge locks downward 3 Firmly grasp both side of the door at the top 4 Close door to the door removal SRVLWLRQ ZKLFK LV DSSUR LPDWHO degrees Lift do...

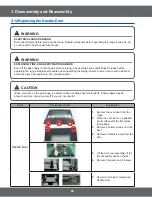
Page 24: ...ng the range Failure to do so can result in death or SHUVRQDO LQMXU IURP H SORVLRQ UH RU DVSK LDWLRQ CAUTION When you work on the gas range be careful when handling sheet metal parts Sharp edges may be present and you can cut yourself if you are not careful Parts SODQDWLRQ 3KRWR SODQDWLRQ Handle Door 1 Remove the oven door from the range 2 Place the oven door on a padded work surface with the fron...

Page 25: ...e Replace all panels before operating the range Failure to do so can result in death or SHUVRQDO LQMXU IURP H SORVLRQ UH RU DVSK LDWLRQ CAUTION When you work on the gas range be careful when handling sheet metal parts Sharp edges may be present and you can cut yourself if you are not careful Parts SODQDWLRQ 3KRWR SODQDWLRQ Glass Inner 1 Remove 6screws from rear side of door to remove 2 Hinge Door ...

Page 26: ...he gas shut off valve in the gas supply line to the range 3 Open the warming drawer to the fully opened position 4 Locate glide lever on each side of drawer Push down on the left glide lever and pull up on the right glide lever while pulling the drawer the rest of the way out 5 Place the ends of the drawer side rails into the ends of the drawer glide rails Push in the drawer to close the drawer an...

Page 27: ...ne to the range 3 Open the warming drawer to the fully opened position 4 Locate glide lever on each side of drawer Push down on the left glide lever and pull up on the right glide lever while pulling the drawer the rest of the way out 5 Place the ends of the drawer side rails into the ends of the drawer glide rails Push in the drawer to close the drawer and snap the glide lever into place Note Whe...

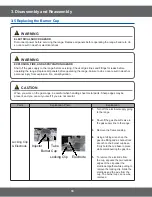
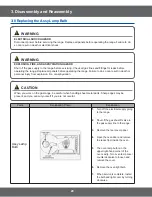
Page 28: ...remove the contents 2 While supporting the drawer pull it out until the 2 bottom JXLGH EORFNV DUH H SRVHG LIW RXW WKH GUDZHU IURP WKH top glide blocks 3 To replace position top edge of drawer on the 2 top glide blocks To replace a glide or guide block remove mounting screw s and block 4 Slide the drawer in until the lower drawer blocks engage with the drawer slide rails on each side of the drawer ...

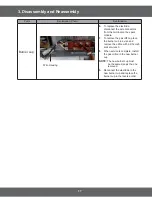
Page 29: ...in the gas supply line to the range 3 Open the oven door and remove the racks from inside the oven 4 Remove Cover back main wire to the rear of the oven 5 Disconnect the wires or the connector of the HSI Identify and mark the two wires going to HSI BRACKET HSI WIRE 6 Remove 1 screw of bracket HSI wire 7 Remove 4 screws of bracket broil spreader to top of oven 8 Support the burner broil with one ha...

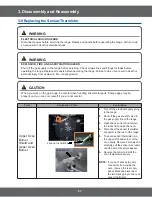
Page 30: ...SK LDWLRQ CAUTION When you work on the gas range be careful when handling sheet metal parts Sharp edges may be present and you can cut yourself if you are not careful Parts SODQDWLRQ 3KRWR SODQDWLRQ Hot Surface Ignitor HSI 1 To replace the HSI of the burner broil Remove 2 screws assembled to HSI Nozzle Broil Burner Remove the gas nozzle 1 To replace the nozzle broil burner Remove the gas nozzle wi...

Page 31: ... present and you can cut yourself if you are not careful Parts SODQDWLRQ 3KRWR SODQDWLRQ Burner Bake CONNECTOR 1 Turn off the electrical supply going to the range 2 Shut off the gas shut off valve in the gas supply line to the range 3 Open the oven door and remove the racks from inside the oven 4 Pull on the wires or the connector until the wire connector appears from the back wall of the warming ...

Page 32: ...UH RU DVSK LDWLRQ CAUTION When you work on the gas range be careful when handling sheet metal parts Sharp edges may be present and you can cut yourself if you are not careful Parts SODQDWLRQ 3KRWR SODQDWLRQ Hot Surface Ignitor HSI HSI 1 To replace the burner bake HSI Remove 2 screws assembled to HSI Nozzle Bake Burner NOZZLE HOLDER 1 To replace the nozzle bake burner Remove WKH JDV RUL FH ZLWK D 9...

Page 33: ...e cover convection 4 Note mark and disconnect wires or connector going to the motor convection 5 Open the oven door and remove the racks from inside the oven 6 Remove 2 screws and the interior cover casing from the back wall of the oven cavity FAN FAN NUT 7 Remove the fan nut fan blade from the motor convection shaft The convection nut has clockwise threads to remove the nut Unbendthe bracket 8 Un...

Page 34: ...over convection 4 Note mark and disconnect wires or connector going to the motor convection 5 Open the oven door and remove the racks from inside the oven 6 Remove 2 screws and the interior cover casing from the back wall of the oven cavity FAN FAN NUT 7 Remove the fan nut fan blade from the motor convection shaft The convection nut has clockwise threads to remove the nut Unbendthe bracket 8 Unben...

Page 35: ... you work on the gas range be careful when handling sheet metal parts Sharp edges may be present and you can cut yourself if you are not careful Parts SODQDWLRQ 3KRWR SODQDWLRQ Heater Convection CONNECTOR of THE HEATER CONVECTION 1 Turn off the electrical supply going to the range 2 Shut off the gas shut off valve in the gas supply line to the range 3 Remove the cover back main wire and cover conv...

Page 36: ...h or SHUVRQDO LQMXU IURP H SORVLRQ UH RU DVSK LDWLRQ CAUTION When you work on the gas range be careful when handling sheet metal parts Sharp edges may be present and you can cut yourself if you are not careful Parts SODQDWLRQ 3KRWR SODQDWLRQ Gas Control Valve Connectorof the heater warming drawer 1 Turn off the electrical supply going to the range 2 Shut off the gas shut off valve in the gas suppl...

Page 37: ... can cut yourself if you are not careful Parts SODQDWLRQ 3KRWR SODQDWLRQ Assy Valve Safety SUPPORTREGULATOR Rear 1 Turn off the electrical supply going to the range 2 Shut off the gas shut off valve in the gas supply line to the range 3 Remove the regulator support bracket from the rear of the range 4 Carefully identify and mark the wires going to the ASSY VALVE SAFETY Disconnect the 4 wires ASSY ...

Page 38: ... back wall of the warming drawer with 4 screws 9 Reconnect gas lines to the ASSY VALVE SAFETY NOTE Check DOO JDV OLQHV DQG WWLQJV for leaks before operation WARNING Cross wiring the wires to the gas FRQWURO YDOYH FUHDWHV DQ H SORVLRQ hazard that can result in death SHUVRQDO LQMXU DQG RU SURSHUW and product damage 10 Reconnect wire connectors in their original positions ...

Page 39: ...s But if the power is interrupted and the oven turns off the stored error codes are deleted 6 Press the Clear Off pad to return to normal display mode Oven sensor error FAILURE CODE CAUSE SOLUTION E 27 Oven temperature sensor open RYHU ȍ 1 Disconnect electrical power to the range Remove the upper rear cover panel 0HDVXUH WKH VHQVRU UHVLVWDQFH ȍ DW WKH URRP WHPSHUDWXUH ĺ I WKHUH DUH DQ problems rep...

Page 40: ...burners to make sure they are lighting and burning properly 3 Check whether the DLB Broil Bake and Warming Drawer relay is working normally 4 Make sure all harness connections are properly connected and securely fastened to the PCB 5 Check the resistance of oven temperature sensor connector on the PCB Normal ȍ SE Shorted key Key pad is pressed for 10 minutes 1 Check the touch control wire harness ...

Page 41: ...nge Remove the upper rear cover panel Make sure the wiring harness is properly connected to the motorized door lock assembly 2 Check motorized door lock assembly for proper operating resistances 3 With operating door lockout measure the voltage of connector on harness which is linked with door lock motor Normal Voltage AC 120V 4 Check the door locking switch to make sure it is working properly ...

Page 42: ...ar cover panel Measure WKH VHQVRU UHVLVWDQFH DW room 7HPSHUDWXUH ĺ I WKHUH DUH DQ SUREOHPV UHSODFH the oven temperature sensor 2 If there is no problem with oven temperature sensor Please check whether there is a damaged terminal or wire on harness 3 Disconnect the oven sensor connector from the PCB Check resistance of oven sensor connector on 3 1RUPDO E 28 Oven Sensor Shorted 8QGHU ...

Page 43: ... connectors to the oven temperature sensor UHVLVWDQFH DW URRP WHPSHUDWXUH ĺ If there are any problems replace oven temperature sensor 2 Check the broil and bake burners to make sure they are lighting and burning properly 3 Check whether DLB Broil Bake and Warming Drawer relay is working normally 4 Make sure all harness connections are properly connected and securely fastened to the PCB 5 Check the...

Page 44: ...42 4 Troubleshooting 4 1 Failure Display Codes Safety error ...

Page 45: ...nector on main PCB and membrane harness replace the PCB SE Disconnect power Take out Membrane Keypad from the PCB Check whether between connector CN301 pin and pin on main PCB have a short circuit Make sure whether between Membrane keypad And Membrane Bracket have a short circuit Ok Ok No No Replace Membrane Board Repair the area of circuit having short Between connector CN301 pins on PCB Repair t...

Page 46: ...ge AC 120V 3 Check the door locking switch to make sure it is working properly Replace PCB Solder again if pattern is damaged or parts is Wrong Contacted E 0E Replace faulty door lock switch or Lock motor No No Disconnect power Get rid of harness connected with Lock motor Check the door lock switches com NO Measure resistance of Lock motor RLO a ȍ DW WKH URRP WHPSHUDWXUH Check whether voltage AC 1...

Page 47: ...45 4 Troubleshooting PCB Membrane Bracket Assembly Front Front Back Back Front Front Back Back 4 1 Failure Display Codes Control PCB Operation PCB Circuit Boards ...

Page 48: ...8H5650WS only and Convection heater NX58H5650WS only and clock and timer operation by touching the membrane panel in the top backguard 2 The marking on the front of membrane acts as a guide for where the panel should be touched to select and program that function If membrane touch control stops working replace the membrane and membrane bracket 3 Membrane tail connects the Membrane Keypad to PCB ...

Page 49: ...ons at the PCB connector CN04 have not come loose or disconnected Replace the oven temperature sensor Repair or replace the harness I SUREOHP VWLOO H LVWV DIWHU FRQ UPLQJ WKH oven temperature sensor and harness are working and connected properly replace the PCB Oven temperature rises too slowly E 08 will show on the display if WKH RYHQ IDLOV WR UHDFK Û Û within 10 minutes at room temperature Measu...

Page 50: ...aning feature will not operate when the warming drawer is on This is normal The self cleaning feature will not operate when the warming drawer is on Membrane control keypads are not working properly Make sure the door lock feature is not turned on Unlock the controls by pressing and holding the lock key for 3 or more seconds Check to see if the sabbath function has been turned on Press and hold th...

Page 51: ... the connector CN02 on the PCB Replace the malfunctioning relay Replace the PCB Measure the resistance across the fan motor terminals Replace the burned out fan motor The oven smells and or smokes when it is initially started This is normal The insulation around the oven will give off a slight odor until the adhesive has cured 7KLV VKRXOG JR DZD DIWHU WKH UVW FRXSOH RI oven uses The oven is design...

Page 52: ...the electrode and check whether electrode wire or tip is broken Replace the faulty electrode Check for a dirty surface burner RUL FH Clean and or replace the surface burner RUL FH NOTE 5HSODFHPHQW RUL FH VKRXOG always be the same size as removed Check for crimped or broken gas lines Replace damaged gas lines Faulty surface burner control Each surface burner control is an integral part of the surfa...

Page 53: ...50WS NG LP LT FR RED 1 78 1 04 LT RR GRN 1 40 0 83 CTR BLU 1 38 0 83 RT RR YEL 1 01 0 62 RT FR ORG 1 92 1 12 NX58H5600SS NG LP LT FR RED 1 78 0 98 LT RR GRN 1 40 0 83 CTR BLU 1 38 0 83 RT RR YEL 1 01 0 62 RT FR NONE 1 92 1 06 NOTE LJK DOWLWXGH RUL FH NLWV DUH DYDLODEOH 5HSODFH DQ ZURQJ VL HG RUL FHV Check for crimped or cracked gas line between the pressure gas regulator and the surface burner con...

Page 54: ...ge is open Open the gas supply valve END No Ok END Check each surface burner terminal on the spark module for voltage No END Replace the PCB Ok Ok Replace the faulty spark module END No Check for crimped of broken gas line or faulty gas pressure regulator Ok Replace damaged gas line or faulty gas pressure regulator Plug in the power cord and or reset the circuit breaker for the range END Connector...

Page 55: ...END No No END Yes Check the GPR to make sure gas is flowing through it Ok Is the GPR shut off lever in the open position Ok Replace the GPR END No END Yes Check for gas supply to the surface burner control manifold Crimped or broken gas supply line to the manifold Replace the damaged gas line Faulty surface burner control manifold Replace the manifold Ok Replace the surface burner control manifold...

Page 56: ...ck whether the ignition switch is properly operated At the LITE position spark from the electrode tip should be made No END END Ok Change the Ignition switch END No Check for a dirty surface of the burner orifice Ok Replace the Spark module Clean the surface of burner orifice or replace the orifice Assemble the burner head and cap on the right position END No Check for a crimped of broken gas pipe...

Page 57: ... surface burner orifice NOTE Replacement orifice should always be same size as removed END No END No END Yes Is the supply line between the surface burner and the control manifold free from damage Ok Crimped or broken gas supply line to the manifold Replace the damaged gas line Faulty surface burner control manifold Replace the manifold Ok Replace the surface burner control manifold ...

Page 58: ...burner heads and caps properly END No Check the orifice nozzle diameter NG LP Replace the orifice nozzle END No Check the direction of the orifice at the GPR Apply the right direction of the orifice END No Check the air shutter opening Broil Bake burner Adjust the air shutter opening END END 2 0 1 12 1 92 1 92 1 01 ModelNX58H5650WS ModelNX58H5600SS ModelNX58H5650WS ModelNX58H5600SS ...

Page 59: ...ion Flame size is too big or small Gas No Ok Ok Check the orifice nozzle diameter Flame size is too big or small Replace the orifice nozzle END No Check the orifice direction at GPR Reverse the direction of the orifice Upside down END END 2 0 ...

Page 60: ...y supplied Oven burner will not light Open the gas valve END No Check whether the Hot surface ignitor HSI is properly heated Check the voltage 120V at the T602 T605 Bake T602 T604 Broil Check the resistance RI 6 ȍ No Replace the PCB END No Replace the HSI END No Check the current of the safety YDOYH WHUPLQDO Replace the Safety valve END END Ok Safety valve terminal Safety valve terminal ...

Page 61: ...59 4 Troubleshooting 4 3 Oven Malfunction Convection fan not working Electrical ...

Page 62: ...rly supplied Oven Temp rises too slowly Open the gas valve END No Check the voltage 120V of the PCB T602 T605 Bake T602 T604 Broil Replace the PCB END No Check whether the Hot surface ignitor HSI is properly heated Check the resistance of HSI ȍ No Replace the HSI END No Check the current of the safety YDOYH WHUPLQDO Replace the Safety valve END END T604 T605 T602 ...

Page 63: ... have a short in it Oven Temp rises too fast Faulty broil bake DLB or source control relay RY601 RY605 Replace the PCB Replace the PCB Check the broil and bake burner operation Replace with properly sized orifices Burner Hole Size NG LP Orifice in mm in mm Broil 1 64 1 02 Bake 1 90 1 15 NOTE High altitude orifice kits are available Yes No Repair or replace the harness Ok END END END RY601 Source L...

Page 64: ... upper oven burner orifices NOTE Orifice sizes should match chart sizes for the gas type being used Fully open the gas supply valve END No Check for crimped or broken gas lines to the lower or upper oven burner Ok Replace the damage gas line No END Are the lower and upper oven burners air shutters adjusted properly Adjust the burner air shutter settings Ok Is the GPR shut off lever in the open pos...

Page 65: ...he display It appears when the oven Temperature reaches 650 343 in any cooking function except self clean Normal resistance of the oven sensor is 1080 ohms Oven overheating in all cooking modes Replace the temperature sensor Oven Temperature Sensor Oven Temperature Sensor Ok Replace the temperature sensor Ok Ok ...

Page 66: ...64 4 Troubleshooting 4 3 Oven Malfunction Oven lamp not working Electrical door lock Start Set ...

Page 67: ...cal No Ok Check the voltage of the housing terminal 120V No Warming drawer does not heat Replace the warming drawer heating element Make sure the warming drawer relay RY605 is working properly Check the voltage T606 and T602 at the same time Replace the PCB END END Ok END PCB T606 T602 G ...

Page 68: ...rd is connected No display Insert the power cord END No Check the voltage of the Power cord connector housing 120V Replace the Power cord END No Check the voltage of the Wire harness A housing CN101 Replace the Wire harness A END No Check the voltage of the PCB connector CN101 Replace the PCB END END CN101 ...

Page 69: ...sure the Door lock feature is not turned on No Ok Ok Ok Press the Start Set keypad for three or more seconds END Make sure the Sabbath feature is not turned on No Press the Timer On Off and Clock for three or more seconds at the same time END Check the membrane control tail connector CN301 No Reconnect securely END Replace the membrane END CN301 ...

Page 70: ...68 4 Troubleshooting 4 5 Control Malfunction Buzzer does not beep when keypad is touched Electrical Faulty buzzer on PCB Buzzer does not beep when keypad is touched END Ok Ok Replace the PCB ...

Page 71: ... controls the broil ignitor operation 9 RY604 Bake RY This is the relay that controls the bake ignitor operation 10 RY605 W Drawer RY This is the relay that controls the Warming drawer heater operation 11 RY606 Conv Heater RY This is the relay that controls the Conv heater operation 12 RY607 Conv Fan RY This is the relay that controls the operation of the convection fan motors 13 RY608 Lamp RY Thi...

Page 72: ...e ignitor operation 10 RY607 Conv Fan RY This is the relay that controls the operation of the convection fan motors 11 RY608 Lamp RY This is the relay that controls the oven lamp operation 12 RY609 Door RY This is the relay that controls the operation of door lock motor 13 T601 L1 Terminal This is terminal that supplies L1 Voltage 120VAC to PCB 14 T602 N Terminal This is terminal that supplies N V...

Page 73: ...R336 2K 47K R332 2200uF C108 KRA225S TR312 1N4007 D102 C402 10nF T607 5V R312 220 47K 5V R202 51K R330 51K C202 R201 1nF S8 16 S9 R333 47K 5 6 DIG6 7 DIG7 8 1 S 17 S10 18 S11 9 1 2 1 S 20 S13 1 2 4 1 S 22 S15 9 2 S 0 1 3 S 1 1 4 S 2 1 5 S 3 1 6 S 4 1 7 S 15 DSP301 LED725D A101 1 1 G I D 2 2 G I D 3 3 G I D 4 4 G I D DIG5 1N4148M D304 12V R103 12K 12V 5V 5V 1N4007 D105 TR609 KRA225S TR308 KRC246M 1...

Page 74: ... under applicable international and or domestic law GSPN GLOBAL SERVICE PARTNER NETWORK Area Web Site Europe CIS Mideast Africa gspn1 samsungcsportal com Asia gspn2 samsungcsportal com North Latin America gspn3 samsungcsportal com China china samsungportal com Samsung Electronics Co Ltd September 2014 Printed in Korea ...

Reviews: