background image

English  19

Ins
tallation ins

truc

tions

Additional installation requirements for mobile homes

The installation of appliances designed for mobile home installation must conform 
with the Manufactured Home Construction and Safety Standard, Title 24 CFR, Part 
3280 (formerly the Federal Standard for Mobile Home Construction and Safety, 
Title 24, HUD, Part 280) or, when such standard is not applicable, the Standard 
for Manufactured Home Installations, latest edition (Manufactured Home Sites, 
Communities and Set-Ups), ANSI A225.1, latest edition, or with local codes. In 
Canada, mobile home installation must be in accordance with the current CAN/CSA 
Z240/MH Mobile Home Installation Code. 
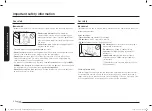
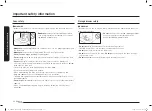
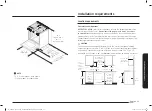
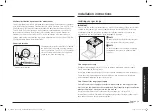
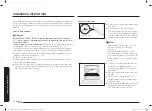
Power cord location

Power cord location

2”

2”

7

7

1

1

//

8

8

””

The power cord for this appliance is located 
on the back of the range, near the bottom 
right hand corner. The 53 in (135 cm) power 
cord will come installed on the range and 
taped to the back for shipping.

Installation instructions

Installing your gas range

IMPORTANT:

Please read the following instructions, as well as the Important Safety Instructions 
section at the front of this manual, completely and carefully BEFORE installing 
and/or operating the gas range. Improper installation, adjustment, service, or 
maintenance can cause personal injury or property damage.

NOTE

To order parts or accessories, contact your 
local retailer or refer to the last page.

NOTE

To ensure proper installation, we strongly 
recommend that you hire a professional 
installer.

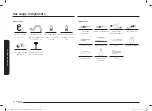
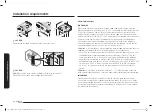
Step 1. Unpack the range

Remove all packaging materials. Failure to remove packaging materials could 
result in damage to the appliance.
Inventory all loose parts against the Parts supplied components listed on page 11.
Check for shipping damage and/or missing parts. Any damage and/or missing 
parts should be reported to your local retailer.

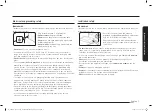
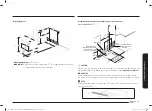
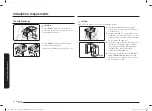
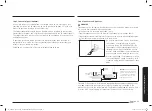
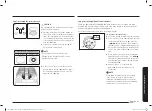
Step 2. Connect the range to gas supply

Shut off the main gas supply valve before disconnecting the old range and leave 
it off until the new hookup has been completed. Don’t forget to relight the pilot on 
other gas appliances when you turn the gas back on.

Because hard piping restricts movement of the range, the use of a CSA 
International-certified flexible metal appliance connector is recommended unless 
local codes require a hard-piped connection.

01. DG68-01600A-00_IM_NSG6DG8700SRAA_EN_231102.indd   19

01. DG68-01600A-00_IM_NSG6DG8700SRAA_EN_231102.indd   19

2023-11-06   오전 11:47:48

2023-11-06   오전 11:47:48

Summary of Contents for NSG6D 8 Series

Page 1: ...Gas Slide in Range Installation manual NSG6D 8 01 DG68 01600A 00_IM_NSG6DG8700SRAA_EN_231102 indd 1 01 DG68 01600A 00_IM_NSG6DG8700SRAA_EN_231102 indd 1 2023 11 06 11 47 43 2023 11 06 11 47 43...

Page 2: ...NAL INJURY AND OR DEATH INSTALL AND CHECK THE ANTI TIP BRACKET FOLLOWING THE INSTRUCTIONS AND TEMPLATE SUPPLIED WITH THE BRACKET To prevent accidental tipping of the range attach an approved anti tip...

Page 3: ...7 Installation safety 7 Location safety 8 Cooktop safety 9 Oven safety 10 Storage drawer safety 10 Self cleaning oven safety 11 Gas range components 11 What s in the box 11 Installation requirements...

Page 4: ...in these installation instructions before installing the range Remove all packing materials from the oven compartments before connecting the electric and gas supply to the range Observe all governing...

Page 5: ...onnected in series General safety WARNING To reduce the risk of fire electric shock personal injuries and or death obey the following precautions Do not touch any part of the range including but not l...

Page 6: ...chemical or foam type fire extinguisher Do not heat unopened food containers buildup of pressure may cause container to burst and result in injury Gas safety WARNING To reduce the risk of fire electr...

Page 7: ...o not modify the power plug power cord or power outlet in any way Do not put a fuse in a neutral or ground circuit Use a dedicated 120 volt 60 Hz 20 amp AC fused electrical circuit for this range A ti...

Page 8: ...ange in areas exposed to the weather and or water Do not install the range in a place which is exposed to a strong draft Select a level well constructed floor that can support the range s weight Synth...

Page 9: ...rs unattended on medium or high heat settings Before igniting make sure all burner caps are properly in place and all burners are level Always use the LITE position when igniting the burners and make...

Page 10: ...er portion of the split oven rack is in the proper position within the outer rack Make sure the oven racks are placed on the same level on each side Do not damage move or clean the door gasket Do not...

Page 11: ...n Before starting a self cleaning cycle wipe grease and food soils from the oven Do not put the lower drawer into the oven cavity when you run a self cleaning cycle When opening the door after a self...

Page 12: ...Utility knife Soapy water solution Pliers Parts needed Gas line shut off valve Flexible metal appliance connector in ID x 5 ft Flare union adapter in or in NPT x in ID Flare union adapter in NPT x in...

Page 13: ...ops and cabinets around the range can withstand the heat up to 194 F 90 C generated by the range If not discoloration delamination or melting may occur 0 in 0 cm 24 in 61 cm Lower Cabinet Depth 4 in 1...

Page 14: ...e cooktop shall conform to the installations packed with that appliance 30 in 76 2 cm minimum clearance between the top of the cooking surface and the bottom of an unprotected wood or metal cabinet or...

Page 15: ...ea for Recommended area for through the wall and through through the wall and through the floor connection of gas the floor connection of gas pipe stub and shut off valve pipe stub and shut off valve...

Page 16: ...hatched area on Fig 1 2 Before installing the unit measure the heights of the two cabinet sides C1 C4 front and back See Fig 1 from the floor to the top of the counter 3 Level the range using the four...

Page 17: ...erent gas without consulting the gas supplier This range is convertible for use on natural or propane gas If you decide to use this range on LP gas conversion must be made by a qualified LP installer...

Page 18: ...be grounded for personal safety All gas models have a power cord with an equipment grounding conductor and a grounding plug The plug must be firmly plugged into a three prong outlet that is properly...

Page 19: ...anual completely and carefully BEFORE installing and or operating the gas range Improper installation adjustment service or maintenance can cause personal injury or property damage NOTE To order parts...

Page 20: ...flare union adapter to the NPT internal thread of the manual shut off valve taking care to back up the shut off valve to keep it from turning 4 Connect flexible metal appliance connector to the adapt...

Page 21: ...and or death To prevent accidental tipping install and check the anti tip bracket following the instructions and template supplied with the bracket An anti tip bracket and screws installation instruc...

Page 22: ...Check to make sure the back leg of the range has slid into the anti tip bracket Carefully tip the range forward to ensure that the anti tip bracket engages the back brace and prevents tip over Step 6...

Page 23: ...lines have been carefully checked for leaks and electrical power cord has been plugged in All surface and oven burners have electronic ignition 3 2 1 1 To turn on a surface burner 1 Press the button i...

Page 24: ...has been turned on All connections have been checked for leaks Range is plugged into the properly grounded electrical receptacle Approved anti tip bracket is properly installed and engaged with the ra...

Page 25: ...t the end of the cones are normal Locking screw After the flames are adjusted properly shut off the oven retighten the locking screws replace the oven bottom and racks and close the oven door To adjus...

Page 26: ...rt English www samsung com ca_fr support French DG68 01600A 00 Scan the QR code or visit www samsung com spsn to view our helpful How to Videos and Live Shows Requires reader to be installed on your s...

Reviews: