


Printing on special media
86
4. Media and tray
8
Envelope
Successful printing on envelopes depends upon the quality of the envelopes.
To print an envelope, place it with the flap side up.
•
When selecting envelopes, consider the following factors:
-
Weight:
The weight of the envelope paper should not exceed 90 g/m
2
(16 lb) otherwise, a jam may occur.
-
Construction:
Prior to printing, envelopes should lie flat with less than
6 mm (0.25 inches) curl, and should not contain air.
-
Condition:
Envelopes should not be wrinkled, nicked, or damaged.
-
Temperature:
Use envelopes that are compatible with the heat and
pressure of the machine during operation.
•
Use only well-constructed envelopes with sharp and well-creased folds.
•
Do not use stamped envelopes.
•
Do not use envelopes with clasps, snaps, windows, coated lining, self-
adhesive seals, or other synthetic materials.
•
Do not use damaged or poorly made envelopes.
•
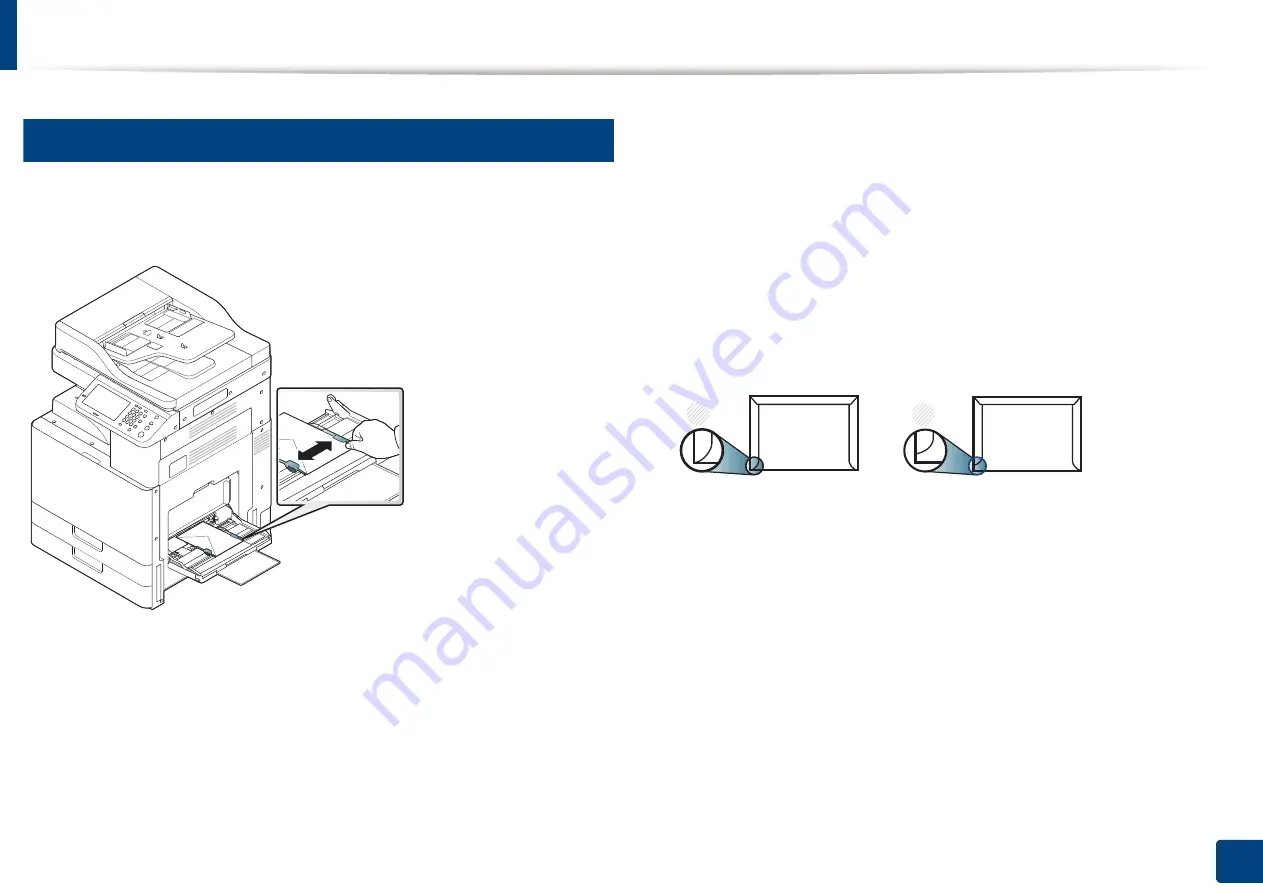
Be sure the seam at both ends of the envelope extends all the way to the
corner of the envelope.
1
Acceptable
2
Unacceptable
•
Envelopes with a peel-off adhesive strip or with more than one flap that
folds over to seal must use adhesives compatible with the machine’s fusing
temperature of about 170°C (338 °F) for 0.1 second. The extra flaps and strips
might cause wrinkling, creasing, or jams, and may even damage the fuser.
•
For the best print quality, position margins no closer than 15 mm (0.6
inches) from the edges of the envelope.
•
Avoid printing over the area where the envelope’s seams meet.
1
2
Summary of Contents for Multifunction MultiXpress X322 Series
Page 295: ...Redistributing toner 295 14 Maintenance 4 X322x X328x series ...
Page 296: ...Redistributing toner 296 14 Maintenance 5 K325x K330x series ...
Page 298: ...Replacing the toner cartridge 298 14 Maintenance 6 X322x X328x series ...
Page 299: ...Replacing the toner cartridge 299 14 Maintenance 7 K325x K330x series ...
Page 301: ...Replacing the imaging unit 301 14 Maintenance 8 X322x X328x series ...
Page 302: ...Replacing the imaging unit 302 14 Maintenance 9 K325x K330x series ...
Page 303: ...Replacing the imaging unit 303 14 Maintenance ...
Page 305: ...Replacing the waste toner container 305 14 Maintenance 10 X322x X328x series ...
Page 306: ...Replacing the waste toner container 306 14 Maintenance 11 K325x K330x series ...
Page 312: ...Cleaning the machine 312 14 Maintenance X322x X328x series ...
Page 313: ...Cleaning the machine 313 14 Maintenance K325x K330x series ...
Page 315: ...Cleaning the machine 315 14 Maintenance X322x X328x series ...
Page 316: ...Cleaning the machine 316 14 Maintenance ...
Page 317: ...Cleaning the machine 317 14 Maintenance K325x K330x series ...
Page 318: ...Cleaning the machine 318 14 Maintenance ...
Page 320: ...Cleaning the machine 320 14 Maintenance K325x K330x series ...
Page 324: ...Cleaning the machine 324 14 Maintenance X322x X328x series ...
Page 325: ...Cleaning the machine 325 14 Maintenance ...
Page 326: ...Cleaning the machine 326 14 Maintenance K325x K330x series ...
Page 327: ...Cleaning the machine 327 14 Maintenance ...
Page 339: ...Clearing paper jams 339 15 Troubleshooting 3 In the multi purpose tray ...
Page 341: ...Clearing paper jams 341 15 Troubleshooting Jam feed 1 Jam feed 2 ...
Page 342: ...Clearing paper jams 342 15 Troubleshooting Jam feed 3 Jam feed 4 Optional device only ...
Page 357: ...Clearing paper jams 357 15 Troubleshooting 8 In the optional finisher area ...