background image

ENG - 35

09  INSTALLING THE 

WALL MOUNT

Installation Precautions


Install on a vertical wall only.


Do not install in a place with high 
temperature or humidity.


Verify whether the wall is strong enough to 
support the product’s weight. If not, reinforce 
the wall or choose another installation point.


• Purchase and use the fixing screws or 

anchors appropriate for the kind of wall you 
have (plaster board, iron board, wood, etc.). If 

possible, fix the support screws into wall 

studs.


Purchase wall mounting screws according to 
the type and thickness of the wall you want to 
mount the Soundbar on.


– Diameter: M5


– Length: 35 mm or longer recommended.


Connect cables from the unit to external 
devices before you install the Soundbar on 
the wall.


Make sure the unit is turned off and 
unplugged from the power source before you 
install it. Otherwise, it may cause an electric 
shock.

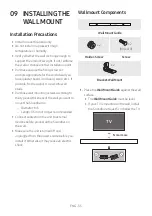
Wallmount Components

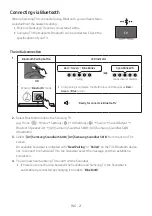
A TYPE : 450mm

Wall Mount Guide

x 2

(M4 x L10)

x 2

Holder-Screw

Screw

x 2

Bracket-Wall Mount

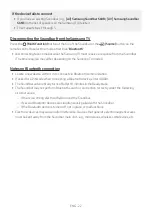
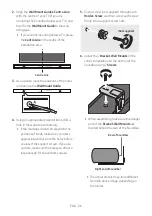
1. 

Place the 

Wall Mount Guide

 against the wall 

surface.


The 

Wall Mount Guide

 must be level.


If your TV is mounted on the wall, install 
the Soundbar at least 5 cm below the TV.

5 cm or more

Summary of Contents for HW-S60B

Page 1: ...HW S60B HW S61B FULL MANUAL Imagine the possibilities Thank you for purchasing this Samsung product To receive more complete service please register your product at www samsung com register ...

Page 2: ... This symbol indicates that the rated voltage marked with the symbol is AC voltage DC voltage This symbol indicates that the rated voltage marked with the symbol is DC voltage Caution Consult instructions for use This symbol instructs the user to consult the user manual for further safety related information WARNING To reduce the risk of fire or electric shock do not expose this appliance to rain ...

Page 3: ...ight or other heat sources This could lead to overheating and cause the unit to malfunction 4 Protect the product from moisture i e vases and excess heat e g a fireplace or equipment creating strong magnetic or electric fields Unplug the power cable from the AC wall socket if the unit malfunctions Your product is not intended for industrial use It is for personal use only Condensation may occur if...

Page 4: ... function 14 Output specifications for the different sound effect modes 15 Adjusting the Soundbar volume with a TV remote control 16 04 ConnectingtheSoundbar 17 Connecting Electrical Power 17 Connecting the Samsung Wireless Rear Kit and Subwoofer to your Soundbar 17 05 ConnectingtoaTV 18 Connecting the TV that supports HDMI ARC Audio Return Channel 18 Connecting using an Optical Cable 20 Connectin...

Page 5: ...ork 32 Using the Tap Sound 33 08 ConnectingviaAppleAirPlay2 34 09 InstallingtheWallMount 35 Installation Precautions 35 Wallmount Components 35 10 InstallingtheSoundbarinfrontofTV 37 11 SoftwareUpdate 38 Auto Update 38 USB Update 38 Reset 39 12 Troubleshooting 40 13 Licence 42 14 OpenSourceLicenceNotice 43 15 ImportantNotesAboutService 43 16 SpecificationsandGuide 44 Specifications 44 ...

Page 6: ... information about the power supply and power consumption refer to the label attached to the product Label Bottom of the Soundbar Main Unit To purchase additional components or optional cables contact a Samsung Service Centre or Samsung Customer Care For more information about the wallmount see page 35 Design specifications and App screen are subject to change without prior notice The appearance o...

Page 7: ... LED M Multicolour LED W White LED W White LED The Multicolour LED changes to White Cyan Green Red and Blue depending on the mode or status Multi Function Button In standby mode press the MultiFunction button to turn on the Soundbar Press the MultiFunction button to change the mode Each time you change the mode the LED lights in white and then turns off LED Indicator WhiteOn Off WhiteOn Off WhiteO...

Page 8: ...ton will begin working in 4 to 6 seconds When you turn on this unit there will be a 4 to 5 second delay before it produces sound If you hear sounds from both the TV and Soundbar go to the Settings menu for the TV audio and change the TV speaker to ExternalSpeaker You can turn on and off audio feedback by using SmartThings app To learn about using the SmartThings app refer to Method2 ConnectingviaW...

Page 9: ...E Connect a USB storage device to upgrade the product s software DIGITALAUDIOIN OPTICAL Connect to the digital optical output of an external device See page 28 HDMI ARC Connect to the HDMI ARC port on a TV See page 18 When disconnecting the power cable of the AC DC power adapter from a wall outlet pull the plug Do not pull the cable Do not connect this unit or other components to an AC outlet unti...

Page 10: ...OL CHLEVEL Power Turns the Soundbar on and off LED Indicator CyanBlinksX1 On Off RedBlinksX3 AutoPowerDownFunction The unit turns off automatically in the following situations In DigitalAudioIn or TVARC Wi Fi Bluetooth mode if there is no audio signal for 18 minutes Source Press to select a source connected to the Soundbar AudioFeedbackOn Off You can turn the Audio Feedback on or off Press and hol...

Page 11: ...e LED Indicator WhitemovestorightX1 Volume Up WhitemovestoleftX1 Volume Down CHLEVEL By pressing the button you can adjust the volume of the each speaker LED Indicator WhiteBlinksX1 CentreLevel SideLevel If the Rear Speakers sold separately are connected the setting RearLevel is supported To adjust the volume of the RearLevel between 6 to 6 by using the Up Down buttons ...

Page 12: ...asier to hear spoken dialog in movies and TV Nightmode is optimized for night time viewing with the settings adjusted to bring the volume down but keep the dialog clear If the video on the TV and audio from the Soundbar are not synchronized select Sync in Sound Control and then set the audio delay between 0 300 milliseconds by using the Up Down buttons Sync is only supported for some functions The...

Page 13: ...nksX1 AdaptiveSound DTSVirtual X Music Game Standard AdaptiveSound Analyzes the content in real time and automatically provides the optimal sound field based on the characteristics of the content DTSVirtual X Immersive 3D sound from any content Music Provides more natural and room filling sound for music content Game Provides stereoscopic sound to immerse you in the action while gaming Standard Ou...

Page 14: ...an always be heard clearly No data is saved during the analysis UsingtheHiddenButtons Buttonswithmorethanonefunction HiddenButton Referencepage RemoteControlButton Function WOOFER Up TV remote control On Off Standby page 16 Up ID SET page 13 Sound Control 7 Band EQ page 12 Source Audio Feedback On Off Standby page 10 ...

Page 15: ...5 1 ch 5 1 ch 7 1 ch Dolby Atmos 5 1 ch 7 1 ch Game 2 0 ch 5 1 ch 7 1 ch 5 1 ch 5 1 ch 7 1 ch Dolby Atmos 5 1 ch 7 1 ch Standard 2 0 ch 2 1 ch 2 1 ch 5 1 ch 5 1 ch 5 1ch Dolby Atmos 5 1 ch 7 1 ch The Samsung Wireless Rear Speaker Kit and Subwoofer can be purchased separately To purchase a Kit or the Subwoofer contact the vendor you purchased the Soundbar from When the input source is Dolby Atmos t...

Page 16: ...you push the WOOFER button up and hold it for 5 seconds the mode switches in the following order Off TVRemote Default mode Samsung TVRemote All TVRemote The LED indicator status changes each time the mode is changed as shown below RemoteControlButton LEDIndicator Status S O U N D M O D E W O O F E R C H L E V E L T O N E C O N T R O L 5 Sec Off TV Remote Default mode RedBlinksX1 Disable the TV rem...

Page 17: ... ARC SERVICE DC 19V PowerCord AC DCAdapter SERVICE DC 19V NOTES If you unplug and reconnect the power cord when the product is turned on the Soundbar turns on automatically Make sure to rest the AC DC Adapter flat on a table or the floor If you place the AC DC Adapter so that it is hanging with the AC cord input facing upwards water or other foreign substances could enter the Adapter and cause the...

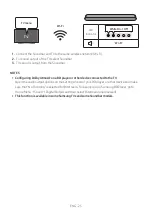
Page 18: ...IN ARC or eARC portofyourTV HDMICable Bottomofthe Soundbar ConnecttotheHDMI ARC portof theSoundbarmainunit TopoftheSoundbar LED Indicator WhiteOn Off DigitalAudioIn 1 With the Soundbar and TV turned off connect the HDMI cable as shown in the figure 2 Turn on the Soundbar and TV 3 TV sound is output from the Soundbar When the TV sound is not output press the MultiFunction button at the top of the S...

Page 19: ...a cored HDMI cable use one whose diameter is less than 14 mm This function is not available if the HDMI cable does not support ARC When the audio in a broadcast is encoded in Dolby Digital and the Digital Output Audio Format on your TV is set to PCM we recommend that you change the setting to Dolby Digital When the setting on the TV is changed you will experience better sound quality The TV menu m...

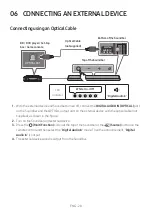
Page 20: ...L OUT Bottomofthe Soundbar OpticalCable notsupplied TopoftheSoundbar 1 With the TV and Soundbar turned off connect the DIGITALAUDIOIN OPTICAL port on the Soundbar and the OPTICAL output port on the TV with the optical cable not supplied as shown in the figure 2 Turn on the Soundbar and TV 3 Press the MultiFunction button at the top of the Soundbar or the Source button on the remote control and the...

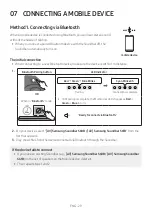
Page 21: ... Red Green Blue in turn ReadytoconnectviaBluetooth 2 Select Bluetooth mode on the Samsung TV e g Home Menu Settings All Settings Sound Sound Output Bluetooth Speaker List AV Samsung Soundbar S60B AV Samsung Soundbar S61B Bluetooth 3 Select AV SamsungSoundbarS60B AV SamsungSoundbarS61B from the list on TV s screen An available Soundbar is indicated with NeedPairing or Paired on the TV s Bluetooth d...

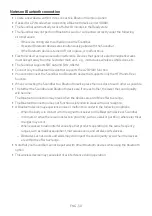
Page 22: ...V model NotesonBluetoothconnection Locate a new device within 1 m to connect via Bluetooth communication If asked for a PIN code when connecting a Bluetooth device enter 0000 The Soundbar automatically turns off after 18 minutes in the Ready state The Soundbar may not perform Bluetooth search or connection correctly under the following circumstances If there is a strong electrical field around the...

Page 23: ...et service provider for details Because the menus may differ depending on the year of manufacture refer to your TV manual To connect the TV to the Soundbar via Wi Fi connect the Soundbar to the wireless router first See page 32 for details on how to establish a Wi Fi connection 1 For more information about Wi Fi connection to the Soundbar see page 32 Method2 ConnectingviaWi Fi WirelessNetwork 2 Ch...

Page 24: ...MI IN ARC DIGITAL AUDIO IN OPTICAL HDMI ARC ConnecttotheHDMIIN ARC or eARC portofyourTV HDMICable Bottomofthe Soundbar ConnecttotheHDMI ARC portof theSoundbarmainunit TopoftheSoundbar LED Indicator WhiteOn Off TVARC 1 With the Soundbar and TV turned off connect the HDMI cable as shown in the figure 2 Turn on the Soundbar and TV 3 TV sound is output from the Soundbar ...

Page 25: ...e Soundbar NOTES ConfiguringDolbyAtmos onaBDplayerorotherdeviceconnectedtotheTV Open the audio output options on the settings menu of your BD player or other device and make sure that No Encoding is selected for Bitstream For example on a Samsung BD Player go to Home Menu Sound Digital Output and then select Bitstream unprocessed ThisfunctionisavailableinsomeSamsungTVsandsomeSoundbarmodels ...

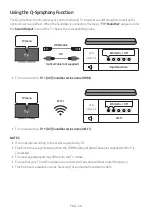
Page 26: ...Cable notsupplied HDMICable TV menu example TV AV Soundbarseriesname HDMI LED Indicator WhiteOn Off Wi Fi TVmenu Wi Fi TV menu example TV AV Soundbarseriesname Wi Fi NOTES It can operate according to the Codec supported by TV This function is supported only when the HDMI Cable or Optical Cable not supplied or Wi Fi is connected The message displayed may differ with the TV model Ensure that your TV...

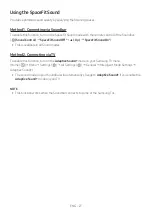
Page 27: ...ndOff Up SpaceFitSoundOn This is available in all Sound modes Method2 ConnectingviaTV To enable this function turn on the AdaptiveSound mode on your Samsung TV menu Home Menu Settings All Settings General Intelligent Mode Settings Adaptive Sound The sound mode on your Soundbar will automatically change to AdaptiveSound if you enable the AdaptiveSound mode on your TV NOTE This function works when t...

Page 28: ...evice and Soundbar turned off connect the DIGITALAUDIOIN OPTICAL port on the Soundbar and the OPTICAL output port on the external device with the optical cable not supplied as shown in the figure 2 Turn on the Soundbar and external device 3 Press the MultiFunction button at the top of the Soundbar or the Source button on the remote control and then select the DigitalAudioIn mode Then the announcem...

Page 29: ...Indicator SOUND MODE PAIR OR Red Green BlueBlinks Pairing Connectioniscomplete Cyan BlinksX3 When in Bluetooth mode 5 Sec Until pairing is complete the Multicolour LED changes as Red Green Blue in turn ReadytoconnectviaBluetooth 2 On your device select AV SamsungSoundbarS60B AV SamsungSoundbarS61B from the list that appears 3 Play music files from the device connected via Bluetooth through the Sou...

Page 30: ...e function When connecting the Soundbar to a Bluetooth device place them as close to each other as possible The farther the Soundbar and Bluetooth device are from each other the lower the sound quality will become The Bluetooth connection may break when the devices are out of the effective range The Bluetooth connection may not function as intended in areas with poor reception A Bluetooth device m...

Page 31: ...the Bluetooth device the multicolour LED indicator on the Soundbar blinks Red three times DisconnectingtheSoundbarfromtheBluetoothdevice Press the MultiFunction button at the top of the Soundbar or the Source button on the remote control to select the mode other than Bluetooth Disconnecting takes time because the Bluetooth device must receive a response from the Soundbar Disconnection time may dif...

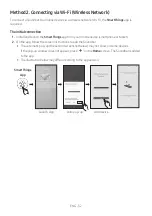
Page 32: ...Things app from your mobile device smartphone or tablet 2 On the app follow the screen instructions to add the Soundbar The automatic pop up the second screenshot below may not show on some devices If the pop up window does not appear press on the Home screen The Soundbar is added to the app The illustration below may differ according to the app version Launch App Add device Auto pop up SmartThing...

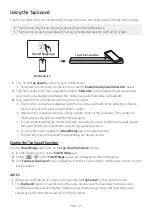
Page 33: ...e device does not tap a sharp corner of the Soundbar The Soundbar or mobile device may become scratched or damaged It is recommended that the mobile device be covered with a case Lightly tap the wide area in the upper portion of the Soundbar without using excessive force To use this function update the SmartThings app to the latest version The function may not be supported depending on the app ver...

Page 34: ...AirPlay 2 you can stream music podcasts and other audio from your Apple devices to the Samsung Soundbar Make sure the Soundbar is powered on and connected to the same Wi Fi network as your Apple device Select from an AirPlay supported app or Control Centre on your iPhone iPad or Mac Select the Soundbar from the list of available devices to play the current audio to ...

Page 35: ...chase wall mounting screws according to the type and thickness of the wall you want to mount the Soundbar on Diameter M5 Length 35 mm or longer recommended Connect cables from the unit to external devices before you install the Soundbar on the wall Make sure the unit is turned off and unplugged from the power source before you install it Otherwise it may cause an electric shock WallmountComponents...

Page 36: ...o not correspond to the positions of studs make sure you insert appropriate anchors into the holes before you insert the support screws If you use anchors make sure the holes you drill are large enough for the anchors you use 5 Push a screw not supplied through each Holder Screw and then screw each screw firmly into a support screw hole Notsupplied 6 Install the 2 Bracket WallMounts in the correct...

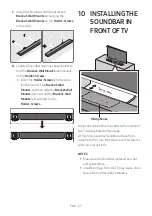
Page 37: ... and then slide the Bracket Wall Mounts down so that the Bracket Wall Mounts rest securely on the Holder Screws 10 INSTALLINGTHE SOUNDBARIN FRONTOFTV 3cmormore Microphones Align the centre of the Soundbar to the centre of the TV as illustrated in the image At this time place the Soundbar at least 3cm away from the TV so that there is no interference with voice recognition NOTES Make sure the Sound...

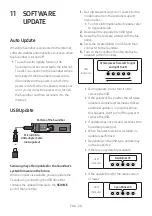
Page 38: ...mware to the SERVICE port of the Soundbar 1 Go to www samsung com search for the model name from the customer support menu option For more information about update refer to Upgrade Guide 2 Download the upgrade file USB type 3 Unzip the file to create a folder with the file name 4 Store the created folder in a USB and then connect it to the Soundbar 5 Turn on the Soundbar Then the product is update...

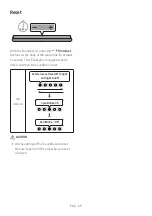
Page 39: ...me time for at least 5 seconds The LED display changes as shown below and then the Soundbar is reset LED Indicator CyanBlinksX3 RedBlinks Off Whitemovesfromlefttoright andrighttoleft CAUTION All the settings of the Soundbar are reset Be sure to perform this only when a reset is required ...

Page 40: ...ed adjust the volume of the external device For sound output of the TV select Soundbar Samsung TV Home Menu Settings All Settings Sound Sound Output Select Soundbar The cable connection to the Soundbar may not be loose Remove the cable and connect again Remove the power cord completely reconnect and turn the power on Reset the product and try again See page 39 IftheTVisnotconnectedviaHDMI ARC Chec...

Page 41: ...sound may drop out Check the installation environment and conditions for use UnabletoconnecttoWi Fi Check whether your wireless router is on Turn off the router turn it back on and then try again The Soundbar will not connect if the wireless signal is too weak Try moving the router closer to the Soundbar or eliminating any obstacles that are between the Soundbar and the router if possible If your ...

Page 42: ... and other countries 2021 DTS Inc ALL RIGHTS RESERVED The terms HDMI and HDMI High Definition Multimedia Interface and the HDMI Logo are trademarks or registered trademarks of HDMI Licensing Administrator Inc in the United States and other countries Use your phone tablet or computer as a remote control for Spotify Go to spotify com connect to learn how The Spotify Software is subject to third part...

Page 43: ...product meets the ENERGY STAR guidelines for energy efficiency The ENERGY STAR Program has been to reduced greenhouse gas emissions and save energy through voluntary labeling Power management setting of this product have been enabled by default and have various timing setting from 1 minutes to 5 hours The product can wake with a button press on the chassis from sleep mode ENERGYSTARqualifiedmodelo...

Page 44: ...Plus DTS 5 1ch LPCM 2ch NOTES Samsung Electronics Co Ltd reserves the right to change the specifications without notice Weight and dimensions are approximate ForIndiaOnly This product is RoHS compliant Precaution TheSoundbarwillrestartautomaticallyifyouturnon turnoffWi Fi Wi Fi Port deactivation method Press the CHLEVEL button on the remote control of the Soundbar for 30 seconds to turn Wi Fi On O...

Page 45: ... rằng điện áp định mức được đánh dấu bằng biểu tượng này là điện áp AC Điện áp DC Biểu tượng này chỉ ra rằng điện áp định mức được đánh dấu bằng biểu tượng này là điện áp DC Lưu ý Tham khảo Hướng dẫn sử dụng Biểu tượng này sẽ hướng dẫn người sử dụng tham khảo sổ tay Hướng dẫn sử dụng để biết thêm thông tin liên quan đến an toàn CA NHBA O Đê gia m nguy cơ cha y hay bi điê n giâ t không đê thiê t bi...

Page 46: ...tiê p dươ i a nh nă ng mă t trơ i hoă c ca c nguô n nhiê t kha c Viê c na y co thê dâ n đê n qua nhiê t va hư ho ng thiê t bi 4 Ba o vê sa n phâ m kho i như ng nơi â m thâ p vi du bi nh hoa va như ng nơi qua no ng vi du lo sươ i hoă c thiê t bi ta o tư ti nh hoă c điê n trươ ng ma nh Ngă t kê t nô i dây nguô n điê n kho i nguô n cung câ p AC nê u thiê t bi bi hư ho ng Sa n phâ m cu a ba n không da...

Page 47: ...t có nhiều chức năng 14 Thông số kỹ thuật đầu ra cho các chế độ hiệu ứng âm thanh khác nhau 15 Điều chỉnh âm lượng Soundbar bằng điều khiển từ xa TV 16 04 KếtnốiSoundbar 17 Kết nối nguồn điện 17 Kết nối Bộ loa sau không dây và Loa siêu trầm Samsung với Soundbar 17 05 KếtnốivớiTV 18 Kết nối TV có hỗ trợ HDMI ARC Kênh chuyển âm thanh 18 Kết nối bằng Cáp quang 20 Kết nối qua Bluetooth 21 Kết nối qua ...

Page 48: ...ng Tap Sound 33 08 KếtnốithôngquaAppleAirPlay2 34 09 Lắpgiátreotường 35 Những điểm cần cân nhắc khi lắp đặt 35 Chi tiết treo tường 35 10 LắpĐặtSoundbarTrướcTV 37 11 Cậpnhậtphầnmềm 38 Tự động cập nhật 38 Cập nhật USB 38 Đă t la i 39 12 Xư ly sư cô 40 13 Giâ yPhe p 42 14 Thôngba oGiâ yphe pNguô nmơ 43 15 LưuýQuanTrọngvềDịchvụ 43 16 ThôngsốkỹthuậtvàHướngdẫn 44 Thông sô ky thuâ t 44 ...

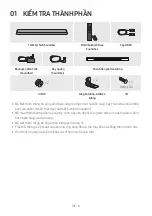
Page 49: ...hêm thông tin về nguồn điện cũng như mức tiêu thụ điện năng hãy tham khảo nhãn đính kèm sản phẩm Nhãn Mặt đáy của thiết bị chính Soundbar Để mua thêm thành phần hay cáp tùy chọn hãy liên hệ với Trung tâm dịch vụ hoặc bộ phận Chăm sóc khách hàng của Samsung Để biết thêm thông tin về giá treo tường xem trang 35 Thiết kế thông số kỹ thuật và màn hình Ứng dụng đều có thể thay đổi mà không thông báo tr...

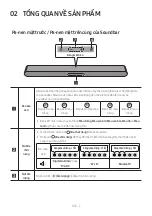
Page 50: ...W Đèn LED màu trắng M Đèn LED nhiều màu W Đèn LED màu trắng W Đèn LED màu trắng Đèn LED nhiều màu chuyển thành Màutrắng Màuxanhlơ Màuxanhlá Màuđỏvà Màu lamtùy thuộc vào chế độ hoặc trạng thái NútĐa chức năng Ở chế độ chờ nhấn nút Đachứcnăng để bật Soundbar Nhấn nút Đachứcnăng để thay đổi chế độ Mỗi lần bạn thay đổi chế độ đèn LED sáng màu trắng rồi tắt Đèn báo LED Sángmàutrắng Tắt Sángmàutrắng Tắt...

Page 51: ... động sau 4 đến 6 giây Khi bạn bật thiết bị này thiết bị sẽ phát ra âm thanh sau 4 đến 5 giây Nếu bạn nghe thấy âm thanh từ cả TV và Soundbar đi tới menu Càiđặt cho âm thanh của TV và thay đổi loa TV thành Loangoài Bạn có thể bật và tắt phản hồi âm thanh bằng cách dùng ứng dụng SmartThings Để tìm hiểu về cách dùng ứng dụng SmartThings tham khảo Phươngpháp2 KếtnốiquaWi Fi Mạngkhông dây ...

Page 52: ...ết nối một thiết bị lưu trữ USB để nâng cấp phần mềm của sản phẩm DIGITALAUDIOIN OPTICAL Kết nối với đầu ra quang học kỹ thuật số của thiết bị bên ngoài Xem trang 28 HDMI ARC Kết nối với cổng HDMI ARC trên TV Xem trang 18 Hãy kéo phích cắm khi rút cáp nguồn của bộ đổi nguồn AC DC ra khỏi ổ cắm trên tường Không kéo dây cáp Không kết nối thiết bị này hoặc các thành phần khác với ổ cắm AC cho đến khi...

Page 53: ...èn báo LED Nhấpnháymàuxanhlơ1lần Bật Tắt Nhấpnháymàuđỏ3lần ChứcnăngAutoPowerDown Thiết bị tự động tắt trong các tình huống sau đây Ở chế độ DigitalAudioIn hoặc TVARC Wi Fi Bluetooth nếu không có tín hiệu âm thanh trong 18 phút Nguồntínhiệu Nhấn để chọn nguồn kết nối với Soundbar Bật tắtphảnhồiâmthanh Bạn có thể bật hoặc tắt Phản hồi âm thanh Nhấn và giữ nút Nguồntínhiệu trên điều khiển từ xa trong...

Page 54: ...áo LED Màutrắngchuyểnsangphải1lần Tăng âm lượng Màutrắngchuyểnsangtrái1lần Giảm âm lượng CHLEVEL Bạn có thể điều chỉnh âm lượng của mỗi loa bằng cách nhấn nút này Đèn báo LED Nhấpnháymàutrắng1lần CentreLevel SideLevel Nếu kết nối với Loa sau được bán riêng thì cài đặt RearLevel sẽ được hỗ trợ Để điều chỉnh âm lượng của RearLevel trong khoảng từ 6 đến 6 bằng các nút Lên Xuống ...

Page 55: ...ng phim và chương trình truyền hình Nightmode được tối ưu hóa để xem vào buổi tối với cài đặt được điều chỉnh để giảm âm lượng nhưng vẫn giúp nghe rõ lời thoại Nếu video trên TV và âm thanh phát ra từ Soundbar không đồng bộ với nhau chọn Sync trong Điều khiển âm thanh sau đó đặt độ trễ âm thanh trong khoảng 0 300 mi li giây bằng nút Lên Xuống Sync chỉ được hỗ trợ cho một số chức năng Có thể Bật Tắ...

Page 56: ...rtual X Music Game Standard AdaptiveSound Phân tích nội dung ở thời gian thực và tự động cung cấp trường âm thanh tối ưu dựa trên đặc điểm nội dung DTSVirtual X Âm thanh 3D đắm chìm từ bất kỳ nội dung nào Music Cung cấp âm thanh tự nhiên hơn và âm thanh ngợp phòng cho nội dung âm nhạc Game Cung cấp âm thanh lập thể khiến bạn như đắm chìm vào pha hành động khi đang chơi game Standard Phát ra âm tha...

Page 57: ... nghe rõ giọng nói Không lưu dữ liệu nào trong khi phân tích SửdụngcácNútẨn Cácnútcónhiềuchứcnăng NútẨn Trangthamkhảo NúttrênĐiềukhiểnTừxa Chứcnăng WOOFER Lên Bật Tắt Điều khiển từ xa tivi Chờ Trang 16 Lên ID SET Trang 13 Điều khiển Âm thanh EQ 7 Dải Trang 12 Nguồn tín hiệu Bật tắt phản hồi âm thanh Chờ Trang 10 ...

Page 58: ...1 kênh 5 1 kênh 5 1 kênh 7 1 Dolby Atmos kênh 5 1 kênh 7 1 Game kênh 2 0 kênh 5 1 kênh 7 1 kênh 5 1 kênh 5 1 kênh 7 1 Dolby Atmos kênh 5 1 kênh 7 1 Standard kênh 2 0 kênh 2 1 kênh 2 1 kênh 5 1 kênh 5 1 kênh 5 1 Dolby Atmos kênh 5 1 kênh 7 1 Bạn có thể mua riêng Bộ loa sau không dây và Loa siêu trầm Samsung Để mua Bộ loa hoặc Loa siêu trầm hãy liên hệ với nhà cung cấp Soundbar của bạn Khi nguồn đầu...

Page 59: ...nút WOOFER trong 5 giây chế độ sẽ thay đổi theo thứ tự sau Off TV Remote Chế độ mặc định Samsung TVRemote All TVRemote Trạng thái đèn báo LED thay đổi mỗi lần thay đổi chế độ như minh họa dưới đây NúttrênĐiềukhiểnTừxa ĐènbáoLED Trạngthái S O U N D M O D E W O O F E R C H L E V E L T O N E C O N T R O L 5 Sec Off TV Remote Chế độ mặc định Nhấpnháymàuđỏ1lần Tắt điều khiển từ xa TV S O U N D M O D E ...

Page 60: ...19V Dâynguồn BộchuyểnđổiAC DC SERVICE DC 19V GHICHÚ Nếu bạn rút phích cắm và cắm lại dây nguồn khi sản phẩm đang bật Soundbar sẽ tự động bật Bảo đảm rằng bạn đặt Bộ chuyển đổi AC DC nằm phẳng trên bàn hoặc sàn Nếu bạn để Bộ chuyển đổi AC DC treo lủng lẳng với đầu vào dây AC hướng lên trên thì nước hoặc các dị vật có thể rơi vào trong Bộ chuyển đổi và khiến Bộ chuyển đổi gặp trục trặc KếtnốiBộloasa...

Page 61: ...ốivớicổngHDMIIN ARC hoặc eARC củaTV CápHDMI Mặtđáycủa Soundbar KếtnốivớicổngHDMI ARC của thiếtbịchínhSoundbar MặttrêncủaSoundbar Đèn báo LED Sángmàutrắng Tắt DigitalAudioIn 1 Nếu đã tắt Soundbar và TV hãy kết nối cáp HDMI như hình minh họa 2 Bật Soundbar và TV 3 Âm thanh TV được phát ra từ Soundbar Khi âm thanh TV không phát ra hãy nhấn nút Đachứcnăng ở mặt trên Soundbar hoặc nút Nguồntínhiệu trên...

Page 62: ...HDMI có lõi hãy dùng cáp có đường kính dưới 14 mm Chức năng này không khả dụng nếu cáp HDMI không hỗ trợ ARC Khi âm thanh trong chương trình phát được mã hoá trong Dolby Digital và Định dạng âm thanh đầu ra kỹ thuật số trên TV của bạn được đặt thành PCM bạn nên đổi cài đặt sang Dolby Digital Khi thay đổi cài đặt trên TV bạn sẽ được tận hưởng chất lượng âm thanh tốt hơn Menu TV có thể sử dụng các t...

Page 63: ...IN OPTICAL HDMI ARC OPTICAL OUT Mặtđáycủa Soundbar Cápquang khôngđikèm MặttrêncủaSoundbar 1 Nếu TV và Soundbar tắt hãy kết nối cổng DIGITALAUDIOIN OPTICAL trên Soundbar và cổng đầu ra OPTICAL trên TV với cáp quang không đi kèm như hình minh họa 2 Bật Soundbar và TV 3 Nhấn Đachứcnăng ở mặt trên của Soundbar hoặc nút Nguồntínhiệu trên điều khiển từ xa và sau đó chọn chế độ DigitalAudioIn Sau đó xuất...

Page 64: ...ển sang Màuđỏ Màuxanhlá Màulam ReadytoconnectviaBluetooth 2 Chọn chế độ Bluetooth trên TV Samsung Ví dụ Trang chủ Menu Cài đặt Tất cả cài đặt Âm thanh Đầu ra âm thanh Bluetooth Danh sách loa AV Samsung Soundbar S60B AV Samsung Soundbar S61B Bluetooth 3 Chọn AV SamsungSoundbarS60B AV SamsungSoundbarS61B từ danh sách trên màn hình TV Soundbar khả dụng sẽ có chỉ báo Cầnghépnối hoặc Đãghépnối trên dan...

Page 65: ...Samsung LưuýkhikếtnốiBluetooth Tìm thiết bị mới trong phạm vi 1 m để kết nối qua giao tiếp Bluetooth Nếu được yêu cầu nhập mã PIN khi kết nối với thiết bị Bluetooth hãy nhập 0000 Soundbar tự động tắt sau 18 phút ở trạng thái Sẵn sàng Soundbar có thể không thực hiện đúng quá trình tìm kiếm và kết nối Bluetooth trong những tình huống sau Nếu có một điện trường mạnh xung quanh Soundbar Nếu có nhiều t...

Page 66: ...ể biết chi tiết Bởi vì các menu có thể khác nhau tùy theo năm sản xuất tham khảo sách hướng dẫn TV Để kết nối TV với Soundbar qua Wi Fi kết nối Soundbar với bộ định tuyến không dây trước Xem trang 32 để biết thông tin chi tiết về cách thiết lập kết nối Wi Fi 1 Để biết thêm thông tin về kết nối Wi Fi với Soundbar xem trang 32 Phươngpháp2 Kếtnối quaWi Fi Mạngkhôngdây 2 Thay đổi nguồn đầu vào của TV ...

Page 67: ...lbyAtmos HDMI IN ARC DIGITAL AUDIO IN OPTICAL HDMI ARC KếtnốivớicổngHDMIIN ARC hoặc eARC củaTV CápHDMI Mặtđáycủa Soundbar KếtnốivớicổngHDMI ARC của thiếtbịchínhSoundbar MặttrêncủaSoundbar Đèn báo LED Sángmàutrắng Tắt TVARC 1 Nếu đã tắt Soundbar và TV hãy kết nối cáp HDMI như hình minh họa 2 Bật Soundbar và TV 3 Âm thanh TV được phát ra từ Soundbar ...

Page 68: ...Soundbar GHICHÚ CáchcấuhìnhDolbyAtmos trêntrìnhphátBDhoặcthiếtbịkháckếtnốivớiTV Mở tùy chọn đầu ra âm thanh trên menu cài đặt của trình phát BD hoặc thiết bị khác và đảm bảo chọn Không mã hóa cho Bitstream Ví dụ trên Trình phát BD của Samsung hãy chuyển tới Menu Màn hình chính Âm thanh Đầu ra kỹ thuật số rồi chọn Bitstream Chưa xử lý ChứcnăngnàycósẵntrênmộtsốTVSamsungvàmộtsốmẫuSoundbar ...

Page 69: ...hôngđikèm CápHDMI Ví dụ về menu TV TV tênsê ri AV Soundbar HDMI Đèn báo LED Sángmàutrắng Tắt Wi Fi MenuTV Wi Fi Ví dụ về menu TV TV tênsê ri AV Soundbar Wi Fi GHICHÚ Chức năng này có thể hoạt động theo Bộ giải mã do TV hỗ trợ Chức năng này chỉ được hỗ trợ khi kết nối với Cáp HDMI hoặc Cáp quang không đi kèm hoặc Wi Fi Thông báo hiển thị có thể khác nhau giữa các model TV Đảm bảo bạn kết nối TV và ...

Page 70: ...undOff Lên SpaceFitSoundOn Tính năng này có sẵn ở mọi chế độ âm thanh Phươngpháp2 KếtnốiquaTV Để bật chức năng này hãy bật chế độ Âmthanhthíchnghi trên menu TV Samsung Trang chủ Menu Cài đặt Tất cả cài đặt Tổng quát Cài đặt chế độ thông minh Âm thanh thích nghi Chế độ âm thanh trên Soundbar sẽ tự động chuyển thành Âmthanhthíchnghi nếu bạn bật chế độ Âmthanhthíchnghi trên TV LƯUÝ Chức năng này hoạt...

Page 71: ...ame 1 Nếu thiết bị bên ngoài và Soundbar tắt hãy kết nối cổng DIGITALAUDIOIN OPTICAL trên Soundbar và cổng đầu ra OPTICAL trên thiết bị bên ngoài với cáp quang không đi kèm như hình minh họa 2 Bật Soundbar và thiết bị bên ngoài 3 Nhấn Đachứcnăng ở mặt trên của Soundbar hoặc nút Nguồntínhiệu trên điều khiển từ xa và sau đó chọn chế độ DigitalAudioIn Sau đó xuất hiện thông báo DigitalAudioIn 4 Âm th...

Page 72: ...SOUND MODE PAIR HOẶC Màuđỏ Màuxanhlá Màulamnhấpnháy Ghépnối Kếtnốihoàntất Nhấpnháymàuxanhlơ3lần Khi ở chế độ Bluetooth 5 Sec Cho tới khi ghép nối hoàn tất đèn LED nhiều màu lần lượt chuyển sang Màuđỏ Màuxanhlá Màulam ReadytoconnectviaBluetooth 2 Trên thiết bị của bạn chọn AV SamsungSoundbarS60B AV SamsungSoundbarS61B từ danh sách hiển thị 3 Phát các tệp nhạc từ thiết bị được kết nối qua Bluetooth ...

Page 73: ... Khi kết nối Soundbar với thiết bị Bluetooth đặt các thiết bị càng gần nhau càng tốt Soundbar và thiết bị Bluetooth càng cách xa nhau chất lượng âm thanh sẽ càng thấp Kết nối Bluetooth có thể bị ngắt khi các thiết bị nằm ngoài phạm vi hoạt động tốt Kết nối Bluetooth có thể không hoạt động như dự định ở những khu vực thu sóng kém Thiết bị Bluetooth có thể gặp nhiễu hoặc trục trặc trong các điều kiệ...

Page 74: ...ết nối Soundbar với thiết bị Bluetooth đèn báo LED nhiều màu trên Soundbar nhấp nháy Màuđỏ ba lần NgắtkếtnốigiữaSoundbarvàthiếtbịBluetooth Nhấn nút Đachứcnăng ở mặt trên Soundbar hoặc nút Nguồntínhiệu trên điều khiển từ xa để chọn chế độ khác với Bluetooth Quá trình ngắt kết nối sẽ mất thời gian vì thiết bị Bluetooth phải nhận được tín hiệu phản hồi từ Soundbar Thời gian ngắt kết nối có thể thay đ...

Page 75: ...h hoặc máy tính bảng của bạn 2 Trên ứng dụng hãy làm theo hướng dẫn trên màn hình để thêm Soundbar Cửa sổ bật lên tự động ảnh chụp màn hình thứ hai bên dưới có thể không hiển thị trên một số thiết bị Nếu cửa sổ bật lên không xuất hiện hãy nhấn trên màn hình Home Soundbar đã được thêm vào ứng dụng Hình minh họa bên dưới có thể khác nhau tùy thuộc vào phiên bản ứng dụng Khởi chạy ứng dụng Thêm thiết...

Page 76: ...thiết bị di động không chạm vào góc nhọn của Soundbar Soundbar hoặc thiết bị di động có thể bị trầy xước hoặc hư hỏng Bạn nên dùng ốp lưng để bảo vệ thiết bị di động Chạm nhẹ vào bề mặt rộng ở phần trên của Soundbar mà không dùng lực quá mạnh Để sử dụng chức năng này hãy cập nhật ứng dụng SmartThings lên phiên bản mới nhất Chức năng này có thể không được hỗ trợ tùy thuộc vào phiên bản ứng dụng Bật...

Page 77: ...ới hơn Với AirPlay 2 bạn có thể phát nhạc podcast và nội dung âm thanh khác từ thiết bị của Apple tới Samsung Soundbar Đảm bảo bạn đã bật Soundbar và kết nối vào cùng mạng Wi Fi với thiết bị Apple Chọn từ một ứng dụng mà AirPlay hỗ trợ hoặc Trung tâm điều khiển trên iPhone iPad hoặc Mac Chọn Soundbar từ danh sách thiết bị có sẵn để phát âm thanh hiện tại tới Soundbar ...

Page 78: ...ốt trên tường Mua các vít treo tường theo loại và độ dày của tường mà bạn muốn gắn Soundbar vào Đường kính M5 Chiều dài Phải từ 35 mm trở lên Kết nối cáp từ thiết bị đến thiết bị bên ngoài trước khi bạn lắp Soundbar trên tường Đảm bảo tắt thiết bị và rút phích cắm khỏi nguồn điện trước khi lắp đặt Nếu không có thể gây điện giật Chitiếttreotường A TYPE 450mm Thanhdẫngiátreotường x 2 M4 x L10 x 2 Ví...

Page 79: ...điểm đánh dấu trên tường Nếu các điểm đánh dấu không khớp với vị trí đinh tán bạn hãy lắp mấu neo thích hợp vào lỗ trước khi lắp vít đỡ Nếu bạn sử dụng mấu neo hãy đảm bảo các lỗ khoan đủ rộng cho mấu neo bạn dùng 5 Đẩy vít không đi kèm qua từng Vítđỡ sau đó vặn chặt từng vít vào lỗ vít đỡ Khôngđikèm 6 Lắp 2 Giáđỡgắntrêntường theo đúng hướng trên cạnh dưới của Soundbar bằng cách sử dụng 2 Đinhvít ...

Page 80: ... trượt Giáđỡ gắntrêntường xuống để Giáđỡgắntrên tường nằm chắc chắn trên Vítđỡ 10 LẮPĐẶT SOUNDBAR TRƯỚCTV 3cmtrởlên Micrô Căn chỉnh phần giữa của Soundbar với phần giữa của TV như minh họa trong hình Lúc này đặt Soundbar cách TV ít nhất 3cm sao cho không có nhiễu với tính năng nhận diện giọng nói GHICHÚ Đảm bảo đặt Soundbar trên bề mặt phẳng và vững chắc Nếu khoảng cách so với TV không đủ có thể s...

Page 81: ...E của Soundbar 1 Truy cập www samsung com tìm kiếm tên mẫu sản phẩm từ tùy chọn menu hỗ trợ khách hàng Để biết thêm thông tin về bản cập nhật tham khảo Hướng dẫn nâng cấp 2 Tải tệp nâng cấp về loại USB 3 Giải nén tệp để tạo thư mục có tên tệp 4 Lưu trữ thư mục đã tạo vào USB rồi kết nối USB với Soundbar 5 Bật Soundbar Sau đó sản phẩm được cập nhật trong vòng 3 phút Đèn báo LED Màutrắngdichuyểntừtr...

Page 82: ... trong ít nhất 5 giây Hiển thị LED thay đổi như minh họa bên dưới và sau đó Soundbar được đặt lại Đèn báo LED Nhấpnháymàuxanhlơ3lần Nhấpnháymàuđỏ Tắt Màutrắngdichuyểntừtráisang phảivàtừphảisangtrái CHU Y Tất cả cài đặt của Soundbar sẽ được đặt lại Hãy nhớ chỉ thực hiện điều này khi việc đặt lại là cần thiết ...

Page 83: ...i đầu ra âm thanh của TV chọn Soundbar TV Samsung Trang chủ Menu Cài đặt Tất cả cài đặt Âm thanh Đầu ra âm thanh Chọn Soundbar Kết nối cáp với Soundbar không được để bị lỏng Tháo cáp và kết nối lại Tháo dây nguồn hoàn toàn kết nối lại và bật nguồn Khởi tạo sản phẩm rồi thử lại Xem trang 39 NếukhôngkếtnốiTVquaHDMI ARC Kiểm tra xem cáp HDMI có được kết nối đúng cách với thiết bị đầu cuối ARC hay khô...

Page 84: ...c lắp trên đồ nội thất bằng kim loại âm thanh có thể bị rớt Kiểm tra môi trường lắp đặt và điều kiện sử dụng KhôngthểkếtnốivớiWi Fi Kiểm tra xem bộ định tuyến không dây của bạn có bật không Tắt bộ định tuyến bật lại rồi thử lại Soundbar sẽ không kết nối nếu tín hiệu không dây quá yếu Thử di chuyển bộ định tuyến tới gần Soundbar hơn hoặc loại bỏ bất kỳ chướng ngại vật nào giữa Soundbar và bộ định t...

Page 85: ...gital Surround Virtual X and the DTS logo are registered trademarks or trademarks of DTS Inc in the United States and other countries 2021 DTS Inc ALL RIGHTS RESERVED The terms HDMI and HDMI High Definition Multimedia Interface and the HDMI Logo are trademarks or registered trademarks of HDMI Licensing Administrator Inc in the United States and other countries Apple Airplay iPhone iPad and Mac are...

Page 86: ...he ENERGY STAR guidelines for energy efficiency The ENERGY STAR Program has been to reduced greenhouse gas emissions and save energy through voluntary labeling Power management setting of this product have been enabled by default and have various timing setting from 1 minutes to 5 hours The product can wake with a button press on the chassis from sleep mode ENERGYSTARqualifiedmodelonly Theother mo...

Page 87: ...Dolby 5 1ch Dolby Digital Plus Dolby ATMOS Dolby Digital Plus DTS 5 1ch LPCM 2ch GHICHÚ Samsung Electronics Co Ltd ba o lưu quyê n thay đô i thông sô ky thuâ t ma không thông ba o Tro ng lươ ng va ki ch thươ c chi mang ti nh gâ n đu ng Thậntrọng Soundbarsẽtựđộngkhởiđộnglạinếubạnbật tắtWi Fi Wi Fi Phương thức vô hiệu hóa cổng Nhấn nút CHLEVEL trên điều khiển từ xa của Soundbar trong 30 giây để Bật ...

Page 88: ...sửa chư a đầu tiên 2 Sản phẩm hoă c phụ kiện hư hại do thiên tai hoă c như ng trường hợp bất khả kháng Do thiên tai se t đánh tai nạn bị rơi va chạm để máy nơi ẩm ướt bụi bậm nhiệt độ cao Côn trùng động vật vào bên trong máy Thằn lằn Chuột Gián Có vết mốc gỉ se t vết ăn mo n bị nứt vỡ gãy biến dạng cháy nổ có chất lo ng có mùi khe t 3 Sảnphẩmhưhạidosửdụngsainguô nđiệnkhuyếncáovà không sử dụng theo...

Page 89: ...vn support THAILAND 1800 29 3232 Tollfreeforallproduct www samsung com th support MYANMAR 95 1 2399 888 www samsung com mm support CAMBODIA 1800 20 3232 Tollfree www samsung com th support LAOS 856 214 17333 MALAYSIA 1800 88 9999 603 77137420 Overseascontact www samsung com my support INDONESIA 021 5699 7777 0800 112 8888 AllProduct TollFree 0800 112 7777 AllProduct TollFree www samsung com id sup...

Reviews: