background image

42

Before using the terminal

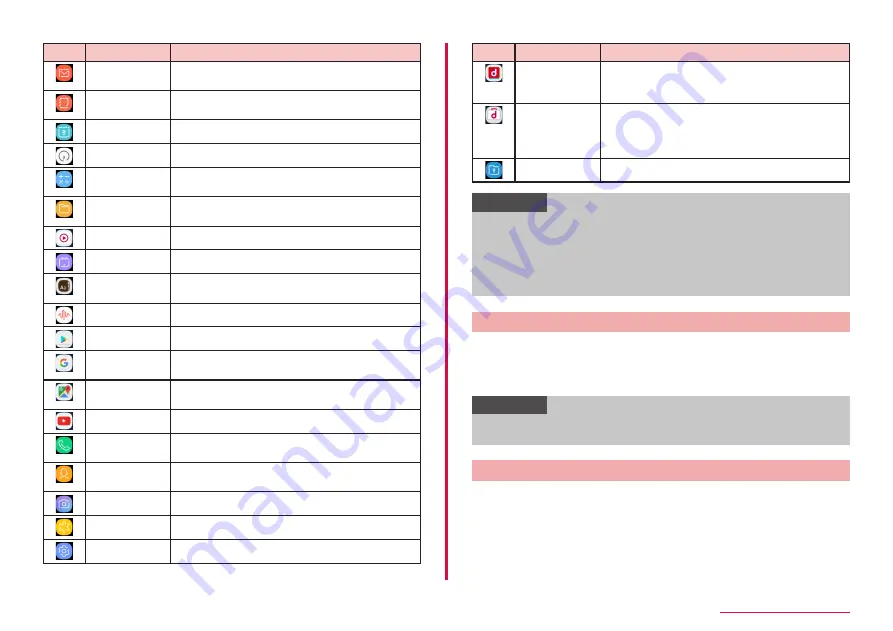
Icon

Apps

Description

Email

Set Email account to send/receive emails. → 
P.67

Galaxy Notes

Create note using software keyboard or 
handwritten input. → P.93

Calendar

Manage schedule. → P.92

Clock

Use Alarm, World Clock, etc. → P.91

Calculator

Perform various calculations with calculator. → 
P.94

My Files

View/manage data such as still images, videos, 
music, etc. → P.122

Media Player

Play music or video. → P.89

MobileTV

Watch 1Seg, etc. → P.79

Dictionary

Use dictionaries to search for words and 
phrases. → P.97

Voice Recorder Record voice sound. → P.94

Play Store

Download apps from Google Play. → P.75

Google

Search various information by the quick search 
box.

Maps

Check current location or search a destination 
with Google Maps. → P.91

YouTube

Play/post videos. → P.96

Dial

Make/receive calls using the terminal's "Dial" 
app provided by Galaxy.

Contacts

Manage contacts using the terminal's 
"Contacts" app provided by Galaxy.

Camera

Shoot still images/videos. → P.84

Gallery

View/organize still images/videos. → P.88

Settings

Make the terminal settings. → P.98

Icon

Apps

Description

dメニュー 
(dmenu)

App shortcut to access "dmenu". In dmenu, you 
can quickly access DOCOMO recommended 
sites and useful apps. → P.74

dmarket

Various services including selling digital 
contents such as music, videos, books, 
shopping sites, travel reservation sites, etc. are 
provided. → P.74

Secure Folder

Protect private files and apps securely.

Information

•  These apps are preinstalled ones when you purchased the terminal. 

Some preinstalled apps can be uninstalled. Even if you uninstall such 
apps, downloading again may be available at "Play Store" (P.75
etc.

•  When an app has notification information, number (number of 

notifications) may be displayed on the icon.

Adding shortcuts to the Home screen

From the Apps screen, touch and hold an app to add to the 
Home screen

Drag to the position you want to add to and release it

Information

•  Alternatively, from the Apps screen, touch and hold an app to add to 

the Home screen → Tap "Add shortcut to Home" to add.

Sorting apps

Touch and hold an app you want to move

Drag to the position you want to move to and release it

Summary of Contents for Galaxy Feel

Page 1: ... 17 5 SC 04J INSTRUCTION MANUAL ...

Page 2: ... Operation descriptions In this manual the operation steps such as the menu operations are simply described as follows Tap is an operation of touching lightly the display of the terminal with finger P 28 Example For tapping Apps icon on the Home screen to display the app menu and then tapping Settings icon the operation is described as follows 1 From the Home screen Settings In this manual the ope...

Page 3: ...クイックスター トガイ ド Quick start guide In Japanese only External TV antenna cable SC04 The terminal supports only 1Seg SIM ejector tool sample To check and purchase optional accessories compatible with the terminal sold separately refer to NTT DOCOMO website https www mydocomo com onlineshop options index html ...

Page 4: ...agazine 50 Home screen information 51 Making a call 52 Receiving a call 53 Operation during a call 54 Recent calls 56 Answering message 57 Making an international call WORLD CALL 57 Call settings 58 Phonebook 62 Mail Web browser Apps Settings File management DOCOMO mail 65 SMS 65 Email 67 Gmail 69 Early Warning Area Mail 70 Web browser 71 dmenu 74 dmarket 74 Play Store 75 Galaxy Apps 75 Osaifu Kei...

Page 5: ...seas services 128 Before using the terminal overseas 129 Making Receiving a call in the country you stay 130 International roaming settings 131 After returning to Japan 132 Troubleshooting 133 Anshin Enkaku Support 139 Warranty and After Sales Service 139 Updating software 141 Main specifications 142 Specific Absorption Rate SAR of Mobile Phones 144 Export Administration Regulations 147 Intellectu...

Page 6: ...s that you install or websites that you access may give the terminal instability of the operation or may send your location information or personal information registered to the terminal to outside via the Internet and the information may be used improperly Therefore verify the supplier and operating conditions of the applications and websites before using them Only the docomo nano UIM card is ava...

Page 7: ...rs to loss of sight injury burns high and low temperature electric shock broken bones injuries with residual aftereffects from poisoning etc and injuries requiring hospital admission for treatment or long term hospital attendance as an outpatient 2 Minor injury This refers to injuries burns high and low temperature electric shock etc that do not require hospital admission for treatment or long ter...

Page 8: ...or squatting with the terminal put in a pocket of trousers or skirt Putting the terminal in a pocket of outer wear and catching them in a door or a door of car Stepping on the terminal on a soft object such as a sofa bed or bedding or on a floor No disassembly Do not disassemble or remodel the equipment May cause fire burns injuries or electric shocks etc No liquids Do not let the product get wet ...

Page 9: ...rator is set The terminal may fall and cause injuries Don t Do not store the equipment in extremely humid dusty or hot areas May cause fire burns or electric shock For the waterproof and dustproof functions refer to the following P 18 Waterproofness Dustproofness Don t When children use the terminal do not let them use incorrectly without instruction by an adult for proper use May cause injuries D...

Page 10: ...xtended period May cause fire burns injuries etc by the light collecting mechanism of the lens Do When on board an airplane turn the power of the terminal off or put it in Airplane mode Follow the instructions of each airline because there are different restrictions for using the terminal on an airplane Not doing so may cause electronic equipment of airplanes to fail or malfunction If you do a pro...

Page 11: ... the fluid contact with the skin on your face or hands or clothes May cause eye or skin problems If the fluid etc enters your eyes or mouth or contacts skin or clothes immediately flush the contacted area with clean water If the fluid etc enters your eyes or mouth immediately see a doctor after flushing Don t Do not discard the old terminal together with other garbage May cause ignition resulting ...

Page 12: ... May cause fire burns or electric shock Don t When it starts to thunder do not touch adapter May cause electric shock Don t Do not short the charging terminal while it is connected to an outlet or accessory socket Do not touch the charging terminal with a part of your body such as your hand or finger May cause fire burns or electric shock Don t Do not place heavy objects on the adapter cord or do ...

Page 13: ...dapter to disconnect Not doing so may cause fire burns electric shock Do When connecting disconnecting the adapter to from the terminal do not use force and connect disconnect straight without bending May cause fire burns injuries or electric shock Do Immediately stop using the terminal if the external connection terminal is deformed Do not use it by restoring the deformation May cause fire burns ...

Page 14: ...ronic medical equipment Do When using the terminal in a medical facility be sure to observe the regulations of the facility Not doing so may affect the performance of electronic medical equipment 6 Material list Part Material Surface treatment Display touch screen Hardened glass Laminating AF coat ing Exterior case side Aluminum Anodic oxidation treat ment docomo nano UIM card microSD card tray PC...

Page 15: ...op trample or throw the terminal or give a strong force or vibration to it May cause fire burns injuries or electric shock Don t The end of the SIM ejector tool is sharp Do not point it at yourself or other people Doing so might hit yourself or other people resulting in injury or loss of sight CAUTION Don t Do not leave the equipment on unstable or sloping surfaces The terminal may fall and cause ...

Page 16: ...n or damage Read the instruction manuals supplied with individual optional devices Do not drop or give a strong impact to the terminal May cause malfunction or damage The terminal Do not press display surface forcibly or not operate with a sharp pointed objects Doing so may cause a malfunction or damage of display Do not use the terminal in extremely hot or cold places Use the terminal within a te...

Page 17: ... line phones or TV radio It is normal for the adapter to become hot while charging Continue to use it When using the DC adapter for charging keep the vehicle engine running The vehicle s battery could become flat When using an outlet with a mechanism preventing unplugging follow the handling instructions for that outlet Do not give strong shock Do not deform the charging terminal May cause malfunc...

Page 18: ...dio wave reaches At the same time there is a risk that a malicious third party may obtain unauthorized access if security settings have not been configured You are recommended to configure security settings before using wireless LAN at your decision and responsibility It is recommended to make necessary security settings on your judgment and responsibility Wireless LAN Do not use wireless LAN in a...

Page 19: ... follow the rules regarding disposal in your area Do not use the SIM ejector tool with other mobile phones May cause malfunction or damage to the terminal Note Do not use a remodeled terminal Using a remodeled terminal violates the Radio Law Telecommunications Business Act The terminal is compliant with rules on the technical standard conformance of specified wireless equipment based on the Radio ...

Page 20: ...ture Do not apply water flow stronger than allowed P 18 Do not use brush sponge soap detergent etc If mud or dirt has adhered to your terminal shake it several times in tap water put in a washbowl or other container to rinse it off and then flush it with running water Drain water in the specified steps P 19 after washing Do not wash rubbing strongly To ensure waterproofness dustproofness To avoid ...

Page 21: ...nterfere with talking If liquid such as water is splashed on the terminal while the docomo nano UIM card microSD card tray is open the liquid may enter the terminal interior and may cause electric shock malfunction etc Do not continue using the terminal and immediately switch off the terminal and contact DOCOMO specified repair office When a water droplet is attached to the terminal or when your h...

Page 22: ...al gets wet adequately drain the terminal wipe off the remaining water with a dry clean cloth or something similar and then connect it to the external connection jack on the terminal Do not use the AC adapter in a bathroom shower room kitchen lavatory or other highly humid area May cause fire or electric shock Do not touch the AC adapter with wet hands May cause electric shock ...

Page 23: ...ey t Volume DOWN Key Shutter key u Strap hole v LTE FOMA antenna 4 1 Do not cover the sensor with your hand or put a sticker on the sensor The sensor may not work properly 2 Mouthpiece Microphone upper operates for calling handsfree calling or video recording etc 3 Mouthpiece Microphone lower operates for calling handsfree calling or recording by voice recorder video recording or speech recognitio...

Page 24: ...he docomo nano UIM card has security code named PIN code P 112 Installing Removing a docomo nano UIM card Attaching docomo nano UIM card 1 Insert the tip of the SIM ejector tool into the docomo nano UIM card microSD card tray eject hole horizontally The docomo nano UIM card microSD card tray will slightly eject Not inserting the tool in a straight line might result in damage or a fault 2 Pull out ...

Page 25: ...e docomo nano UIM card microSD card tray in a straight line 3 Remove the docomo nano UIM card microSD card from the docomo nano UIM card microSD card tray 4 Insert the docomo nano UIM card microSD card tray into the terminal P 22 Information When handling docomo nano UIM card take care not to touch or scratch the IC Attaching or removing forcibly may damage the docomo nano UIM card Be careful not ...

Page 26: ...tting the microSDXC card with SDXC compatible device is needed All data is erased To copy data to from SDXC incompatible device use memory card compatible with the standard of device for copying to from such as microSDHC card or microSD card Attaching microSD card 1 Insert the tip of the SIM ejector tool into the docomo nano UIM card microSD card tray eject hole horizontally The docomo nano UIM ca...

Page 27: ...ult in damage or a fault 2 Pull out the docomo nano UIM card microSD card tray in a straight line 3 Remove the microSD card from the docomo nano UIM card microSD card tray 4 Insert the docomo nano UIM card microSD card tray into the terminal Information If you lost the SIM ejector tool you can use a paper clip instead Example of a paper clip Formatting microSD card Note that formatting microSD car...

Page 28: ...may appear shortly In such case charge again in a proper way When charging again remove the terminal from the AC adapter or DC adapter and set again Estimate internal battery operating time The operating time of the internal battery varies depending on the operating environment and the degradation level of the internal battery etc For estimate of operating time see Main specifications P 142 Estima...

Page 29: ... radio wave condition An icon indicating radio wave reception level appears on the status bar P 36 When appears you are out of LTE FOMA service area or in a place where the radio wave cannot reach Turning power OFF 1 Press Power Screen lock key for 1 second or longer 2 Power off Power off The terminal vibrates and power turns off Press and hold for 1 second or longer to power off restart and enabl...

Page 30: ... static electricity The touch screen might not operate when you use the terminal while charging In that case remove the terminal from the charger Do not cover the antenna section with your hand when operating the terminal while holding it Using touch screen Notes on using the touch screen Touch screen is designed for being touched lightly with fingers Do not push it forcibly with a finger or press...

Page 31: ...roll the content Pinch out Pinch in With touching a displayed image or web page with your two fingers widen pinch out or narrow pinch in the distance to zoom in out the content Using navigation area You can operate the screen by using the keys in the navigation area at the bottom of the terminal The name and operation of each key is as follows Navigation area History key Display recently used apps...

Page 32: ...ra Multi window Press and hold History key to switch the split screen view Smart capture After a screen capture the Scroll capture Draw Crop and Share options will appear These options allow you to capture a non displayed area of the screen draw lines on a captured screen or share trim a screen capture Palm swipe to capture Swipe the screen from right to left or vice versa with the side of your ha...

Page 33: ... the toggle switches or drag them and tap checkboxes to toggle the ON OFF and enable disable settings is ON and is OFF shows available and shows unavailable Saving display content as image Save screen content as image screen capture 1 Display a screen you want to save as an image 2 Press Home key and Power Screen lock key at the same time for 1 second or longer Information Screen capture may not b...

Page 34: ...old to display the following icon menu Displayed key differs depending on selected icon menu Switch to voice input Display clipboard and paste text etc Display Galaxy Japanese keyboard setting menu Switch between floating keyboard keyboard for one handed operation c Moves cursor left or right Tap to enter a character assigned to the same key in a row on 3x4 Keyboard When Japanese Wildcard Predicti...

Page 35: ...ction and Wildcard Prediction are set to ON Example Entering 東京都 1 When the keyboard is displayed enter と う 2 Tap 4 times とう is displayed and 東京都 is displayed in the predictive conversion options Tap to change the numbers of reading 3 東京都 Selecting Copying Cutting Pasting text 1 While the keyboard is displayed touch and hold entered character string etc appear Drag etc to move the cursor 2 Select ...

Page 36: ...diction Conversion Set whether to save a word to the dictionary and to display conversion options Voice Input Select a voice input from docomo Voice Input Google Voice Input or None Dictionary Register edit words etc to user dictionary External Application Set whether to use Mushroom plug in Backup and restore Send receive restore the backup data between the other devices and the terminal using NF...

Page 37: ... displays the Home screen Information Some functions can be changed after you have set them up Before setting up online services check that the terminal can transmit data LTE 3G GSM or that the terminal is connected to a Wi Fi network While you can use the terminal without setting up a Google account Google services such as Gmail and Google Play cannot be used Display and icons In the status bar a...

Page 38: ...vailable Wi Fi open network exists P 99 Available memory space of the terminal drops Watching recording 1Seg P 79 Omakase lock is set Notification icon Notification of docomo Data Copy P 95 Location information function of docomo apps is enabled P 116 Main status icons Status icon Weak Strong Radio wave condition Weak Strong Radio wave condition roaming Out of service area Airplane mode is set P 1...

Page 39: ...d to LTE Notification panel Scroll flick the status bar downward to display the Notification panel You can check the notification information or tap the icons to set functions Scroll and flick upward to close the Notification panel a b c d d e f g h a b i k j Contents on Notification panel Contents on Notification panel when expanded a Display current date and time b Switch ON OFF for each functio...

Page 40: ...inal is locked by Pattern PIN Password or Fingerprints and you will not be notified about them Information Quick setting buttons are displayed in blue when the functions are enabled Home screen docomo LIVE UX and TouchWiz home can be set as the screen Home screen displayed by pressing Home key For information on docomo LIVE UX see P 46 For Switching home apps refer to P 45 TouchWiz home b d e c a ...

Page 41: ...nge Set as wallpaper To select an image other than wallpaper tap Select an image Tap Set as wallpaper Information To delete a shortcut widget folder etc touch and hold a shortcut widget or folder Remove For widgets connecting to network packet communication charge may be applied Apps screen Apps screen when the Home screen is set to TouchWiz home is described 1 From the Home screen swipe up or dow...

Page 42: ...your intentions check the weather and train transfer information make outgoing phone calls and set alarms You can also enjoy chatting with various characters Icon Apps Description i コンシェル i concier i concier is a service for supporting your life like a butler or concierge This app delivers useful information for daily life such as nimbus alarm train service information or outing spot depending on ...

Page 43: ...firm Save and Spend Amazon Shopping Shopping at Amazon store McDonald s This is McDonald s official app An app for collecting coupons or latest information Icon Apps Description LAWSON This is Lawson s official app You can display digital membership using your mobile phone as a member s card search shops and find valuable exchange coupons iD アプリ iD app An app to use electronic money iD provided by...

Page 44: ... Gallery View organize still images videos P 88 Settings Make the terminal settings P 98 Icon Apps Description dメニュー dmenu App shortcut to access dmenu In dmenu you can quickly access DOCOMO recommended sites and useful apps P 74 dmarket Various services including selling digital contents such as music videos books shopping sites travel reservation sites etc are provided P 74 Secure Folder Protect...

Page 45: ... widget The quick search box appears When you enter characters in the quick search box information and search suggestions in the terminal including the entered characters appear below the quick search box If Google Now information screen appears follow the onscreen instructions a b Quick search box a An entered character appears b Tap it to delete all entered characters Tap before entering charact...

Page 46: ... of app 4 START Information To release app pinning simultaneously press and for 1 second or longer Using Split screen view You can display two windows on the screen to use different apps at the same time App to display need to be activated in advance In some apps this feature may not be available Split screen view example 1 Tap Display a thumbnail of app 2 Tap of the thumbnail of app The screen is...

Page 47: ... AGREE TURN ON Information To disable Emergency mode Turn off Emergency mode or Touch and hold Power Screen lock key for 1 second or longer to display a menu screen then tap Emergency mode To enable Wi Fi Bluetooth function in Emergency mode Settings Wi Fi Bluetooth Tap To turn Silent mode Vibrate Mute ON during Emergency mode touch and hold the Volume DOWN key until Silent mode is set Enabling Em...

Page 48: ...ons are displayed on any Home screen Managing Home screen Addable items on Home screen Move apps and add shortcuts for widgets folders etc on the Home screen Moving or adding apps etc 1 From the Home screen touch and hold a wallpaper in which apps or widgets etc are not displayed 2 Show apps Show widgets Create folder To move or add apps and widgets touch and hold an icon Drag to the Home screen s...

Page 49: ...w the onscreen instruction to set the wallpaper Adding home screens 1 From the Home screen touch and hold a wallpaper in which apps or widgets etc are not displayed Home screens or pinch in on the Home screen list 2 Add Home screen Add up to 7 pages Sorting home screens 1 From the Home screen touch and hold a wallpaper in which apps or widgets etc are not displayed Home screens or pinch in on the ...

Page 50: ...Menu Display menu such as Search Settings Help etc e Current location Indicate the apps screen page count and current location Managing apps Moving apps to Home screen 1 From the Apps screen touch and hold an app you want to move to the Home screen 2 Drag to the Home screen shown on the bottom of the screen and release it on the position you want to move to Uninstalling apps or widgets 1 From the ...

Page 51: ...y app list and notification of recommended apps sets ON From the Home screen tap Recommends of notification settings to set ON OFF Displaying all apps This feature searches the location of apps in the terminal 1 From the Apps screen Display all apps Display a list of all apps Tap an app to activate it Tap to transfer to the screen that app is on It will also be focused and displayed ...

Page 52: ...rmation You can also configure My Magazine so that it can be customized using notifications location information docomo service contract information etc 1 From the Home screen When using for the first time follow the onscreen instructions to set the journals to be displayed in My Magazine The list screen divided by genres appears Flick the article list by categories left or right to switch categor...

Page 53: ...ely from the Apps screen tap My Magazine use setting to set whether to use My Magazine Home screen information Version You can check the provider of docomo LIVE UX and version information etc of home app 1 From the Apps screen About If there is docomo LIVE UX update Update now button appears on the app information screen Then tap it to update docomo LIVE UX Help text You can view the descriptions ...

Page 54: ...about 2 seconds On the dial screen enter the phone number Add wait enter the desired phone number and tap the call is connected and the touch tone signals numbers are sent when you have tapped YES You can make calls and video calls in high quality with VoLTE To use VoLTE you and the other party both need to meet the following conditions The device supports VoLTE Both parties are in a VoLTE service...

Page 55: ...g from a mobile phone then give your present location and mobile phone number To make sure that you are not cut off during the call do not move during the call and do not turn OFF the phone after the call but keep it ON for about 10 minutes Depending on the area you are calling from you are not connected to the local police or fire department In Japan when docomo nano UIM card is not inserted to t...

Page 56: ...full screen view Operation during a call 1 A call is received A reception screen appears 2 Drag to outside of the circle A call screen appears and calling starts Voice calling screen d b c a Video calling screen a e f d g h k c j i a High quality sound indication Appears when using a call with high quality sound of VoLTE b Menu icons Tap to perform one of the following operations Add call Make a s...

Page 57: ... call Turn on extra volume Turn off extra volume 3 Switch whether or not to enable extra volume View contact Add to Contacts 2 View contact or add contact Send message 2 Send SMS Capture image 4 Capture the screen of the other party during video call Keypad 4 Show keypad Switch to headset Switch to phone 4 Set whether or not to use a Bluetooth device when calling Switch to voice call 4 Switch to v...

Page 58: ...me Tap to open the recent calls screen Tap an item on the Outgoing screen to make a call send an SMS etc Touch and hold an item to edit number delete from call log register number to decline or search location before calling e Menu Display menu f Outgoing incoming missed calls The difference between voice and video calls are not shown g Voice call key Make a voice call to the number for the call l...

Page 59: ...ded for one message Number of savable messages depends on available memory space in the device memory Making an international call WORLD CALL WORLD CALL is an international telephone service that you can use inside Japan with DOCOMO terminal For using overseas see P 128 and after Depending on the network operator the caller ID may not be shown displayed properly In this case calls cannot be made f...

Page 60: ...de turn off While the terminal is OFF or in Airplane mode a guidance message indicating that the receiver is in a place where power should be turned off is heard on the caller s terminal and then the call ends Roaming P 131 Item Description Call blocking Blocking mode Set Blocking mode Block list Manage the phone numbers which are going to have their incoming calls and messages blocked Quick decli...

Page 61: ...ications Receive notifications after calls are recorded Auto record calls Record calls to or from selected numbers automatically Auto area code Register the area code to add to the front of the phone number when calling by Dial app Suguden settings P 60 About Phone Display version information of phone app and open source licenses Not supported to video calls Registering reason of decline for SMS t...

Page 62: ...disconnect the call by putting the terminal horizontally with the screen facing down or by shaking the terminal twice during a call Voice command Set whether to disconnect the call by releasing the terminal from your ear after voice command during a call Call Set whether to call the registered number or the number in Recent calls by shaking the terminal once on the Home screen then placing the ter...

Page 63: ...s you flip it over to operate disconnect reject If a motion is detected after enabling the call ending function of Suguden the call will be ended in the following cases While the other party is holding When the answering message is active playing the answering message recording a message When the voice command is set to ON during a call you may not be able to use apps for which other microphones a...

Page 64: ...egister Edit contacts screen a b c a Account Tap Setting to select an account b Image field Tap Setting to register an image c Label key Select a content label item 3 Enter the required items When group P 63 is set to a contact tap Set in Group to group the contact 4 Save If the contact is not displayed on the contacts list screen tap Settings Accounts to display to change the display settings Inf...

Page 65: ...er display area k Search Search contacts 2 Tap the contact you want to check Profile screen appears Tap Edit to edit a contact Making a call from phonebook 1 On the Contacts list screen tap the recipient you want to call Profile screen appears 2 Tap the phone number to create SMS or make video call To create a mail tap a mail address and select an app Adding a contact to Favorites 1 On the Contact...

Page 66: ...o delete Delete member Mark contacts to delete OK Tap OK Information Only contacts saved in the save location where the same account is can be added to the group Registering My profile 1 On the Contacts list screen My profile Profile screen appears 2 Edit 3 Enter the required items Save Importing Exporting contacts You can import contacts between microSD card or docomo nano UIM card and the termin...

Page 67: ...of characters that you can send receive etc refer to Short Message Service SMS on the NTT DOCOMO website Creating and sending SMS 1 From the Home screen Messages A thread sender recipient of SMS list appears 2 SELECT RECIPIENTS screen appears 3 Select a recipient COMPOSE When sending to an unregistered recipient tap COMPOSE and enter the recipient s cell phone number To send to multiple recipients...

Page 68: ...s set to ON when an SMS is received appears on the status bar Menu on thread list screen Tap on the thread list screen to display the following items Item Description Edit Edit a thread Mark all as read Mark all threads as read Locked messages Display locked SMS Item Description Settings Notifications Notification sound Set notification sound for sounding when an SMS is received Vibrate when sound...

Page 69: ...ically If settings cannot be made automatically or you make settings manually you need to enter settings for sending and receiving Prepare the required information of Email account settings in advance The steps vary depending on the email accounts which are set 1 From the Home screen Email 2 Enter mail address and password SIGN IN An account type selection screen appears follow the onscreen instru...

Page 70: ...count settings 1 From the Home screen Email 2 Tap an account you want to set 3 Tap an item to set Item Description Sync account Set whether to synchronize with Email server Account name Change account name Your name Change user name Always Cc Bcc myself Add your mail address to Cc Bcc Signature Set whether to add signature to a mail message Also edit signature Show images Set whether to display im...

Page 71: ...il address P 115 When a setting screen of email address appears perform the settings according to the onscreen instructions and then operate it For details of Gmail on the Gmail screen Help feedback Opening Gmail 1 From the Home screen Google Gmail If the screen describing new Gmail functions appears follow the instructions on the screen 2 Tap an email you want to read Content of the selected emai...

Page 72: ...is displayed etc Also if the terminal is low on memory receiving Area Mail may fail You cannot receive the unreceived Area Mail Earthquake Early Warning Area Mail tsunami warning emergency warning related to weather etc disaster evacuation information can be resent In the case you could not receive it you can receive it again When receiving Early Warning Area Mail When Area Mail is received the Ar...

Page 73: ...yed in easy to comprehend Japanese 翻訳 アプ リ連携設定 Translation App link setting Translate the received content or use the link with the other apps Web browser Using web browser Using web browser you can view web pages as PCs On the terminal web browser can be used via a packet transmission or Wi Fi connection Some web pages may not be displayed or may not appear properly Activating web browser 1 From ...

Page 74: ... to close Opening new secret tab View with the browser without history of browser or search remained All of bookmarks and web pages saved in secret mode is not displayed when the secret mode is disabled 1 From the Home screen 2 Tabs Tab manager appears 3 TURN ON SECRET MODE 4 DON T USE PASSWORD OK If you use password tap SET PASSWORD and follow the onscreen instructions If you register password la...

Page 75: ...When is tapped on the bookmark list the following items appear Edit Select multiple bookmarks and you can delete and move them or change their display sequence etc Create folder Create a folder Bookmarks History Saved pages Touch and hold bookmarks history saved pages to display the selection screen Follow the on screen instructions Setting web browser 1 From the Home screen 2 Settings 3 Tap an it...

Page 76: ...and downloading apps introduced by dmenu a packet communication charge is applied separately Some downloaded apps automatically perform packet communications Apps introduced by dmenu may include charged ones dmarket Various services including selling digital contents such as music videos books shopping sites travel reservation sites etc are provided 1 From the Home screen dmarket Information For d...

Page 77: ...COMO is not liable for any malfunctions or disadvantage brought to you or any third party due to app which you installed and provided by a third party including Google Inc For the app which you installed from Play Store and provided by the third party including Google Inc contact each provider Some apps automatically perform packet communications Packet communication keeps active unless you discon...

Page 78: ...f the terminal is stolen or misplaced immediately contact Osaifu Keitai compatible service provider for an advice 1 Data saved to IC card in the Osaifu Keitai compatible device 2 Data stored on a docomo nano UIM card Using Osaifu Keitai compatible service To use Osaifu Keitai compatible service download Osaifu Keitai compatible app from Osaifu Keitai compatible site before setting up Depending on ...

Page 79: ...onscreen instructions to set password To unlock NFC Osaifu Keitai Lock Enter the password Tap OK Information When using NFC Osaifu Keitai Lock or appears on the status bar Be careful about remaining battery level because NFC Osaifu Keitai Lock settings cannot be canceled if the battery runs out while using NFC Osaifu Keitai Lock If the battery runs out charge the battery and then cancel NFC Osaifu...

Page 80: ...applied To obtain ToruCa by Bluetooth function set Bluetooth of ToruCa app to ON When obtaining ToruCa from an IC tag you must turn ON Reader Writer P2P on the terminal P 125 Depending on the settings of contents provider the following functions may not be available Updating sharing ToruCa displaying on the map obtaining from the IC card reader You may not be able to obtain ToruCa with an IC card ...

Page 81: ...f LTE service or FOMA service is received For this reason the signal cannot be received at places where the broadcast does not reach or while broadcasting is out of service regardless of whether the terminal is outside or inside the LTE FOMA service area Even in areas where the terrestrial digital TV broadcasting service is available you may have poor or no reception in the following places Place ...

Page 82: ...he cursor with tap OK to select an item The broadcast data of the link displays Tap to return to the previous linked program Key operations on viewing screen Adjust the volume with the volume UP key volume DOWN key Operation screen 1 On the viewing screen 2 Tap a tab at the top of the screen CH Tab Operation screen CH tab a b c j f h g d e i k l m a Channel b Image Channel can be switched by flick...

Page 83: ...file b Menu TV file playback screen a b c e f d g h i a Channel Program name b Image Flick left or right to switch TV files Play operation panel is displayed on the image TV file can be changed with Play pause the TV file with c Subtitle d Play time slider Change any time point of a TV file to be viewed by dragging e Broadcast data f Menu g Screen lock h Pop up screen Pop up display i Operation pan...

Page 84: ...nge the schedule by tapping the unexecuted schedule Confirm the result or delete from the list by tapping the executed schedule TV Link 1 On the viewing screen Settings TV Link TV Link screen a b a TV link Connect to registered site P 82 b Delete Registering TV link 1 Operate broadcast data and select an item to register to TV link The registration method of TV links varies depending on each progr...

Page 85: ...ling manually 1 On the viewing screen Reservations 2 Schedule manually 3 Enter each items on New program reservation screen 4 Finish Information On the viewing screen CH SCHEDULE Deleting reservations 1 On the viewing screen Reservations 2 Touch and hold the reservation to delete 3 Delete OK Setting channels 1 On the viewing screen Settings Change area 2 Tap a unmarked area OK 3 Select regions sel...

Page 86: ...nished under law or regulations for example nuisance prevention ordinance Please be considerate of the privacy of individuals around you when taking and sending photos using camera equipped mobile phones Before using Camera Though the camera is manufactured using extremely accurate technology some dots and lines may always be displayed to be lighter or darker than you expect Images shot under very...

Page 87: ...D card savable number of images Appears when a saving location is set to microSD card and the shootable number is 300 or less Savable number of images is estimate value Number may not change even after shooting c Remaining battery level appears when battery level is less than 15 d Current shooting mode Currently set mode appears e Skin tone f Flash settings Switch flash to OFF AUTO ON g Switch bet...

Page 88: ...mages which the Out camera is going to shoot Video size rear Set the size of the videos which the Out camera is going to shoot Picture size front Set the size of the still images which the In camera is going to shoot Video size front Set the size of the videos which the In camera is going to shoot Save pictures as previewed Laterally invert and save shot images videos Ways to take pictures Set Tap...

Page 89: ...e color tone and brightness Pro Manually adjust metering ISO speed exposure value and white balance Selfie Take selfies easily Wide selfie If you move the terminal side to side when taking a selfie you can take a selfie of a large number of people Item Description Panorama Move the terminal horizontally or vertically to shoot panorama photo Slowly move the camera in a direction not to get the whit...

Page 90: ...ion menu of each data list screen 2 Tap data When no icons are displayed tap the screen to display Displayed icons vary by displayed data Item Description Return to the data list screen Add the item to Favorites Display a function menu for each selected data type Share Share data using online services send data via Bluetooth or attaching to mail or use data on other apps Edit Edit still image and ...

Page 91: ... a music or a video to play Playing music or video starts Displayed items will be different depending on the screen playing music screen playing video screen Item Description Indicate the current playback position Drag left and right to change the playback position Display data list Set whether to automatically switch portrait or landscape view according to orientation of the terminal Play pause T...

Page 92: ...rminal as a high accuracy measurement GPS Note that DOCOMO shall have no liabilities whatsoever even if you suffer damage or loss due to a deviation of the location information GPS is a service operated by the USA Department of Defense so the GPS radio wave condition may be controlled accuracy degraded radio wave suspended etc for reasons of US national security And wave conditions differ by satel...

Page 93: ...en instructions Clock You can use Alarm World Clock Stopwatch or Timer 1 From the Home screen Clock 2 Tap a tab at the top of the screen Tapping switches screen of each function Using ALARM 1 On the ALARM screen Set each item SAVE Tap the number of hour minute to display 3x4 keyboard 2 To stop alarm drag out of the displayed circle If Alarm screen appears tap DISMISS When snooze is set tap SNOOZE ...

Page 94: ...ours Minutes Seconds on the TIMER screen 2 START The timer starts 3 To stop time up notification sound drag out of the displayed circle If Timer screen appears tap DISMISS Calendar Display Calendar to register event and task Set up a Google account to synchronize with Google calendar 1 From the Home screen Calendar 2 Event registration screen 3 Set items SAVE ...

Page 95: ...xt Switch to text input Pen Switch to pen input Brush Switch to brush input Image Insert images Voice Record voices b Category Change and add category c Edit screen d Rich text menu Change styles such as bold type and color e SAVE f Menu g BACK h Note content i Favorites Register unregister favorites j Share Select SDOC PDF Image Text only and share with other apps k ALL COLLECTIONS tab Tap COLLEC...

Page 96: ...ap data you want to play Playing starts Menu of Voice Recorder When you tap on the recorded data list screen playback screen the items will be displayed Follow the on screen instructions Calculator You can perform four arithmetic operations percent calculus functional calculus etc 1 From the Home screen Calculator When the Auto rotate is ON turning the terminal sideways switches to the alpha calcu...

Page 97: ...ck up is phonebook saved in docomo s account and the terminal When backing up phonebook entries to microSD card data without a name registered cannot be copied When available memory space of microSD card is not enough backup may not be executed In such case delete unnecessary files from the microSD card to save the memory space When the remaining battery gets low backup or restoration may not be e...

Page 98: ...ears Information The periodical backup may not be executed at the specified time while the screen lock is set or power saving mode is enabled In the case the backup will be executed when the activation is possible next time Note that a packet communication charge may be high if you set Periodical backup of Data Storage Box YouTube YouTube is a free online video streaming service You can view or po...

Page 99: ... need a Galaxy Account setting If the setting screen of Galaxy Account appears follow the on screen instructions and make settings before using 1 From the Home screen S Health S Health screen appears 2 Tap an item Information For details on S Health on the S Health screen tap Contact us S Voice Operate each terminal function such as sending SMS creating memo by voice input Before using S Voice To ...

Page 100: ...g contents Connections 1 From the Home screen Settings Connections 2 Select a menu item and make settings Item Description Wi Fi P 98 Bluetooth P 124 Data usage P 101 Airplane mode P 101 NFC Osaifu Keitai settings P 101 Tethering P 102 Mobile networks P 103 Location P 90 More connection settings P 104 Wi Fi You can use Wi Fi function of the terminal to connect to wireless access point of your home...

Page 101: ...s automatically connected when Wi Fi is enabled Information The Wi Fi network password security key is automatically saved when connection is established so that you do not need to enter it next time Deleting connection of Wi Fi network 1 From the Home screen Settings Connections Wi Fi 2 Tap a connected Wi Fi network FORGET Setting Wi Fi access point For information necessary for connection refer ...

Page 102: ...Settings Connections Wi Fi 2 ADVANCED 3 Install network certificates Using static IP address You can set the terminal to connect to Wi Fi network using the static IP address 1 From the Home screen Settings Connections Wi Fi 2 Tap Wi Fi network to connect Mark Show advanced options 3 Tap IP settings field Static 4 Set required items For using static IP address enter the following items IP address G...

Page 103: ...cation will suspend when data usage volume reaches to the set limit volume To resume the mobile data communication on the pop up screen of Mobile data turned off tap TURN ON MOBILE DATA or change the setting value of the data usage limit Airplane mode Disable all wireless connections 1 From the Home screen Settings Connections Airplane mode 2 Information Alternatively tap Airplane mode on the noti...

Page 104: ...he network name AndroidAP is set in advance 5 Tap Security field Select a proper setting from Open and WPA2 PSK 6 Tap Password field Enter password Password is not required if you set Open in Security 7 SAVE Information WPA2 PSK is set by default While connected via Wi Fi tethering on the Wi Fi tethering screen Configure Wi Fi tethering Mark Hide my device Tap SAVE to disconnect the connected wire...

Page 105: ...de refer to NTT DOCOMO website https www nttdocomo co jp service spmode When using mopera U or Business mopera Internet add access point manually For details on mopera U refer to mopera U website https www mopera net Checking the access point in use 1 From the Home screen Settings Connections Mobile networks Access Point Names Setting an access point additionally 1 From the Home screen Settings Co...

Page 106: ...ings 4 SAVE Connecting to a VPN 1 From the Home screen Settings Connections More connection settings VPN 2 Tap a VPN you want to connect to 3 Enter necessary authentication information CONNECT appears on the status bar Disconnecting VPN 1 Open the Notification panel Tap the VPN connecting notification 2 DISCONNECT Sounds and vibration 1 From the Home screen Settings Sounds and vibration 2 Select a...

Page 107: ...by sound vibration Set melody etc of ringtone notification sound for incoming call or notification or whether to vibrate the terminal Setting ringtone 1 From the Home screen Settings Sounds and vibration Notification sounds 2 Tap a notification sound you want to set When Mute is set phone ringtone does not sound Tap Add from phone to search ringtones and add Setting notification sound 1 From the H...

Page 108: ...eedback Setting key tap sounds and vibration Set whether to play sounds when tapping keys and vibrate the terminal 1 From the Home screen Settings Sounds and vibration Dialing keypad tones Keyboard sound Keyboard vibration Notifications Set apps you want to receive notifications from 1 From the Home screen Settings Notifications 2 of app that you want to receive notification from Tap ADVANCED to m...

Page 109: ... home and app screen easy to view If you are using docomo LIVE UX on the Home screen this setting does not activate Status bar Set the display of notification icons and battery remain level Screen timeout Set the time until the screen turns OFF after inactivity Keep screen turned OFF Prevent the screen from turning on accidentally while the terminal is in a dark place such as pocket or bag Screen ...

Page 110: ...d may not be displayed if being charged in a low or high temperature environment Estimated battery life Display the estimated time of the battery life to use when not charging BATTERY USAGE Display the battery usage You can also check which apps are consuming power and optimize battery usage of each app To change the settings of battery usage optimization tap Optimize battery usage Apps not optimi...

Page 111: ... security 1 From the Home screen Settings Device maintenance Device security SCAN PHONE The device security status is displayed Apps Set apps 1 From the Home screen Settings Apps 2 Tap an app Set each app according to the onscreen instructions Information From the apps setting screen tap Default apps to set usual home screen browser apps message apps etc From the apps setting screen tap to display...

Page 112: ...pted locations or devices are detected unlock the mobile terminal automatically Setting the security unlock method with authentication is required in advance Secure lock settings Set the secure lock functions such as Lock automatically Lock instantly with power key etc Always On Display P 31 Information and FaceWidgets Select the contents to display on the lock screen and Always on Display Notific...

Page 113: ...een etc for unlocking the screen lock 1 From the Home screen Settings Lock screen and security Screen lock type 2 Select unlock method Enter according to the onscreen instructions Set PIN with 4 to 16 digit number set Password with 4 to 16 characters including alphabets If the screen to set how to display the notification information for the lock screen appears follow the onscreen instructions Inf...

Page 114: ...nformation Center on the last page of this manual PIN password for screen lock The security code is used for lock function of the terminal Network security code The network security code is a 4 digit number necessary for identification or using the docomo Network Services or お客様サポー ト Customer support at reception of your request in docomo Shop or at docomo Information Center It can be set any numb...

Page 115: ...d normally If you hold down your finger too lightly or take it away too quickly your fingerprint may not be recognized correctly Try as much as possible to place your finger so that the center of the whorl of the fingerprint comes to the center of the fingerprint sensor Do not touch the fingerprint sensor before the lock screen appears by pressing Power Screen lock key Home key The fingerprint sen...

Page 116: ... Pass Galaxy account authentication 1 From the Home screen Settings Lock screen and security Fingerprint Scanner Cancel the security to protect fingerprint 2 Galaxy Pass Galaxy account 3 After this step follow the onscreen instructions to register fingerprint Unregister fingerprint 1 From the Home screen Settings Lock screen and security Fingerprint Scanner Cancel the security to protect fingerpri...

Page 117: ...ebook enter mail address password etc and tap LOG IN etc Information To edit a registered account delete the account and register again To change items to synchronize from the Home screen Settings Cloud and accounts Accounts Tap an account type Tap an account to change Set only items to synchronize to ON To synchronize manually from the Home screen Settings Cloud and accounts Accounts Tap an accou...

Page 118: ...e cloud 1 From the Home screen Settings docomo service cloud 2 Select a menu item and make settings Item Description d ACCOUNT setting Set d ACCOUNT for using in docomo apps Also you can set d ACCOUNT certification using biological information fingerprint registered in the terminal docomo cloud Make settings for docomo cloud compatible services docomo apps management Set regular update check etc O...

Page 119: ...rm practice and tutorial of touch operation Set Voice Assistant to ON to use it Dark screen Always turn the screen OFF to protect privacy Set Voice Assistant to ON to set it Press Power Screen lock key twice to enable disable this function Rapid key input Release the finger to make settings so that you enter selected characters Set Voice Assistant to ON to set it Speak passwords Set whether to rea...

Page 120: ...h audio to mono to listen to with mono ear Item Description Dexterity and interaction Universal switch Control your terminal with your customized switches Assistant menu Enable the function to improve phone accessibility for users with reduced dexterity Press and hold delay Set the time that the touch panel detects the touch and hold operation Click after pointer stops Automatically click after th...

Page 121: ...ormation leak If Voice Assistant is permitted to use the touch guide function is enabled Touch guide is a function for reading up or displaying an explanation for an item of your finger position When the touch guide function is ON tap once to select item and then double tap it for item selection and scroll with 2 fingers for operation Voice Assistant may not work correctly when the Home screen is ...

Page 122: ... Automatic time zone OFF and make settings Use 24 hour format Switch clock to 24 hour format Date and time information may be adjusted automatically Reset 1 From the Home screen Settings General management Reset Item Description Reset settings Reset the terminal to the default state except for your personal data downloaded apps settings security language and account settings Reset network settings...

Page 123: ...mation etc Legal information Open source licenses Check license agreement of open source Google legal Check the Google terms of use System Webview licenses Check Webview licenses Samsung legal Check End user license agreement Device name Check change name of the terminal Regulatory information Display Regulatory information of the terminal Model number Check model number Software information Check...

Page 124: ... on microSD cards that can be used for this terminal refer to microSD card P 24 For how to attach remove microSD card refer to Attaching microSD card P 24 and Removing microSD card P 25 File operation Folder and file operation Use My Files to display or manage various data such as still images videos music or document saved on the terminal or microSD card Depending on the folders there are some op...

Page 125: ...u want to delete DELETE DELETE Moving Copying a file or folder 1 From the Home screen My Files 2 Tap category storage Tap a folder as required 3 Touch and hold a folder file you want to move copy Move Copy 4 Display a folder to move to copy to DONE Menu of My files The items appear by tapping on the folder file list screen on the main screen in My Files Follow the on screen instructions Data searc...

Page 126: ...nd 2 4GHz If you use the terminal near a wireless LAN device reception interference may occur or the communications speed may lower Also you may hear noise or have a connection problem In these cases do the following 1 Keep the Bluetooth device over approximately 20 m away from a wireless LAN device 2 Within approximately 20 m turn off either the Bluetooth device or the wireless LAN device Bluetoo...

Page 127: ...national Organization for Standardization By using reader writer function R W or device communication function P2P put the terminal close to NFC tag to receive data send receive data to from other device equipped with NFC module For holding over the other device see P 77 Enabling NFC Reader Writer P2P function To send receive data between the terminal and an NFC equipped mobile phone etc turn Read...

Page 128: ... own or have the rights to Samsung Electronics Co Ltd takes no responsibility for any infringements on the Copyright Law You can download Galaxy Smart Switch PC from Galaxy Smart Switch homepage and install it into your computer For the terms of use or more information see Galaxy Smart Switch homepage http www samsung com smartswitch In Japanese only 1 Connect this terminal to PC via USB cable A t...

Page 129: ... terminal or the connected device Connecting to printer You can print on a compatible printer via Wi Fi or USB connection When using Wi Fi function the terminal and printer are needed to be connected to the same Wi Fi network or connected via Wi Fi Direct Make settings for wireless LAN Wi Fi and printer in advance For compatible connection cables when using USB connection refer to the instruction ...

Page 130: ...e used in LTE network 3G network and GSM GPRS network service areas It can also be used in countries regions supporting 3G 850 MHz GSM 850 MHz networks Information For country codes international call access codes universal number international prefix supported countries areas and network operators refer to NTT DOCOMO website Available overseas services Available Main Communication services LTE 3G...

Page 131: ...g on overseas network operators After arriving overseas When you arrive overseas and turn on the terminal an available network is automatically connected Connection The optimum network will be selected automatically if Select automatically is selected in Network operators Settings for overseas use Setting data roaming To perform packet communications overseas set Data roaming settings to ON 1 From...

Page 132: ...call access code or Universal number international prefix for the country is needed Making Receiving a call in the country you stay Making a call to outside country you stay including Japan You can make a call from the country you stay to other country using the international roaming service For details on available countries network operators etc refer to NTT DOCOMO website 1 From the Home screen...

Page 133: ...er dialed as a domestic call in Japan To have the other party make a call from the outside Japan to the terminal in the country you stay Regardless of countries you will receive a call via Japan The other party should dial with prefix an international access code and 81 Country code of Japan International access code of the country the dialer stays 81 90 or 80 70 XXXX XXXX International roaming se...

Page 134: ...r s phone number when there is an incoming call without notifying the phone number Noti while roaming paid P 131 Roaming guidance paid P 131 Voicemail service paid Take messages from callers when you are in a place the signal does not reach or turn off the terminal Separate subscription required Call forwarding paid Forward incoming calls to another mobile phone etc that is registered in advance S...

Page 135: ...u cannot turn the power off Note that data and the settings may be erased since the operation restart forcibly Charging Trouble Check and remedy Cannot charge the terminal Is the adapters power plug inserted to the outlet or accessory socket correctly Are the adapter and terminal inserted correctly When using an AC adapter sold separately are the Micro USB plug of the AC adapter and terminal inser...

Page 136: ...erminal is turned ON for a long time the clock may go wrong Make sure that Automatic date and time is set and turn on the terminal at places where signal is strong P 120 Trouble Check and remedy Terminal operation is unstable It may be caused by apps installed to the terminal after purchase If problems improve when you start in Safe mode a function to activate the terminal in a mode similar to def...

Page 137: ...nd call again Is the terminal set to Blocking mode P 58 Due to the crossing of radio waves at the crowded public places calls mails are crossed and the connection status may not be good In that case calling sound is played Move to other place or call later Cannot connect to network Do you use the terminal at a place where signal is weak Turning the terminal power OFF and ON again may work for the ...

Page 138: ...operator Try to change the network settings or settings for overseas network operator Set Network mode to 4G 3G GSM auto connect P 129 Set Network operators to Select automatically P 129 Turning the terminal power OFF and ON again may work for the restoration P 27 Trouble Check and remedy Cannot perform data communication overseas Set Data roaming to ON P 129 Cannot use the terminal suddenly while...

Page 139: ...er the device on the terminal If you register the device again after deleting the registration delete the registrations on both Bluetooth device and the terminal and then newly register the device Cannot call from the terminal with external device connected such as a car navigation or hands free device If calls are made several times when the other party does not answer or is out of service the ca...

Page 140: ...er you end the call P 52 Error messages Cause and remedy Page Unable to set due to no signal Appears when you try to change the calling mode settings when you are out of the service area Set in a place with good reception P 36 Unable to update software A network or server error occurred Try again later Communication with the server failed Wait for a while and retry the operation P 141 Camera faile...

Page 141: ...進む Go to Remote support connection screen 同意する Agree 4 Enter connection number notified by DOCOMO 5 Enkaku support starts when you are connected Warranty and After Sales Service Warranty The terminal is provided with a written warranty Make sure that you receive it Check the written contents and items such as 販売 店名 お 買い上げ日 Shop name date of purchase and keep it in a safe place If it does not conta...

Page 142: ...t trouble repair shop compatible index html In Japanese only However depending on the malfunctioning part repair may not be possible due to a lack of replacement parts Please contact a repair counter specified by DOCOMO Notes Do not modify the terminal or its accessories Doing so may cause fire injury or damage The modified terminal may be repaired only if the owner agrees on that all the modified...

Page 143: ...te files During the installation of the update files for software update all functions including making receiving phone call are not available When you cannot perform any operations because of the failure of the software update please take your terminal to DOCOMO specified repair office Updating software only with the terminal You can update the software of the terminal by connecting network with ...

Page 144: ...n camera Out camera Approx 15 9 mil pixels In camera Approx 5 0 mil pixels Digital zoom Up to Approx 4 0 x 80 levels 1Seg Continuous watching time Approx 960 min Recording time Approx 6 H 1GB Display language Japanese English Korean Chinese Portuguese Vietnamese Input language character input voice input Character input Japanese English Korean Voice Input Using Google voice typing Headphone connec...

Page 145: ...n settings temperature or radio signal reception in the area no reception or weak etc A use of the Internet connection reduces the call communication stand by time Composing emails or starting apps also reduces call communication stand by time even if you do not call or use the Internet Stationary continuous stand by time is the estimated average operation time when radio signal reception is norma...

Page 146: ...uses the minimum required to reach the network Therefore in general the closer you are to a base station the lower the power output of the device is This mobile phone can be used in positions other than against your head Please keep the mobile phone farther than 1 5 cm away from your body by using such as a carrying case or a wearable accessory without including any metals This mobile phone satisf...

Page 147: ...r is encouraged to try to correct the interference by one or more of the following measures 1 Reorient relocate the receiving antenna 2 Increase the separation between the equipment and receiver 3 Connect the equipment into an outlet on a circuit different from that to which the receiver is connected 4 Consult the dealer or an experienced radio TV technician for help FCC RF exposure information Yo...

Page 148: ... As mobile devices offer a range of functions they can be used in other positions such as on the body as described in this user guide In this case the highest tested SAR value is 1 350 W kg As SAR is measured utilizing the devices highest transmitting power the actual SAR of this device while operating is typically below that indicated above This is due to automatic changes to the power level of t...

Page 149: ...you make duplications etc using this product please observe the copyright law and use them properly Also for recorded items using the camera function mounted to this product please use them properly as above Portrait rights Portrait rights are claimable rights against taking photos by others publishing or using the taken photos without any permission In Portrait rights there are moral right author...

Page 150: ...ademarks of Rovi Corporation and or its subsidiaries in Japan Other products and company names written in this manual are registered trademarks or trademarks of each company Others This product is licensed based on MPEG 4 Visual Patent Portfolio License The use of MPEG 4 Video Codec function is allowed for personal and nonprofit use only in the cases below Recording moving pictures that conform to...

Page 151: ...ures or malfunctions For details on unlocking SIM lock refer to NTT DOCOMO website 1 Insert the other company s SIM card 2 Start up the terminal and release the screen lock 3 Enter SIM unlock code 4 UNLOCK Information If the SIM lock release code is incorrectly entered 10 times in a row the SIM lock release will be blocked You can check the SIM lock release code status via the lock screen when sta...

Page 152: ...opy 95 Data Storage BOX 96 microSD card 95 docomo LIVE UX 46 Kisekae 47 DOCOMO mail 65 docomo nano UIM card 22 Attaching 22 PIN code 112 Removing 23 Double tap 28 Drag 29 Index A AC adapter 26 Charging 26 Access point Initializing 103 Setting 103 Accounts 115 Delete 116 Setting 115 Adjusting volume 105 Advanced features 30 Airplane mode 101 Always On Display 31 Answering message 57 Apps 109 Apps s...

Page 153: ...26 Gallery 88 Gmail 69 Google Maps 91 Searching direction 91 Google Play 75 GPS 90 H Holding call 55 Home screen 38 I Initial settings 35 Internal battery Charging time 142 Continuous call time 142 Continuous standby time 142 Internal battery life 26 International call WORLD CALL 57 International roaming WORLDWING 128 L Location information 90 Lock screen 28 Logs of dialed calls 56 Logs of receive...

Page 154: ... Screen capture 31 Screen saver 107 Scroll 29 Security code Network security code 112 PIN code 112 PUK code 112 Setting menu 98 Setting screen lock 27 Setting unlock method for the screen lock 111 Setting up SIM card lock 113 Setting vibration pattern 105 S Health 97 Silent mode 105 SMS 65 Creating and sending 65 Receiving 66 Software Update 141 Specific Absorption Rate SAR 144 Specifications 142 ...

Page 155: ...Q 133 Turning power ON OFF 27 V Video Playing 88 Shooting 86 Video call Calling screen 54 Making a call 53 Viewing apps screen 48 Viewing homescreen 46 Voice mail service 58 Voice Recorder 94 VPN 104 W Waterproofness Dustproofness 18 Web browser 71 Wi Fi 98 WORLD CALL 57 Y YouTube 96 Numeric 1Seg 79 ...

Page 156: ...king on station platform or road makes your eyesight extremely narrow It may cause accident Stop in a safe place and then use smartphone Functions designed for public use There are some advanced settings such as not answering incoming call or muting sound etc Public mode turn off P 58 Tells the caller via a guidance message that receiver need to turn the power off and the call ends automatically V...

Page 157: ... after returning to Japan Inquiries for sample accessories Galaxy Customer Support Center In Japanese only R0120 363 905 Business hours 9 00 a m to 8 00 p m open all year round Please confirm the phone number before you dial Check the supplied sample accessories in this manual Don t forget your mobile phone or your manners When using your mobile phone in a public place don t forget to show common ...

Reviews: