background image

04  Initial Setup

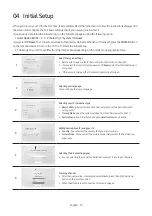
When you turn on your TV for the first time, it immediately starts the Initial Setup. Follow the instructions displayed on 
the screen and configure the TV's basic settings to suit your viewing environment.
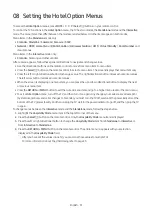
If you already completed the Initial Setup, run the Initial Setup again using the following menu.


Hotel Option

 (

MUTE

 > 

1

 > 

1

 > 

9

 > 

Select

E

) > 

System

 > 

TV Reset

If you select 

TV Reset

, the TV resets all values to their factory defaults. When the TV turns off, press the 

POWER

 button 

on the remote control to turn on the TV. The TV starts the Initial Setup.


The image on your TV may differ from the image above depending on the model and geographical area.

1

Next

Region Settings

Change the region settings if you are located in North America, Latin

America, or Europe. Your TV might not function if the region settings are not

correctly configured. When the region settings are changed, your TV will

automatically restart to apply them.

Country List

Select the region settings


Before select region, refer to the country list information on the right.


If you select the incorrect region, execute 

TV Reset

 again after the Initial Setup is 

completed.


If the region is changed, the TV automatically turns off and on.

2

Welcome to Samsung TV!

Select your language to start the on screen setup.

Bienvenue!

Welcome!

Bienvenido!

Use the Up and Down buttons to change the

language. 

Next

Selecting your language

You can change the menu language.

3

Next

TV installation Type

Select your TV installation type.

TV Basic Setup

Cloning Mode

Factory Menu

Start basic setup to use your TV.

Selecting your TV installation type


Basic TV Setup

: Select to proceed to the next step to set the basic options for 

using your TV.


Cloning Mode

: Copy the system settings from the USB or server to the TV.


Factory Menu

: End Initial Setup and go to 

Hotel Option

 menu directly.

4

Next

Configure your TV

Set the basic options to use your TV.

Country

Others

Select the country that you are currently in.

1

2

3

Picture Mode

Standard

Setting basic options for using your TV


Country

: You can select the country that you are currently in.


Picture Mode

: You can select the picture mode that provides the best viewing 

experience.

5

Next

Previous

Terr./Cable Signal Detected

Select each item and choose the correct setting. Then select Next to search for channels.

Select the connected aerial that you want to use to get channels

Aerial

Next

Terrestrial

2

3

Channel Type

Digital & Analogue

Selecting the broadcasting signal


• You can selecting the connected aerial that you want to use to get channels.

6

Next

Scan Channels

Scanning for channels...

Digital
- TV

- Radio

- Data/Other

Analogue

Stop

2

3

Previous

Scanning Channel


After channel sanning is completed, select 

Next

 or press the right directional 

button on the remote control.


When the RF cable is not connected, this step is skipped.

English - 19

Summary of Contents for EJ690

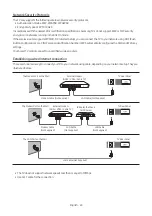
Page 1: ...product To receive more complete service please registeryour product at www samsung com Model Serial No INSTALLGUIDE Questo manuale d istruzione fornito da trovaprezzi it Scopri tutte le offerte per S...

Page 2: ...orSTB identifies the TV the TVgives full control to the SBB orSTB Standalone mode In this mode the TVworks alonewithout an external SBB orthe STB The TVhas a Hotel Option menu that letsyou easilyset i...

Page 3: ...ace such as a bookcase orbuilt in cabinet unless proper ventilation is provided Do not place this apparatus nearorovera radiatororheat register orwhere it is exposed to direct sunlight Do not placeves...

Page 4: ...es high humidity chemical substances orwhere itwill operate 24 hours a daysuch as in an airport a train station etc Failure to do so maylead to serious damage toyourTV Use onlya properlygrounded plug...

Page 5: ...ntrol About the Buttons on the Remote Control 17 Installing batteries into the remote control 18 04 Initial Setup Using the TVController 20 05 The Connection Panel 06 Connections Connecting toyourInte...

Page 6: ...Remocon 10 Settingthe Soundbar Samsung Soundbar AirTrack and HospitalityTVs in 2018 53 11 Editing Channels Channel Bank Editor Smoovie TVOnly 54 Using Channel Editor 55 12 Anti theft Kensington Lock...

Page 7: ...nyaccessories hidden behind orin the packing materialswhen opening the box An administration fee maybe charged in the following situations a An engineeris called out atyourrequest but it is found that...

Page 8: ...purchase contract This product and its electronic accessories should not be mixedwith othercommercialwastes fordisposal Correct disposal ofthe batteries inthis product Applicable in countrieswith sep...

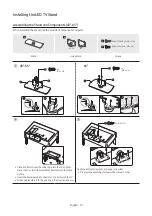
Page 9: ...swivel To configure the TVso that it swivels 20 left and right insert the prong on the bottom of the stand through the curved hole in the Bracket HolderSwivel marked 20 Then fix the Bracket HolderSwiv...

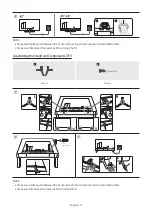
Page 10: ...ews x 4 M4 x L14 43 55 1 x 4 M4 x L14 65 2 3 x 4 M4 x L14 Tight the bottom screwfirst and upperscrewlast Progress the assemblyof screwin the manual s order Place a soft cloth overthe table to protect...

Page 11: ...sure that at least two persons lift and move the TV Assemblingthe Stand and Components 75 A B x 4 M4 x L14 Stand Screws 1 2 3 x 4 M4 x L14 NOTE Make sure to distinguish between the front and back of e...

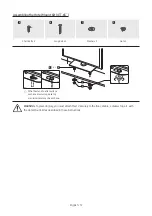
Page 12: ...Nut x 2 A B C D or Affix the stand to a flat surface such as a dressertop desk top orentertainment centre as shown WARNING To prevent injury you must attach this TVsecurelyto the floor a table a dres...

Page 13: ...epending on the model Thewall mount kit sold separately allowsyou to mount the TVon awall Fordetailed information on installing thewall mount see the instructions providedwith thewall mount Contact a...

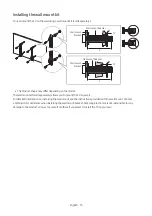
Page 14: ...sure the screws are firmlyfixed to thewall We stronglyrecommendyou drive the screws into a stud 2 Insert the screws into thewall brackets and firmlyfasten the screws to the topVESAscrewholes on the ba...

Page 15: ...cations Screws that are too long maycause damage to the inside of the TVset Forwall mounts that do not complywith theVESAstandard screwspecifications the length of the screws may differdepending on th...

Page 16: ...n a fire ora problem with the product caused byan increase in its internal temperature Whenyou installyourTVwith a stand orawall mount we stronglyrecommendyou use parts provided bySamsung Electronics...

Page 17: ...ccording to the directions on the TVscreen Launches the APPS Press to displayinformation on the TVscreen Moves the cursor selects the onscreen menu items and changes thevalues seen on the TV s menu Tu...

Page 18: ...s to the symbols in the batterycompartment Use the remote controlwithin 7 m of the TV Bright light mayaffect the performance of the remote control Avoid using nearbright fluorescent lights orneon sign...

Page 19: ...e Up and Down buttons to change the language Next Selectingyourlanguage You can change the menu language 3 Next TV installation Type Select your TV installation type TV Basic Setup Cloning Mode Factor...

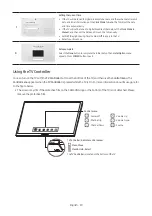
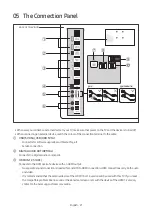
Page 20: ...Selectyourtime zone 8 Setup Complete Your TV is now ready to use Done Setup complete Select the Done button to complete the Initial Setup Then Hotel Option menu appears Press POWER button to exit Usin...

Page 21: ...Service connection DIGITALAUDIO OUT OPTICAL Connects to a DigitalAudio component HDMI IN1 2 3 ARC Connects to the HDMI jack of a devicewith an HDMI output No separate sound connection is needed foran...

Page 22: ...sometimes labelled Y B Y and R Y orY Cb and Cr ForAVdevices connect RCAaudio cables not supplied to L AUDIO R onyourTV withAVIN Component IN Adapter set and the otherends to corresponding audio out ja...

Page 23: ...ion protocols Samsung recommends using IEEE 802 11n Otherwise whenyou playvideo overa network connection thevideo maynot playsmoothly To use awireless network the TVmust be connected to awireless rout...

Page 24: ...s the SSID andWPAkey settings YourSmart TVcannot connect to uncertifiedwireless routers Establishing awired Internet connection There are three mainways to connectyourTVtoyournetwork using cable depen...

Page 25: ...erspecification Band pass filtercentre frequency 37 9 CarrierFrequency Duty50 Minimum Burst Length tburst 12 pulses 316 us Minimum Gap Time Between the burst tburst gap 16 pulses 422 us Minimum Gap Ti...

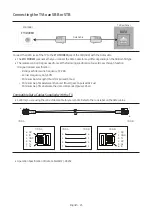
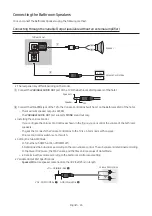
Page 26: ...y Installing theVolume Control Ifyou configure theVolume Control Box as shown in the figure you can control thevolume of the bathroom speakers The jack that connects theVolume Control Box to the TVis...

Page 27: ...Rear 3 RS 232 Data Cable 1Video Audio Cable 2 HDMI cable The rearpanel maydifferdepending on the model 1 Connect the AVIN VIDEO L AUDIO R port of the TV withAVINAdapter to the RCAport of the RJP 2 Con...

Page 28: ...callyturn off anyLEDs after5 minutes to avoid unnecessarylight pollution in the hotel room The LEDs thatwere turned offwill turn on again if the guest touches anyof the buttons and the 5 minute timer...

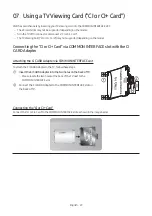
Page 29: ...nectingthe CI orCI Card via COMMON INTERFACE slotwiththe CI CARDAdapter Attachingthe CI CARDAdaptervia COMMON INTERFACE slot To attach the CI CARDAdapterto the TV followthese steps Insertthe CI CARDAd...

Page 30: ...one number the CI orCI CARD ID the Host ID and otherinformation will be displayed in about 2 3 minutes If an errormessage is displayed please contactyourservice provider When the configuration of chan...

Page 31: ...splaying one menu item you can press the up ordown directional button to displaythe next orprevious menu item Press the RETURN orMENU button to exit the current menu item and go to a highermenu level...

Page 32: ...itwas turned off PowerOn Channel Num When the TVis turned on it switches automaticallyto this channel PowerOn Channel Type Select the type of the channelwill be displayedwhen the TVis turned on ATV an...

Page 33: ...aswell Cable type channels OFF When set to off guest can access the channel map corresponding to the selected antenna type Aerial Cable orSatellite only The Channel List Channel Editorwill onlyshowth...

Page 34: ...dcasting menu is disable forguest ON Broadcasting menu is enable forguest Panel Button Lock Turning the TVControllerbutton operations on oroff Unlock Unlocks TVControllerbutton Lock Locks TVController...

Page 35: ...utton on the remote control and then select external device icon Remote Jack Pack PriorityAV Letsyou set the priorityof the 7610 RJPAVjack You can choose 1 2 with 1 being the highest and 2 the lowest...

Page 36: ...put source OFF Auto Source function is disabled Anynet Return Source Select the source to return afterstopping anAnynet HDMI CEC connection This function is especiallyuseful forthe Guestlink RJP Bathr...

Page 37: ...rk menu is displayed The Network menu is used for setting network like internet access Network Status Viewthe current network and Internet status SoftAP Turns on oroff the SoftAP When SoftAP is set to...

Page 38: ...es Afterthe correct password is entered options such as Password Setting Password Reset and SecurityMode are available Password Setting Usercan change the password Password Reset Password is reset to...

Page 39: ...to Pro Idiom encryption Ifyourbroadcasting system does not have a problem contact Samsung Service If STB SIVendorSetting appears to have failed and communication with the SI STB orSBB has failed first...

Page 40: ...k ServerURLSetting You can enterthe address of REACH IPServer Example http 192 168 1 2 443 REACH Channel This is a DTVcable channel PTC numberforreceiving REACH datawhen the REACH RF Mode set to on Th...

Page 41: ...played However all the hot keys except forroom control key on the HMS remote controlwillwork normallywithout the HalfTickerUI Display Virtual Standby Virtual StandbyMode When theAC powercord is plugge...

Page 42: ...he directional buttons on the remote control to enterthe title and message and select Save Hotel Logo HospitalityLogo Hotel Option MUTE 1 1 9 SelectE Logo Message Hospitality Logo HospitalityLogo func...

Page 43: ...E 1 1 9 SelectE Cloning The USB cloning function letsyou download user configured settings Picture Sound Channel and Hotel Option from one TVto a USB device and then upload these settings from the USB...

Page 44: ...5 Press the up ordown directional button to select Clone USBto TV and press the SelectE button on the remote control 6 The message Clone USBto TV is displayed Press the SelectE button on the remote c...

Page 45: ...0 Yes PowerOn Source TV HDMI1 HDMI2 HDMI3 AV COMP Last Saved Yes PowerOn Option PowerOn Standby Last Option Yes Channel Channel Setup No Channel Editor No Channel Bank Editor No Mixed Channel Map ON O...

Page 46: ...igh Yes Logo Message Welcome Message ON OFF Yes EditWelcome Message Yes HospitalityLogo OFF BMP AVI BOTH Yes HospitalityLogo DL Yes Logo DisplayTime 3 second 5 second 7 second Yes Cloning Clone TVto U...

Page 47: ...ome MenuAuto Start ON OFF Yes REACH Solution REACH RF Mode ON OFF Yes REACH IPMode ON OFF Yes ServerURLSetting Yes REACH Channel Yes Group ID ALL 1 511 No REACH Update Time OFF 12 00 am 2 00 am 12 00...

Page 48: ...nyguest side menuvalues to the cloned standardvalueswhen the TV is turned off and then turned on again Note that SettingAuto Initializeworks on cloned guest side menuvalues only Settingswhich have not...

Page 49: ...Point Settings 20 Point Interval Red Green Blue Gamma HLG ST 2084 BT 1886 RGB OnlyMode ColourSpace Settings ColourSpace Colour Red Green Blue Sound Sound Output Sound Mode Expert Settings Balance Equ...

Page 50: ...ock Clock Mode Time Zone DST GMT Language Auto Protection Time External Device Manager Anynet HDMI CEC Game Mode HDMI UHD Color HDMI Black Level Input Device Manager Keyboard Language Keyboard type Ec...

Page 51: ...gh a USB device To update the TV s software followthese steps 1 Insert a USB flash dirve containing the software update file into the USB port of the TV 2 Run Update Now MENUm Support Software Update...

Page 52: ...To set a TV s ID code followthese steps 1 Aim the remote at the TV and then press the MUTE button and the RETURN button simultaneouslyformore than 7 seconds Whenyou stop pressing the buttons the TVdis...

Page 53: ...owerOn PowerOnVolume UserDefined PowerOn PowerOnVolume Num set greaterthan 0 PowerOn MaxVolume set greaterthan 0 2 Connect an HDMI cable from the HDMI out port of the Soundbar AirTrack to the HDMI por...

Page 54: ...lect Smoovie 3 Go to Channel Channel Bank Editor Press the SelectE button on the remote control 4 Enterthe Channel Bank Editor Edit the Channel Bank Bank1 Free channel Select the channels thatwill be...

Page 55: ...ers and names edit the channel language and channel genre and delete channels This function is enabledwhen MyChannel set to On in Hotel Option menu Hotel Option MUTE 1 1 9 SelectE Channel MyChannel Ap...

Page 56: ...nel number the channel information is updated automatically Renamethe Channel Change the name of a channelyou select To change the name of a channel followthese steps 1 Select a channel on the Channel...

Page 57: ...creen 2 Use the directional buttons on the remote control move the focus to Edit Channel Number and SelectE button 3 Use the up ordown directional buttons on the remote control to assign the channel n...

Page 58: ...sung Please find the K icon on the rearof the TV AKensington slot is beside the K icon 1 To lock the product followthese steps 1 Wrap the Kensington lock cable around a large stationaryobject such as...

Page 59: ...5EJ690U HG65EJ690U DisplayResolution 3840 x 2160 3840 x 2160 Screen Size Diagonal 55 inches 138 cm 65 inches 163 cm Sound Output 20W 20W Stand Swivel Left Right 20 60 90 20 60 90 Dimensions Wx H x D B...

Page 60: ...d more information about powerconsumption referto the label rating attached to the product You can see the label rating attached to the back of the TV Forsome models you can see the label rating insid...

Page 61: ...rticalfrequency Hz Clockfrequency MHz Polarity horizontal vertical IBM 720 x 400 70 Hz 31 469 70 087 28 322 MAC 640 x 480 832 x 624 1152 x 870 67 Hz 75 Hz 75 Hz 35 000 49 726 68 681 66 667 74 551 75 0...

Page 62: ...000 28 125 33 750 56 250 67 500 54 000 56 250 67 500 112 500 135 000 54 000 56 250 67 500 112 500 135 000 50 000 59 940 50 000 59 940 50 000 60 000 50 000 60 000 24 000 25 000 30 000 50 000 60 000 24...

Page 63: ...Frontview Sideview The displayed image maydifferfromyourTV depending on the model 43 Unit mm 943 2 970 2 58 8 226 5 531 4 556 5 563 2 618 1 49 Unit mm 1075 8 1102 8 59 7 226 5 606 0 556 5 637 8 691 8...

Page 64: ...55 Unit mm 1211 6 1238 6 59 2 226 5 682 4 556 5 714 2 768 4 65 Unit mm 1430 5 1457 5 59 7 355 1 805 5 676 3 837 3 908 7 75 Unit mm 1652 2 1684 6 60 6 356 1 930 3 1256 7 966 4 1056 5 English 64...

Page 65: ...be checked at Displaysolutions samsung com Base Stand detail The displayed image maydifferfromyourTV depending on the model 43 Unit mm 70 0 152 0 556 5 199 1 226 5 R3 75 R9 5 135 0 49 55 Unit mm 70 0...

Page 66: ...75 Unit mm 53 8 356 1 214 5 NOTE All drawings are not necessarilyto scale Some dimensions are subject to changewithout priornotice Refer to the dimensions priorto performing installation ofyourTV Not...

Page 67: ...ED CONTENTCREATED BYATHIRD PARTY WHICH THE USER HAS ORDERED OR PURCHASED FROMATHIRD PARTY UNLESS THE USER IS SEPARATELY GRANTED RIGHTS TO USE THE PRODUCTWITH SUCH CONTENTBYALICENSED SELLER OF THE CONT...

Page 68: ...726 7864 www samsung com hu support ITALIA 800 SAMSUNG 800 7267864 www samsung com it support LUXEMBURG 261 03 710 www samsung com be_fr support MONTENEGRO 020 405 888 www samsung com support SLOVENI...

Reviews: