background image

8

As shown in the illustration, the correct way to wear your Qe fitness headset microphone, is 
over the ears, as you would wear a pair of eyeglasses. Because the Qe microphone is specially 
designed to be used up close, be sure to position the microphone directly in front of your lips. 
To avoid feedback problems, take care not to cover the microphone capsule with your hand.

Wearing the AH9 Headset Microphone

Position the headset over your head so 
that the body of the transmitter is behind 
your head. Adjust the headset so that it fits 
comfortably on your ears and is secure against 
your head. 

Note: If wearing glasses, it is recommended 

to put the AH9 transmitter on first than place 

glasses over the transmitter. 

For added comfort and fit, the headset 
includes an adjustable headband. To fit the 
headband, pull elastic strap over the ear 
hooks and locate in front of the stop point 
(A). For larger sizing, the headband can be 
moved behind the stop point (B) or completely 
removed by sliding the elastic band over the 
ear hooks and microphone capsule. 

Note: When removing the headband, first take 

off the microphone windscreen.

Summary of Contents for Airline AH9

Page 1: ...OWNER S MANUAL Headset Wireless Systems Qe Fitness Headset DE10x Headset...

Page 2: ...een damaged in any way such as power supply cord or plug is damaged liquid has been spilled or objects have fallen into the apparatus has been exposed to rain or moisture does not operate normally or...

Page 3: ...ipment does cause harmful interference to radio or television reception which can be determined by turning the equipment off and on the user is encouraged to try to correct the interference by one or...

Page 4: ...p and use If your wireless system was purchased in the United States you ll also find a registration card enclosed don t forget to follow the instructions so that you can receive online technical supp...

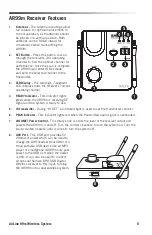
Page 5: ...signal and the system is ready to use 5 IR Transmitter During IR SET an infrared light is used to set the transmitter channel 6 PEAK Indicator This indicator lights red when the transmitted audio sig...

Page 6: ...Use these unbalanced 1 4 and 1 8 jacks when connecting the AR99m to consumer 10 dBV audio equipment Wiring is as follows tip hot sleeve ground 3 BALANCED OUTPUT Use this electronically balanced low i...

Page 7: ...Pressing the or button increases or decrease the level by one step with each push of the button There is a total 9 volume levels The Status Indicator light will flash faster for each increased step an...

Page 8: ...dy of the transmitter is behind your head Adjust the headset so that it fits comfortably on your ears and is secure against your head Note If wearing glasses it is recommended to put the AH9 transmitt...

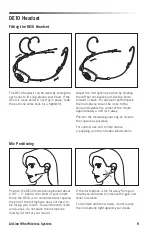
Page 9: ...reduce isolation To minimize additional noise do not locate the microphone tight against your cheek The DE10 headset can be sized by sliding the ear hooks to fit snug around your head If the DE10 is...

Page 10: ...Turn on the power to the AH9 transmitter by pressing and holding the Power button for 3 seconds the indicator LED will light yellow when the button is pressed and turns green when released and the AH...

Page 11: ...the button on the XPD receiver for 5 seconds until it begins to flash Press and continue to hold the Power button on the transmitter until the LED indicators on both units light steady indicating tha...

Page 12: ...ndicates that the AH9 is fully charged 7 Disconnect the magnetic power cable from the AH9 when the unit is fully charged If you notice your AH9 battery life is becoming shorter after a full charge you...

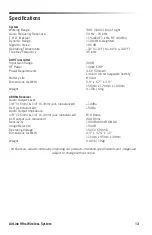
Page 13: ...ry Battery Life 8 hours Dimensions LxWxH 5 9 x 6 7 x 3 9 150mm x 170mm x 100mm Weight 0 13lb 60g AR99m Receiver Audio Output Level 1 8 3 5mm 1 4 6 3mm jack unbalanced 14dBu XLR jack balanced 9dBu Audi...

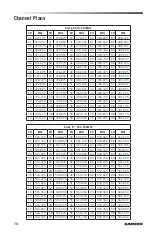
Page 14: ...8 474 175 38 478 675 58 483 175 78 487 675 98 492 175 19 474 400 39 478 900 59 483 400 79 487 900 99 492 400 Group D 542 566MHz CH MHz CH MHz CH MHz CH MHz CH MHz 00 542 125 20 546 625 40 551 125 60 5...

Page 15: ...G 863 865MHz CH MHz CH MHz CH MHz CH MHz CH MHz 00 863 050 07 864 950 14 864 800 21 864 650 28 864 400 01 863 550 08 863 100 15 863 300 22 864 850 29 864 700 02 863 750 09 863 600 16 863 150 23 863 3...

Page 16: ...Y 11801 Phone 1 800 3 SAMSON www samsontech com Follow us Having Trouble with your AirLine Wireless System We can help CONTACT OUR SUPPORT TEAM support samsontech com Our experts can help you resolve...

Reviews: