


EB 8052-E EN
9-19
Servicing and conversion
4.
Valve versions without anti-rotation fix
-
ture:
unscrew the stem connector nut (9)
and lock nut (10) from the plug stem
(5.1).
Valve versions with anti-rotation fixture:
undo the screws (303) and remove the
clamps (301) of the anti-rotation fixture.
Set aside clamps (301), screws (303),
washers (304) and stem (9).
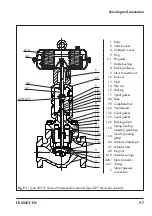
5. Gradually unscrew the two guide bolts
(163.1) of the spring loading assemblies
(163) at the hex head in a crisscross pat-
tern.
6. Lift off the two spring loading assemblies
(163) and packing gland (162) vertically
over the studs (164) off the valve bonnet
(2).
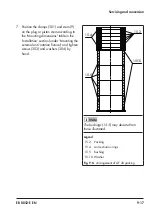
7. Unscrew castellated nut (92) and lift the
yoke (60) off the valve bonnet (2).
8. Pull out the packing follower (8).
9.
Pull plug stem (5.1) out of the valve bon-
net (2).
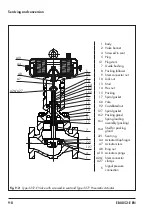
10.
Pull the entire packing out of the packing
chamber using a suitable tool.
11.
Clean the packing chamber thoroughly.
12.
Remove spiral gaskets (17, 126) from the
body (1) and valve bonnet (2).
13. Remove the seat retainer (124) from the
body (1). For versions ≥NPS 6, a special
SAMSON tool is available (
u
14. Remove seat (4) and spiral gasket (127)
from the body (1).
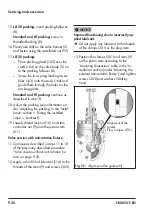
b) Removing the (screwed-in)
seat and plug
Risk of control valve damage due to incor-
rect servicing or conversion.
Î
Do not attempt to remove the seat and
plug yourself in the valve version (NPS 6
and 8) with screwed-in seat and plug.
Î
Contact our after-sales service.
Standard and HT packing
1.
Loosen threaded bushing (8).
2.
Undo the body nuts (14) gradually in a
crisscross pattern.
3.
Valve versions without anti-rotation fix
-
ture:
ensure that the stem connector nut
(9) is still fastened tight to the plug stem
(5.1).
Valve versions with anti-rotation fixture:
ensure that the clamps (301) are still fas-
tened tight to the plug stem (5.1).
4. Lift the valve bonnet (2) including yoke
(60), plug (5) and plug stem (5.1) up-
wards off the body (1) and set it aside.
5.
Valve versions without anti-rotation fix
-
ture:
unscrew the stem connector nut (9)
and lock nut (10) from the plug stem
(5.1).
Valve versions with anti-rotation fixture:
undo the screws (303) and remove the
clamps (301) of the anti-rotation fixture.
Set aside clamps (301), screws (303),
washers (304) and stem (9).
NOTICE
!
Summary of Contents for 3251-E
Page 6: ...Contents EB 8052 E EN ...
Page 34: ...4 6 EB 8052 E EN ...
Page 86: ...9 28 EB 8052 E EN Servicing and conversion ...
Page 92: ...12 2 EB 8052 E EN ...
Page 94: ...13 2 EB 8052 E EN ...
Page 96: ...14 2 EB 8052 E EN ...
Page 100: ...15 4 EB 8052 E EN ...
Page 101: ......


