


5-001
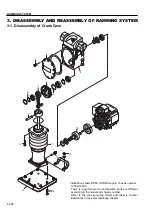
RAMMING SYSTEM
1. PRECAUTIONS FOR DISASSEMBLY AND REASSEMBLY
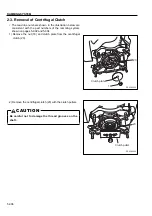
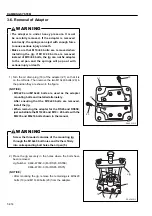
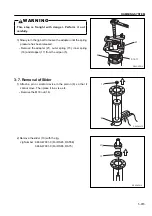
WARNING
• Do not remove the adapter without first reading disassembly procedures or taking instruction from
someone familiar with its safe removal. The adapter is under heavy spring pressure and could cause a
serious injury if the proper disassembly procedures are not followed.
• Do not run the engine without
fi
rst removing the clutch. Centrifugal force will cause the clutch shoes to
separate and
fl
y off the engine crankshaft with considerable force.
• When removing, installing, disassembling or reassembling the unit, observe the general precautions described
below.
1) Precautions for removal work
• To prevent dust from getting into disconnected hoses and tubes, cover them with a plug or similar means.
• When draining oil, use a receptacle with suf
fi
cient capacity to receive it.
• Before proceeding with the work, look for matchmarks that show the installation location. For reassembly,
place matchmarks in the required locations to prevent errors. Then remove.
• When disconnecting wiring connectors, hold the connector components so that unreasonable force is not
applied to the wires.
• Label wires and hoses to ensure correct installation location.
• When lifting parts, use lifting equipment of suf
fi
cient capacity.
• When separating parts by using pull bolts, tighten the bolts alternately.
• Before removing a unit, clean its surrounding area. Then after removal, cover it to prevent dust and other
substances form getting in.
2) Precautions for installation work
• Tighten bolts and nuts (sleeve nuts) to the speci
fi
ed torque (screw tightening torque table).
• When installing hoses, do not twist them or allow them to interfere with other parts.
• Replace gaskets, O-rings, split cotter pin, and lock plates with new parts.
• Properly bend split cotter pins and lock plates.
• When applying an adhesive,
fi
rst clean and remove oil/grease from the surfaces properly. Then apply two or
three drops to the threaded areas.
• When applying a liquid gasket,
fi
rst clean and remove oil/grease from the application surface properly, and
con
fi
rm that the surface is free of dust and damage. Then apply the product evenly.
• Clean parts well. Repair scratches, dents, burrs, rust, etc.
• Apply gear oil to rotating and sliding components.
• Apply grease to the surfaces of press-
fi
t parts.
• After installing snap rings, con
fi
rm that they are properly seated in the grooves.
• Connect wiring connectors securely after cleaning off adhering oil, dust and water.
• Use lifting bolts that are not fatigued or deformed. Screw them in fully.
• When tightening a split
fl
ange, tighten screws alternately to prevent uneven tightening.
3) Precautions when work is completed
• If coolant has been drained, securely retighten the drain cock and
fi
ll with coolant (mixing in long-life coolant)
to the speci
fi
ed level. Start the engine and allow the coolant to circulate through the piping. Then add coolant
again to the speci
fi
ed level.
• If hydraulic equipment has been removed and reinstalled,
fi
ll with hydraulic oil to the speci
fi
ed level. Start the
engine and allow the oil to circulate through the piping. Then add oil again to the speci
fi
ed level.
Summary of Contents for RS45
Page 1: ...RS45 RS55E RS65 RS75 SHOP MANUAL 3498 64694 0 ...
Page 2: ......
Page 4: ......
Page 9: ...SAFETY ...
Page 10: ......
Page 17: ...SPECIFICATIONS ...
Page 18: ......
Page 29: ...INSPECTION AND MAINTENANCE ...
Page 30: ......
Page 37: ...PARTS CATALOGUE ...
Page 38: ......
Page 50: ...4 012 PARTS CATALOGUE 2 4 SHOE ASSY 5 6 7 13 12 11 10 9 8 1 2 3 4 16 15 14 17 ...
Page 70: ...4 032 PARTS CATALOGUE 3 4 SHOE ASSY 5 6 13 16 15 14 12 11 10 1 2 3 4 9 8 7 17 ...
Page 76: ...4 038 PARTS CATALOGUE 3 7 NAME PLATE VIEW A A VIEW B B 12 11 2 15 5 9 4 1 3 7 8 10 13 14 ...
Page 92: ...4 054 PARTS CATALOGUE 4 4 SHOE ASSY 8 3 5 4 4 6 5 7 2 1 ...
Page 122: ...4 084 PARTS CATALOGUE 5 4 SHOE ASSY 8 3 5 4 4 6 5 7 2 1 ...
Page 136: ......
Page 137: ...RAMMING SYSTEM ...
Page 138: ......
Page 155: ......