background image


13 


Copyright. SAI HVAC 2021 


TM_VRAF_VAV12.19.001


3.6 Leaving Global Time Schedules Page 


Press the “Hide Show” button at the top right of the page and this will take you back in to the Overview 

Screen. 

(Figure 15 

 Blue Arrow)


3.7 Accessing Individual Zone 

 
Press on the Select Zone Button. This will drop down a list of the zones in your home or premises (Figure 15 


Purple Arrow). Then press on the zone name you wish to access and it will launch the User Interface page for 
that zone. 

(Figure 15 - Green Arrow)


3.8 Return to Overview Page 

 
Press the overview button. 
 

3.9 Browse to Other Systems 

 
If you have multiple SAI HVAC 

Air Conditioning or Lighting systems, use the “Other Systems” button to browse 

to them. Simply select the system you wish to interact with from the drop down list. 
 

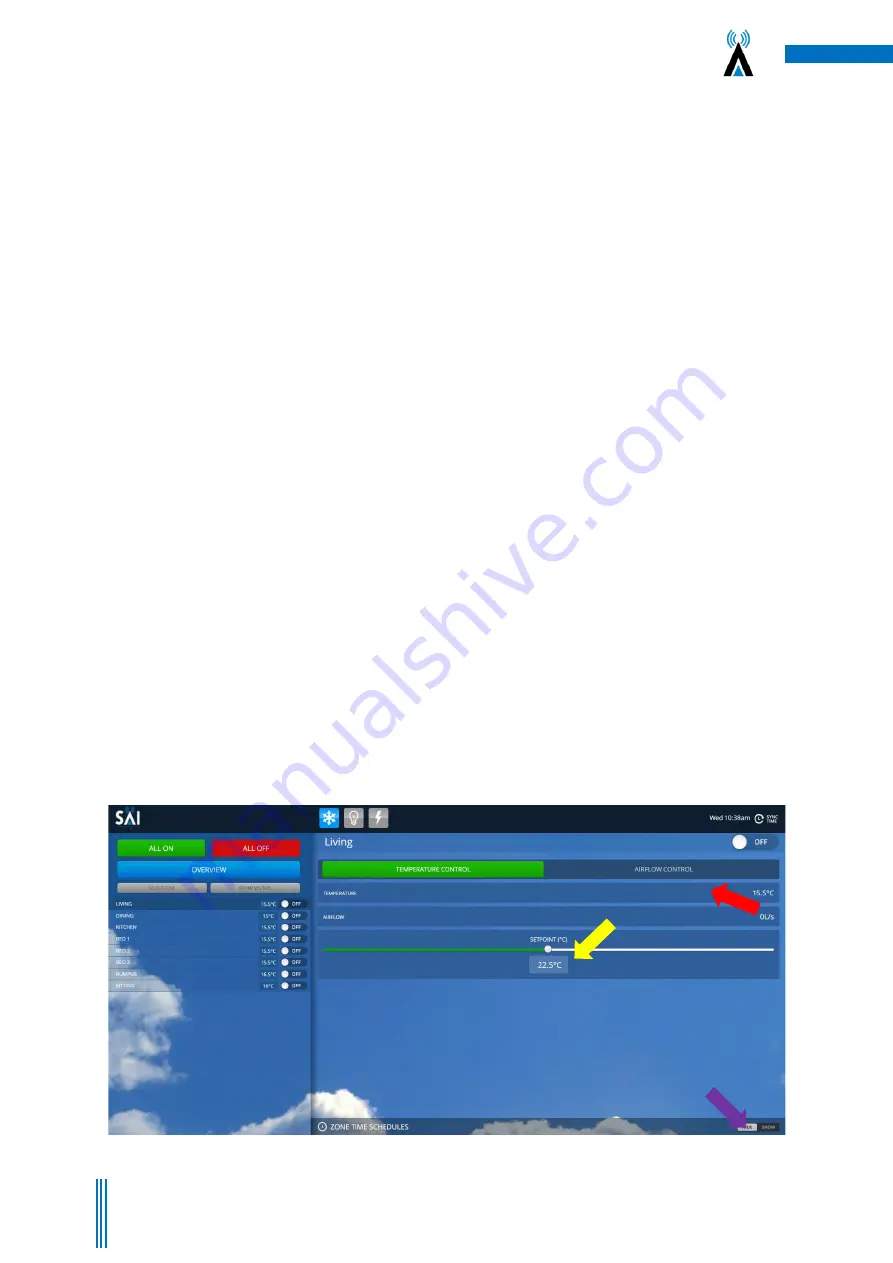
3.10 Adjusting the Settings on a Zone 

 
Use the slider bar to adjust the temperature set point within the zone 

(Figure 16 

 Yellow Arrow

). To use the 

system most efficiently, we recommend a set point between 20 and 24 degrees for each zone and the zone to 

be left in “Temperature Control” mode. To change the mode to “Airflow Control” (disables th

e temperature 

sensor and delivers the maximum airflow specified for the zone at 100%) press on the “Airflow Control” button 

(Figure 16 Red Arrow).

 In Airflow Control mode, you can use the slider bar to adjust the percentage of air being 

delivered between 0-100%. 
 

3.11 Setting Time Schedule for Individual Zones


Go to the zone and press the “HIDE SHOW” button in the bottom right hand corner 

(Figure 16 

 Orange 

Arrow). 

Then follow the same instructions as per points 4.5 and 4.6. Setting zone schedules will only action the 

event in the zone you have selected. 


Figure 16


Adjust the Set point using the slider bar (Yellow Arrow). You can use the optional Airflow control feature by pressing the “A

irflow Control 

button (Red Arrow) and adjusting the slider bar. To set time clock events in each zone, select the zone and then 

press the HIDE SHOW” button (

Purple 

Arrow), then follow the time schedule instructions in points 4.5 & 4.6. 

Summary of Contents for Compact Comfort VRF12

Page 1: ...1 Copyright SAI HVAC 2021 TM_VRAF_VAV12 19 001 Compact Comfort by SAI HVAC VRF12 Controls Install Manual Series 2 ...

Page 2: ...C reserves the right to make changes and improvements to any of the products described in this document without prior notice Under no circumstances shall SAI HVAC be responsible for any loss of income or any special incidental consequential or indirect damages howsoever caused Warranty The contents of this document are provided as is Except as required by applicable law no warranties of any kind e...

Page 3: ...the Optional Countdown Timer 11 3 4 Optional Cooling and Economy Settings 11 3 5 Setting the Global Time Schedules 12 3 6 Leaving Global Time Schedules Page 13 3 7 Accessing Individual Zone 13 3 8 Return to Overview Page 13 3 9 Browse to Other Systems 13 3 10 Adjusting the Settings on a Zone 13 3 11 Setting Time Schedule for Individual Zones 13 4 SAI HVAC VRF12 Controls 14 4 1 SAI HVAC VRF12 Navig...

Page 4: ...4 Copyright SAI HVAC 2021 TM_VRAF_VAV12 19 001 6 Troubleshooting 18 7 Other Documents in this Series 19 ...

Page 5: ...ded without the need for you to do anything 1 4 Html User Interface The html user interface can be used on most devices with a browser from a Smartphone or tablet to PC The display results vary slightly depending on your device and browser type used Many people choose the iPad mini as their UI platform but a laptop PC or even your iPhone Samsung can be used to control your SAI HVAC product 1 5 Rem...

Page 6: ...12 controls system creates its own network via Wi Fi This means you can connect the clients smart device computer to the system 1 Open your Wi Fi settings on your device and select the SAI VRF network Figure 1 if multiple chatterboxes ion site check for the Mac Address on the device you are connecting to 2 The Password is chatterbox Figure 2 3 Once connected to the controls network you can open yo...

Page 7: ...system 1 Follow the steps listed above 2 1 Direct Connection via Wi Fi to get to the User interface 2 Select SAI HVAC Logo located in the top left corner of screen 3 The Technical information window appears on the screen select Network Settings 4 Enter the SSID and Password for the client s Wifi Network 5 Check the test above the SSID to see if you are connected to the network Close browser and fo...

Page 8: ...information window select Network Settings Figure 8a SAI Network Settings Figure 9 Select SSID and enter SSID as per the client Wi Fi Network Then select Password and enter the client network password associated with the SSID This line will show you when you are connected to the Wi Fi Network ...

Page 9: ...m to your router using a cable gives a level of access control as access can only be achieved by persons or devices having your LAN access password 2 3 Connection via Mothership Recommended Providing the clients system is connected to the building LAN and that the LAN has an internet connection you can setup an account on the SAI Mothership global server to allow remote connection to the system vi...

Page 10: ...tom of page when on the LAN 2 4 Using the Mothership Cloud Service https chatterboxmothership com au Figure 11 Your devices will be listed on the control centre screen Press Launch for the device you wish to interact with Log in to the cloud service Register for the service Your local devices on your network LAN ...

Page 11: ...find the right balance for their home or building between energy reduction and comfort The slider moves the point at which the worst performing zone can terminate dynamic energy recovery and force heating or cooling The VRF12 zoning control is a unique part of the SAI HVAC system that provides the ability to dramatically reduce your energy bills It is important to note that the average household u...

Page 12: ...HIDE SHOW show button in the bottom right hand corner Figure 14 Green Arrow This will launch the Global Time Schedules screen Figure 15 Setting Global Time Schedules cont Press on any day in Schedule A you wish to activate and the day will illuminate Green Figure 15 Yellow Arrow Use the drop down bars to set on and off time for the system Figure 15 Red Arrow Repeat these steps for Schedule B It is...

Page 13: ...To use the system most efficiently we recommend a set point between 20 and 24 degrees for each zone and the zone to be left in Temperature Control mode To change the mode to Airflow Control disables the temperature sensor and delivers the maximum airflow specified for the zone at 100 press on the Airflow Control button Figure 16 Red Arrow In Airflow Control mode you can use the slider bar to adjus...

Page 14: ...N and OFF Press the ON OFF Button when on the main screen to turn all zones ON or OFF 4 1 2 Turning a Zone ON and OFF Press the ON OFF Button when in the zone screen to turn an individual zone ON or OFF Set Button Navigate Left Navigate Right Current Mode Current Temperature Navigate Up On Off Navigate Down Temperature Set Point ...

Page 15: ...ing the Single Button Capacitive Touch Room Controller The Single button room controller is an easy to use on off controller for your room or zone It has a built in temperature sensor with a central button for turning a zone on or off If the zone is switched off the LED indicator around the capacitive touch button will be turned off Otherwise the LED indicator has three different colours that sign...

Page 16: ...16 Copyright SAI HVAC 2021 TM_VRAF_VAV12 19 001 4 3 Surface 7 Touchpad Capacitive Touch Buttons Page Navigation ...

Page 17: ...ntact your installer for a replacement filter a charge will apply 5 2 Outdoor Unit Do not place any object in front of the condenser Keep free of grass leaves and any other form of debris This will allow for proper air flow and ensure unit efficiency 5 3 Vents Return Air Grill Regular cleaning of the return air grill and air vents is recommended This will prevent build up of dust and dirt 5 4 Cont...

Page 18: ...ut from the outdoor unit The air conditioner does not operate Has the mode been set correctly Is at least one zone ON Has the setpoint for ON zones been set low enough for cooling or high enough for heating Has the circuit breaker been tripped The air conditioner does not cool heat effectively Has the mode been set correctly Are all the windows and doors closed Are the filters dirty Are the intake...

Page 19: ...Vertical Part D Service Troubleshooting TM_VRAF_3H C VRAF 3Phase Horizontal Part C Installation Commissioning TM_VRAF_3H D VRAF 3Phase Horizontal Part D Service Troubleshooting TM_VRAF_1H C VRAF Mini horizontal Part C Installation Commissioning TM_VRAF_1H D VRAF Mini horizontal Part D Service Troubleshooting TM_VRAF_VRF12 Control System Multiple FCU VRF 12 TM_VRAF_VAV12 Control System Multi Zone V...

Reviews: