J
K
L
M
N
O
J
J
K
L
M
N
O
A
B
C
D
E
F
G
H
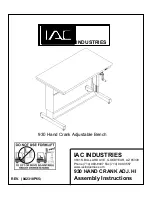
5023, 5024
5025
5023-37MP: 1 of 2; Rev. 2; 06/11
MasterFile
Safco Products Company, New Hope, MN 55428
Q
D
Q
A
OPERATING INSTRUCTIONS
HOW TO LEVEL THE MASTERFILE
The MasterFile pins and posts are aligned by
leveling, as follows. After placing your MasterFile
in position, raise lid and
pull the drawer
completely open
.
Unscrew and remove E Stabilizer Knobs at
bottom of cabinet. Slide the Stabilizer Tube out
to align holes with one of the numbered holes
shown. Use hole #2 for vellum; hole #3 for film
up to 3-mil; hole #4 for film over 3-mil. Or, set
at hole #4 for all applications. Insert Stabilizer
Knob into appropriate hole and tighten.
Do not pull the Stabilizer Tube out beyond
hole location #4.
Using the wrench supplied with the cabinet,
unscrew the rear G Levelers until the back of
the unit is at least 1/4” off floor. Then, unscrew
one of the front levelers until front comer of the
cabinet nearest that leveler is 1/4”
to 3/8” off
floor. Unscrew other front leveler until ends of
pins align with open ends of posts.
Close drawer completely.
Be sure to level the
unit side-to-side
and
front-to-back.
1
Common Hardware
Lock 1
5023-12
Key
2
5023-10
Drawer Glide, Set of 4
1
5023-14
Gas
Lift
2
5023-11
Stabilizer
Knob
4
5023-24
Caster
4
5023-25
Leveler
4
5023-26
Index/Out
Card
1
6554-01
Models 5023, 5024
Drawing Selector (for 5023)
1
6555-01
Drawing Selector (for 5024)
1
6556-01
Selector
Silencer
1
6555-05
Hanger
Knob
2
5023-23
Hanger Slide Bar
2
5023-15
Hanger
Spring
2
5023-31
Hex
Nut
2
5023-21
Q
Q
Q
Q
Q
Q
Q
Q
Q
Q
Q
Q
Q
Q
Q
Model 5025
Drawing Selector (for 5025)
1
6557-01
Selector
Silencer
1
6557-05
Hanger
Knob
4
5023-23
Hanger Slide Bar
4
5023-15
Hanger
Spring
4
5023-31
Hex
Nut
4
5023-21
Q
Q
Q
Q
Q
Q
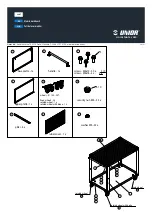
TOOLS REQUIRED: WRENCH (Included)
PART NO.
LETTER
CODE
DESCRIPTION
QTY.
PARTS LIST
ASSEMBLED UNIT,
MODEL #5024 SHOWN
Q
Q
C
Q
B
Q
F
Q
H
Q
J
When filing or retrieving, roll
the drawer out of the main
cabinet to a point where
about two inches of the
pins remain in the posts of
the cabinet.
Insert the J Drawing Selector
behind the desired drawing
so the notches ride on cabinet
posts. Use the Selector to
move the groups of drawings
from posts to pins.
When selected drawings
are on the pins, roll the
entire drawer away from the
cabinet
as far as it will go,
disengaging the pins from
the posts.
The space between pins and
posts permit filing or removal
without rubbing on adjacent
drawings. Remove drawings
from the side or the top. Always
handle by carrier strips – not
drawings. Drawings transfer to
posts when cabinet is closed.
NOTE:
ALL MASTERFILES MUST BE LEVELED SIDE-TO-SIDE AND FRONT-TO-BACK.
BEFORE RELOCATING UNIT, POSITION LEVELERS FULLY UPWARD.
STABILIZER TUBE
Q
G
Q
E
WRENCH
For questions or concerns, please call
Safco Consumer Hot Line: 1-800-664-0042
available Monday-Friday 8:00 AM to 4:30 PM (Central
Time)
NOTE:
If the drawer is jammed,
the drawer slides
need to be re-cycled. Pull hard on drawer forcing
it open. Completely open and shut drawer two or
three times. Check slide lubrication. Drawer should
now operate smoothly.
1
2
3
4
2
Q
Q
Q
Q
J
an LDI Company
G
PRODUCT WARRANTY REGISTRATION
is available online at:
www.safcoproducts.com
Minneapolis, MN 55428
www.safcoproducts.com