background image

Page 4

SAFETY...YOU CAN LIVE WITH IT

EQUIPMENT SAFETY GUIDELINES

Every year many accidents occur which could have been avoided by a few seconds of thought and a more 
careful approach to handling equipment. You, the operator, can avoid many accidents by observing the following 
precautions in this section. To avoid personal injury, study the following precautions and insist those working 
with you, and you yourself, follow them.

In order to provide a better view, certain illustrations in this manual may show an assembly with a safety shield 
removed. However, equipment should never be operated in this condition.   Keep all shields in place. If shield 
removal becomes necessary for repairs, replace shield prior to use.

Replace any caution, warning, danger or instruction safety decal that is not readable or is missing. Location 
of such decals is indicated in this booklet.

Do not attempt to operate this equipment under the infl uence of alcohol or drugs.

Review safety instructions with all users annually.

Operator should be a responsible adult. 

DO NOT ALLOW PERSONS TO OPERATE OR ASSEMBLE 

THIS UNIT UNTIL THEY HAVE DEVELOPED A THOROUGH UNDERSTANDING OF SAFETY 
PRECAUTIONS AND HOW IT WORKS.

Do not paint over, remove, or deface any safety signs or warning decals on your equipment.  Observe all 
safety signs and practice instructions on them.

Never exceed limits of a piece of machinery. If its ability to do a job, or to do so safely is in question 

DON’T 

TRY IT

LIGHTING AND MARKING

It is the responsibility of customer to know lighting and marking requirements of local highway authorities and 
to install and maintain equipment to provide compliance with regulations.  Add extra lights when transporting 
at night or during periods of limited visibility.

Lighting kits are available from your dealer or from manufacturer.

SAFETY SIGN CARE

• Keep 

safety signs clean and legible at all times.

• Replace 

safety signs that are missing or have become illegible.

• Replaced 

parts that displayed safety signs should also display current safety signs.

• Safety 

signs are available from your distributor, dealer parts department,  or factory.

  How to install safety signs:

• Be 

sure that installation area is clean and dry.

• Decide 

on exact position before you remove backing paper.

• Remove 

smallest portion of split backing paper.


• Align 

decal over specifi ed area and carefully press small portion with exposed sticky backing in place.

• Slowly 

peel back remaining paper and carefully smooth remaining portion of decal into  place.

• Small 

air pockets can be pierced with a pin and smoothed out using piece of decal backing paper.


Summary of Contents for TURBO-MAX 6046

Page 1: ...t Ave NW Sioux Center IA 51250 PH 712 722 1488 Toll Free 1 866 722 1488 www siouxautomation com ASSEMBLY CALIBRATION OPERATION REPLACEMENT PARTS READ COMPLETE MANUAL CAREFULLY BEFORE ATTEMPTING OPERAT...

Page 2: ...llow anyone in near or on mixing chamber during mixing transporting or unloading of feed Thank you for purchasing aTurbo Max MixerTruck We feel you have made a wise choice and hope you are completely...

Page 3: ...ignal word is to be limited to most extreme situations typically for machine components which for functional purposes cannot be guarded WARNING Indicates a potentially hazardous situation that if not...

Page 4: ...int over remove or deface any safety signs or warning decals on your equipment Observe all safety signs and practice instructions on them Never exceed limits of a piece of machinery If its ability to...

Page 5: ...n materials which may require specific safety equipment relative to handling of such materials Keep wheel and lug nuts tightened to specified torque Assure that truck tires are inflated evenly Give un...

Page 6: ...Keep all bystanders pets and livestock clear of work area Operate towing vehicle from operators seat only Never stand alongside of unit with engine running or attempt to start engine and or operate ma...

Page 7: ...it in an area away from human activity Do not park equipment where it will be exposed to livestock for long periods of time Damage and livestock injury could result Do not permit children to play on o...

Page 8: ...ulic leak on attachments Use a small piece of cardboard or wood Hydraulic fluid escaping under pressure can penetrate skin Openings in skin and minor cuts are susceptible to infection from hydraulic f...

Page 9: ...400 540 7 8 170 230 420 570 650 880 1 225 300 630 850 970 1310 Torque figures indicated are valid for non greased or non oiled threads and heads unless otherwise specfied Therefore do not grease or oi...

Page 10: ...tip off on the power chute should be adjusted for correct magnet and discharge angle Remove or loosen the upper bolts pivot the tip off to the desired angles and reinstall or retighten all bolts POWE...

Page 11: ...eparation or processing to be mixed in the Maxi Mixer ALL LONG AND UNCURED GRASSES ROUND BALES LARGE SQUARE BALES SMALL SQUARE BALES MATERIALS REQUIRING PREPERATION Always use cured dry hay Tough hay...

Page 12: ...sepower requirements increased strain on driveline and poor mixer performance LOADING AND MIXING MIXER OPERATION Do not overload mixer Overloading causes excessive horsepower requirements increased st...

Page 13: ...turned around or replaced to improve clean out Upper Auger Knives can be turned over for use on a new cutting edge and should be periodically sharpened or replaced if they are no longer sufficiently b...

Page 14: ...e a month check lines and connections on grease banks for leaks Oilbath Oil Use a good high quality universal oil Use an oil that meets or exceeds hydraulic oil grade Fill to the top lower oilbath rol...

Page 15: ...ROTATE 3 1 1 1 DEC106 DECAL CAUTION MAN OWNER 5 6 4 1 1 1 DEC107 DECAL WARNING CHAIN EXPOSED 5 1 1 1 DEC108 DECAL WARNING PART MOVING 4 4 6 1 1 1 DEC109 DECAL CAUTION WLD 3 3 7 4 4 4 DEC111 DECAL DAN...

Page 16: ...1 MON300048 TAPER LOCK HUB Y2 ITEM QTY PART DESCRIPTION 24 1 MON300027 CHAIN TIGHTNER TOP AUGER 25 1 MON300028 CHAIN TIGHTNER BOTTOM AUGER 26 4 MON300026 TIGHTNER BLOCK 27 2 TM03102 TIGHTNER CHAIN 28...

Page 17: ...20 1 MON700985 REEL 21 1 MON300063 CHAIN COUPLER ITEM QTY PART DESCRIPTION 22 1 MON300077 DRIVELINE SHAFT 23 2 MON300009 BEARING 24 1 TM08038 OILBATH DOOR 25 10 MON300064 OILBATH DOOR LATCH 26 2 MON3...

Page 18: ...2 6 2 6 2 6 2 63 7 9 3 08 6 3 7 7 1 7 758 6 5 7 56 1 5 5 6 866 7 1 5 5 5 5 75 6 866 7 1 5 5 5 75 6 1 5 5 0 5 75 6 803 5 5 5 7 758 6 675 3 7 08 6 187 1 187 1 187 1 187 1 187 1 2 02817 3 576 5 48 5 7 0...

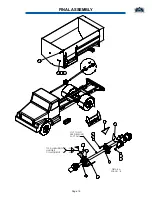
Page 19: ...Page 19 FINAL ASSEMBLY...

Page 20: ...while loading Refer to the manufactures operator manual for your specific scale option operation and maintenance ELECTRONIC SCALES Wheels and tires should be sized to support the gross weight of the...

Page 21: ...E CYLINDER MOUNT 7 1 05053 DISCHARGE CYLINDER PIN 8 1 03040 DISCHARGE CYLINDER 9 1 05045 DISCHARGE TRAY LINKAGE 10 1 05051 DOOR CYLINDER PIN 11 1 08043 DISCHARGE DOOR 12 1 08044 SLIDE TRAY EXTENSION S...

Page 22: ...025 37 2 0 025 37 2 0 025 6 187 5 25 1 0 7 52 36 317 021 7 52 25 1 021 6 7 2 6 237 216 2 7521 2 7521 20 7 6 32 5 81 7 9 9 9 6 02817 32 5 81 7 6 26 6 26 6 26 6 26 6 5 7 1 75 7 50 6 5 7 6 7 63 76 6 5 5...

Page 23: ...25 25 8 6 3 7020 6 7 72 3 7 6 6 1 1 2 5 86 1 1 6 03 9 6 63676 6 7 72 6367 21 2 630 663 6 5 0 66 67 29 5 2 175 67 2 175 67 6 7 5 027 67 5 35 5 35 0 5 5 7 0 47 3 57 6 5 37 21 175 67 1 6 86 03 66 127 6...

Page 24: ...8 3 8 3 672 672 672 187 1 187 1 2 2 26 8 6 5 66 26 2 6 5 3 67 2 675 7 3 28 283 3 1 3 1 33 372 2 51 872 372 7 8 372 5266 5 1 52 5 5 21 1 52 5 6 2 59 1 6 02817 5 2 75 1 5 6 02817 5 2 75 1 55 6 6 7 1387...

Page 25: ...Page 25 PTO DRIVELINE SAC75756 PTO DRIVELINE SAC75757 DRIVE ASSEMBLY...

Page 26: ...Frame 120 305 cm Capacity 460 cu ft 13 cu m Struck Level 368 bushels Unit Weight 15 050 lbs 6827 Kg Bottom Section 3 8 Steel Plate Upper Sides 3 16 Steel Plate Front Rear Panels 1 4 Steel Plate Reel D...

Page 27: ...Page 27...

Page 28: ...W LQFOXGH WKH RULJLQDO SDUW LQ TXHVWLRQ DORQJ ZLWK D SURSHUO ILOOHG RXW ZDUUDQW FODLP VKHHW EHIRUH D ZDUUDQW DZDUG ZLOO EH PDGH DERU DW WKH IDFWRU RU GHDOHU LV VSHFLILHG DV ODERU GRQH DW WKH 6 IDFWRU...

Page 29: ...H ILQDO 7KLV ZDUUDQW GRHV QRW FRYHU WKH FRVW RI ODERU SDUWV RU WUDQVSRUWDWLRQ FKDUJHV ZKHQ DQ SDUW RWKHU WKDQ 6 SHUIRUPV WKH UHSODFHPHQW RU UHSDLU RI SDUWV FODLPHG WR EH GHIHFWLYH QRU VKDOO WKLV ZDUUD...

Page 30: ...SIOUX AUTOMATION CENTER INC 877 1ST AVE NW SIOUX CENTER IA 51250 PH 712 722 1488 FAX 712 722 1487 TOLL FREE 1 866 722 1488 http www siouxautomation com...

Reviews: