Ryobi OLT1832, Manual
The Ryobi OLT1832 is a versatile and efficient cordless grass trimmer designed for effortless lawn maintenance. This user-friendly tool comes with a comprehensive manual to guide you through its features and operation. Download the free manual from our website to unlock the full potential of your OLT1832 and achieve exceptional results in your yard.
Share
Download


Reviews:
No comments
Related manuals for OLT1832
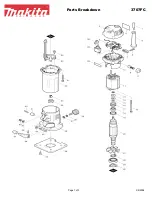
3707FC
Brand: Makita Pages: 3

90- 3373
Brand: DMX4ALL Pages: 21

72-503
Brand: Niko Pages: 16

WG783E
Brand: Worx Pages: 160

DHT260
Brand: Daewoo Pages: 16

SHC-225
Brand: Echo Pages: 2

FHT 600 E3
Brand: FLORABEST Pages: 34

300DM
Brand: Trust Pages: 3

GRS 3820 Magnetic
Brand: ECG Pages: 128

GTZ 5800
Brand: Texas Equipment Pages: 20

AH 18
Brand: Texas Equipment Pages: 20

GTX 4000
Brand: Texas Equipment Pages: 29

HT39
Brand: Flymo Pages: 11

HC-61
Brand: Sabo Pages: 44

POWER TRIM 600 HD
Brand: Flymo Pages: 80

7255U
Brand: BaBylissMEN Pages: 16

LMBLGTK-000
Brand: Ozito Pages: 6
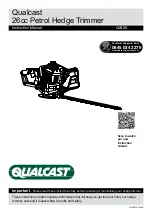
QJB26
Brand: Qualcast Pages: 10


