background image

Web-based Configuration Guide 


Port Management 

67 


3.  

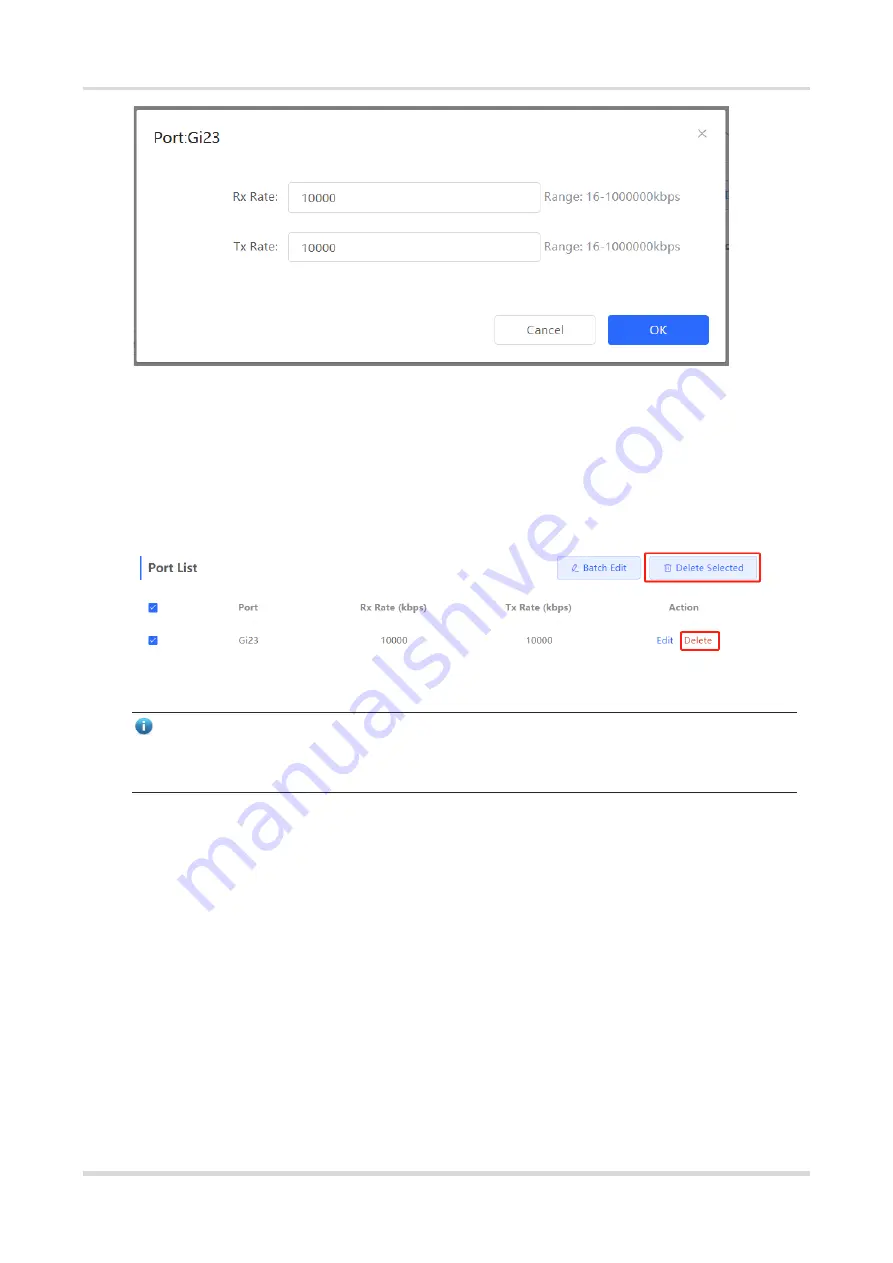
Deleting Rate Limiting 

Batch configure: Select multiple records in 

Port List

, click 

Delete Selected 

and


click 

OK 

in the confirmation 

dialog box

.


Configure one port: In 

Port List

, click 

Delete

 on the corresponding port entry, and click 

OK

 in the confirmation 

dialog box. 


Note


When configuring rate limits for a port, you must configure at least the ingress rate or egress rate. 


When the ingress rate or egress rate is not set, the port rate is not limited. 


4.6   

MGMT IP Configuration 

Choose 

Local Device 

>

 Ports 

>

 MGMT IP

The 

MGMT IP

 page allows you to configure the management IP address for the device. Users can configure 

and manage the device by accessing the management IP. 

Summary of Contents for Reyee RG-NBS Series

Page 1: ...Ruijie Reyee RG NBS Series Switches ReyeeOS 1 86 Web based Configuration Guide Document Version V1 0 Date 2022 08 31 Copyright 2022 Ruijie Networks...

Page 2: ...rchase are subject to commercial contracts and terms Some or all of the products services or features described in this document may not be within the scope of your purchase or use Unless otherwise ag...

Page 3: ...Boldface 1 Button names 2 Window names tab name field name and menu items 3 Link 1 Click OK 2 Select Config Wizard 3 Click the Download File link Multi level menus items Select System Time 2 Signs Th...

Page 4: ...version support 3 Note The manual offers configuration information including model description port type software interface for indicative purpose only In case of any discrepancy or inconsistency bet...

Page 5: ...PC that is on the same network segment as the default IP of the device to ensure that the PC can ping through the switch For example set the IP address of the PC to 10 44 77 100 Table 1 1 Default sett...

Page 6: ...ected to the power supply to restore factory settings After restoration you can use the default IP address and password to log in Caution Restoring factory settings will delete all configurations of t...

Page 7: ...set the networking modes and management password of the device 1 Network Name Identify the network where the device is located 2 Internet Select the networking mode DHCP An IP address is assigned to t...

Page 8: ...ng Network It works in Self Organizing Network mode by default The system presents different menu items based on the work mode To modify the work mode see Switching the Work Mode Self Organizing Netwo...

Page 9: ...d in device without self organizing network function As shown in In self organizing network mode the Web page has the network mode and the local device mode Click the Currently in Network mode in the...

Page 10: ...Web based Configuration Guide Login 6 Figure1 1 The Web Page in Standalone Mode Figure1 2 The Web Page in Network Mode in Self Organizing Mode...

Page 11: ...Web based Configuration Guide Login 7 Figure1 3 The Web Page in Local Device Mode in Self Organizing Mode...

Page 12: ...traffic network connection status and number of users and provides short cut entries for configuring the network and devices Users can monitor and manage the network status of the entire network on t...

Page 13: ...total traffic information Click a device in the topology to view the running status and configuration of the device and configure device functions By default the product model is used as the device na...

Page 14: ...ide Network management 10 The update time is displayed in the lower left corner of the topology view Click Refresh to update the topology to the latest state It takes some time to update the topology...

Page 15: ...ys the message A device not in SON is discovered and the number of such devices in orange under Devices on the upper left corner of the Overview page You can click Manage to add this device to the cur...

Page 16: ...rk management 12 3 You do not need to enter the password if the device to add is newly delivered from factory If the device has a password enter the configuring password of the device Device addition...

Page 17: ...e new AP can receive Wi Fi signals from the existing AP Log in to a device in the network On the Overview page click AP in the upper right corner of the topology to scan nearby APs that do not belong...

Page 18: ...Web based Configuration Guide Network management 14 Click the device SN to configure the specified device separately...

Page 19: ...o remove them from the list and networking topology 2 5 Configuring the Service Network The wireless and wired network configurations of the current network are displayed in the lower left of the Over...

Page 20: ...select an existing wired VLAN and click Setup to modify its configuration 2 Configure a VLAN for wired access specify the address pool server for access clients in this VLAN and determine whether to...

Page 21: ...17 3 Select the switch to configure in the topology select the switch ports added to this VLAN and click Next 4 Confirm that the configuration items to be delivered are correct and then click Save Wa...

Page 22: ...18 2 5 2 Configuring the Wireless Network 1 Click Add Wi Fi VLAN to add wireless network configuration or select an existing Wi Fi VLAN and click Setup to modify its configuration 2 Set the Wi Fi nam...

Page 23: ...clients in this VLAN and determine whether to create a new DHCP address pool A switch or gateway device can be selected as the address pool server After setting the service parameters click Next 4 Co...

Page 24: ...f a network exception occurs alert message on this exception and the corresponding solution are displayed on the Overview page Click the alert message in the Alert Center section to view the faulty de...

Page 25: ...Web based Configuration Guide Network management 21...

Page 26: ...current wired users wireless users in the 2 4GHz band and wireless users in the 5GHz band Click to switch to the online clients page or click Clients Online Clients Table 2 1 Description of Online Cl...

Page 27: ...so as to isolate the client network from the normal service network and other types of clients and improve the stability of the network The smart device network supports rapid identification of variou...

Page 28: ...nt network segments can be set Click Identify Client after filling in 3 Display the identified client and client server information including IP address MAC address SN number of the connected switch a...

Page 29: ...of the VLAN VLAN ID gateway address and subnet mask of the isolated client Check the target network segment and click Generate Config 5 After confirming the configuration click Deliver Config If you n...

Page 30: ...settings you can view the client monitoring information on the page including client online status connection information device information and online and offline time Select the client entry and cl...

Page 31: ...Web based Configuration Guide Network management 27...

Page 32: ...about the Device Choose Local Device Home Basic Info Basic information includes device name device model SN number software version management IP MAC address networking status system time working mode...

Page 33: ...Basic Management 29 2 Switching the Work Mode Click the current work mode to change the work mode 3 Setting MGMT IP Click current management IP address to jump to the management IP configuration page...

Page 34: ...ion Choose Local Device Home Smart Monitoring Display the current hardware operating status of the device such as the device temperature and power supply status etc 3 1 3 Port Info Choose Local Device...

Page 35: ...he cursor to the icon of a port for example Gi14 on the port panel and more information about the port will be displayed including the port ID port status port rate uplink and downlink traffic transmi...

Page 36: ...y traffic statistics such as the rate of the device port the number of sent and received packets and the number of error packets The rate of the port is updated every five seconds Other traffic statis...

Page 37: ...e destination MAC address matches the one in such an entry are forwarded through the correct interface This type of entries does not age Dynamic MAC address entries Automatically generated by devices...

Page 38: ...The MAC address entry capacity depends on the product For example the MAC address entry capacity of the device shown in the figure above is 32K 3 3 3 Displaying Dynamic MAC Address Choose Local Device...

Page 39: ...Binding The switch forwards data based on the MAC address table You can set a static MAC address entry to manually bind the MAC address of a downlink network device with the port of the device After a...

Page 40: ...nd VLAN VLAN ID select the port for packet forwarding and click OK After the addition is successful the MAC address table will update the entry data 2 Deleting Static MAC Address Entries Choose Local...

Page 41: ...dress of the user to a filtering MAC address entry After the entry is configured packets whose source or destination MAC address matches the MAC address in the filtering MAC address entry are directly...

Page 42: ...dress entries do not age The device deletes useless dynamic MAC address entries based on the aging time to save entry resources on the device An overly long aging time may lead to untimely deletion of...

Page 43: ...address resolution The Address Resolution Protocol ARP is used to resolve IP addresses into MAC addresses ARP can obtain the MAC Address associated with an IP address ARP stores the mappings between I...

Page 44: ...s When a port is defined as a member of a VLAN all clients connected to the port are a part of the VLAN A network supports multiple VLANs VLANs can make L3 communication with each other through L3 dev...

Page 45: ...omatically creates a VLAN description in the specified format for example VLAN000XX The VLAN descriptions of different VLANs must be unique If the device supports L3 functions VLANs routed ports and L...

Page 46: ...LAN VLAN 1 management VLAN native VLAN and access VLAN cannot be deleted For these VLANs the Delete button is unavailable in gray 3 5 3 Configuring Port VLAN 1 Overview Choose Local Device VLAN Port L...

Page 47: ...port supports one native VLAN and several allowed VLANs Native VLAN frames forwarded by a trunk port do not carry tags while allowed VLAN frames forwarded by the trunk port carry tags A trunk port be...

Page 48: ...unk port you need to select Native VLAN and enter the allowed VLAN ID range if the port mode is Hybrid port you need to select Native VLAN and enter the allowed VLAN range and Untag VLAN range Click O...

Page 49: ...VLANs configure port attributes and divide port VLANs for switches in the network 2 Procedure Choose Network Batch Config 1 The page displays all switches in the current network Select the switches to...

Page 50: ...cted in Step 1 in a batch Select a port type If you set Type to Access Port you need to configure VLAN ID If you set Type to Trunk Port you need to configure Native VLAN and Permitted VLAN After setti...

Page 51: ...Web based Configuration Guide Basic Management 47 3 5 5 Verifying Configuration View the VLAN and port information of switches to check whether the batch configurations are successfully delivered...

Page 52: ...nt 4 1 Overview Ports are important components for data exchange on network devices The port management module allows you to configure basic settings for ports and configure port aggregation switched...

Page 53: ...tion of Port Type Port Type Note Remarks Switch Port A switch port consists of a single physical port on the device and provides only the L2 switching function Switch ports are used to manage physical...

Page 54: ...switch port It can combine the bandwidths of multiple ports to expand link bandwidth In addition for frames sent through an L2 aggregate port load balancing is performed on member ports of the L2 agg...

Page 55: ...is equivalent to the virtual interface of corresponding VLAN and can be used for inter VLAN routing on L3 devices For related configuration see 6 1 Routed Port On L3 devices you can configure a singl...

Page 56: ...L3 AP are balanced among the L3 AP member ports If one member link fails the L3 AP automatically transfers the traffic on the faulty link to other member links improving reliability of connections L3...

Page 57: ...port to be configured In the displayed dialog box select the port switch rate work mode and flow control mode and click OK to deliver the configuration In batch configuration optional configuration it...

Page 58: ...click Edit in the Action column In the displayed dialog box select port status rate work mode and flow control mode and click OK Table 4 2 Description of Basic Port Configuration Parameters Parameter...

Page 59: ...n receive packets while sending Half duplex control that the port can receive or send packets at a time Auto the duplex mode of the port is determined through auto negotiation between the local port a...

Page 60: ...Batch configure Click Batch Edit In the displayed dialog box select the port to be configured configure the EEE switch MTU enter the port description and click OK Note Copper ports and SFP ports cann...

Page 61: ...bute The port attribute indicates whether the port is a copper port or an SFP port Coper port copper mode cannot be changed SFP port fiber mode cannot be changed Only combo ports support mode change D...

Page 62: ...c AP Address In static AP mode you can manually add a physical interface to an aggregate port An aggregate port in static AP mode is called a static aggregate port and the member ports are called memb...

Page 63: ...a same source MAC address are forwarded along a same member link Currently the AP supports the traffic balancing modes based on the following Source MAC address or destination MAC address Source MAC...

Page 64: ...ck an added static aggregate port Member ports of the aggregate port will become selected Click a port to deselect it or select other ports to join the current aggregate port Click Save to modify the...

Page 65: ...leted and click Delete Selected to delete the selected aggregate port After deleted the corresponding ports become available on the port panel to set a new aggregate port Caution After an aggregate po...

Page 66: ...outgoing packets on source ports As shown by configuring port mirroring on Device A the device copies the packets on Port 1 to Port 10 Although the network analysis device connected to Port 10 is not...

Page 67: ...onitoring ports but only one destination port Moreover the source traffic monitoring ports cannot contain the destination port An aggregate port cannot be used as the destination port A maximum of fou...

Page 68: ...ort Data flows on the source port are monitored for network analysis or troubleshooting Support selecting multiple source ports and mirroring multiple ports to one destination port N A Dest Port The d...

Page 69: ...ther a destination port forwards other packets while monitoring packets Enabled While monitoring the packets of the source port the packets of other non Src ports are normally forwarded Disabled Only...

Page 70: ...s are sent from a port to a switch in kbps Not limited Tx Rate Max Rate at which packets are sent out of a switch through a port in kbps Not limited 2 Changing Rate Limits of a Single Port In the port...

Page 71: ...ing port entry and click OK in the confirmation dialog box Note When configuring rate limits for a port you must configure at least the ingress rate or egress rate When the ingress rate or egress rate...

Page 72: ...er Click Save to make the configuration take effect Note If the management VLAN is null or not specified VLAN 1 takes effect by default The management VLAN must be selected from existing VLANs If no V...

Page 73: ...t DHCP is not supported 4 8 PoE Configuration Caution Only PoE switches The device models are marked with P support this function Choose Local Device Ports PoE The device supplies power to PoE powered...

Page 74: ...nnected to a device of Class 3 even if the actual power consumption is only 11W the PoE power supply device will allocate power to the port based on the power of 15 4W In energy saving mode the PoE de...

Page 75: ...iguration Guide Port Management 71 4 8 2 Power Supply Configuration of Ports Choose Local Device Ports PoE Port List Click Edit in the port entry or click Batch Edit to set the PoE power supply functi...

Page 76: ...h high priorities are powered first When the system power of the PoE device is insufficient ports with low priorities are powered off first Ports with the same priority are sorted by the port number A...

Page 77: ...Indicates the power output by the current port in watts W Non Standard Indicates whether the non standard compatibility mode is enabled Work Status Current work status of PoE ports Current Indicates t...

Page 78: ...eb based Configuration Guide Port Management 74 Field Description PD Class The classification level of the PD connected to the port is divided into Class 0 4 based on the IEEE 802 3af 802 3at standard...

Page 79: ...multicast saves bandwidth and reduces network loads Therefore IP multicast is applied to different network services that have high requirements for real timeliness for example Internet TV distance ed...

Page 80: ...k clients connected to the switch simultaneously send the report packet to demand the same multicast group Disable Unknown Multicast Pkt When both the global and VLAN multicast functions are enabled t...

Page 81: ...ust parameters to refresh dynamic multicast forwarding entries and IGMP snooping membership quickly Choose Local Device Multicast IGMP Snooping The IGMP Snooping function is implemented based on VLANs...

Page 82: ...guration Parameters of IGMP Snooping Parameter Description Default Value Multicast Status Whether to enable or disable the VLAN multicast function The multicast function of a VLAN takes effect only wh...

Page 83: ...ery packets and multicast data packets the device will no longer forward it to the port This function is applicable when only one host is connected to one port of the device and is generally enabled o...

Page 84: ...o enable the MVR select the MVR VLAN set the multicast group supported by the VLAN and click Save Multiple multicast groups can be specified by entering the start and end multicast IP addresses Table...

Page 85: ...ed end multicast IP address of an MVR multicast group NA 5 4 3 Configuring the MVR Ports Choose Local Device L2 Multicast MVR Batch configure Click Batch Edit select the port role the port to be set a...

Page 86: ...ticast group Disable Note If a source port or a receiver port is configured the source port must belong to the MVR VLAN and the receiver port must not belong to the MVR VLAN The fast leave function ta...

Page 87: ...range of the MVR the protocol is MVR In other cases the protocol is IGMP snooping NA Type Multicast group generation mode can be statically configured or dynamically learned In normal cases a port can...

Page 88: ...permit or deny user access you can customize the multicast service scope for users to guarantee the interest of operators and prevent invalid multicast traffic There are 2 steps to configure the port...

Page 89: ...f the range of multicast group addresses NA End IP Address End Multicast IP address of the range of multicast group addresses NA 5 6 2 Configuring a Range of Multicast Groups for a Profile Choose Loca...

Page 90: ...es effect on a port If it is not set no profile rule is bound to the port NA Max Multicast Groups Maximum number of multicast groups that a port can join If too much multicast traffic is requested con...

Page 91: ...pport IGMP To resolve this problem you can configure the IGMP snooping querier function on the L2 device so that the L2 device sends IGMP Query packets to user hosts on behalf of the L3 multicast devi...

Page 92: ...e set to IGMPv2 or IGMPv3 IGMPv2 Src IP Address Source IP address carried in query packets sent by the querier NA Query Interval Sec Packet transmission interval of which the value range is from 30 to...

Page 93: ...rt L3 functions such as RG NBS3100 Series Switches RG NBS3200 Series Switches do not support the functions mentioned in this section 6 1 Setting an L3 Interface Choose Local Device L3 Interfaces L3 In...

Page 94: ...set the start IP address of an address pool number of IP addresses that can be assigned and address lease for more information see 6 2 DHCP Relay Indicates that the device serves as a DHCP relay obtai...

Page 95: ...vice L3 Interfaces L3 Interfaces Click Edit on the designated port or click Add L3 Interface to add a Layer 3 interface select DHCP mode for local allocation and enter the starting IP of the address p...

Page 96: ...ress is automatically renewed If a leased IP address is not renewed due to client disconnection or network instability the IP address will be reclaimed after the lease term expires After the downlink...

Page 97: ...d IP address of the client to be bound and click OK After a static IP address is bound the bound IP address will be obtained each time the corresponding downlink client connects to the network To dele...

Page 98: ...Enter the IP address of the AC Similar to Option 43 when the AC and AP are not in the same LAN you can configure Option 138 to enable the AP to obtain the IPv4 address of the AC Option 150 Enter the I...

Page 99: ...ology When the network topology changes you need to reconfigure the static routes Click Add In the dialog box that appears enter the destination address subnet mask outbound interface and next hop IP...

Page 100: ...n ping the next hop address To delete or modify a static route in Static Route List you can click Delete or Edit in the last Action column or select the static route entry to be deleted click Delete S...

Page 101: ...Web based Configuration Guide L3 Management 97 To remove the binding between a static IP address and a MAC address click Delete in the Action column...

Page 102: ...ice Configuration Choose Local Device Security DHCP Snooping Turn on the DHCP snooping function select the port to be set as trusted ports on the port panel and click Save After DHCP Snooping is enabl...

Page 103: ...y the privately accessed router to guarantee the stability of the network 1 Click Enable to access the DHCP Snooping Config page 2 In the networking topology you can select the access switches on whic...

Page 104: ...unction click Configure to reselect the switch that enables the anti private connection in the topology After the configuration is delivered if you want to modify the effective range of the DHCP Snoop...

Page 105: ...device transmits only packets in the specified range and discards packets beyond the range until the packet rate falls within the range This prevents flooded data from entering the LAN and causing a s...

Page 106: ...ed until the rate falls within the threshold 7 3 ACL 7 3 1 Overview An access control list ACL is commonly referred to as packet filter in some documents An ACL defines a series of permit or deny rule...

Page 107: ...ving a port and deny or permit specific Ipv4 packets destined to a network 2 Click Details in the Action column of the ACL entry set the filtering rules in the pop up sidebar and click Save to add rul...

Page 108: ...ule the packets are permitted IP Protocol Number Match IP protocol number The value ranges from 0 to 255 Check All to match all IP protocols Src IP Address Match the source IP address of the packet Ch...

Page 109: ...he same name Only the name of a created ACL can be edited An ACL applied by a port cannot be edited or deleted To edit unbind the ACL from the port first There is one default ACL rule that denies all...

Page 110: ...cation be disabled between some ports on the device For this purpose you can configure some ports as protected ports Ports that enable port protection protected ports cannot communicate with each othe...

Page 111: ...control the validity of input sources 7 5 2 Procedure Choose Local Device Security IP MAC Binding 1 Adding an IP MAC Binding Entry Click Add select the desired port enter the IP address and MAC addres...

Page 112: ...ch type enter the search string and click Search Entries that meet the search criteria are displayed in the list 3 Deleting an IP MAC Binding Entry Batch Configure In IP MAC Binding List select an ent...

Page 113: ...ewing Binding List Choose Local Device Security IP Source Guard Binding List The binding list is the basis for IP Source Guard Currently data in Binding List is sourced from dynamic learning results o...

Page 114: ...ts are allowed to pass through the port only when the source IP addresses of these packets match those in the binding list IP address MAC address The source IP addresses and MAC addresses of IP packet...

Page 115: ...Ns under the interface by default Users can specify excluded VLANs within which IP packets are not checked or filtered that is such IP packets are not controlled by IP Source Guard Click Edit enter th...

Page 116: ...om receiving wrong ARP response packets If not the packet will not be handled In this way only the uplink devices can send ARP packets and the ARP response packets sent from other clients which pass f...

Page 117: ...tion Guide Security 113 2 Disabling Anti ARP Spoofing Batch disable Select an entry to be deleted in the list and click Delete Selected Disable one port click Delete in the last Action column of the c...

Page 118: ...in the network It also provides the link backup function 8 1 1 STP Global Settings Choose Local Device Advanced STP STP 1 Click to to enable the STP function and click OK in the displayed box The STP...

Page 119: ...e expires the root bridge or the link to the root bridge is deemed as faulty 20 seconds Recovery Time Network recovery time when redundant links occur on the network 30 seconds Hello Time Interval for...

Page 120: ...lue Role Root A port with the shortest path to the root Alternate A backup port of a root port Once the root port fails the alternate port becomes the root port immediately Designated designated ports...

Page 121: ...tially selected to enter the forwarding state 128 Link Status Config Statis Configure the link type the options include Shared Point to Point and Auto In auto mode the interface type is determined bas...

Page 122: ...nnection status for example ports of the device that are connected to other devices port rates at both ends of a link and duplex mode matching status An administrator can locate and troubleshoot fault...

Page 123: ...ends a certain number of LLDP packets continuously and then restores the normal transmission interval You can configure the number of LLDP packets that can be transmitted rapidly for the fast transmis...

Page 124: ...the Link Layer Discovery Protocol Media Endpoint Discovery 8 2 4 Displaying LLDP information Choose Local Device Advanced LLDP LLDP Info To display LLDP information including Including the LLDP infor...

Page 125: ...configurations do not match those on the connected neighbor 8 3 RLDP 8 3 1 Overview The Rapid Link Detection Protocol RLDP is an Ethernet link failure detection protocol which is used to rapidly dete...

Page 126: ...alone Device Configuration 1 RLDP Global Settings Choose Local Device Advanced RLDP RLDP Settings 1 Enable the RLDP function and click OK in the displayed dialog box The RLDP function is disabled by d...

Page 127: ...tion is prompted to indicate the failed port and the failure type Block After alerting the fault set the faulty port not to forward the received packets Shutdown port After alerting the fault shutdown...

Page 128: ...failure handling methods and ports that connect the neighbor device to the local device You can click Reset to restore the faulty RLDP status triggered by a port to the normal state 8 3 3 Batch Confi...

Page 129: ...cess switches in the network are selected automatically If you select the custom mode you can manually select the desired access switches Click Deliver Config RLDP is enabled on the selected switches...

Page 130: ...ted uplink device by default Choose Local Device Advanced Local DNS Enter the DNS server address used by the local device If multiple addresses exist separate them with spaces Click Save After configu...

Page 131: ...voice VLAN you can have voice data transmitted in the voice VLAN and deliver specified policy of the quality of service QoS for voice streams to improve the transmission priority of voice traffic and...

Page 132: ...LAN OUI The source MAC address of a voice packet contains the organizationally unique identifier OUI of the voice device manufacturer After the voice VLAN OUI is configured the device compares the voi...

Page 133: ...ort Choose Local Device Advanced Voice VLAN Port Settings Click Edit in the port entry or click Batch Edit on the upper right corner In the displayed dialog box select whether to enable the voice VLAN...

Page 134: ...bal aging time the device removes the Voice VLAN from the permit VLANs of the port Manual Mode If the permit VLANs of a port contains the voice VLAN voice packets can be transmitted in the voice VLAN...

Page 135: ...he function If you need to switch the L2 mode of the port disable the voice VLAN function on the port first It is not recommended that both voice data and service data be transmitted over the voice VL...

Page 136: ...urce Guard and CPP statistics of the device and relevant configurations 9 1 1 Port Info Choose Local Device Diagnostics Info Center Port Info Port Info displays the status and configuration informatio...

Page 137: ...cluding the port information included in the VLAN the port IP address and whether the DHCP address pool is enabled Note To configure VLAN see 3 5 To configure SVI ports and routed ports see 6 1 9 1 3...

Page 138: ...ice does not support L3 functions such as RG NBS3100 Series and RG NBS3200 Series Switches this type of information is not displayed Choose Local Device Diagnostics Info Center DHCP Clients Displays t...

Page 139: ...MAC Address Choose Local Device Diagnostics Info Center MAC Displays the MAC address information of the device including the static MAC address manually configured by the user the filtering MAC addres...

Page 140: ...by the trust port Note To modify DHCP Snooping related configuration see 7 1 9 1 8 IP MAC Binding Choose Local Device Diagnostics Info Center IP MAC Binding Displays the configured IP MAC binding ent...

Page 141: ...nction will check the IP packets from non DHCP trusted ports according to the list and filter out the IP packets that are not in the binding list Note To configure IP Source Guard function see 7 6 9 1...

Page 142: ...Start to test the network connectivity between the device and the IP address or website If Ping failed is displayed the device is not reachable to the IP address or website 9 2 2 Traceroute Choose Loc...

Page 143: ...Diagnostics Network Tools DNS Lookup is used to query the information of network domain name or diagnose DNS server problems If the device can ping through the IP address of the Internet from your web...

Page 144: ...s of the device will be packed into a compressed file Download the compressed file locally and provide it to R D personnel for fault locating 9 4 Cable Diagnostics Choose Local Device Diagnostics Cabl...

Page 145: ...Device Diagnostics System Logs System logs record device operations operation time and operation modules System logs are used by administrators to monitor the running status of the device analyze net...

Page 146: ...in time Exercise caution when performing this operation Table 9 1 Alert Types and Product Support Alert Type Description Support Description Addresses in the DHCP address pool are to be exhausted The...

Page 147: ...of the device NA The PoE process is not running The PoE service of the device fails and no power can be supplied It is applicable only to NBS Series Switches that support the PoE function The device...

Page 148: ...local time zone If the time zone is correct but time is still incorrect click Edit to manually set the time In addition the device supports Network Time Protocol NTP servers By default multiple serve...

Page 149: ...n password of all devices in the network will be changed synchronously 10 3 Setting the Session Timeout Duration Choose System Login Session Timeout If you do not log out after login the Eweb manageme...

Page 150: ...configuration and download it locally Configure import Click Browse select a backup configuration file locally and click Import to apply the configuration specified by the file to the device After imp...

Page 151: ...lick Reset All Devices and all devices in the current network will be restored to their factory settings Caution Resetting the network will clear current settings of all devices in the network and reb...

Page 152: ...he network to reboot please be patient The network operation will affect the entire network Therefore exercise caution when performing this operation 10 6 3 Rebooting Specified Devices in the Network...

Page 153: ...Self Organizing Mode Network System Scheduled Reboot Choose Standalone Mode System Scheduled Reboot Click Enable and select the date and time of scheduled reboot every week Click Save When the system...

Page 154: ...plays the current system version and allows you to detect whether a later version is available If a new version is available click Upgrade Now to perform online upgrade If the network environment does...

Page 155: ...oftware version You can choose whether to keep the configuration upgrade or not Click Browse to select the local software installation package click Upload to upload the installation package and upgra...

Page 156: ...Web based Configuration Guide System Configuration 152 10 10 Switching the System Language Click in the upper right corner of the Web page Click a required language to switch the system language...

Page 157: ...AP Groups 11 1 1 Overview After self organizing network discovery is enabled the device can function as the master AP AC to batch configure and manage its downlink APs by group Before you configure t...

Page 158: ...l APs in the group are displayed One AP can belong to only one group By default all APs belong to the default group Select a record in the device list and click Change Group to migrate the selected de...

Page 159: ...s to configure more Wi Fi parameters Caution Modification will cause restart of the wireless configuration resulting in logout of connected clients Exercise caution when performing this operation Tabl...

Page 160: ...periods VLAN Set the VLAN to which the Wi Fi signal belongs Hide SSID Enabling the hide SSID function can prevent unauthorized user access to Wi Fi improving security However mobile phones or computer...

Page 161: ...t and it cannot be disabled In this case users associating with guest Wi Fi are mutually isolated and they can only access the Internet through Wi Fi This improves network access security You can conf...

Page 162: ...e Network Wi Fi Wi Fi List Click Add enter the Wi Fi name and password and click OK to create a Wi Fi Click Expand to configure more Wi Fi parameters For details see 11 2 After a Wi Fi is added client...

Page 163: ...schedule for the mode After the healthy mode is enabled the RF transmit power and Wi Fi coverage range of the wireless device are reduced in the schedule This may lead to weak signals and network free...

Page 164: ...eration Table 11 2 RF Configuration Parameter Description Country Region The Wi Fi channels stipulated by each country may be different To ensure that clients can find the Wi Fi signal select the coun...

Page 165: ...s high To ensure that the client can normally access the Internet you are advised to set this parameter to Disable or a value smaller than 75 dBm Note Wireless channels available for your selection ar...

Page 166: ...automatically Click the MAC address directly for automatic input All clients in the blacklist will be forced offline and not allowed to access the Wi Fi network The global blacklist and whitelist sett...

Page 167: ...lient The SSID based blacklist and whitelist will restrict the client access to the specified Wi Fi 11 8 Wireless Network Optimization with One Click Choose Network WIO On the Network Optimization tab...

Page 168: ...k after optimization starts Exercise caution when performing this operation After optimization starts please wait patiently until optimization is complete After optimization ends click Cancel Optimiza...

Page 169: ...support EasyLink can be paired to form a mesh network Devices can automatically search for new routers around them and pair with each other via the Mesh button or log in to the router management page...

Page 170: ...elong to the same VLAN In self organizing network mode the AP wired port configuration applies to all APs having wired LAN ports on the current network The configuration applied to APs in LAN Port Set...

Page 171: ...y between the PC and the device 4 If you still cannot log in to the Device Management page after the preceding steps restore the device to factory settings 12 2 Password Lost and Restoration of Factor...

Reviews: