


10
11
1.3.
DELIVERY SCOPE
»
Bosch charging device
»
2 keys for securing the battery to the Pedelec
»
2 transport fixations for the Shimano BL-MT201 brakes
»
Bosch hazardous material package for battery shipment (please store and
when appropriate, use this for the disposal or return of the defect battery)
»
Delivery package (please store if you consider to cancel the purchase within
two weeks)
User manuals of different component manufacturers
1.4.
ASSEMBLY OF ACCESSORIES
When installing accessories like child seat or trailer, please check the com-
patibility with the Pedelec through the accessory manufacturer or a bicycle
dealer.
2.
COMMISSIONING
This chapter explains how to prepare your Lil’Buddy for the ride.
Inflate the tires first. The air pressure volume is described in chapter 3.1.
Your Lil’Buddy is supplied as a part assembly and as a full assembly.
In the latter case, you can skip items 2.1. and 2.2.
If it is not a standard delivery, please read the following items for
„handlebar alignment“ and „Pedal assembly“.
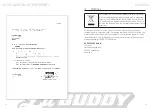
2.1.
HANDLE BAR ALIGNMENT
The stem is a significant safety component. When tightening the bolts,
ensure that you use the torque as defined in the torque table under
9.3. Otherwise, there is a hazard of accident!
»
Lift the vehicle by the front frame, so that it no longer touches the ground.
Turn the fork leftwards and rightwards. The front wheel must follow the
movement. This simulated steering operation should not be difficult.
»
If the steering is not rotated easily, the ahead bolt is tightened too fast (1).
Loosen it by releasing the 2 screws (2) of the
stem. Now you can adjust the compression
of the steering bearing with the ahead bolt.
Retighten the stem screw with a torque of
6-7 Nm.
»
Finally, clamp the handlebar in the middle
by tightening the bolts (3) at the cross on the
stem. Ensure a uniform front and rear gap
between stem and cover.
2.2.
PEDAL ASSEMBLY
The right pedal has a right thread, the left pedal has a left thread
on the pedal axis. The right pedal is mounted clockwise and the left
pedal is mounted counter-clockwise. The pedals are marked with R
and L.
Pedals are important safety components. Make sure that you tighten
the pedal axis firmly, according to the manual. Otherwise, there is a
hazard of accident!
»
Apply a thin layer of grease onto the thread of the pedal axis and the crank.
Next, screw the pedal by hand loosely into place. Consider the correct assem-
bly angles in order to avoid tilting.
»
Place the crank in a horizontal position, the
right pedal oriented towards the front wheel.
»
Tighten the pedal with an SW 15 open end
wrench at 30 - 35 Newton meter.
COMMISSIONING
YOUR VEHICLE
3
2
1