125
Effects and 31-band GEQ
Effects and 31-band GEQ
fig.ScrFxRack.eps
•
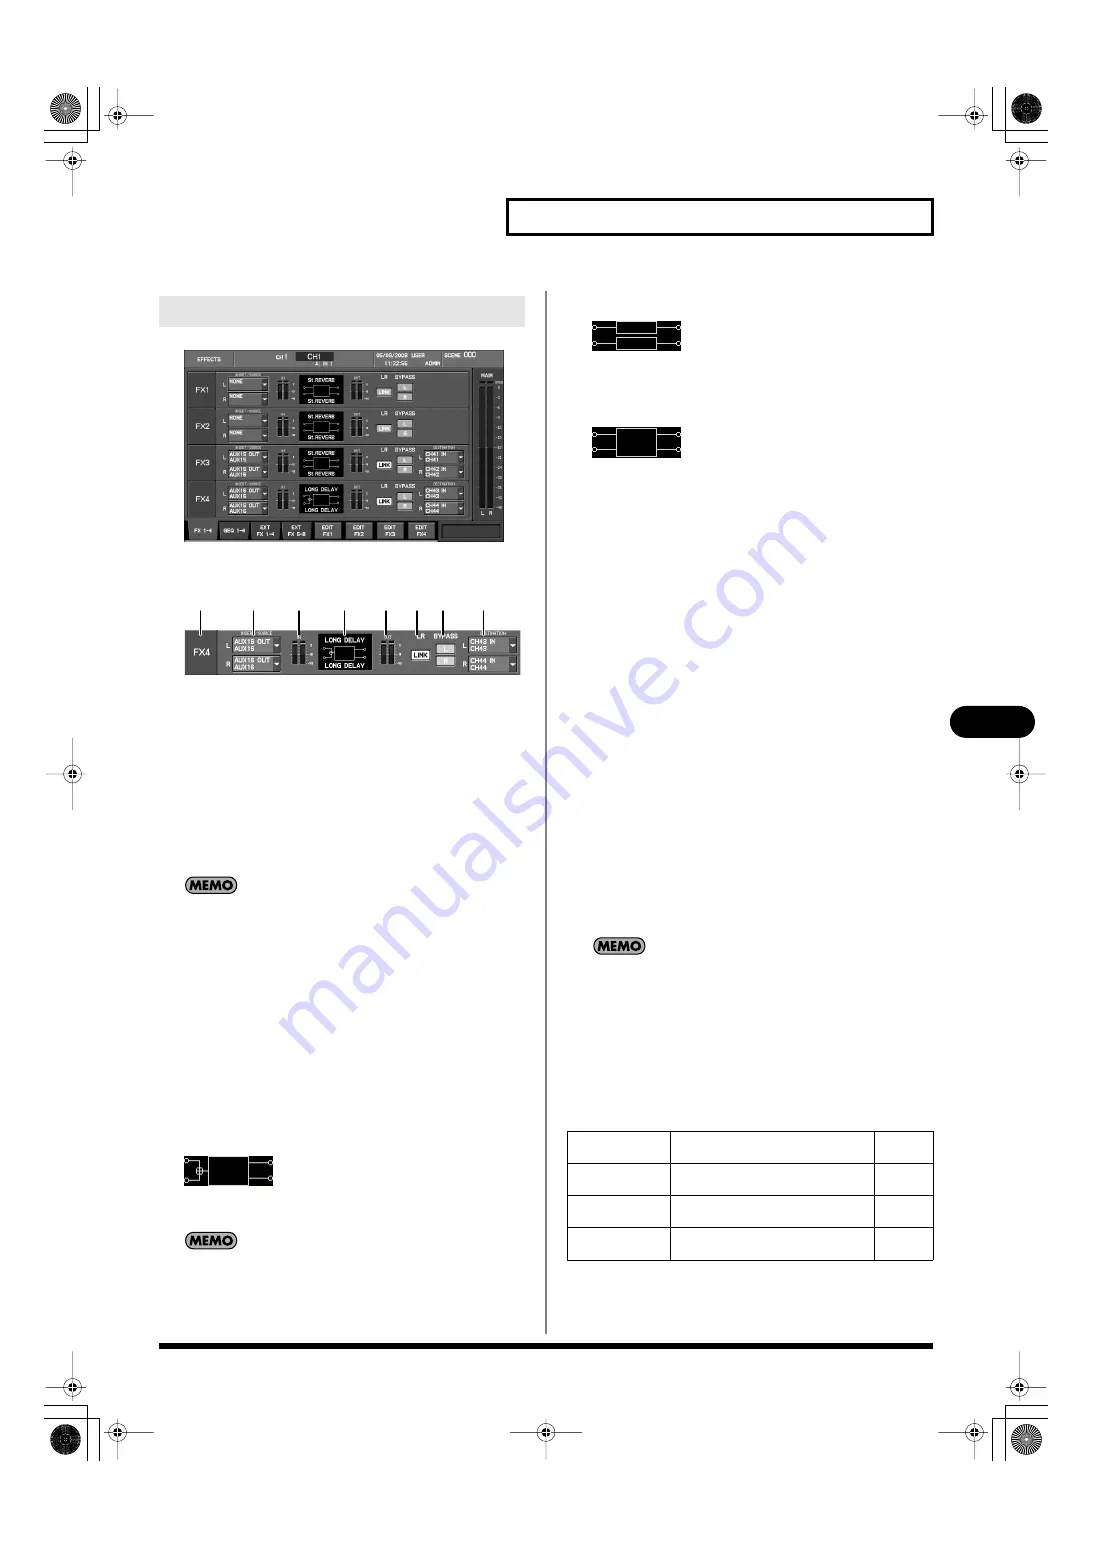
FX1–FX4
fig.ScrFxRackGuide.eps
This area indicates the status of FX1–FX4. It is organized as follows.
1.
Effect number indication
This indicates the effect number.
2.
FX INSERT/SOURCE SELECT popup button
This selects the input source for the effect. The current input
source is shown on the button. When you move the cursor to
the button and press [ENTER], the FX INSERT/SOURCE
SELECT popup will appear. This can be set separately for the L
and R channels.
If you’ve selected insertion into a channel in the FX INSERT/
SOURCE SELECT popup, the channel insert will be used as
both the input and output of the effect. In this case, the
corresponding FX DESTINATION SELECT button will be
unavailable.
3.
IN meters
These indicate the input level to the effect.
4.
Effect name indication
The upper line shows the library name, and the lower line
shows the effect type name. The icon indicates the input/output
configuration for the effect.
•
Mono-in/Stereo-out
fig.ScrFxTypeMS.eps
This is a monaural-input/stereo-output type effect. These
effects are used mainly in a send/return configuration.
If you specify two input sources, the two inputs will be mixed
to mono before being input.
•
Dual mono
fig.ScrFxTypeMM.eps
This allows the effect to be used as two monaural effects. These
effects are used mainly for insertion in a channel.
•
Stereo-in/Stereo-out
fig.ScrFxTypeSS.eps
This is a stereo-input/stereo-output type effect. These effects
can be inserted into a stereo channel, or used in a send/return
configuration with stereo-linked AUX channels.
5.
OUT meters
These indicate the output level from the effect.
6.
LR LINK button
This links the parameters of the effect between the L and R
sides.
The following effect types support LR LINK.
• DUAL GEQ
• DELAY x2
• P.SHIFTER x2
• CH STRIP x2
7.
BYPASS L, R buttons
These buttons bypass the effect. When these are on, the effect
will be bypassed, and the input signal will be “thru-ed” to the
output. Separate buttons are provided for the L and R channels.
8.
FX DESTINATION SELECT popup buttons
These select the output destination for the effect. The current
output source is shown on the button. When you move the
cursor to the button and press [ENTER], the FX DESTINATION
SELECT popup will appear. This can be set separately for the L
and R channels.
If you select insertion into a channel in the FX INSERT/
SOURCE SELECT popup, the corresponding FX
DESTINATION SELECT button will be unavailable. If you want
to re-enable the FX DESTINATION SELECT button, select an
input source other than Insert in the corresponding FX
INSERT/SOURCE SELECT popup.
The function buttons specific to the FX 1–4 tab have the following
operations.
FX 1–4 tab
1
2
3
4
5 6 7
8
[F5 (EDIT FX1)]
Accesses the FX EDIT popup for
FX1.
[F6 (EDIT FX2)]
Accesses the FX EDIT popup for
FX2.
[F7 (EDIT FX3)]
Accesses the FX EDIT popup for
FX3.
[F8 (EDIT FX4)]
Accesses the FX EDIT popup for
FX4.
M-400_v15_e.book 125 ページ 2008年6月20日 金曜日 午後4時5分


