background image

22

1.  Lift Location:

  Use architects plan when available 

to locate lift.  Fig. 1 shows dimensions of a typical bay 

layout.

2.  Lift Height:

  See Fig. 4 for overall lift height of 

each specific lift model.  Add 1” min. to overall height to 

lowest obstruction.

WARNING  

DO NOT install this lift in a pit or 

depression due to fire or explosion risks.

3.  Lift Setting:

  Position columns in bay using 

dimensions shown in Fig.1.    Place column with power 

unit mounting bracket on vehicle passenger side of 

lift.  Both column base plate backs must be square on 

center line of lift.  Notches are cut into each base plate to 

indicate center line of lift.

Use appropriate equipment to raise carriage to first latch 

position.  Be sure locking latch is securely engaged.

Concrete and Anchoring:

  Concrete shall have a 

compression strength of at least 3,000 PSI and a minimum 

thickness of 4-1/4" in order to achieve a minimum anchor 

embedment of 3-1/4".  When using the standard supplied 

3/4” x 5-1/2” lg. anchors, if the top of the anchor exceeds 

2-1/4” above the floor grade, you 

DO NOT

 have enough 

embedment.

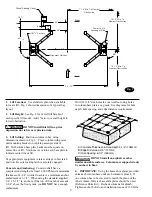
Fig.  1

Drill (18) 3/4" dia. holes in concrete floor using holes 

in column base plate as a guide.  See diagrams for hole 

depth, hole spacing, and edge distance requirements.

A) Concrete Thickness & Hole Depth 4-1/4" (108mm)
B) Edge Distance 4-3/4" (121mm)
C) Hole Spacing 6-1/2" (165mm)

A

B

C

C

B

C

C

CAUTION

 DO NOT install on asphalt or other 

similar unstable surfaces.  Columns are supported only 

by anchors in floor.

4.  IMPORTANT:

  Using the horse shoe shims provided, 

shim each column base until each column is plumb.  If 

one column has to be elevated to match the plane of the 

other column, full size base shim plates should be used 

(Reference Shim Kit).  Recheck columns for plumb.  

Tighten anchor bolts to an installation torque of 150 ft-lbs.  

H

C

A

O

R

P

P

A

C

L

Rear

Front

Lift

12' - 11"

15'– 0" Min. To

Nearest Obstruction

90

0

Power Unit to

Passenger Side

15'– 0" Min. To

Nearest Obstruction

(18)

3

/

4

" Anchors

7''– 6" Min. To Nearest

Obstruction

90

0

62

7

/

16

"

19

1

/

4

"

Wheel Spotting Dishes

6"

34"

28"

Alignment Notches

Summary of Contents for Sprinter SPO15

Page 1: ...ft All rights reserved IN20379 CO6363 1 Rev A 11 22 2005 I N S T A L L A T I O N I N S T R U C T I O N S SPO15 SPO18 Sprinter SPO15 3A0 Lifts Capacity 11 000 lbs Standard SPO15 300 Series Lifts Capaci...

Page 2: ...n using the standard supplied 3 4 x 5 1 2 lg anchors if the top of the anchor exceeds 2 1 4 above the oor grade you DO NOT have enough embedment Fig 1 Drill 18 3 4 dia holes in concrete oor using hole...

Page 3: ...IEW FROM APPROACH SIDE All Star Washers are to be mounted on the Right side column to ensure grounding of overhead limit switch Star Washers are not needed when mounting to Left Side column Notice the...

Page 4: ...power unit bracket using Push Nuts to hold in place Fig 8a Mount unit with motor up to column bracket and install 4 5 16 star washers and 5 16 Nuts Install and hand tighten Branch Tee to pump until O...

Page 5: ...easier to tie off lower studs rst A Run cable stud up through the lower tie off plate and or bracket s and or spacer s depending on the lift model Fig 11 B Push cable up until stud is above top of car...

Page 6: ...1 spacer provided For 15 height carriages use pattern four with 472 cable Has 1 spacer provided For 16 6 height with 472 long cable or for 14 6 height with 424 long cable both use pattern one 4 3 1 2...

Page 7: ...e Install air line from lowering valve to union tee then to the right column air cylinder K Install air line from union tee to left column air cylin der Fig 14 L Mount lowering valve and bracket to co...

Page 8: ...er valve is open 14 Oil Filling Bleeding Use Dexron III ATF or Hydraulic Fluid that meets ISO 32 speci cations Remove ll breather cap Fig 15b Pour in 8 quarts of uid Start unit raise lift about 2 ft O...

Page 9: ...TABLE THREE PHASE LINE VOLTAGE RUNNING MOTOR VOLTAGE RANGE 208 240V 50 60Hz 197 253V 400V 50Hz 360 440V 440 480V 50 60Hz 396V 528V 575V 60Hz 518V 632V FOR 3 POWER UNITS Attach Box using M5 x 10 PHMS...

Page 10: ...in Fig 18 so that the rounded edge top side of the gear teeth is fac ing upward Then install the three 3 3 8 16NC x 1 1 2 Lg HHCS 12 total for all 4 arms and 3 8 Spring Lockwashers into the gear and a...

Page 11: ...l if required Repeat air bleeding of cylinders 19 Final Adjustments Raise lift to check equalizer cable tension Below carriage grasp adjacent cables between thumb and fore nger with about 15 lbs effor...

Page 12: ...erved Unless otherwise indicated ROTARY DOVER and all other trademarks are property of Dover Corporation and its affiliates Rotary World Headquarters 2700 Lanier Drive Madison IN 47250 USA www rotaryl...

Reviews: