background image

DRA-8204 User Manual (Iss. 05)

Installation • 2–5

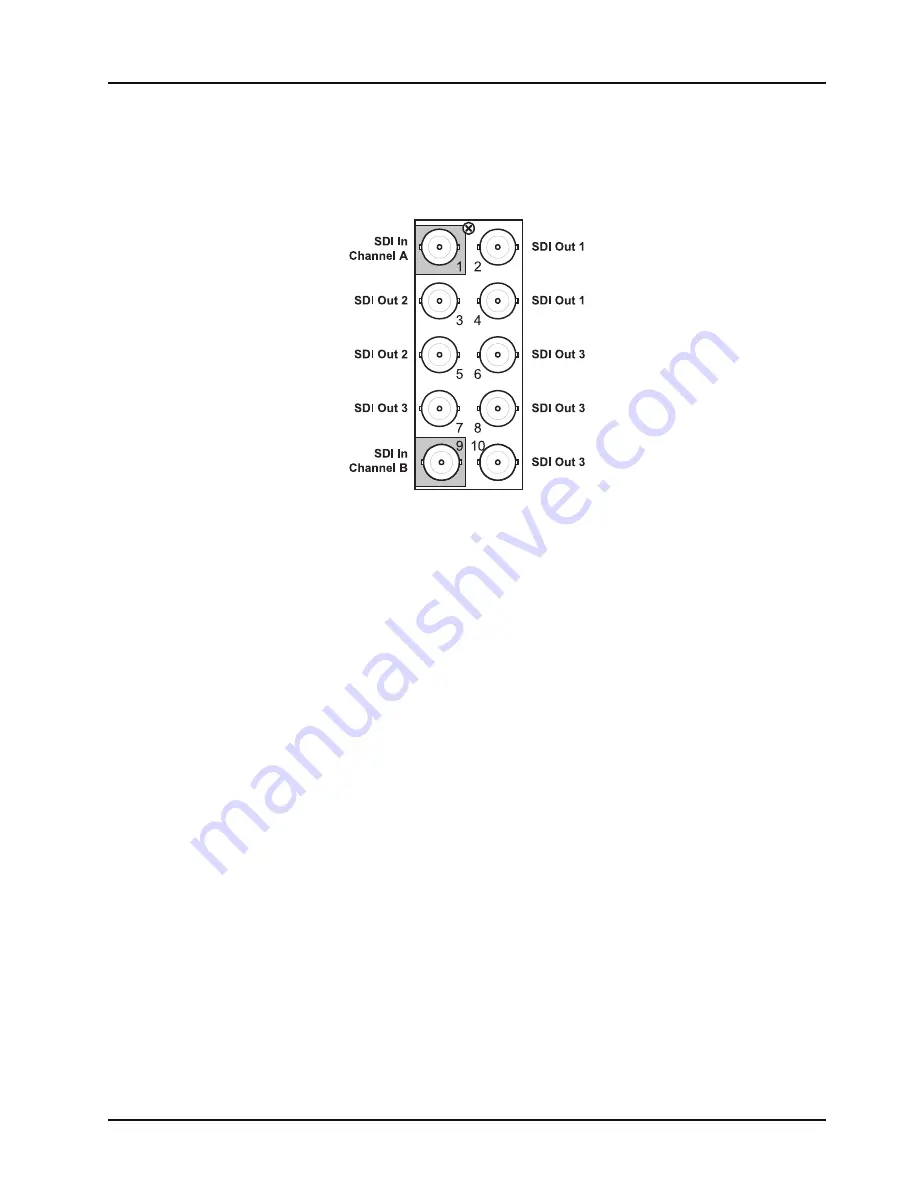
Cabling for the DRA-8204

This section provides instructions for connecting cables to the installed Rear Modules on the 
DFR-8300 series frame backplane. Connect the input and output cables according to the 
following diagram. The inputs are internally terminated in 75 ohms. It is not necessary to 
terminate unused outputs. 

Figure 2.2  

Cable Connections for the DRA-8204

The flexible assignment of Input Channels to Output BNCs via jumper selection is discussed in the 
section “

Output Channel Configuration

” on page 3-4.

Summary of Contents for DRA-8204

Page 1: ...Ross Video Limited DRA 8204 Dual MD SDI Reclocking Amplifier User Manual ...

Page 2: ... protected by the following Canadian Patents 2039277 1237518 1127289 Other patents pending Notice The material in this manual is furnished for informational use only It is subject to change without notice and should not be construed as commitment by Ross Video Limited Ross Video Limited assumes no responsibility or liability for errors or inaccuracies that may appear in this manual Trademarks is a...

Page 3: ...voided may result in major or minor equipment damage or a situation which could place the equipment in a non compliant operating state ESD Susceptibility This symbol is used to alert the user that an electrical or electronic device or assembly is susceptible to damage from an ESD event Caution This product is intended to be a component product of the DFR 8300 series frame Refer to the DFR 8300 ser...

Page 4: ...ith the essential requirements and other relevant provisions of CE Directive 93 68 EEC INTERNATIONAL This equipment has been tested to CISPR 22 1997 along with amendments A1 2000 and A2 2002 and found to comply with the limits for a Class A Digital device Maintenance User Serviceable Parts Routine maintenance to this openGear product is not required This product contains no user serviceable parts ...

Page 5: ...ural resources Ross Video encourages you to use the appropriate take back systems These systems will reuse or recycle most of the materials from your end of life equipment in an environmentally friendly and health conscious manner The crossed out wheeled bin symbol invites you to use these systems If you need more information on the collection reuse and recycling systems please contact your local ...

Page 6: ...P O Box 880 Ogdensburg New York USA 13669 0880 General Business Office 1 613 652 4886 Fax 1 613 652 4425 Technical Support 1 613 652 4886 After Hours Emergency 1 613 349 0006 E mail Technical Support techsupport rossvideo com E mail General Information solutions rossvideo com Website http www rossvideo com ...

Page 7: ...ew 3 2 Output Channel Configuration 3 4 Channel Rate Selection Buttons and LEDs 3 4 Single or Dual Channel Jumper Configurations 3 4 Control and Monitoring 3 5 Status and Selection LEDs on the DRA 8204 3 5 Factory Default Values 3 6 Reclocker Rate Selection 3 7 Reclocker Rate Selection LEDs 3 7 Menus 4 SNMP Monitoring and Control 4 2 DashBoard Control System Software 4 3 Status Menus 4 3 Setup Men...

Page 8: ...2 Contents DRA 8204 User Manual Iss 05 ...

Page 9: ...f products backed by Ross Video s experience in engineering and design expertise since 1974 You will be pleased at how easily your new DRA 8204 fits into your overall working environment Equally pleasing is the product quality reliability and functionality Thank you for joining the group of worldwide satisfied Ross Video customers Should you have a question pertaining to the installation or operat...

Page 10: ...pplications requiring only a few outputs such as mid cable signal boosters router expansion or signal cleanup Up to 20 SDI distribution channels can be housed in a 2RU space Special attention has been taken to ensure the SDI outputs faithfully reproduce the incoming signals with excellent jitter and return loss specifications LED indicators at the front of the card identify the presence of incomin...

Page 11: ...This section provides the functional block diagram for the DRA 8204 Figure 1 1 Simplified Block Diagram of DRA 8204 Functions SDI OUT BNC 2 BNC 3 BNC 4 BNC 5 BNC 6 BNC 7 BNC 8 BNC 10 Equalizer Equalizer Reclocker Reclocker Channel A BNC 1 Channel B BNC 9 Crosspoint SDI IN ...

Page 12: ... available options unless otherwise noted All references to the DRA 8204 also includes all versions unless otherwise indicated Operator and User refer to the person who uses DRA 8204 Board and Card refer to openGear terminal devices within openGear frames including all components and switches System and Video system refer to the mix of interconnected production and terminal equipment in your envir...

Page 13: ...n In This Chapter This chapter provides instructions for installing the rear modules for the DRA 8204 installing the card into the frame and cabling details The following topics are discussed Before You Begin Installing the DRA 8204 Cabling for the DRA 8204 ...

Page 14: ...utions as described in the following note Unpacking Unpack each DRA 8204 you received from the shipping container and ensure that all items are included If any items are missing or damaged contact your sales representative or Ross Video directly ESD Susceptibility Static discharge can cause serious damage to sensitive semiconductor devices Avoid handling circuit boards in high static environments ...

Page 15: ...me or the rear module is already present skip this section Use the following procedure to install a Rear Module in a DFR 8300 series frame 1 Refer to the DFR 8300 Series User Manual to ensure that the frame is properly installed according to instructions 2 Locate the card frame slot on the rear of the frame 3 Seat the bottom of the Rear Module in the seating slot at the base of the frame s back pl...

Page 16: ...on page 2 3 2 Ensure the Rear Module is the required one 3 Hold the card by the edges and carefully align the card edges with the slots in the frame 4 Fully insert the card into the frame until the rear connection plugs are properly seated on the midplane and rear module 5 Affix the supplied Rear Module label to the BNC area on the rear module This completes the procedure for installing the DRA 82...

Page 17: ...es frame backplane Connect the input and output cables according to the following diagram The inputs are internally terminated in 75 ohms It is not necessary to terminate unused outputs Figure 2 2 Cable Connections for the DRA 8204 The flexible assignment of Input Channels to Output BNCs via jumper selection is discussed in the section Output Channel Configuration on page 3 4 ...

Page 18: ...2 6 Installation DRA 8204 User Manual Iss 05 ...

Page 19: ... Controls 3 1 User Controls In This Chapter This chapter provides a general overview of the user controls available on the DRA 8204 This following topics are discussed Card Overview Output Channel Configuration Control and Monitoring ...

Page 20: ...l option MUTE a channel s outputs will be muted if the input signal degrades to the point that the input EQ can no longer guarantee error free performance When the red ERROR LED is on the outputs will be muted If you have input channels set to any rate other than Auto mode we recommend this jumper position The output of the card would then mute if an incorrect data rate is applied to the input or ...

Page 21: ...n Channel B default setting C Position C is not used on the DRA 8204 and should not be selected Blank The top blank position for these jumpers is for factory use and should not be selected for normal operation Should you select this position the BNCs will output the signal input on Channel A None If the jumper is removed the BNCs will output the signal input on Channel A 6 Channel A Rate Selection...

Page 22: ...a rate detected from the incoming SDI signal For applications where only one specific data rate will be used and the fastest possible lock times are desired the DRA 8204 can be set and locked to a specific data rate Press the Channel Rate Selection button until the AUTO LED is off and the specific data rate LED is illuminated Only SDI signals matching the selected data rate will be reclocked and p...

Page 23: ...functioning normal and that no anomalies have been detected The following conditions must be satisfied a valid input signal is present a valid reference signal is present when a reference is required and that the reference standard matches the input standard Flashing Green When flashing green this LED indicates that the Bootload button was pressed and the card is receiving a new software load from...

Page 24: ...to factory default values PWR Red When lit red or flashing red this LED indicates the card is not operational Re seat card in frame check the rear module type and connections or call Ross Video Technical Support Off When off this LED indicates there is no power to the card CH A OK ERROR Green When lit this LED indicates that Channel A is reclocking a valid signal without errors Red When red this L...

Page 25: ...ate LED Displays Description AUTO OTHER 143 177 270 360 540 1485 Cycling through LEDs Channel searching incoming signal for a valid data rate default setting Auto mode channel detects and reclocks 143Mbps Auto mode channel detects and reclocks 270Mbps Auto mode channel detects and reclocks 360Mbps Auto mode channel detects and reclocks 540Mbps Auto mode channel detects and reclocks 1 485Gbps Chann...

Page 26: ...3 8 User Controls DRA 8204 User Manual Iss 05 ...

Page 27: ... Manual Iss 05 Menus 4 1 Menus In This Chapter This section provides a summary of the menus available for the DRA 8204 The following topics are discussed SNMP Monitoring and Control DashBoard Control System Software ...

Page 28: ...ontrol of your frame and DRA 8204 using Simple Network Management Protocol SNMP which is compatible with many third party monitoring and control tools Refer to your DRA 8204 Management Information Base MIB file for a breakdown of SNMP controls on this card Refer to your DFR 8300 Series User Manual and your MFC 8300 Series User Manual for additional information on SNMP Monitoring and Control ...

Page 29: ...urrent mA Current consumption of card Rear Module 14 4 Indicates a Full Rear Module is installed 15 4 Indicates a Split Rear Module is installed CPU Headroom Processing power available RAM Available On board processing memory available Uptime h Displays the number of hours since the last reboot of the card EE Bank Storage count Signal Read only Signal Status OK All channels are passing a valid sig...

Page 30: ... Rate Same as above Low Signal Muteb b If you have input channels set to any rate other than Auto Mode the Mute option is recommended The output of the card would then mute if an incorrect data rate is applied to the input or if the input signal became too weak for the input equalizer to compensate The channel outputs are muted if the input signal degrades to the point that the input EQ can no lon...

Page 31: ...Output BNC 2 4 Input A The BNCs will output the signal input on Channel A Input B The BNCs will output the signal input on Channel B Output BNC 3 5 Same as above Output BNC 6 7 8 10 Same as above Table 4 4 Alarms Menu Items Menu Title Item Parameters Description Alarmsa a In the Alarms menu if an input channel is not routed to any outputs the Input Status field ignores any loss of input and the st...

Page 32: ...4 6 Menus DRA 8204 User Manual Iss 05 ...

Page 33: ...ns 5 1 Specifications In This Chapter This chapter provides technical specifications information on the DRA 8204 Note that technical specifications are subject to change without notice The following topic is discussed Technical Specifications ...

Page 34: ...ps 525 625 Component SMPTE 259M C 360Mbps 525 625 Component wide screen SMPTE 259M D 540Mbps 525 625 Component wide screen SMPTE 344M 1 485 or 1 4835 Gbps Component SMPTE 292M Impedance 75Ω terminating Equalization 120m of Belden 1694A cable 1 485Gbps 300m of Belden 1694A cable 270Mbps Return Loss 15dB to 1 485GHz SDI Outputs Number of Outputs 8 Impedance 75Ω Return Loss 15dB to 1 485GHz Signal Le...

Page 35: ...DRA 8204 User Manual Iss 05 Service Information 6 1 Service Information In This Chapter This chapter contains the following sections Troubleshooting Checklist Warranty and Repair Policy ...

Page 36: ...erified to work 3 Re seat the Card in the Frame Eject the card and re insert it in the frame 4 Check Control Settings Refer to the Installation and Operation sections of the manual and verify all user adjustable component settings 5 Input Signal Status Verify that source equipment is operating correctly and that a valid signal is being supplied 6 Output Signal Path Verify that destination equipmen...

Page 37: ... DRA 8204 User Manual provides all pertinent information for the safe installation and operation of your openGear Product Ross Video policy dictates that all repairs to the DRA 8204 are to be conducted only by an authorized Ross Video Limited factory representative Therefore any unauthorized attempt to repair this product by anyone other than an authorized Ross Video Limited factory representative...

Page 38: ...6 4 Service Information DRA 8204 User Manual Iss 05 ...

Page 39: ...Notes ...

Page 40: ...n Related products and full product lines On line catalog News Testimonials Ross Video Part Number 8204DR 004 05 PHONE General Business Office and Technical Support 613 652 4886 After Hours Emergency 613 349 0006 Fax 613 652 4425 E MAIL General Information solutions rossvideo com Technical Support techsupport rossvideo com POSTAL SERVICE Ross Video Limited 8 John Street Iroquois Ontario Canada K0E...

Reviews: