background image

35 Congress Street, Salem, MA 01970

 Tel# 1- 800 631-9707  Fax# 1-800-560-2890

e-mail:[email protected]

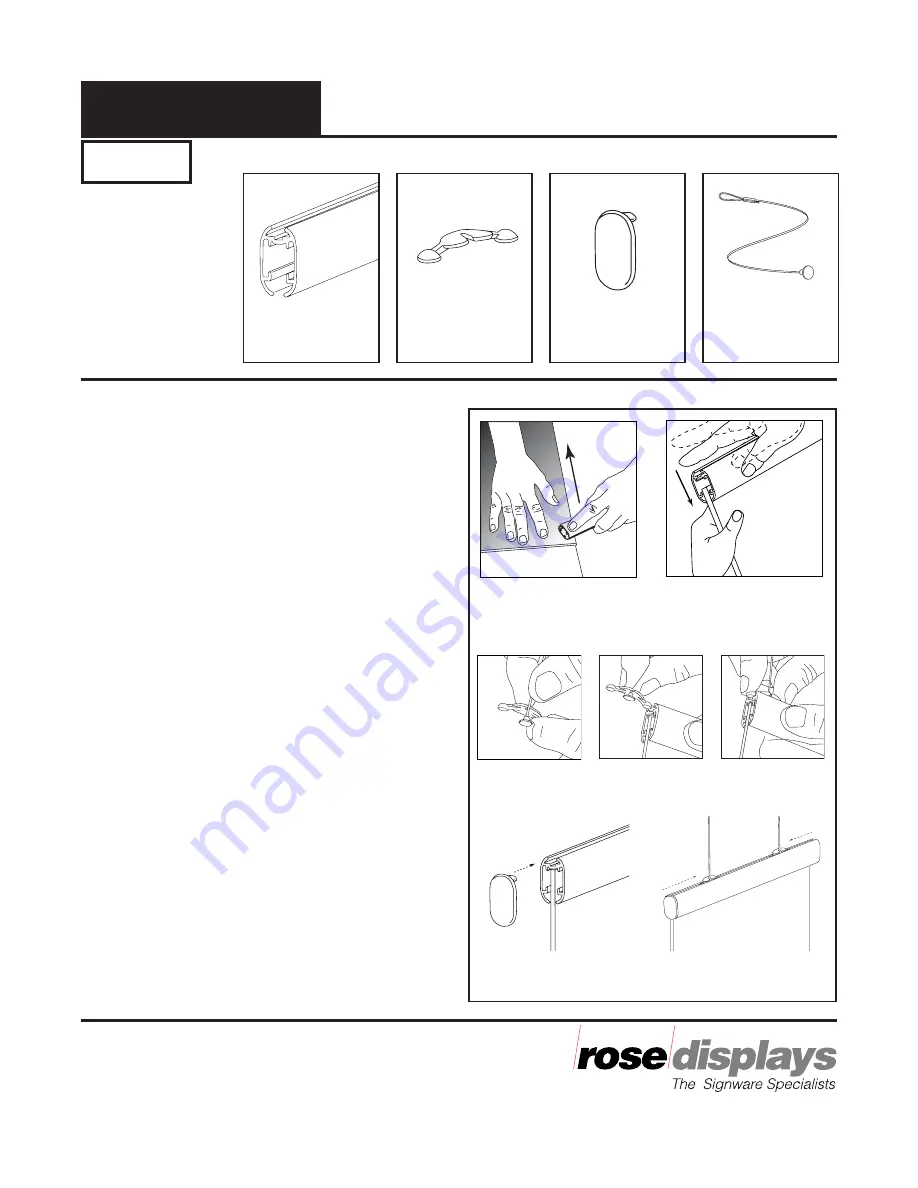
Parts

 Instruction Sheet

Step 1

Prepare edges of graphic. Place the graphic on
tabletop with one edge at the table edge. Using
the AnoQuick holder, run it across the graphic
edge, crushing it slightly. 

Fig. 1

Step 2

Starting at one corner, push the holder onto the
graphic.  Work your way down the holder tapping
it down firmly to seat the graphic fully. 

Fig. 2

Step 3

Place cable onto inner channel of Cable Clip. The
cable should snap into place. 

Fig. 3

Step 4

Align one end of the Cable Clip with the top
channel of the aluminum holder. Then insert one
round end, then press down on the other round
end and slide Cable Clip into rail.

 Fig.  4

Step 5

Push end caps into place. 

Fig. 5

Step 6

Suspend poster. 

Fig. 6

Important note:

Please save and reuse the AnoQuick, Cable Clips,
End Caps and MultiClips for future projects.

Note: Use only
with graphics
mounted on 3/16”
foamboard or other
similar thickness.
Can also use a
folded edge thinner
substrate.

AnoQuick™

Instructions for Hanging

Incept-9.27.02

Figure 2

The AnoQuick is a trademark of Rose Displays, Ltd.. Neither the
manufacturer nor any sales agent may be held liable for injury, loss or
damage resulting from the use of these products.
Part #02INSAnoQuickCableClipLoopSaucer

Figure 3

Figure 5

Figure 4

Figure 1

Figure 6

End Cap

06-5525

AnoQuick

12A300

Cable Clips

06-5050

Loop and

Saucer

16-0018SL

Summary of Contents for ANOQUICK ROUND WITH CABLE CLIP AND LOOP AND SAUCER

Page 1: ...aluminum holder Then insert one round end then press down on the other round end and slide Cable Clip into rail Fig 4 Step 5 Push end caps into place Fig 5 Step 6 Suspend poster Fig 6 Important note Please save and reuse the AnoQuick Cable Clips End Caps and MultiClips for future projects Note Use only with graphics mounted on 3 16 foamboard or other similar thickness Can also use a folded edge th...

Page 2: ...should snap into place Fig 3 Step 4 Align one end of the Cable Clip with the top channel of the aluminum holder Then insert one round end then press down on the other round end and slide Cable Clip into rail Fig 4 Note For OneUp applications the AnoQuick holder is conveniently marked in the center Slide the Cable Clip to the mark Step 5 Push end caps into place Fig 5 Step 6 Suspend poster Fig 6 Im...

Page 3: ...hic edge crushing it slightly Fig 1 Step 2 Starting at one corner push the holder onto the graphic Work your way down the holder tapping it down firmly to seat the graphic fully Fig 2 Step 3 Place cable onto inner channel of Cable Clip The cable should snap into place Fig 3 Step 4 Align one end of the Cable Clip with the top channel of the aluminum holder Then insert one round end then press down ...

Page 4: ...dge crushing it slightly Fig 1 Step 2 Starting at one corner push the holder onto the graphic Work your way down the holder tapping it down firmly to seat the graphic fully Fig 2 Step 3 Place cable onto inner channel of Cable Clip The cable should snap into place Fig 3 Step 4 Align one end of the Cable Clip with the top channel of the aluminum holder Then insert one round end then press down on th...

Reviews: