background image

WARRANTY TERMS AND CONDITIONS 


Standard Terms


This is to certify that your ROMA MEDICAL


wheelchair is guaranteed for a 

period of one year from the date of purchase. The warranty is not 
transferable. 
 

Should a defect or operating fault arise within this period the Dealer 
from where the product was originally purchased should be notified 
immediately. Failure to register the fault may invalidate the warranty. 
The Dealer from where the product was purchased is responsible for 
any warranty repairs. 

 
Roma Medical warrants that if a fault occurs within this period due to faulty 
workmanship or materials that the product will be repaired (or replaced at the 
Companys discretion) free of charge. 
 
The manufacturer will not accept liability for damage caused by any misuse, 
unauthorised alterations or non-observance of the instructions set out in this 
user manual. 
 
The guarantee excludes parts, which have been subjected to natural wear 
and tear during this period (Tyres, upholstery and plastic parts) 

 
Model No:…………………………… 
 
 
Serial No:……………………………. 
 
 
Purchase Date:…………………….. 


Roma Medical Aids Ltd 

York Road, Bridgend Industrial Estate, Bridgend, CF31 3TB. 

T: 01656 674488   F: 01656 674499


Dealer’s Stamp 

KB&S16311 

Summary of Contents for 1500

Page 1: ...Lightweight Manual Wheelchair Models 1500 1530 USER MANUAL Please ensure this manual is read and understood before using the scooter March 2012 ...

Page 2: ... Page Introduction 3 Intended Use 3 Technical Specification 3 Feature Guide 4 Safety Advice 5 Opening and Folding 6 Reaching and Stretching 6 7 Reclining and Tilting 7 8 General Use Maintenance 8 10 Warranty 2 ...

Page 3: ...Intended Use The ROMA MEDICAL 1500 1530 wheelchair was designed to provide a lightweight means of mobility for users up to 110kgs 17st The folding backrest and removable footrests make it easily transportable when not in use Technical Specification Self Propel 1500 model Length 107cm 42 Width 65cm 25 Height 89cm 35 Seat Height 52cm 20 incl 2 cushion Seat Depth 40cm 16 Seat Width 45cm 18 Seat to Fo...

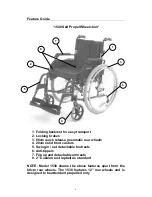
Page 4: ...ear wheels 4 20cm solid front castors 5 Swing in out detachable footrests 6 Anti tippers 7 Flip up and detachable armrests 8 2 Cushion and lapbelt as standard NOTE Model 1530 shares the above features apart from the 60cm rear wheels The 1530 features 12 rear wheels and is designed to be attendant propelled only 7 8 1 4 6 5 2 3 4 ...

Page 5: ... your wheelchair is fitted with anti tipping wheels and you have assistance Do not adjust the footrests lower than 6 5cms 2 ins from the ground Do not stand on the footplates when transferring to or from the wheelchair This could cause the chair to tip Do not lean on the wheelchair or use it as a walking aid this could result in a loss of balance Do not lean reach forward unless you have ensured t...

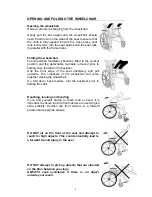
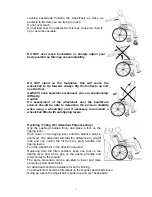
Page 6: ...rest Grip the front edge of the seat upholstery and pull upwards The crossbars of the wheelchair will come together closing the wheelchair On fold down back models fold the backrest prior to folding the chair Reaching leaning and bending If you find yourself having to reach lean or bend it is important to ensure that the front castors are used to give extra stability Position the front castors in ...

Page 7: ...ir and if necessary recommend a wheelchair fitted with anti tipping levers Reclining Tilting For Attendant Purposes Only Grip the pushing handles firmly and place a foot on the tipping lever Push down on the tipping lever until the balance point is achieved The attendant will feel the difference in weight ratio and can control the tilt from the push handles and tipping levers Turn the wheelchair i...

Page 8: ... wheel The castor fork swivel allows the wheelchair to turn properly An adjustment locknut is located under the castor cap Pry this cap off to expose the adjustment locknut If the locknut is too tight the wheelchair will be difficult to steer If the locknut is too loose the castor will flutter and may cause the chair to become unstable To check for correct tightness Tip the chair backwards resting...

Page 9: ...els or sharp edges Self taping screws or rivets are secure Armrests Check for damage Ensure armpads are screwed firmly in place Seat and back Check edges for tears Check for excessive stretch 24 12 wheels No excessive side movement when wheels are spun Axle lock nuts are secure 8 castor wheel bushes Inspect stem for correct tension by spinning the castor Castor should come to a gradual stop Adjust...

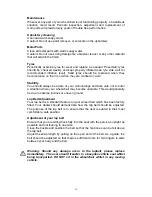
Page 10: ...not to enter a situation where your wheelchair may become unstable This would generally be due to adverse inclines or uneven ground Lap Belt Adjustment Your lap belt is a standard feature on your wheelchair which has been factory fitted Your dealer should demonstrate how the lap belt should be adjusted The purpose of the lap belt is to ensure that the user is seated in their most comfortable safe ...

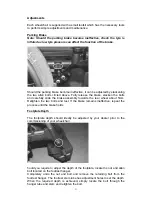
Page 11: ... brake assembly towards the rear wheel about 5mm Retighten the two bolts and test If the brake remains ineffective repeat the process until the brake holds Footplate Depth The footplate depth should ideally be adjusted by your dealer prior to the commissioning of your wheelchair hould you require to adjust the depth of the footplate locate the nut and allen bolt located on the footrest hanger Comp...

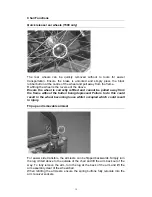
Page 12: ...ed away from the frame without the button being depressed Failure to do this could result in the wheel becoming loose whilst occupied which could result in injury Flip up and removable armrest For easier side transfers the armrests can be flipped backwards Simply turn the lug circled above to the outside of the chair and lift the arm back out of the way To fully remove the arm turn the lug at the ...

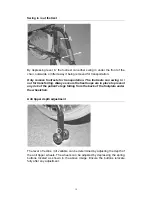
Page 13: ... transferring Always ensure the heel loops are in place to prevent any risk of the patient s legs falling from the back of the footplate under the wheelchair Anti tipper depth adjustment The level of recline tilt vailable can be determined by adjusting the depth of the anti tipper wheels The wheels can be adjusted by depressing the spring buttons located as shown in the above image Ensure the butt...

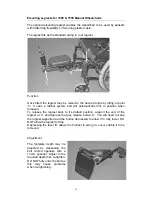
Page 14: ...sition when released To release the legrest back to it s default position support the end of the legrest at C and depress the grey release button A You will need to keep the legrest supported and the button depressed to allow it to fully lower DO NOT allow the legrest to drop Depressing the lever B allows the footrest to swing in out or enable it to be removed Adjustment The footplate depth may be...

Page 15: ...Notes 15 ...

Page 16: ...y warranty repairs Roma Medical warrants that if a fault occurs within this period due to faulty workmanship or materials that the product will be repaired or replaced at the Companys discretion free of charge The manufacturer will not accept liability for damage caused by any misuse unauthorised alterations or non observance of the instructions set out in this user manual The guarantee excludes p...

Reviews: