background image


Important notes


VIMA JM-8 


r


9


Electromagnetic radiations


• Electromagnetic radiations may cause a deterioration of audio 

performances. Such possible deterioration consists in an audio sig-
nal being emitted. On ceasing the electromagnetic noise, the emis-
sion of the audio signal will simultaneously stop.


Liability and copyright


• The law prohibits the unauthorized recording, public performance, 

broadcast, sale, distribution, etc., of a work (musical works, visual 
works, broadcasts, live performances, etc.) whose copyright is 
owned by a third party. This product does not implement SCMS. 
This design decision was made with the intent that SCMS should 
not restrict the creation of original compositions which do not 
violate copyright law. Roland assumes no responsibility for any 
infringement of copyright that you may commit using the JM-8.

• The JM-8’s CD-writing functionality and its copy functionality are 

designed to allow you to reproduce material to which you have 
copyright, or material which the copyright owner has granted you 
permission to copy. Accordingly, the reproduction of music CDs or 
other copyrighted material without permission of the copyright 
owner avoiding technical prohibiting features of second-genera-
tion and later copying, like SCMS or other solutions, constitutes 
copyright infringement and may incur penalties even in case such 
reproduction is for your own personal use and enjoyment (private 
use).
Consult a copyright specialist or specialized publications for more 
detailed information on obtaining such permission from the copy-
right holders.


About supported picture files


• Picture files of the following formats can be loaded by the JM-8:

• JPG files with a maximum size of 3MB

• Max. width: 5120 pixels, max. height: 3840 pixels. All pictures 

are temporarily resized to fit the JM-8’s display. Using either 
800 x 480 pixels or exact multiples (such as 1600 x 960 or 3200 
x 1920 pixels) is highly recommended.

• Do 


not


 save your pictures as “Progressive” JPG files if you want 

to use them with the JM-8. Select the “Baseline” format.

• If pictures of different dimensions are displayed during a slide-

show, some transition effects may lead to poor results.


About audio files


• Audio files in the following formats can be played back:

• WAV format

• 16-bit linear

• Sampling rate of 44.1kHz

• Stereo/mono

• mp3 files:

• MPEG-1 Audio Layer 3

• Sampling frequency: 8/11.025/12/16/22.05/24/32/44.1/48kHz

• Bit rate: 32/40/48/56/64/80/96/112/128/160/192/224/256/

320kbps, VBR (variable bit rate)


Supported Standard MIDI Files


• Format 0/1


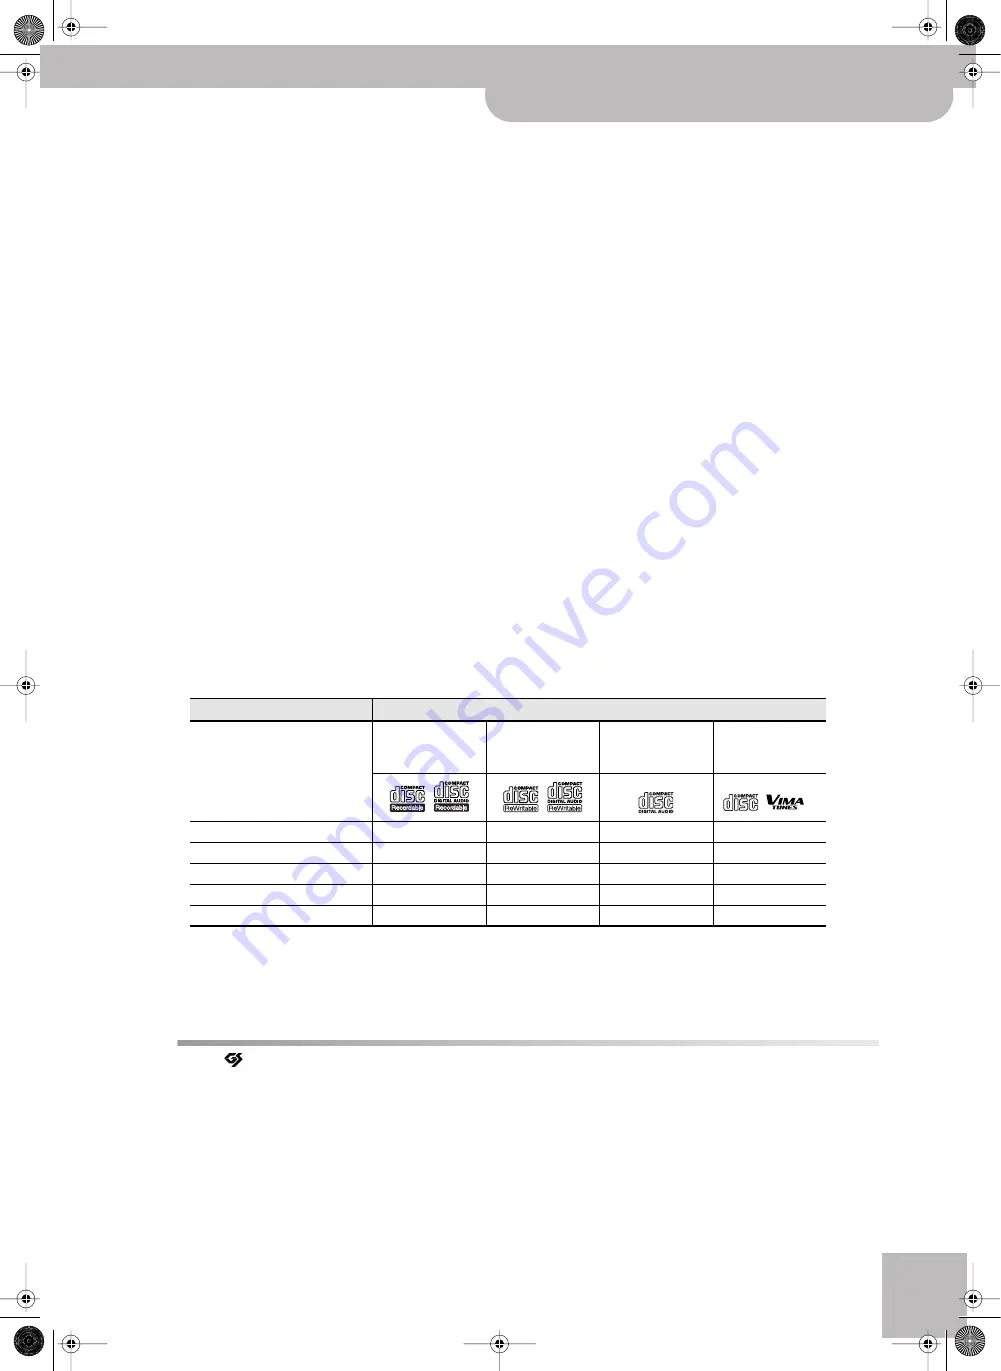
CD media usable for recording and playback


The JM-8 supports the following media. The table below also show which functions are available for the various media types.

• We cannot guarantee that a music CD created with the JM-8 will play on all CD players. Depending on your CD player’s support for CD-R/RW discs, 

music CDs you create may or may not play correctly. 

• The JM-8 does not allow you to cancel a CD-R/RW.


Function

Media

CD-R discs


8x speed Read

4x speed Write


CD-RW discs


8x speed Read

4x speed Write


Music CD

CD-ROM/VIMA


8x speed read


Recording


Playback


Create an original music CD


Backup an original music CD


Read a data CD


• GS (

) is a registered trademark of Roland Corporation.

• Microsoft and Windows are registered trademarks of Microsoft Corporation.

• The screen shots in this document are used in compliance with the guidelines of the Microsoft Corporation.

• Apple and Macintosh are registered trademarks of Apple Inc.

• Mac OS is a trademark of Apple Inc.

• All product names mentioned in this document are trademarks or registered trademarks of their respective owners.

• MPEG Layer-3 audio compression technology is licensed from Fraunhofer IIS Corporation and THOMSON Multimedia Corporation.

• This product uses certain software of the “Independent JPEG Group”.

• Copyright © 2003 by Bitstream, Inc. All rights reserved. Bitstream Vera is a trademark of Bitstream, Inc.


JM-8_OM_GB.book  Page 9  Wednesday, July 29, 2009  4:43 PM

Summary of Contents for VIMA JM-8

Page 1: ...r Owner s Manual JM 8_OM_GB book Page 1 Wednesday July 29 2009 4 43 PM ...

Page 2: ...ult the dealer or an experienced radio TV technician for help This device complies with Part 15 of the FCC Rules Operation is subject to the following two conditions 1 This device may not cause harmful interference and 2 This device must accept any interference received including interference that may cause undesired operation Unauthorized changes or modification to this system can void the users ...

Page 3: ...dule for professional entertainers Conventions in this manual The explanations in this manual include illustrations that depict what should typically be shown by the display Note however that your unit may incorporate a newer enhanced version of the system e g includes newer sounds so what you actually see in the display may not always match what appears in the manual Buttons on the front panel ar...

Page 4: ...vice like a Flash memory device or a digital photo camera Record your performances The JM 8 incorporates an audio recorder that allows you to record all audio signals the JM 8 can output simulta neously The resulting WAV files can be played back on the JM 8 itself burned to audio CDs used on a com puter etc Lyrics VIMA TUNES and video throughput The JM 8 incorporates several video functions that a...

Page 5: ...unit and consult an audiologist Do not allow any objects e g flammable material coins pins or liquids of any kind water soft drinks etc to penetrate the unit Immediately turn the power off remove the AC adaptor from the outlet and request servicing by your retailer the nearest Roland Service Center or an authorized Roland distributor as listed on the Information page when The AC adaptor the power ...

Page 6: ... only the plug on the AC adaptor cord when plugging into or unplugging from an outlet or this unit At regular intervals you should unplug the AC adaptor and clean it by using a dry cloth to wipe all dust and other accumulations away from its prongs Also discon nect the power plug from the power outlet whenever the unit is to remain unused for an extended period of time Any accumulation of dust bet...

Page 7: ...s of any kind to avoid the possibility of discoloration and or deformation Please be aware that all data contained in the unit s memory may be lost when the unit is sent for repairs Important data should always be backed up on a USB storage device or written down on paper when possible During repairs due care is taken to avoid the loss of data However in certain cases such as when circuitry relate...

Page 8: ...ommercially available CD cleaner Keep CDs in their case when not in use Do not leave a CD in the CD drive for an extended period of time Bending a CD may make it unreadable and cause malfunctions To hold a CD insert a finger into the center hole and grasp it between the hole and the outer edge Do not allow fingerprints or scratches to mar the recording surface of the CD Do not drop CDs or stack th...

Page 9: ...s 1600 x 960 or 3200 x 1920 pixels is highly recommended Do not save your pictures as Progressive JPG files if you want to use them with the JM 8 Select the Baseline format If pictures of different dimensions are displayed during a slide show some transition effects may lead to poor results About audio files Audio files in the following formats can be played back WAV format 16 bit linear Sampling ...

Page 10: ... part to be muted 33 Singing or playing in a different key Key Control 34 Changing the tempo playback speed of a song 34 Viewing Lyrics and chords 35 Viewing the lyrics and chords in the internal display and adjusting the settings 35 Monitoring what the audience sees 36 5 Recording your performance as audio data 37 Recording 37 Burning your recording to CD 38 Saving your recording as an audio file...

Page 11: ... your modified song 95 17 Using the JM 8 s MIDI functions 97 About MIDI 97 Using the JM 8 as a MIDI module 97 Connections 97 Setting MIDI channels on the external module for the EXTERNAL IN preset 98 Setting MIDI channels on the JM 8 starting from EXTERNAL IN 98 Other MIDI parameters for the EXTERNAL IN parts 99 Leaving the MIDI EDIT page 100 MIDI parameters for the SONG parts 100 Activating the S...

Page 12: ...ct and edit parameters simply by touching them on screen F VIDEO section The buttons in this section provide access to the video signals the JM 8 receives from its VIDEO IN socket to picture files in the jpg format and to the available video effects EFX G MIC 1 section The MIC 1 knob controls the level of the micro phone connected to the MIC 1 jack The REVERB knob in this section sets the level of...

Page 13: ...neither button lights the Standard MIDI File or audio file uses its normal pitch O EJECT button Press this button to eject the CD in the JM 8 s drive To insert a CD simply press it in the slot on the right side until the drive picks it up and loads it com pletely P TEMPO buttons These buttons allow you to reduce SLOW or increase FAST the tempo of the currently selected MIDI or audio song Left side...

Page 14: ...icrophone input whose signal can be processed with the JM 8 s harmony function Note This instrument is equipped with balanced XLR and 1 4 phone type jacks Wiring diagrams for these jacks are shown below Make connections after first checking the wiring diagrams of other equipment you intend to connect G AUDIO R L MONO jacks These sockets transmit all audio signals the JM 8 generates as well as the ...

Page 15: ...ny function If your microphone is connected to the MIC 2 socket set the MIC 2 GUITAR switch to MIC 2 Note Try to use dynamic microphones whenever possible Although you can also connect a condenser microphone this will require a commercially available DI box that supplies phantom power Cautions when using a microphone Lower the volume before you connect a microphone to the JM 8 If the volume is rai...

Page 16: ... or 16 9 wide screen If your television has both a video jack and an RGB connector The JM 8 s provides both a VIDEO and an RGB con nector You may use either of these depending on the type of connector provided on your television We recommend that you use the RGB connection because it will provide a higher quality picture than the VIDEO connector Connecting an external display Types of displays tha...

Page 17: ...he amplifica tion system connected to the JM 8 You can set the volume of the DVD s sound using the JM 8 s AUDIO IN knob or decrease the melody portion and sing the melody yourself Connect the DVD player s video output to the VIDEO IN socket located on the JM 8 s left side panel This is a composite video input If you want to hear the audio from the DVD player connect your DVD player s audio output ...

Page 18: ...icrophones connected to it or the metal portions of other objects such as guitars This is due to an infinitesimal electrical charge which is absolutely harmless However if you are concerned about this connect the ground terminal see figure with an external ground When the unit is grounded a slight hum may occur depending on the particulars of your installation If you are unsure of the connection m...

Page 19: ...n use headphones to enjoy the JM 8 without dis turbing those around you such as at night 1 Plug the headphones into the PHONES socket located on the JM 8 s left side panel If you don t want to disturb others switch off the external amplification system because the JM 8 s AUDIO outputs remain active even when you connect headphones 2 Use the JM 8 s MASTER VOL knob to adjust the headphone volume Cau...

Page 20: ...t in the display you can change its setting with the JM 8 s dial The JM 8 contains two pages with menu functions BASIC and ADVANCED These pages can be selected by pressing the MENU display button Selecting BASIC parameters 1 Press the EXIT button several times until it stops flashing to return to the main page 2 Press the MENU display button in the lower left corner The display changes to 3 Press ...

Page 21: ... press the MIDI display button 5 To return to the regular page if you selected the ADVANCED page by mistake press the BASIC display button in the lower left corner Returning to the main page 1 Press the EXIT button several times until it stops flashing Abbreviated instruction Press MENU ADVANCED MIDI JM 8_OM_GB book Page 21 Wednesday July 29 2009 4 43 PM ...

Page 22: ...ay Note Bear in mind that the audio files you are using may be copyright protected Never use protected material in public without first asking the permission of the copyright owner Also be aware that you may have to pay performance royalties for any protected material you use in front of an audience Device Explanation INTERNAL Refers to the JM 8 s internal hard disk 120GB It contains 5 songs when ...

Page 23: ...the song or folder you need on p 24 if you cannot see the file you want to play back 3 Select the file you want to play back by pressing its line The selected song name is highlighted and also appears in the display s upper left corner Note See Using the Finder to locate songs and pictures on p 47 for how to search the selected storage device for specific files Note The My Songs folder is empty wh...

Page 24: ... must not be copied nor used in a secondary copy righted work without the permission of the copyright holder 1 Connect the JM 8 to an audio system or connect a pair of headphones and switch it on see p 18 2 Insert the desired disc into the JM 8 drive The drive is located on the right side panel Reading of data from the CD starts when the CD is inserted in the drive It may take a few moments to com...

Page 25: ... the CD drive insert a straightened paper clip or similar object into the emergency eject hole below the slot and press several times until you can remove the CD by hand Note The emergency eject hole must be used only when the JM 8 s power is switched OFF Using it while the power is on may damage the disc or cause serious problems Playing back songs on a USB storage device Here s how you can liste...

Page 26: ... a line level signal source to the JM 8 and use it instead of or together with a song on the internal hard disk a CD or a USB storage device 1 Switch off your amplification system the JM 8 see p 19 and the external audio device 2 Connect the signal source to the JM 8 s AUDIO IN L R RCA phono jacks Depending on the output connector types on the external audio source you may need appropriate adapter...

Page 27: ...m posi tion to avoid generating a powerful noise that may dam age your audio system 4 Sing or talk into the microphone or play your gui tar and gradually turn the MIC 1 or MIC 2 GUITAR knob towards the right Set the knob in such a way that you can easily hear your voice or instrument If the sound distorts you need to turn it a little towards the left again Note If you don t hear anything check the...

Page 28: ... received via the MIC 1 and MIC 2 sockets Though this effect is shared by the two sockets you can set the amount for each input individually 1 Sing or play while setting the desired reverb amount with the MIC 1 REVERB or MIC 2 REVERB knob The knob to use depends on the socket to which you connected the microphone or electric guitar Turn it towards the right to increase the amount of reverb and to ...

Page 29: ...e main page by pressing the EXIT button several times 4 Press MENU VOCAL EFFECTS Note You can also select this page by pressing and hold ing the GUITAR EFFECT button 5 Press the GUITAR MFX display field 6 Use the dial to select the desired effect type The following guitar effects are available Setting Meaning REVERB1 REVERB2 REVERB3 These types simulate the reverb characteris tics of a room or a c...

Page 30: ... into the microphone while performing the following steps 5 Press the VOCAL EFX display field in the MIC1 VOCAL EFX section and use the dial to choose one of the following settings EXIT GUITAR EFFECT Setting Explanation DUET One harmony voice will be added to your singing TRIO Two harmony voices will be added to your singing QUARTET Three harmony voices will be added to your singing KIDS Your voic...

Page 31: ... follows 1 Select the song you want to sing to See page 23 and following 2 If you want to use the vocal effect right from the start press the VOCAL button it must light If you want to use the vocal effect at a later stage in the chorus for example switch off the VOCAL but ton 3 Press the π button to start song playback and start singing 4 Switch on the VOCAL button when you want to hear the effect...

Page 32: ... nient way to enjoy karaoke or practice soloing Note The function described here is available for all files with the WAV or mp3 icon on any of the supported storage devices and commercially available audio CDs It can also be used for the signal source you connect to the AUDIO IN sock ets 1 Select the storage device and the audio song WAV or mp3 you want to sing or play If you want to play back a s...

Page 33: ...or the melody part That is why the JM 8 s MELODY MUTE function at first switches off MIDI channel 4 If the melody part is assigned to a different channel or if you wish to mute the guitar part instead proceed as follows 1 Select a song with the SMF icon Note The display page shown below does not appear while an audio song file WAV or mp3 is selected 2 Press the EXIT button repeatedly until it stop...

Page 34: ...y or sing along com fortably you can slow it down to a more comfortable tempo Changing the tempo playback speed will not affect the pitch You can also change the tempo while the song is playing Here s how to change the playback speed of a Standard MIDI File or audio song 1 Use the SLOW FAST buttons to adjust the tempo playback speed Pressing the SLOW button will make the tempo slower and pressing ...

Page 35: ...are flagged with a symbol to the right of the song title For audio songs nothing will be displayed Note For mp3 and WAV files you can search the internet for lrc files or instructions for how to create them and save such files in the same folder as the audio songs they apply to Note that both the audio and the lrc file must have the same name except for the extension Note You can also import a tex...

Page 36: ...ress the COLOUR display button Press it several times until you have found the text and background color that is most convenient for you Your color settings are adopted by the JM 8 Note You can also press the VIDEO MONITOR button to check the video signal transmitted to the external screen in the JM 8 s display 8 To turn off the lyrics display on the external screen press the LYRICS button once ag...

Page 37: ...eave record standby mode 6 Press the π button The REC and π buttons light and the JM 8 starts playing back the selected song and recording Every thing you say sing into a connected microphone or play on a connected instrument is recorded 7 At the end of the song press the REC or ª but ton to stop recording Song playback and recording stop The JM 8 now processes the audio data it has just recorded ...

Page 38: ...ible to record or write additional material to that disc Only final ize the disc when you have completed your music CD and don t need to write or record any more data Note Never switch off the JM 8 before it has ejected the CD Otherwise your CD will be unusable and the JM 8 may be damaged Note Though the JM 8 can play back unfinalized CD R RWs allowing you to listen to your recording consumer CD p...

Page 39: ... string If you forgot to insert a character use ø or to select the position where the missing character should be inserted and enter it 8 To confirm your name and save the file press the ENTER display button The display shows a Working message and returns to the main page when the operation is finished Your audio file has been saved to the My Record ings folder on the internal hard disk HDD JM 8_O...

Page 40: ...t to images page 46 The ANIME effect is a special effect that displays graphics in synchronization with the song that s playing or with the timing at which you press the keys of an external MIDI instrument This can enhance the visual impact when you re per forming along with a song or along with a slide show or the video signal of an external DVD player Note The ANIME function is only available wh...

Page 41: ...rouped into vari ous categories These photos can be used for automatic slide show generation If you do not change the related setting the JM 8 automatically makes a random selec tion of a picture category whose pictures are displayed as a slide show whenever you start song playback See page 71 for how to select a specific picture category and START WITH SONG on p 71 If you select Auto as picture c...

Page 42: ... background music Note You can only connect a digital camera that supports USB mass storage class or PTP format For details refer to the owner s manual of your digital camera Note You can t operate the digital camera from the JM 8 1 Select the song you want to play back see p 23 and following 2 Make sure that your digital camera contains the photos you want to view as a slide show 3 Use a USB cabl...

Page 43: ...e images you want to display in the _PICTURE folder 4 Disconnect the USB storage from your computer in accordance with the standard procedure for the operating system you are using 5 Connect your USB storage device to the JM 8 s EXTERNAL MEMORY port on the front panel The JM 8 automatically shows the contents of the USB storage device you inserted 6 Select the song you want to play back see p 23 a...

Page 44: ... picture in the JM 8 s display press the VIDEO MONITOR button To return to the JM 8 s user interface switch off the VIDEO MONITOR but ton 4 Press the EXIT button repeatedly until it stops flashing to return to the main page if necessary 5 Press MENU ZOOM PAN OPTIONS The JM 8 s display shows the ZOOM PAN OPTIONS page Note You can also select this page by pressing and hold ing the ZOOM PAN button 6 ...

Page 45: ...r DVD player s analog audio outputs to the AUDIO IN sockets on the JM 8 s left side panel see p 26 4 Press the VIDEO IN button it lights If the JM 8 receives no video signal the external dis play shows the No signal message 5 Start playback of your DVD or portable audio video player The external display or television connected to the JM 8 shows the video being played by the DVD player 6 Set the AU...

Page 46: ...tton repeatedly until it stops flashing to return to the main page if necessary 3 Press MENU ANIME OPTIONS The JM 8 s display will show the type color select screen Note You can also select this page by pressing and hold ing the ANIME button 4 Press the button icon assigned to the desired type T The first two rows of four button icons are used to select the type Each type provides variations which...

Page 47: ... the FILTER section to restrict your search If you don t select any of these options the search results will include all files whose names match your entry 5 Enter the characters the JM 8 should look for See Entering names on p 38 for details 6 To confirm your entry and start the search press the FIND display button Device Explanation INTERNAL Refers to the JM 8 s internal hard disk CD Refers to t...

Page 48: ... 7 Press the name of the file you want to use 8 Press the CLOSE display button to close the SEARCH RESULT window Note If another song or slide show is currently playing wait until it finishes then proceed with the following step Press the ª button if you don t want to wait until the current song is finished then proceed with step 9 9 Press the π button to start playback of your song or press SLIDE...

Page 49: ...a loop then press the MARK B button The MARK B button lights while MARK A is still flashing The loop s start and end positions have been set and can be used Here is what you have set so far this is only an example 5 Press the MARK A button it lights to activate the loop The passage selected above is now played back over and over 6 Press the MARK A button again it flashes to deactivate loop playbac...

Page 50: ...o jump to a page similar to the following 4 Select the device that contains the first song you want to add INTERNAL CD EXTERNAL 5 Select the folder that contains the desired song if necessary 6 Press the name of the song you want to add to the playlist Steps 4 6 are the same as for selecting the songs you want to play back see p 23 and following Note You can also select several songs at once by pr...

Page 51: ...how to select a different playlist 1 On the PLAYLIST EDIT page see above press the name of the song in your new playlist where you want playback to start The PLAYLIST button lights If you like you can press the EXIT button to return to the main page 2 Press the π button to start playback 3 Press the ª button to stop playback Note If the PLAYLIST PLAYS ALL SONGS function is selected page 55 pressin...

Page 52: ...mode select any song on any stor age device The PLAYLIST button goes dark Note You can specify whether all songs of the selected playlist should be played one after another or whether the JM 8 should stop at the end of each song see p 55 Note The JM 8 can automatically load a specific playlist when you switch it on see p 56 Quickly finding songs for your playlists While compiling new playlists or ...

Page 53: ...ligible song files 8 Enter the characters the JM 8 should look for See Entering names on p 38 for details The JM 8 will search for files whose names contain the supplied information This would allow you to also locate a file called Raggabeat if you entered BEA Note Using this function for tracks on a commercially available audio CD makes no sense because all tracks are called Track with a number 9...

Page 54: ...playlist you want to edit See Selecting an existing playlist on p 51 The display shows the PLAYLIST EDIT page Inserting steps To add a step to your playlist and assign a song to it proceed as follows 1 Press the ADD SONG display button The display shows a page similar to the following 2 Select the device that contains the song you want to add INTERNAL CD EXTERNAL 3 Select the folder that contains ...

Page 55: ...witch off the JM 8 or when you select a different playlist Moving existing steps to a different position You can also change the order of existing steps in your playlist 1 See Selecting an existing playlist on p 51 or cre ate a new playlist 2 Select the step you want to move to a different position a Press one of the following display buttons b Press the SAVE display button to save your edited lis...

Page 56: ...hen the JM 8 is switched on 5 Switch on the RECALL display button to the left Switch off this button icon if no playlist should be recalled when the JM 8 is switched on 6 Press the EXIT button repeatedly until it stops flashing to return to the main page Deleting unnecessary playlists Playlists that you no longer need can be deleted Note that deleting a playlist will not reclaim a big amount of st...

Page 57: ...he playlist file you want to delete by press ing its name in the PLAYLIST LOAD list 4 Press the REMOVE display button 5 Press the EXIT button repeatedly until it stops flashing to return to the main page JM 8_OM_GB book Page 57 Wednesday July 29 2009 4 43 PM ...

Page 58: ...a preset you can press ORIGINAL PAGE 1 to return to the original orchestration 6 Try out various presets to see how fast this con cept works 7 If you like the new version better than the original one you can press the SAVE COVER display but ton to save the song to the internal memory or a USB storage device with this information see below Otherwise press the EXIT button repeatedly until it stops f...

Page 59: ... details 9 To confirm your name and save the file press the ENTER display button Note If you pressed the SAVE display button by mistake you can close the keyboard window by pressing the EXIT button In that case your song is not saved If you selected the device that contains the original version with the same name the following message is displayed Press the YES display button to overwrite the old ...

Page 60: ... Press the instrument icon at the top of the channel strip to switch the corresponding instrument on no MUTE indication or off a MUTE indication appears A muted part no longer sounds 8 Press the EXIT button repeatedly until it stops flashing to return to the main page Using the SMF compressor and SMF equalizer The JM 8 contains two effect processors that allow you to change the sound of SMF songs ...

Page 61: ...you see each of the three frequency ranges has its own set of parameters that allow you to spec ify their behavior ATTACK 0 100ms Use this parameter to specify how fast the compressor of the band in question should start processing the signal once the level of that band exceeds the THRSHLD level Choose a smaller value if you prefer a compression similar to that of FM radio stations Higher values m...

Page 62: ...ntly lower level select a positive value If your settings lead to a significantly higher level select a negative value 0 means that the level is neither boosted nor attenuated HI FREQ HZ 2000 12000Hz This parameter allows you to set the cutoff frequency of the high band this is a shelving filter HI GAIN DB 15 15dB Use this parameter to set the level of the selected HI frequency Positive values boo...

Page 63: ...2 bars before the JM 8 starts playing Note The Count In function can be used independently of the metronome There is thus no need to activate the met ronome in order to hear the count in MODE Yet another option on the above display page is to specify when the metronome should sound ALWAYS The metronome even counts when play back is stopped Press this display button if you want to hear the metronom...

Page 64: ...ected screen by pressing either the VIDEO OUT ASPECT RATIO 4 3 or the 16 9 field Specifying the television format 6 Press the OPTIONS display button to jump to the following page 7 Press the VIDEO IN OUT STANDARD PAL or NTSC display button 8 Press the BACK display button to return to the VIDEO CONTROLS screen if you need to change one of its settings Press the EXIT button to return to the menu Wat...

Page 65: ...display Here is how to select one 1 On the VIDEO CONTROLS page press the OPTIONS display button 2 Press the VIEWPOINT display field 3 Use the dial to select one of the following options 4 Press the BACKGROUND display field 5 Use the dial to select one of the following options 6 Press the BACK display button to return to the VIDEO CONTROLS screen if you need to change one of its settings Press the ...

Page 66: ... until it stops flashing to return to the main page Displaying the score on the external screen 1 Select the song you want to play back see p 23 and following 2 Press the EXIT button repeatedly until it stops flashing to return to the main page if necessary 3 Press MENU VIDEO CONTROLS 4 Press the EXTERNAL OUT DIGISCORE display but ton to select it The notation of the selected song appears on the e...

Page 67: ...t plays a drum part Most drum parts only trigger MIDI notes between numbers 35 and 59 5 Press BACK to activate your settings and see the notes again If necessary you can return to the SMF SCORE OPTIONS page to correct settings you don t like after all 6 Press the EXIT button repeatedly until it stops flashing to return to the main page Mirroring the JM 8 s user interface on an external screen You ...

Page 68: ...e them Roland assumes no responsibility whatsoever with regard to any infringement of third party copyrights arising through your use of the JM 8 1 Use a graphic program on your computer to pre pare the pictures you want to use See the owner s manual of the software you use for details The ideal dimensions of your pictures would be 800 x 480 pixels This depends on the aspect ratio of the external ...

Page 69: ...e the picture folder or Copy your picture folder to the same file level on the same device as the song it is intended for then rename the picture folder Note Below we will use this approach Here we will assume that the song file is located on the JM 8 s internal hard disk while your pictures are initially on a USB storage device The copy direction will therefore be USB storage device internal hard...

Page 70: ...ck The SLIDE SHOW button is switched on automati cally and the pictures in the linked folder are dis played as a slide show on the external screen while the song plays Settings related to slide shows You can specify how the transitions between images will occur when you play back a slide show Note These effects are not available while you are using the ZOOM PAN or ANIME function 1 Press the EXIT b...

Page 71: ... button icon is off picture playback must be started using the SLIDE SHOW button While this display button is active the JM 8 switches off the following functions when you start song playback in order to display your slide show VIDEO IN PIANO ROLL DIGISCORE VIDEO OUT If you don t want the slide shows to override these settings switch off the START WITH SONG display button 5 Press the EXIT button r...

Page 72: ...EXIT button repeatedly until it stops flashing to return to the main page if necessary 3 Press MENU CD BURN 4 Press the ADD SONG display button The display changes to 5 Press the INTERNAL or EXTERNAL display button to select the storage device The CD drive cannot be selected because it contains the target disc 6 If necessary select the folder that contains a desired audio file by pressing its name...

Page 73: ...sage appears to signal that the disc is being finalized After a few minutes the Operation Complete mes sage appears your CD will be ejected and the display returns to the main page Your CD is now ready for use on commercially available CD players Note Press the NO display button if you want to add more songs to that disc at a later stage Note Though the JM 8 can playback unfinalized CD Rs consumer...

Page 74: ...essed the YES display button a Working message appears to signal that the disc is being final ized After a few minutes the Operation Complete mes sage appears your CD will be ejected and the display returns to the main page Your CD is now ready for use on commercially available CD players JM 8_OM_GB book Page 74 Wednesday July 29 2009 4 43 PM ...

Page 75: ... WARNING Changing the name of a song is usually not recommended Song files may be referenced by playlists If you change their names here such files are no longer visible to the Playlist function 1 Perform steps 1 2 under Selecting the FILE UTILITY page and select the storage device 2 Open the folder that contains the file or folder you want to rename 3 Press the RENAME display button Note If you s...

Page 76: ...tion Deleted files cannot be restored 6 Press the OK display button If you selected one or several folders the following message appears Note This operation cannot be undone Press YES to delete both the folder and all the files it contains Press NO to abort the Delete operation 7 Press the EXIT button repeatedly until it stops flashing to return to the main page Copy You can copy one several or al...

Page 77: ...to check the free space on the internal hard disk and connected USB device and to format the inter nal hard disk or the connected USB device 1 Press the EXIT button repeatedly until it stops flashing to return to the main page if necessary 2 Press MENU ADVANCED UTILITY 3 Press the INFO FORMAT display button at the top After a few seconds the display changes to Free Space The display page shows the...

Page 78: ...u do indeed want to format The display now responds with 4 Press the YES display button to format the selected device Press NO to return to the INFO FORMAT page without formatting If you press YES the JM 8 formats the device 5 Press the EXIT button repeatedly until it stops flashing to return to the main page Note Never remove the USB storage device while the operation is in progress Wait until th...

Page 79: ...n after every line or word you wish to synchronize separately The synchroniza tion function see below always works with entire text lines i e until the next return Note Avoid long lines of text because this may lead to incomplete text lines being displayed on screen 2 Export the file as TXT file save it to a USB storage device and connect that device to the JM 8 3 On the JM 8 load the song you wis...

Page 80: ...w the arrows Note In this mode the JM 8 always displays four lines of text 1 Press the REC button it lights 2 Press the π button Playback and Lyric synchronization recording start 3 On the beat where the first text line should be dis played press the dial 4 Repeat this at the quarter note where the second line should be displayed 5 Press the dial on all beats where the subsequent text lines should...

Page 81: ... file on p 80 Saving your song along with the lyrics After synchronizing the Lyrics you must save the song again To do so proceed as follows 1 On the LYRICS SYNC page press the SAVE dis play button the display changes to 2 Select the device where you want to save your song 3 Select the folder where you want to save your song by pressing its name If you like you can also create a new folder where t...

Page 82: ...play button by mistake you can close the keyboard window by pressing the EXIT button In that case your song is not saved 7 Press the EXIT button repeatedly until it stops flashing to return to the main page If you selected the device that contains the original version with the same name the following message is displayed Press the YES display button to overwrite the old version Press the NO displa...

Page 83: ...witch duplicates the function of the GUITAR EFFECT button see p 29 Optional footswitch Roland DP series BOSS FS 5U PLAY PAUSE The footswitch duplicates the function of the π button AUDIO X FADE The footswitch can be used to activate a crossfade between two files To make this work select a different song while the current song is being played back and press the footswitch The JM 8 cre ates a brief ...

Page 84: ...this page is not displayed press the GLOBAL display button in the upper left corner 4 Press the relevant display button to switch that function on or off For the SONG QUICK START and USB DRIVER functions you need to press the display field and use the dial to make the desired setting 5 When you are done see below press the EXIT button repeatedly until it stops flashing to return to the main page B...

Page 85: ... Lyrics Smooth Highlighting The JM 8 can display lyrics either syllable by syllable or in a smoother fashion that may be easier to follow If you prefer the second approach activate this dis play button Initializing the JM 8 Factory Reset The following function allows you to recall the JM 8 s original factory settings This has no effect on the data stored on the internal hard disk Here is how to in...

Page 86: ...y which is called Drum Set Drum Sets assign differ ent sounds to each MIDI note number C2 bass drum D2 snare drum etc In addition the SMF MAKEUP TOOLS window does not display MIDI tracks it works with instruments because that is more intuitive Selecting the song you want to edit 1 Press the EXIT button repeatedly until it stops flashing to return to the main page 2 Select the storage device you wa...

Page 87: ...lect the instrument with the PAGE ø display buttons b If you can barely hear the Tone Drum Set press the SOLO display button its indicator icon must light then use JUMP TO 1st NOTE to jump to the first note of that instrument Press SOLO again to switch this function off c Use the MUTE display button to switch the selected instrument off The corresponding part is no longer played back Just as a rem...

Page 88: ...field in the top row to change yet other parameters before saving your modified song Editing other aspects Here are other more refined aspects you can set for the instruments used by the selected SMF song 1 If you are not already on a SMF MAKEUP TOOLS page see page 87 for how to select one 2 Press the PALETTE display button 3 Use the PAGE ø display buttons in the lower right corner to select the i...

Page 89: ...ect A B or C an additional display and an EDIT display button appear The display shows the name of the effect type currently assigned to the selected MFX processor 3 Press the long MFX display field below EDIT and select the desired type with the dial The available types are Note Each MFX A B and C can be assigned to as many instruments as you like Be aware however that selecting a different type ...

Page 90: ...vailable here is that some equalizer settings may lead to rather noticeable level drops or hikes HI FREQ HZ 1500 2000 3000 4000 6000 8000 12000Hz This parameter allows you to set the cut off frequency of the high band this is a shelving fil ter HI GAIN DB 15 15dB Use this parameter to set the level of the selected HI frequency Positive values boost increase the volume of that frequency nega tive v...

Page 91: ...u to set the sound s envelope The envelope parameters affect both the volume TVA and the filter TVF The cutoff frequency will rise as the envelope rises and fall as the envelope falls ATTACK This parameter adjusts the onset of the sound Negative values speed up the attack so that the sound becomes more aggressive DECAY This parameter adjusts the time over which the sound s volume and Cutoff freque...

Page 92: ...nnot select sounds from another Set Note The names of the drum percussion sounds depend on the currently selected Drum Set 1 See General procedure on p 87 for how to select the SMF MAKEUP TOOLS environment 2 Press the DRUM INSTR display button 3 Use PAGE ø to select the drum instrument you want to replace with a different sound watch the icon that appears to the left of this field 4 Press the fiel...

Page 93: ...bl and thus don t show the Global equal izer settings nor do they disappear when you select Off HI FREQ HZ 1500 2000 3000 4000 6000 8000 12000Hz This parameter allows you to set the cut off frequency of the high band this is a shelving fil ter HI GAIN DB 15 15dB Use this parameter to set the level of the selected HI frequency Positive values boost increase the volume of that frequency nega tive va...

Page 94: ...he SLOW FAST buttons TRANSPOSE This parameter allows you to transpose all song parts except the drums up to 12 semitones 1 octave up or down This value is written to the song data and used every time you play back this song Setting Meaning Original This setting means that the song uses its own programmed reverb settings Room1 Room2 Room3 These types simulate the reverb characteris tics of a room T...

Page 95: ...The display responds with Operation Complete when the data have been converted Careful this operation cannot be undone Note This operation is unnecessary for files you only want to use with the JM 8 Saving your modified song 1 If you are happy with your changes and wish to preserve them press the SAVE display button The display changes to 2 Select the device where you want to save your song 3 Sele...

Page 96: ... button If you pressed the SAVE display button by mistake you can close the keyboard window by pressing the EXIT button In that case your song is not saved 7 Press the EXIT button repeatedly until it stops flashing to return to the main page If you selected the device that contains the original version with the same name the following message is displayed Press the YES display button to overwrite ...

Page 97: ... control the JM 8 s sound source from an external MIDI instrument proceed as follows Connections Note Before connecting the JM 8 to other devices you must turn down the volume of all devices and turn off their power to prevent malfunctions or damage to external speakers 1 Set the volume of the JM 8 and of the MIDI equip ment you are connecting to the minimum value 2 Switch off power to the JM 8 an...

Page 98: ...reception and trans mission for the JM 8 s SONG parts and cancel any MIDI settings you have made for the SONG parts 5 Press the EXIT button repeatedly until it stops flashing to return to the main page Setting MIDI channels on the JM 8 starting from EXTERNAL IN If you cannot change the transmit channels on the MIDI controller proceed as follows 1 Select the EXTERNAL IN display button see Set ting ...

Page 99: ...ameters 3 Press the display field of the parameter you wish to edit and set the desired value with the dial Note Press the INIT VALUE display button to recall the default setting for the parameter that is currently selected whose display field lights RX ON This display button allows you to specify whether lights or not dark the part whose name appears in the upper left corner should receive RX MID...

Page 100: ...mputer on page 102 Activating the SONG section Here is how to enable the MIDI trans mission and reception of the JM 8 s SONG parts Note that pressing the SONG PARTS display button will deactivate the EXTERNAL IN parts Only one of these two sections can receive and or transmit MIDI data 1 Press the EXIT button repeatedly until it stops flashing to return to the main page if necessary 2 Press MENU A...

Page 101: ...messages CC66 SOFT Soft messages CC67 REVERB Reverb Send messages CC91 CHORUS Chorus Send messages CC93 CAF Channel aftertouch RPN Registered parameter number CC100 101 NRPN Non registered parameter number CC98 99 SysEx SysEx messages system exclusive 3 Press the CLOSE display button to close the TX EVENTS window MIDI RX section CHANNEL 1 16 Allows you to assign a MIDI chan nel to the selected par...

Page 102: ...he JM 8 together alongside an external sequencer computer drum machine etc For this to work properly you need set the JM 8 to follow the tempo of the external device to ensure that it starts and stops at the same time as the external device Note The JM 8 does not transmit system realtime data 1 Connect the external sequencer etc to the JM 8 s MIDI IN socket see p 97 or USB MIDI port see p 102 Be s...

Page 103: ...IT button repeatedly until it stops flashing to return to the main page if necessary 2 Press MENU ADVANCED MIDI 3 Press the MIDI SET 1 8 display button that corre sponds to the MIDI Set that you want to use the two PRESET display buttons are switched off 4 Press the EXIT button repeatedly until it stops flashing to return to the main page MIDI Set selection at power on When you switch on the JM 8 ...

Page 104: ...g a MIDI instrument that has 88 keys However you can achieve the same effect with a 61 note keyboard by shifting it 2 octaves down Connections Note Before connecting the JM 8 to other devices you must turn down the volume of all devices and turn off their power to prevent malfunctions or damage to external speakers 1 Minimize the volume of the JM 8 and of the MIDI equipment you are connecting 2 Sw...

Page 105: ...tons to select PART1 this part is on page 1 9 Press the CHANNEL display field and use the dial to select the MIDI channel that corresponds to the external keyboard s TX transmission channel As stated above do not use MIDI channel 16 10 If the RX ON display button below PART1 is off switch it on If it is off the part in question won t receive MIDI messages 11 Press the EXIT button repeatedly until ...

Page 106: ...atedly until it stops flashing to return to the main page 10 Connect an external monitor or screen page 16 11 Select MIDI channel 16 as transmission channel on your external MIDI controller 12 If your external MIDI keyboard has fewer than 88 keys change its Octave Shift setting the name may be different to a value that allows you to play the notes A0 and up 13 Switch on the JM 8 s ANIME button 14 ...

Page 107: ...ion off 8 Start playing on the external keyboard The animation will follow the rhythm of your playing 9 Use the lower section of the external MIDI key board to transmit a different program change number 1 12 to the JM 8 to select another pat tern Selecting a background for the ANIME function The JM 8 s V LINK function furthermore allows you to select the background image for the ANIME pattern For ...

Page 108: ...age Meaning Pitch Bend Change Pitch bend messages received from the external keyboard or MIDI controller Cutoff Frequency CC74 messages received from the external keyboard or MIDI con troller Expression CC11 messages received from the external keyboard or MIDI con troller Function Meaning ANIME Control1 The animation follows the direc tion in which the pitch bend lever knob slider or pedal is move...

Page 109: ...splay button allows you to listen to the selected track in isolation it mutes all other tracks The selected track is displayed in yellow To select another track simply press its row in the left column of the display B MUTE This display button allows you to temporarily switch off the selected track which may be useful when you want to record or edit additional parts without being distracted by alre...

Page 110: ...don t need to see the events you want to change choose a TRACK EDIT function If the TRACK EDIT level does not provide the func tion you need or if you want to see the notes MIDI messages etc choose the MICRO EDIT environ ment Here is how to select functions 1 If necessary select the SMF song you wish to edit see p 23 and following 2 Select the 16 track sequencer page See page 109 3 If you have alr...

Page 111: ...it used by the JM 8 There are 120 CPT units to every beat of a 4 4 bar Change this setting only if your edit operation should start after the selected beat TO By default the TO position is set to the last event of the selected track or the last event of the longest track when you select ALL BAR 1 last measure of the track or song This is where you specify the bar position of the last measure to be...

Page 112: ...at position The number of available beats depends on the time signature in the selected area CPT 1 119 Refers to the starting CPT position CPT is short for Clock Pulse Time the smallest unit used by the JM 8 There are 120 CPT units to every beat of a 4 4 bar Change this setting only if your edit operation should start after the selected beat TO By default the TO position is set to the last event o...

Page 113: ... first measure to be edited By default the FROM value is set to the beginning of the selected track s BEAT 1 number of beats per bar Specifies the beat position The number of available beats depends on the time signature in the selected area CPT 1 119 Refers to the starting CPT position CPT is short for Clock Pulse Time the smallest unit used by the JM 8 There are 120 CPT units to every beat of a ...

Page 114: ...n track in the area to which the selected data are copied MIX The data in the selected range of the source track are added to the data on the destination track In most instances REPLACE is probably a good choice when you set DATA TYPE to ALL or when you wish to substitute a given message cluster modulation data for example for other messages of the same type thus creating a perfect reproduction of...

Page 115: ... inserted BAR BEAT CPT See above TIME SIGNATURE If TRACK ALL you can use these fields to set the time signature of the new measures 1 32 2 4 8 16 ENTER Press this display button to confirm your settings and edit the data This function allows you to transpose the notes of the selected track non note data obviously cannot be transposed TRACK ALL 1 16 Allows you to select the track you wish to transp...

Page 116: ...st event of the selected track or the last event of the longest track when you select ALL BAR 1 last measure of the track or song This is where you specify the bar position of the last measure to be edited BEAT 1 number of beats per bar Specifies the beat position The number of available beats depends on the time signature in the selected area CPT 1 119 Refers to the last clock that should be affe...

Page 117: ... position The number of available beats depends on the time signature in the selected area CPT 1 119 Refers to the last clock that should be affected by the edit operation Change this setting only if your edit operation should not end exactly on the selected beat BIAS CPT 4800 4800 This parameter sets the amount by which the duration of the selected notes needs to change The shortest possible GATE...

Page 118: ...s parameter to change the address a k a program change number of a sound e g from 1 to 2 Select if the current setting must not change INC DEC These are so called relative changes the positive or nega tive value you set here will be added to or subtracted from the original values of the selected track s Use these fields to increase or decrease existing values for the entire selected track s Volume...

Page 119: ... limit of the notes to be copied See also Fine tuning the setting range on p 113 VALUE CPT 4800 4800 This parameter sets the amount by which the notes are shifted The value refers to CPT units one CPT 1 120 q Notes on the first beat of the first bar cannot be shifted further to the left ENTER Press this display button to confirm your settings and edit the data TRACK EXCHANGE allows you to move the...

Page 120: ... select the list entry you want to edit The name of the selected parameter appears in the upper right hand corner of the display 5 Press the dial to select the first value 6 Modify the value by rotating the dial The parameters you can change are Tempo Change BPM 20 250 Specifies the song tempo If necessary you can insert tempo changes anywhere within the song This could even be done in real time u...

Page 121: ...orrect That byte is called the checksum If you don t know how to calculate that value press the AUTO SUM display button and the JM 8 will insert it for you This is a very important step for Roland tone genera tors If the checksum is wrong or missing the entire string will be ignored Note The checksum is only calculated for SysEx strings of a certain length more than 7 bytes Use the 0 9 and A F dis...

Page 122: ... dial to select the event you want to delete 2 Press the ERASE EVENT display button to erase the selected event Note Tempo and time signature events located at 1 01 00 cannot be erased MOVE EVENT This function allows you to move one or several events 1 Select the event you want to move Note For this function you could take advantage of the VIEW filter to avoid selecting event types that should rem...

Page 123: ...if you only need to change small details of an otherwise perfect Standard MIDI File In this section we will use the word event for any kind of MIDI message You can only view and edit one track at a time There fore be sure to check the TRACK setting before editing the events displayed on this page 1 If necessary select the SMF song you wish to edit see p 23 and following This is not necessary if yo...

Page 124: ... NONE to switch them all off in which case the MICRO EDIT list only contains the End of Data message 3 Press CLOSE to close the pop up window General procedure To change information already available on the selected track proceed as follows 1 Use the DATA ENTRY dial to select the list entry you want to edit The name of the selected parameter appears in the upper right hand corner of the display 2 ...

Page 125: ...can be set anywhere between 1 extremely soft and 127 The value 0 cannot be entered because it would effectively switch off the note After selecting the Gate Time entry rotate the dial to set the required length as a CPT value q 120CPT The maximum duration a note event can have is 65 535 clocks Drum parts usually use the Gate Time value 1 for all notes Increasing it to 20 for example has no audi bl...

Page 126: ...ed value for each unit using the dial 4 Press the ENTER display button to confirm your settings and move the event Press CLOSE to close the pop up window without applying your changes COPY EVENT This function allows you to copy one or several events Use PLACE EVENT to insert a copy of those events at the desired position Note For this function you could take advantage of the VIEW filter to avoid s...

Page 127: ...r the desired values using the dial Tempo Allows you to specify the initial tempo of the new song q 20 250 Choose a tempo that is com fortable for recording You can set the final tempo by editing the MASTER track see p 120 or by recording it after activating the TEMPO REC SW parameter see p 128 BEAT If your new song uses the 4 4 time signature there is no need to change this value Otherwise enter ...

Page 128: ...llowing options 16 If you want to record tempo changes press the TEMPO REC SW display field and use the dial to select On This option allows you to use the TEMPO SLOW FAST buttons to vary the tempo while recording Those changes are recorded to the MASTER track 17 Press the INPUT QUANTIZE display field and set the desired resolution Quantize corrects the timing of your notes by shift ing them to th...

Page 129: ...stops flashing to return to the main page if necessary 3 Press MENU ADVANCED SMF SEQUENCER The MEAS field at the top of the display informs you about the current measure The tempo and time signature are displayed next to it 4 Use the º and buttons to jump to another measure or press ª to return to the beginning of the song 5 Press the REC button The display changes to RECORDING SELECT Meaning NOTE...

Page 130: ...cer to edit a song that already contains Cover modifications the Cover settings are ignored and erased when you save the edited version of your song We therefore recommend saving such songs under a different name unless you used FREEZE DATA before you started editing your song 1 Press the YES display button to save your changes and the entire song This will take you to the fol lowing display page ...

Page 131: ... to return to the main page If you selected the device that contains the original version with the same name the following message is displayed Press the YES display button to overwrite the old version Press the NO display button if you don t want to overwrite this song and return to the previous page Then enter a different name or select a different storage device Saving your song manually If you...

Page 132: ...Working with the SMF 16 track sequencer 132 rVIMA JM 8 Memo JM 8_OM_GB book Page 132 Wednesday July 29 2009 4 43 PM ...

Page 133: ...um value Select a higher level setting p 28 Can t hear the vocal of a music CD Can t hear the melody of music files Could the CENTER CANCEL button be dimmed If the CENTER CANCEL button is lit the vocal sound will be canceled from the audio file CD playback If the MELODY MUTE button is lit the melody of the MIDI files will be muted Switch it off p 32 p 33 Buzz is heard from external amplifier Is th...

Page 134: ...n horizontal lines flicker in the television screen Thin horizontal lines may flicker in the television screen but this is due to the television itself and is not a malfunction of the JM 8 Can t see the edge of the image on the television screen In some cases the edge of the image may not be visible on the television screen but this is due to the characteristics of the television and is not a malf...

Page 135: ...nd compressor MIC1 MIC2 Guitar Reverb 5 types Guitar effects MFX 10 types Vocal effects MIC1 Auto Harmony 4 types Transformer 9 types Vocal External Keyboard 1 type SONGS Real time player hard disk CD drive USB storage device SMF Format 0 1 KAR mp3 WAV CD audio CD ROM VIMA TUNES Song chord extractor Automatic chord detection for SMF files SMF Makeup Tools Instrument oriented editing Mark Loop func...

Page 136: ...ternal CD drive read write USB Host connection for storage devices frontal PANEL CONTROL Knobs MASTER VOL BACKING AUDIO IN MIC1 REVERB MIC 1 MIC2 GUITAR REVERB MIC 2 GUITAR Rotary encoder Data dial with push switching function MIC2 GUITAR section 1 switch CONNECTORS Phones 1x 1 4 jack Audio inputs AUDIO IN R L RCA 1x MIC 1 XLR or 1 4 1x MIC2 GUITAR XLR or 1 4 Video input 1x composite USB ports 1x ...

Page 137: ...erred or sold Note These images may not be printed recorded placed on the Internet or used as screen savers even for personal use 22 Shortcut list Pressing and holding the following buttons allows you to directly jump to a related parameter page which is faster than selecting the page in question via the JM 8 s menu SUPPLIED ACCESSORIES Owner s Manual AC adaptor Power cord for AC adaptor OPTIONS P...

Page 138: ... O O O O O O O O O Reverb 1 O Chorus 1 O 1 O 1 Bank Select Modulation Portamento Time Data Entry Volume Panpot Expression Hold 1 Portamento Sostenuto Soft Hold 2 Resonance Realease Time Attack Time Cutoff Decay Time Vibrato Rate Vibrato Depth Vibrato Delay Portamento Control Effect 1 Depth Effect 3 Depth NRPN LSB MSB RPN LSB MSB Program Change True O 1 O 1 0 127 Program Number 1 128 System Exclusi...

Page 139: ...3 P2 Accordion It 8 4 22 Accordion Fr 0 4 22 B Harp Basic 8 4 23 B Harp Suppl 9 4 23 Soft Accord 25 4 22 Accordion 1 64 4 22 Accordion 2 16 4 22 JV Accordion 69 4 22 OrientalAcc1 65 4 22 OrientalAcc2 66 4 22 P3 OrientalAcc3 67 4 22 OrientalAcc4 68 4 22 A Guitar CC00 CC32 PC P1 Nylon Gt 1 64 4 25 Nylon str Gt 0 4 25 Steel Gt2 64 4 26 Steel Gt4 69 4 26 Ac Guitar1 48 4 26 2_Guitars 66 4 26 12 Strings...

Page 140: ...olo Spic 16 4 46 StringsSpic 17 4 46 Harp St 2 4 47 Uillean Harp 8 4 47 Synth Harp 16 4 47 Choir Str 11 4 49 Mild Strings 7 4 49 P7 60s Strings 40 4 49 P8 High Strings 16 4 51 Tron Strings 24 4 51 Noiz Strings 25 4 51 JUNO Strings 2 4 52 DistStrings 6 4 52 Vocal CC00 CC32 PC P1 Warm Voices 82 4 95 Syn Vox Pad 0 4 55 Fem Mm Srt 82 4 54 Rich Choir 2 81 4 53 St ChoirAahs 8 4 53 Vox Pad 83 4 95 Real C...

Page 141: ...Saw 7 4 82 Doctor Solo 8 4 82 Fat Saw Lead 9 4 82 Saw Impulse 5 4 97 P11 Strange Str 6 4 97 P11 FatSawLead 14 4 82 Waspy Synth 16 4 82 PM Lead 17 4 82 MG Saw 24 4 82 Crystal 0 4 99 Syn Mallet 1 4 99 P5 Saw Lead 33 4 82 Soft Crystal 2 4 99 Round Glock 3 4 99 P12 Loud Glock 4 4 99 Natural Lead 36 4 82 Synchronized 38 4 82 SequenceSaw1 40 4 82 Digi Bells 9 4 99 SequenceSaw2 41 4 82 Reso Saw 42 4 82 C...

Page 142: ...ngine 1 4 126 Seal 8 4 124 Rain 1 4 123 Thunder 2 4 123 Wind 1 3 4 123 P4 Stream 4 4 123 Melo Tom 2 8 4 118 Jungle SD 18 4 118 Bubble 5 4 123 Wind 2 6 4 123 Bird 2 3 4 124 DoorCreaking 2 4 125 Siren 5 4 126 Train 6 4 126 Jetplane 7 4 126 P5 Starship 8 4 126 Burst Noise 9 4 126 Synth Drum 0 4 119 Car Pass 3 4 126 Door 3 4 125 Telephone 2 1 4 125 Cricket 7 4 123 Rev Snare 8 4 120 Rev ConBD 17 4 120 ...

Page 143: ...urdo Open Surdo Cana NewTmblHiFlm NewTmblLoFlm NewTmblPHS NewShekere1 NewShekere2 NHBngoMute NewLBngoMute CajonHi PC 6 CC32 4 V Fiesta HipHop BD1 Jazz Kick 1 Mex_Kik36 85Rm BsDrum1 85Rm BsDrum2 HipHop BD2 Techno BD1 JungleBD Set HipHop BD1 909 Comp BD 85St BsDrum1 NewJzKik NewRockKik Cymbal Roll NewRkCStk_2 82Rm Snare1 82Rm Snare2 85St Snare1 85St Snare2 NewJzSn2 NewJzSn1 NewR BSn NewRockSn2_2 New...

Page 144: ...NewLoConga NewTmblHi NewTmblLo Agogo Agogo NewShaker2 NewShaker1 ShrtWhistle LongWhistle NewQuide1 NewQuide2 NewClaves Woodblock Woodblock Mute Cuica Open Cuica MuteTriangl OpenTriangl Shaker Jingle Bell Bell Tree Castanets Mute Surdo Open Surdo Cana NewTmblHiFlm NewTmblLoFlm NewTmblPHS NewShekere1 NewShekere2 NHBngoMute NewLBngoMute CajonHi PC 25 CC32 4 ELECTRONIC Elec Kick 2 Elec Kick 1 CR78 BD ...

Page 145: ... 2 TR 808 SD2 909 Snare 1 909 Snare 2 909 SD 1 TR 909 SD2 Rap Snare JungleSD1 House SD House Snare House SD Voice Tah Noise Slap C7 96 98 100 101 103 105 107 97 99 102 104 106 C8 108 110 112 113 115 117 119 109 111 114 C9 G9 120 122 124 125 127 121 123 126 116 118 85Rm BsDrum2 Crash Cym 1 82Rm Snare2 Ride Cymbal 82Rm Snare1 Room Tom 5 Room Chh Room Tom 2 Ride Bell Room Tom 2 R8 Ohh2 82RmBsDrum1P 8...

Page 146: ...nga Lo Opn High Timbale Low Timbale Agogo Agogo Cabasa Maracas ShrtWhistle LongWhistle Short Guiro Long Guiro Claves Woodblock Woodblock Mute Cuica Open Cuica MuteTriangl OpenTriangl Shaker Jingle Bell Bell Tree Castanets Mute Surdo Open Surdo Applause PC 42 CC32 4 BRUSH 2 Std 1 Kick1 Std 1 Kick2 Std 2 Kick1 Std2 Kick2 Kick 1 Kick 2 Jazz Kick 1 Jazz Kick 2 Room Kick 1 Room Kick 2 Power Kick1 Power...

Page 147: ... Jublag33dw Jublag Penyacah33dw Penyacah Penyacah Penyacah33up Penyacah33dw Penyacah33dw Penyacah Pemade33up Pemade33dw Pemade33dw Pemade Pemade Pemade33up Pemade33dw Pemade33dw Pemade Pemade33up Reyong33dw Reyong33dw Reyoung Reyoung Reyong33up Reyong33dw Reyong33dw Reyoung Reyoung Reyong33up Reyong33dw Reyong33dw PC 56 CC32 4 GAMELAN 2 KendangWadon KendangWadon Bebarongan Pelegongan Kelontuk Kelo...

Page 148: ...re1 Std 2 Snare2 Tight Snare Standard SN1 LD Snare M LD Snare C Room Snare 1 Room Snare 2 Dance Snare1 Power Snare1 Rev Snare Power Snare2 Elec Snare 1 Dance Snare2 Elec Snare 2 Elec Snare 3 82Br BsDrum2 Brush Crash 82Br Snare1 Ride Cym IN 82Br Snare2 Lite Tom 4 Brs Chh Lite Tom 4 Brush RideBL Lite Tom 4 Brush Ohh 82BrBsDrum1P 82BrBsDrum2P 82BrCrsCym1P 82Br Snare1P 82Br RdCym P 82Br Snare2P Lite4_...

Page 149: ...ek Tik Mazhar Dom PC 32 CC32 4 MultiDrum IPopCyml2_52 IPopRd1_51 R B Snare R B Clap Techno Snare House Snare Jungle Snare Ps Snare 909 Snare 909Snare2 909 Kick 3 House Kick TR 808 Kick 909 Kick 909 Kick2 TR 909 OHHsh TR 909 OHH Ah Ha ShutHa ShutHi One Two Three Four Snare Roll FingerSnaps2 High Q Slap Scrtch Push2 Scrtch Pull2 Sticks SquareClick Mtrnm Click Mtrnm Bell HipHop Kick SimpleKick Side S...

Page 150: ...2 808 Tom 2 808 Tom 2 808cowbe 808 Conga 808 Conga 808 Conga Synth Drum 2 Synth Drum 2 Synth Drum 2 Synth Drum 2 Synth Drum 2 Synth Drum 2 R B OHHsh R B OHH R B CHH R B OHH TR 909 CHH TR 909 OHH 909 Crash IPopKik36 IPopCStk37st IPopSn38st IPopSn40st IPopHat1_42 IPopHat2_44 IPopHat3_46 IPopTomL43 IPopTomM47 IPopTomH50 Mazhar Dom Mazhar Tak Mazhar Sak Mazhar Brass Sagat Mid Sagat Hi Sagat Closed Sag...

Page 151: ...Tamorra 8 Tamorra Ending Pandeiro_SW1 Pandeiro_SW2 Pandeiro_SW3 Pandeiro 5 Brazilian_Tamburin Chimes Seeds_1 Chimes Seeds_2 PopHiHatFoot VibratoneSlow Fast AfricanCowBell Kick_Plastic Kick_Plastic Snare Snare SnareFlam Snare FloorTomFlam Jazz Hat1 FloorTom Jazz Hat2 Tom2Flam Jazz Hat3 Tom2 Tom1Flam JazzCrCym1 PopBrushTom1 NewJzRide1 BrushCrash2 Jazz Ride2 CembaloFree BrushCrash1 CowBell JzCrashCym...

Page 152: ... RidePhrase4 Egg_M3 Egg_MEndOff Egg_M_SW1 Egg_L4 Egg_LEndOff Egg_L_SW1 Egg_TuttiEndOff Egg_S4 Egg_SEndOff Egg_S_SW1 Chimes DoorKeys Pinchimes Harmess bell1 Harmess bell2 Harmess bell3 CembaloEnding CembaloFree CajonHi CajonHiFlm Cajon Low CajonLoFlm FlmncoHClap1 FlmncoHClap1 BongoCowBell RockSnareFl_H MamboCowBell Snare Ghost HiHatPhrase3 Crash2Phrase4 Crash1Phrase3 Crash1Phrase4 CrashPhrase4 Cras...

Page 153: ... is a mono effect that combines incoming signals You can how ever place the processed signal anywhere between the left and right channels Level 0 127 Output level Use this parameter to compensate for exaggerated level differences resulting from the settings you made 6 Spectrum Spectrum is a type of filter that modifies the timbre by boost ing or cutting the level at specific frequencies Spectrum 2...

Page 154: ... Chorus Depth Deviation 20 0 20 Adjusts the difference in modulation depth between each chorus sound Chorus Pan Deviation 0 20 Adjusts the distribution of the various chorus lines in the stereo image 0 All chorus sounds are in the center 20 Each chorus sound will be spaced at 60 degree intervals rela tive to the center Balance D100 0W D50 50W D0 100W Volume balance between the direct D and the eff...

Page 155: ...rom the direct sound until when the left delay sound is heard Delay Right 0 0 500 0ms Adjusts the time until the delay sound is heard Delay Feedback 98 0 98 Adjusts the amount of the delay sound that s fed back into the effect Negative settings invert the phase Delay HF Damp 200 8000Hz Bypass Adjusts the frequency above which sound fed back to the effect is filtered out If you don t want to filter...

Page 156: ...ignal anywhere between the left and right channels EQ Low Gain 15dB 0 15dB Gain of the low range EQ High Gain 15dB 0 15dB Gain of the high range Balance D100 0W D50 50W D0 100W Volume balance between the direct D and the effect sound W Level 0 127 Output level 25 Reverb A nice Reverb effect Reverb Type Room 1 Room 2 Stage 1 Stage 2 Hall 1 Hall 2 Type of reverb Room1 Dense reverb with short decay R...

Page 157: ...D Level 0 127 Output level 33 EH Chorus This effect connects an enhancer and a chorus in series Enhancer Sens 0 127 Sensitivity of the enhancer Enhancer Mix Level 0 127 Level of the overtones generated by the enhancer Chorus Pre Delay 0 0 100 0ms Adjusts the delay between the incoming direct signal and the moment when the chorus starts working Chorus Rate 0 05 10 0Hz Frequency i e modulation speed...

Page 158: ...vel 0 127 Output level 40 Flanger DLY This effect connects a flanger and a delay in parallel Flanger Pre Delay 0 0 100 0ms Adjusts the delay time from when the direct sound begins until the flanger sound is heard Flanger Rate 0 05 10 0Hz Frequency i e modulation speed Flanger Depth 0 127 Modulation intensity Flanger Feedback 98 0 98 Adjusts the proportion of the flanger sound that is fed back into...

Page 159: ...ired note Attack 0 127 Speed at which the cutoff frequency changes between steps Filter Type LPF BPF HPF NOTCH Filter type Frequency range that will pass through each filter LPF frequencies below the cutoff BPF frequencies in the region of the cutoff HPF fre quencies above the cutoff NOTCH frequencies other than the region of the cutoff Filter Slope 12 24 36 dB Amount of attenuation per octave 36d...

Page 160: ...0 127 Depth of modulation Resonance 0 127 Amount of feedback Mix Level 0 127 Level of the phase shifted sound Panpot L64 0 63R Stereo location of the output sound This is a mono effect that combines incoming signals You can how ever place the processed signal anywhere between the left and right channels EQ Low Gain 15dB 0 15dB Gain of the low frequency range EQ High Gain 15dB 0 15dB Gain of the hi...

Page 161: ...d to the Arranger or Recorder tempo Depending on your choice the setting range of the following parameter refers to a speed Hz or a note value Rate Hz 0 05 10 00Hz Rate at which the 16 step sequence will cycle Rate note musical notes Rate parameters can be set as a note value of a tempo if you set the Sync parameter above to Note Specify the value of the desired note Attack 0 127 Speed at which th...

Page 162: ...r sound is heard Rate sync Hz Note Use this parameter to specify whether Note or not Hz the modulation rate should be synchro nized to the Arranger or Recorder tempo Depending on your choice the setting range of the following parameter refers to a speed Hz or a note value Rate Hz 0 05 10 00Hz Frequency i e modulation speed Rate note musical notes Rate parameters can be set as a note value of a tem...

Page 163: ...w range flanger sound that is to be returned to the input negative val ues invert the phase Low Step Rate sync Hz Note Use this parameter to specify whether Note or not Hz the low step rate should be syn chronized to the Arranger or Recorder tempo Depending on your choice the setting range of the following parameter refers to a speed Hz or a note value Low Step Rate Hz 0 10 20 00Hz Rate at which t...

Page 164: ...ut any high frequencies set this parameter to BYPASS Panpot L64 0 63R Stereo location of the output sound This is a mono effect that combines incoming signals You can how ever place the processed signal anywhere between the left and right channels EQ Low Gain 15dB 0 15dB Gain of the low frequency range EQ High Gain 15dB 0 15dB Gain of the high frequency range Balance D100 0W D50 50W D0 100W Volume...

Page 165: ...ed to the Arranger or Recorder tempo Depending on your choice the setting range of the following parameter refers to a time or a note value Delay 1 Time msec 0 1300ms Delay 2 Time msec 0 1300ms Delay 3 Time msec 0 1300ms Adjusts the time until the delay is heard Delay 1 Time note musical notes Delay 2 Time note musical notes Delay 3 Time note musical notes Delay times can be set as a note value of...

Page 166: ...ative settings invert the phase Delay HF Damp 200 8000Hz Bypass Adjusts the frequency above which sound fed back to the effect is filtered out If you don t want to filter out any high frequencies set this parameter to BYPASS Panpot L64 0 63R Stereo location of the output sound This is a mono effect that combines incoming signals You can how ever place the processed signal anywhere between the left...

Page 167: ...W D0 100W Volume balance between the direct D and the effect sound W Level 0 127 Output level 81 Step Pitch A pitch shifter in which the amount of pitch shift is varied by a 16 step sequence Step 1 16 24 0 12 semitones Amount of pitch shift at each step semitone units Rate sync Hz Note Use this parameter to specify whether Note or not Hz the rate should be synchronized to the Arranger or Recorder ...

Page 168: ...ff On Turns the Overdrive on off Overdrive Drive 0 127 Degree of distortion Overdrive Level 0 127 Sets the Overdrive output level Rotary Switch Off On Turns the Rotary on off Rotary Speed Slow Fast Rotational speed of the rotating speaker Rotary Woofer Slow Speed 0 05 10 00Hz Low speed rota tion speed of the woofer Rotary Woofer Fast Speed 0 05 10 00Hz High speed rota tion speed of the woofer Rota...

Page 169: ...rds 35 Chorus 29 60 89 100 Drum Instrument 92 Level 94 Send 90 Song 94 Classic 62 Classical Choir 31 Clean 1 2 29 CLEAR ALL 73 COLOUR 36 Colour 68 Common 94 Compander 116 Compressor 60 Computer 102 Voice 30 Connecting AC adapter 18 Audio 15 Computer 102 Control Pedal 17 Digital camera 42 DVD player 17 External display 16 Microphone 15 Portable Audio Video Player 17 Television 16 Video camera 17 Vi...

Page 170: ...rmony 97 HDD 58 75 95 Headphones 19 HI FREQ HZ 62 90 HI GAIN DB 62 90 High 99 101 Boost 61 HIGHER 111 113 Hold 100 I Image format 42 43 Import Lyrics 79 Inc 118 Info Format 77 Init Value 99 100 118 Initialize 85 Storage device 77 Input Quantize 128 Insert sequencer 115 Inserting Measures 115 Steps 54 INSIDE 111 113 Instr 93 EQ 93 Vol 90 93 Instrument Equalizer 90 Instrument Equalizer 90 Instrument...

Page 171: ...key 34 Drum Instrument 93 Pitch Bend Change 108 Place Event 123 126 Plate 94 Play All Songs 56 Metronome 63 Playback Speed 34 Player 84 Playing back your new playlist 51 Playlist 50 Behavior 55 Continuous playback 55 Plays All Songs 56 Recall 56 PLAYLIST EDIT 51 PLAYLIST LOAD 57 Pop 62 Portable Audio Video Player 17 Portable audio video player 45 POWER 18 Preparing your own slide show 68 Preparing...

Page 172: ...ure 63 THRSHLD 61 Time Signature 63 127 Tone 87 Map 118 Sound Edit 91 Tone Select 98 Touch screen 20 Touch Screen Beep 85 Track 67 Edit 110 Xchange 119 Transition EFX 70 Transpose MIDI parameter 101 Sequencer 115 Song 94 Transposition 34 Tremolo 29 TRIO 30 Troubleshooting 133 Tuning 84 TX 100 Event 101 U UNDO CHANGES 88 UNEQUAL 111 113 USB 12 58 75 95 102 Driver 85 102 MIDI 102 Slide show 43 Song ...

Page 173: ... PERU Audionet Distribuciones Musicales SAC Juan Fanning 530 Miraflores Lima Peru TEL 511 4461388 TRINIDAD AMR Ltd Ground Floor Maritime Plaza Barataria Trinidad W I TEL 868 638 6385 NORWAY Roland Scandinavia Avd Kontor Norge Lilleakerveien 2 Postboks 95 Lilleaker N 0216 Oslo NORWAY TEL 2273 0074 POLAND ROLAND POLSKA SP Z O O ul Kty Grodziskie 16B 03 289 Warszawa POLAND TEL 022 678 9512 PORTUGAL R...

Page 174: ...174 rVIMA JM 8 JM 8_OM_GB book Page 174 Wednesday July 29 2009 4 43 PM ...

Page 175: ...For EU Countries For China For China JM 8_OM_GB book Page 175 Wednesday July 29 2009 4 43 PM ...

Page 176: ...R 602 00 0323 01 RES 736 09 JM 8 OM E JM 8 Cov 3 4 GB Page 176 Thursday July 30 2009 10 30 AM ...

Reviews: