24
Video Operations
Using Imported Still Images
You can take a still image imported from a USB flash drive or captured from final video output and assign it to channel 9 or 10, then output it in the same
way as video. You can save up to 16 still images in internal memory.
NOTE
5
When still images are saved in internal memory, startup times become correspondingly longer according to the image size and the number of
saved still images.
5
Depending on the USB flash drive, recognition of the flash drive might take some time.
Importing a Still Image from a USB Flash Drive
This imports into the unit a still image saved on a USB flash drive.
Supported Still-image Formats and Resolutions
Still-image file formats that can be imported are as follows.
Format
Bitmap (.bmp), 24-bit, uncompressed
Resolution
Maximum 1,920 x 1,200 pixels
File name
No more than 8 single-byte alphanumeric characters
* Be sure to append the “.bmp” file extension.
Importing a Still Image
* When you’re using a USB flash drive for the first time, be sure to
format it on the V-800HD MK II (p. 33).
1.
Save the still image in the root directory of the USB flash
drive.
2.
Connect the USB flash drive containing the saved still image
to the USB MEMORY port.
3.
Select the [MENU] button
g
“System”
g
for USB Memory,
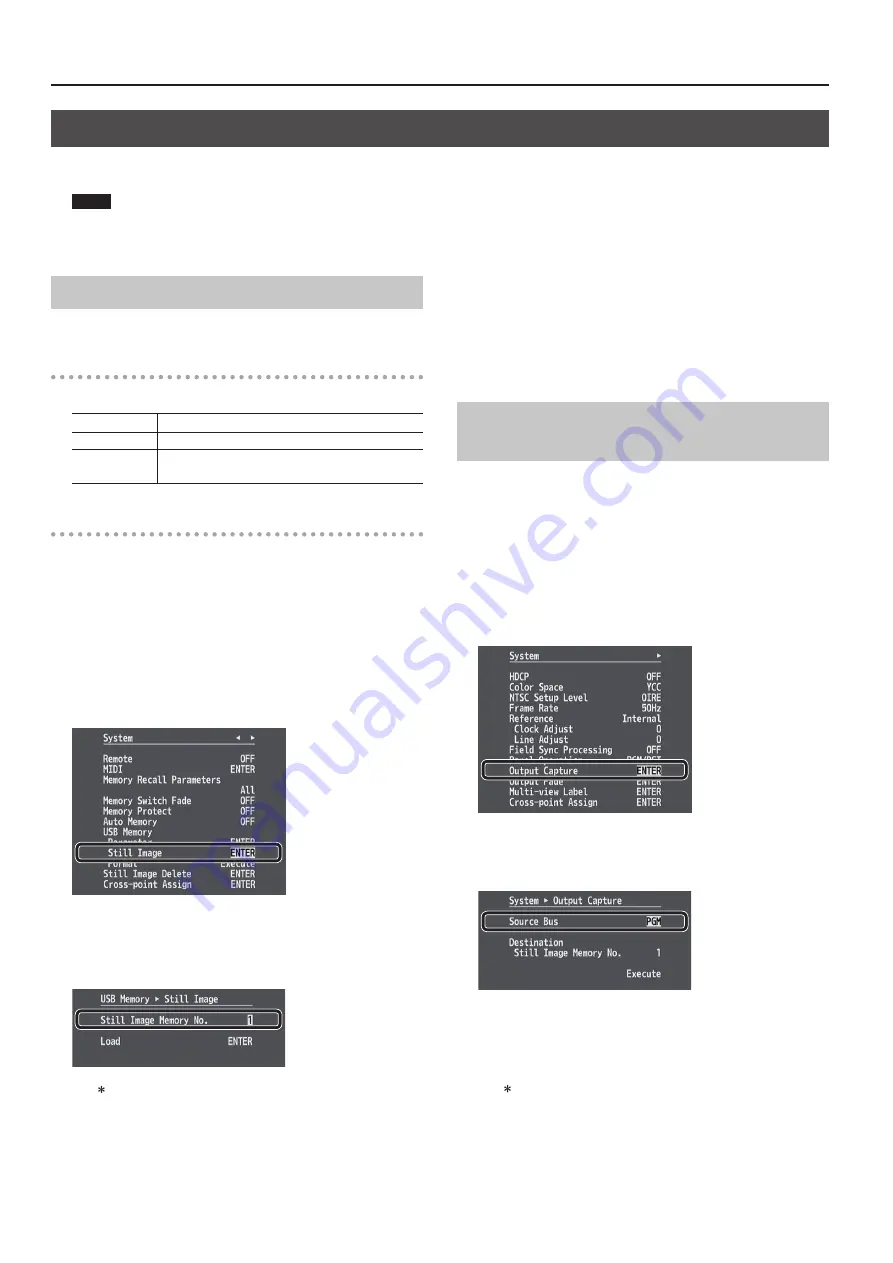
select “Still Image,” then press the [ENTER] button.
USB Memory
A
Still Image screen is displayed.
4.
Select “Still Image Memory No.,” then use the [VALUE] knob
to select a memory number (1 through 16) for saving the
still image.
* A “ ” symbol is displayed for memory numbers where a still image
is already saved.
5.
Select “Load,” then press the [ENTER] button.
The Load File Select screen appears. The names of the files on the USB
flash drive are displayed on this screen.
6.
Select the still image file you want to import, then press the
[ENTER] button.
7.
When the message “Push ENTER to execute.” appears, press
the [ENTER] button.
(If you want to cancel the operation, press the [EXIT] button.)
The still image is imported into the unit.
8.
Press the [MENU] button to quit the menu.
Capturing a Still Image from Final-output
Video
This captures a still image from final video output and saves it in the
unit.
* The captured still image cannot be saved to a USB memory device.
1.
Select the [MENU] button
g
“Input”
g
set “Ch. 10” to
“Background.”
* If “Ch. 10” is set to “Still Image,” still-image capture is not possible.
2.
Select the [EXIT] button
g
“System”
g
“Output Capture,”
then press the [ENTER] button.
System
A
Output Capture screen is displayed.
3.
Select “Source Bus,” then use the [VALUE] knob to specify
the bus for the video source (PGM, PVW, or AUX).
The video is displayed in the PGM section of the multi-view monitor.
4.
Select “Still Image Memory No.,” then use the [VALUE]
knob to select a memory number (1 through 16) of the
destination for saving.
* A “ ” symbol is displayed for memory numbers where a still image
is already saved.
5.
Select “Execute,” then press the [ENTER] button.
Capturing is carried out.
6.
Press the [MENU] button to quit the menu.


