3
EnglishEnglish
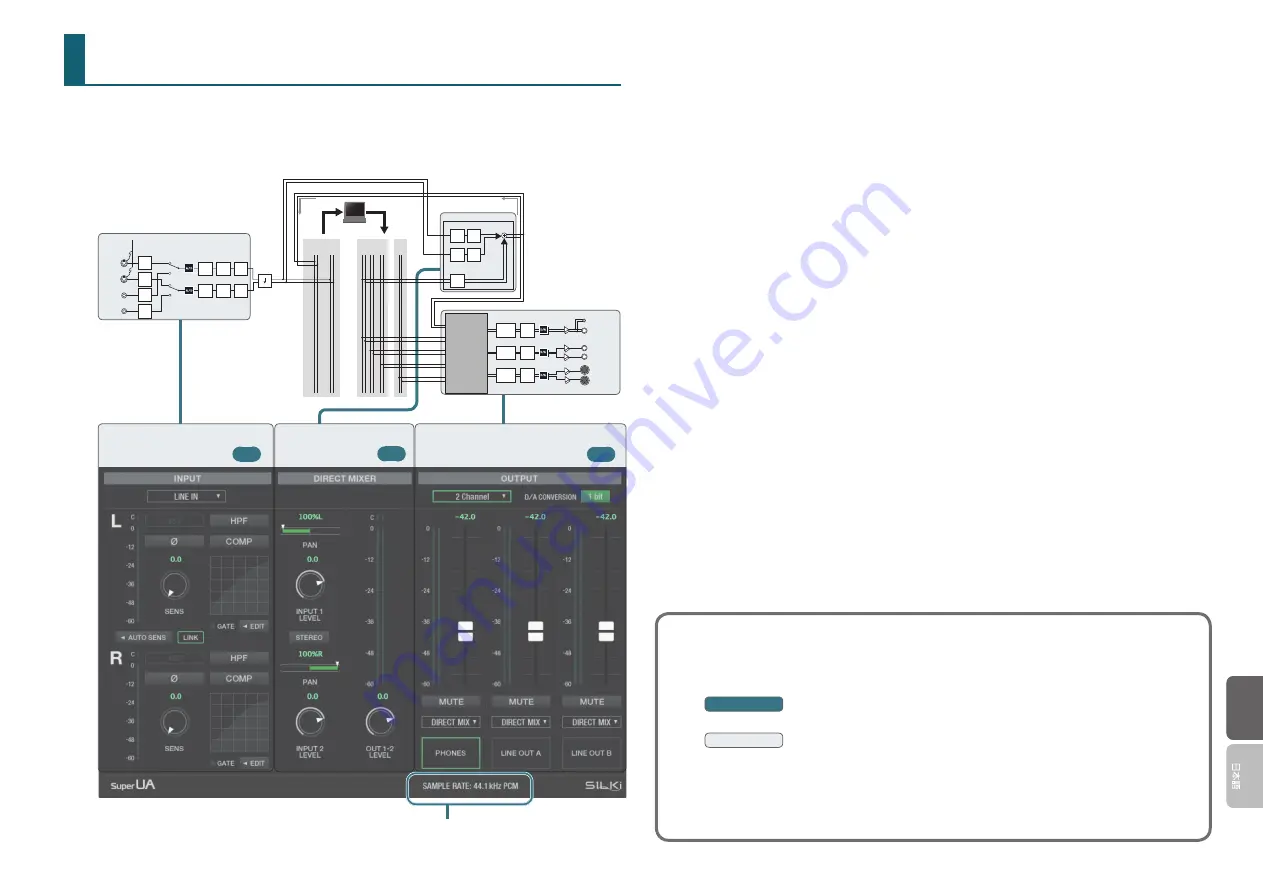
Internal Blocks of the Super UA
The Super UA lets you adjust the input audio and the output audio. It also provides a direct mixer that
can adjust the balance between the audio from the input jacks and the audio that’s played back from the
computer.
For details on the signal flow diagram, refer to p. 13.
To USB
From USB
1-2
MONITOR
1-2
1-2
5-6
3-4
PCM
DSD
OUT
OUT
IN
PATCH BAY
LINE OUT B L
LINE OUT B R
LINE OUT A L
LINE OUT A R
MUTE
PHONES
MUTE
MUTE
VOLUME
VOLUME
VOLUME
PHONES
DIRECT MIXER
PAN
LEVEL
PAN
LEVEL
LEVEL
MIC 1
MIC 2
LINE IN L
LINE IN R
Ф
COMP
48V
SENS
HPF
SENS
SENS
SENS
Down
sampling
Ф
COMP
HPF
Input Settings
Direct Mixer
Output Settings
SAMPLE RATE: Indicates the current sample rate.
Input Settings
The preamp lets you adjust the input sensitivity. You can also set the input sensitivity automatically. You
can also adjust the compressor and low cut filter, and switch the polarity.
Phantom power is supported for the MIC 1 and 2 jacks. Since this can be turned on/off individually
for the MIC 1 and 2 jacks, you have the flexibility to use setups that combine a dynamic mic with a
condenser mic.
Direct Mixer
Here you can adjust the balance between the audio from the input jacks and the audio that’s played back
from the computer.
By adjusting the balance, the audio signals that are input from the MIC 1, 2, and LINE IN jacks can be
output directly to your monitors without passing through the computer.
The direct mixer is a cue mixer that lets you individually set the level and pan of each source, such as the
MIC 1, 2, and LINE IN jacks and the playback channels from the computer.
Output Settings
The output destination of the direct mixer and the output destination of the playback channels from the
computer can be assigned as needed.
About the sampling rate
The sampling rate setting of the Super UA automatically changes to match the rate of the audio
data that is played, or the rate that your DAW software is set to when recording.
You can also switch the sampling rate manually from the driver setting screen.
Windows
For details, refer to the driver’s README file.
Mac
In the Mac OS X Finder, open the [Applications] folder and then the [Utilities] folder, and
double-click [Audio MIDI Setup]. Then, open the audio window from the [Window] menu.
* When the sampling rate is switched, a small pop noise may be heard, but this does not indicate
a malfunction.


