background image

24

How to Use

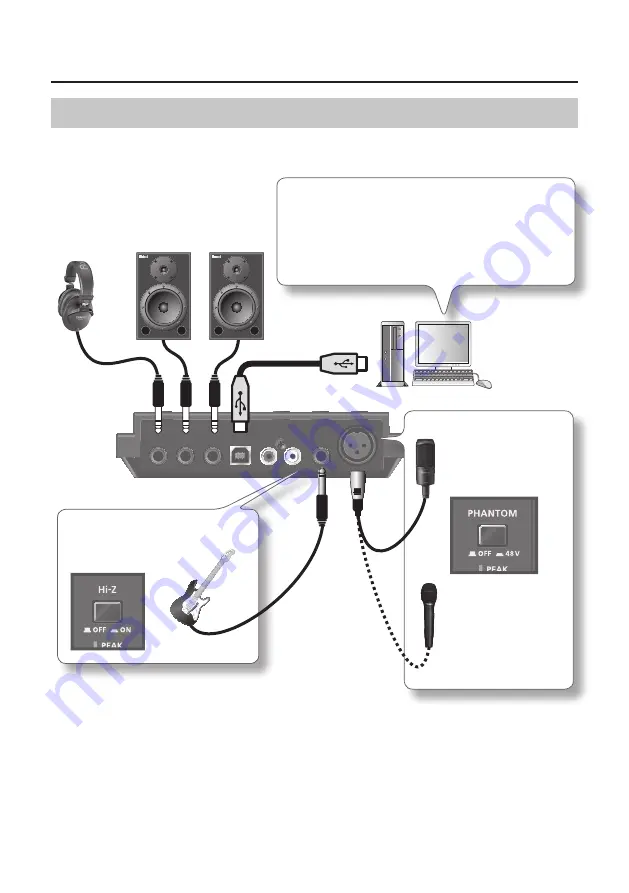
Recording Microphone or Guitar Sound (MIC/GUITAR)

When you set the recording mode to “MIC/GUITAR,” you can record microphone and guitar sounds 

on each track individually.

Computer

Amplified speakers

Headphones

Set the input port for the track in the software.
When using SONAR, set as follows:  

When recording the microphone sound: Left IN 

(TRI-CAPTURE) 

When recording the guitar sound: Right IN (TRI-

CAPTURE)

When connecting 

a condenser 

microphone, set the 

[PHANTOM] button to 

“48V.”

Make sure that the 

[PHANTOM] button 

is set to “OFF” when 

connecting a dynamic 

microphone that does 

not require phantom 

power (p. 10).

When connecting a guitar or 

bass, set the [Hi-Z] button to 

“ON” (p. 10).

Rear panel

Use the [INPUT 1 (MIC)] and [INPUT 2 (GUITAR)] knobs to adjust the input level so that the PEAK 

indicator does not light.

Summary of Contents for TRI-Capture

Page 1: ...For the following languages a PDF version of the Owner s Manual can be found on the CD ROM Deutsch Français Italiano Español Português Nederlands ...

Page 2: ...e driver p 14 Mac OS X Prepare the DAW software such as GarageBand Logic etc For details refer to the installation guide of the SONAR LE Yes No Set the input output audio device on the DAW p 21 Connect a guitar or microphone to the TRI CAPTURE p 24 Set the REC MODE function to GUITAR MIC p 24 Windows Install the included SONAR LE Register SONAR LE Do you have a DAW ...

Page 3: ...ry feature provided by your new unit the Owner s Manual should be read in its entirety The manual should be saved and kept on hand as a convenient reference Used for instructions intended to alert the user to the risk of injury or material damage should the unit be used improperly Material damage refers to damage or other adverse effects caused with respect to the home and all its furnishings as w...

Page 4: ...he unit does not appear to operate normally or exhibits a marked change in performance In households with small children an adult should provide supervision until the child is capable of following all the rules essential for the safe operation of the unit Protect the unit from strong impact Do not drop it DO NOT play a CD ROM disc on a conventional audio CD player The resulting sound may be of a l...

Page 5: ... please make sure that the unit will not slip or move accidentally Do not put anything that contains water e g flower vases on this unit Also avoid the use of insecticides perfumes alcohol nail polish spray cans etc near the unit Swiftly wipe away any liquid that spills on the unit using a dry soft cloth Maintenance For everyday cleaning wipe the unit with a soft dry cloth or one that has been sli...

Page 6: ...akewalk Inc ASIO is a trademark of Steinberg Media Technologies GmbH Company names and product names appearing in this document are registered trademarks or trademarks of their respective owners MMP Moore Microprocessor Portfolio refers to a patent portfolio concerned with microprocessor architecture which was developed by Technology Properties Limited TPL Roland has licensed this technology from ...

Page 7: ...hile Mixing it with Audio Data Played on a Computer LOOP BACK 28 Troubleshooting 30 Problems When Installing the Driver 30 Problems When Using the TRI CAPTURE 31 Changing Computer Settings to Avoid Problems 36 Driver Signing Options Setting Windows XP 36 Power Management Settings 37 System Performance Settings Windows 38 Setting the System Volume 39 Voice Communication Software Settings Windows 8 ...

Page 8: ...E user registration and obtaining a registration code refer to the installation guide included on the DVD ROM or to the Help function of the software Avoid touching or scratching the shiny underside encoded surface of a disc Damaged or dirty discs may not be read properly Use a commercially available CD ROM DVD ROM cleaner to keep your disc clean You need DAW software for Mac OS X USB cable Use th...

Page 9: ...e Package You ll need to provide the following items External amplifier speakers headphones etc for listening to the sound that is output via the TRI CAPTURE Microphone guitar etc for inputting audio to the TRI CAPTURE ...

Page 10: ...ess condenser microphones requiring phantom power are connected to the XLR type jacks Supplying phantom power to a dynamic microphone or to an audio playback device may cause malfunctions For details on the requirements of your microphone refer to its owner s manual TRI CAPTURE s phantom power supply DC 48 V 10 mA maximum 2 Hi Z button Switches the impedance of the INPUT 2 GUITAR jack You can sele...

Page 11: ...TURE has three recording modes You can change the recording mode by pressing this button p 23 7 INPUT MONITOR button Sets whether to directly output the input signal When the INPUT MONITOR button is set to ON you can listen to the instrument s output directly without passing the audio signal through the computer When the INPUT MONITOR button is set to OFF the instrument s audio signal passes throu...

Page 12: ...g audio signal Wiring diagrams for the balanced TRS type jack are shown in the illustration Make connections only after first checking the pin outs of the other equipment you intend to connect An unbalanced TS type jack can also be connected 13 USB connector Used to connect to a computer Before connecting you must install the driver p 14 14 INPUT 3 AUX jacks Used to connect an audio device Adjust ...

Page 13: ...ch of newspapers or magazines and place them under the four corners or at both ends to prevent damage to the buttons and controls Also you should try to orient the unit so no buttons or controls get damaged 17 18 17 SAMPLE RATE switch Sets the sampling rate for the audio signal to be recorded or played When you switch the sampling rate disconnect the USB cable that connects the TRI CAPTURE and com...

Page 14: ... a user account that has administrator privileges Windows 8 Switch to the Desktop 2 Exit all applications that are running 3 Insert the included CD ROM into the CD ROM drive 4 Of the following double click the relevant file on the included CD ROM to start the installer Operating System File Windows Setup in the WinDriver folder Mac OS X TriCapture_USBDriver in the MacDriver folder Refer to the Rol...

Page 15: ... the computer using the USB cable Turn down the volume on any peripheral devices before connecting the USB cable This unit is equipped with a protection circuit A brief interval a few seconds after power up is required before the unit will operate normally Before switching the power on off always be sure to turn the volume down Even with the volume turned down you might hear some sound when switch...

Page 16: ... p 19 If you cannot select the TRI CAPTURE refer to Problems When Using the TRI CAPTURE p 31 If the TRI CAPTURE is selected as the output device the computer s audio alerts will be played using the TRI CAPTURE they will not be heard from the computer s speakers To open the Control Panel Windows 8 1 On the Start screen click the Desktop 2 Move the mouse pointer to the upper right or lower right cor...

Page 17: ... has been completed appears click Close If the Change System Settings dialog box appears click Yes to restart Windows 14 Open the Control Panel click Sounds Speech and Audio Devices and then click Sounds and Audio Devices If you have selected Classic view double click Sounds and Audio Devices 15 Click the Audio tab and select OUT TRI CAPTURE 16 Click OK Proceed to p 19 If you cannot select theTRI ...

Page 18: ...Turn down the volume on any peripheral devices before connecting the USB cable This unit is equipped with a protection circuit A brief interval a few seconds after power up is required before the unit will operate normally Before switching the power on off always be sure to turn the volume down Even with the volume turned down you might hear some sound when switching the power on off However this ...

Page 19: ... that has been copied to the desktop Windows Windows Media Player starts Mac OS X iTunes starts Click the playback button to play the sample file The software that starts and is used to play the sample file may vary depending on your computer environment If different software starts play the sample file as described in the owner s manual for the software you are using Mac OS X The copyright of con...

Page 20: ...me of the signals output from the OUTPUT jacks cannot be adjusted on the TRI CAPTURE itself If the sample file can be heard the computer and TRI CAPTURE are connected properly and the driver has been successfully installed If you cannot hear the sample file refer to Problems When Using the TRI CAPTURE p 31 ...

Page 21: ...ur software s audio device setting Match the sampling rate of the software to the setting of the SAMPLE RATE switch on the bottom panel The TRI CAPTURE will not operate in the Mac OS X Classic environment Use the TRI CAPTURE when the Classic environment is not running Input Output Device Settings To play and record audio data on your software select the TRI CAPTURE as the audio input output device...

Page 22: ...om your DAW software or the sound from an instrument or audio device connected to the TRI CAPTURE Computer Amplified speakers Headphones Audio output device of software TRI CAPTURE Rear panel Set the OUTPUT MUTE button to ON to not output sound from the speakers Use the PHONES knob to adjust the volume of the headphones Front panel To carry out playback at a sampling rate of 96 kHz set the SAMPLE ...

Page 23: ...o data played on the computer p 28 Precautions Concerning the Use of an External Audio Device To play an input audio signal without latency a short period of delay between the performance and the playback set the INPUT MONITOR button to ON Howling could be produced depending on the location of microphones relative to speakers This can be remedied by 1 Changing the orientation of the microphone s 2...

Page 24: ...lows When recording the microphone sound Left IN TRI CAPTURE When recording the guitar sound Right IN TRI CAPTURE When connecting a condenser microphone set the PHANTOM button to 48V Make sure that the PHANTOM button is set to OFF when connecting a dynamic microphone that does not require phantom power p 10 When connecting a guitar or bass set the Hi Z button to ON p 10 Rear panel Use the INPUT 1 ...

Page 25: ...t channel R You cannot record or monitor sound input via the INPUT 3 AUX jacks When recording sound input via the INPUT 3 AUX jacks set the REC MODE button to ALL INPUTS or LOOP BACK In MIC GUITAR mode you cannot record audio data played on the computer To record audio data played on the computer set the REC MODE button to LOOP BACK Examples of How to Use the MIC GUITAR Mode Recording microphone a...

Page 26: ...rophone or guitar sound with the stereo playback of the audio device Computer Amplified speakers Headphones When connecting a condenser microphone set the PHANTOM button to 48V Make sure that the PHANTOM button is set to OFF when connecting a dynamic microphone that does not require phantom power p 10 When connecting a guitar or bass set the Hi Z button to ON p 10 Audio device Rear panel Set the i...

Page 27: ...ITAR knobs fully to the left In ALL INPUT mode you cannot record audio data played on the computer To record audio data played on the computer set the REC MODE button to LOOP BACK When recording sound from the microphone guitar and audio device is mixed together You cannot edit the recorded audio data separately Examples of How to Use the ALL INPUT Mode Recording the guitar sound while playing a M...

Page 28: ...played on the computer Computer Amplified speakers Headphones When connecting a condenser microphone set the PHANTOM button to 48V Make sure that the PHANTOM button is set to OFF when connecting a dynamic microphone that does not require phantom power p 10 When connecting a guitar or bass set the Hi Z button to ON p 10 Audio device Rear panel Set the input port in the software When using SONAR set...

Page 29: ...left If you set the SAMPLE RATE switch to 96k you cannot set the REC MODE button to LOOP BACK Set the SAMPLE RATE switch to 44 1k or 48k When recording sound played by the computer and sound from the microphone guitar and audio device are mixed together You cannot edit the recorded audio data separately Usage Examples for the LOOP BACK Mode Singing with the karaoke sound that is played on a web br...

Page 30: ...yed Reinstall the TRI CAPTURE driver p 41 Installer does not exit Is your computer running on battery power Connect the power cord to the computer Other than a mouse and keyboard are any USB devices connected Make sure that there are no USB devices connected to the computer other than a mouse and keyboard during installation Is the TRI CAPTURE connected to a USB hub that is not connected to a powe...

Page 31: ...mputer Did you disconnect and reconnect the USB cable while using the TRI CAPTURE Exit all programs that are using the TRI CAPTURE disconnect the TRI CAPTURE s USB cable and then reconnect it If the problem is not resolved restart the computer Was the TRI CAPTURE connected to the computer while the computer was starting up Connect the TRI CAPTURE after the computer has started up With some compute...

Page 32: ...r microphone with an XLR type plug to the XLR type connector INPUT 1 MIC jack p 13 Does the sensitivity of the microphone match the nominal input level of the TRI CAPTURE The TRI CAPTURE s microphone nominal input level is 60 dBu If the sensitivity of the microphone is low the level will be low Also check the contents of The volume level of the instrument connected to input connector is too low p ...

Page 33: ... the Recording Margin setting appropriate Mac OS X If audio drops out or if noise is heard even if you have adjusted the audio buffer size increase the Recording Margin setting p 44 Is the system software up to date Run Windows Update or Microsoft Update and make sure the system software is up to date Have you used Mac OS X Software Update Run Software Update and make sure the system software is u...

Page 34: ...le connected to the input jack of the TRI CAPTURE Connect the MIDI sound module and the TRI CAPTURE to a self powered USB hub a USB hub that uses an AC plug Have you connected the ground terminal You may be able to solve the problem by grounding a metal component of your computer or the ground pin of your computer s AC adaptor Also check whether there might be a device nearby that is emitting a st...

Page 35: ...PTURE s USB cable and then reconnect it If the problem is not resolved restart the computer Is the computer s volume setting turned down Adjust the computer s volume setting p 39 Are you using voice communication software Windows 8 Windows 7 Disable automatic volume adjustment p 40 Was the TRI CAPTURE connected to the computer while the computer was starting up Connect the TRI CAPTURE after the co...

Page 36: ...e as follows 1 Open the Control Panel click Performance and Maintenance and then click the System icon If you have selected Classic view double click System 2 Click the Hardware tab and then click Driver Signing The Driver Signing Options dialog box will open 3 In the Driver Signing Options dialog box select Warn or Ignore and then click OK 4 Click OK to close the System Properties dialog box 5 In...

Page 37: ...rmance is not displayed in Windows 8 Windows 7 click Show additional plans 4 Click Change advanced power settings 5 In the Advanced settings tab of the Power Options control panel click the mark next to Hard disk and then click the mark next to Turn off hard disk after 6 Click Setting click the down arrow and then select Never 7 Click OK to close the Power Options window 8 Close the Edit plan sett...

Page 38: ...tem icon 2 Click Advanced system settings at the left 3 When a User Account Control dialog box appears click Yes or Continue If you re asked to enter an administrator password log on to the computer with a user account that has administrator privileges and make the setting again 4 Click Settings in Performance and click the Advanced tab 5 Select Background services and click OK 6 Click OK to close...

Page 39: ...the TRI CAPTURE s OUT from the Device menu and adjust the volume If Mute is set to On click Mute to set it to Off Windows XP 1 Open the Control Panel click Sounds Speech and Audio Devices and then click Sounds and Audio Devices If you have selected Classic view double click Sounds and Audio Devices 2 Click the Audio tab 3 In the Sound playback area make sure that OUT TRI CAPTURE is selected as the...

Page 40: ...detects communications activity to Do nothing 3 Click OK to close Sound Monitoring Function Settings Windows 8 Windows 7 If the monitoring function of Windows is enabled the input sound may be doubled each sound is echoed or feedback may be heard Use the following procedure to disable the monitoring function of Windows 1 Open the Control Panel click Hardware and Sound and then click Sound If you h...

Page 41: ... up the computer without the TRI CAPTURE connected Disconnect all USB cables other than those for a USB keyboard and or USB mouse if used 2 Log on to the computer with a user account that has administrator privileges 3 Insert the included CD ROM into the computer s DVD ROM drive 4 Double click the Uninstal icon in the WinDriver folder on the included CD ROM 5 When a confirmation screen regarding u...

Page 42: ...ded CD ROM 4 When This uninstalls TRI CAPTURE driver from this Macintosh appears click Uninstall If other messages appear follow the instructions on the screen 5 When Are you sure you want to uninstall the driver appears click OK The authentication dialog box or the message Uninstaller requires that you type your password will appear 6 Enter the password and click OK 7 When Uninstallation is compl...

Page 43: ...e click the TRI CAPTURE icon 4 From the Driver menu select Driver Settings The TRI CAPTURE Driver Settings dialog box will appear Setting Description Audio Buffer Size You can adjust the input and output audio buffer size Decrease the buffer size to decrease latency Increase the buffer size if audio drops out After adjusting the buffer size make sure to restart all programs that are using the TRI ...

Page 44: ...he TRI CAPTURE If using software that has an audio device test function run the test function Recording Margin If audio drops out or if noise is heard even if you have adjusted the buffer size setting in the software and adjusted the Audio Buffer Size as explained above increase the recording margin setting Recording Timing Adjust this setting if the recorded audio data is not in time If the audio...

Page 45: ...s Input Monitor OFF IHF A typ Dynamic Range 100 dB typ Interface USB Rec Mode MIC GUITAR ALL INPUTS LOOP BACK Except 96 kHz Controller INPUT1 MIC INPUT2 GUITAR INPUT3 AUX knob PHONES knob PHANTOM button Hi Z button REC MODE button OUTPUT MUTE button INPUT MONITOR button SAMPLE RATE switch MODE switch Indicator PEAK indicators SIG indicators Connectors INPUT1 MIC Jack XLR type balanced phantom powe...

Page 46: ... 8 H inches Weight 320 g 12 oz TRI CAPTURE unit only Accessories Owner s Manual CD ROM USB cable Cakewalk SONAR LE DVD ROM for Windows 0 dBu 0 775 Vrms In the interest of product improvement the specifications and or appearance of this unit are subject to change without prior notice ...

Page 47: ... 11 INPUT 3 AUX jacks 12 INPUT 3 AUX knob 11 INPUT MONITOR button 11 Input output device 21 Install Driver 14 L LOOP BACK 28 49 M MIC GUITAR 24 48 MODE switch 13 O OUTPUT jack 12 Output level indicators 11 OUTPUT MUTE button 11 P PEAK indicators 11 PHANTOM button 10 Phantom power 10 13 PHONES jack 12 PHONES knob 12 Playing Back 22 R REC MODE 23 ALL INPUTS 26 48 LOOP BACK 28 49 MIC GUITAR 24 48 REC...

Page 48: ...PUT 1 INPUT MONITOR MIC INPUT 2 GUITAR INPUT 3 AUX D A OUTPUT MUTE OUTPUT PHONES USB AUDIO IN OUT A D STEREO MONO PEAK SIG PEAK SIG PEAK SIG A D D A ALL INPUTS 48V Hi Z INPUT 1 A D INPUT MONITOR MIC INPUT 2 GUITAR INPUT 3 AUX D A OUTPUT MUTE D A OUTPUT PHONES USB AUDIO IN OUT A D STEREO MONO PEAK SIG PEAK SIG PEAK SIG ...

Page 49: ...49 Block Diagrams for REC MODE LOOP BACK 48V Hi Z INPUT 1 A D INPUT MONITOR MIC INPUT 2 GUITAR INPUT 3 AUX D A OUTPUT MUTE D A OUTPUT PHONES USB AUDIO IN OUT A D STEREO MONO PEAK SIG PEAK SIG PEAK SIG ...

Page 50: ...50 For EU Countries For China ...

Page 51: ...erference by one or more of the following measures Reorient or relocate the receiving antenna Increase the separation between the equipment and receiver Connect the equipment into an outlet on a circuit different from that to which the receiver is connected Consult the dealer or an experienced radio TV technician for help This device complies with Part 15 of the FCC Rules Operation is subject to t...

Page 52: ... 5 1 0 0 0 1 9 2 0 5 0 5 www maxlight ru ...

Reviews: