background image

7

Quick Start

Playing

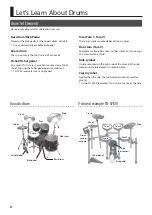
Playing drums is not only fun, but just about anyone can easily start playing — they make sound when you simply hit them! 

Let’s start playing drums using the wide variety of built-in sounds.

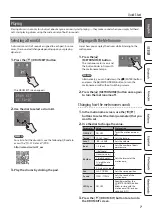
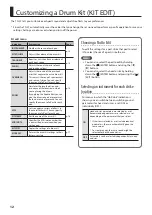
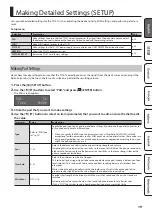
Selecting a Drum Kit

A drum kit consists of sounds assigned to each pad. In some 

cases, the sound will change depending upon your playing 

dynamics.

1  

Press the [ ] (DRUM KIT) button.

The DRUM KIT screen appears.

DRUM KIT

01 TD-07

2  

Use the dial to select a drum kit.

MEMO

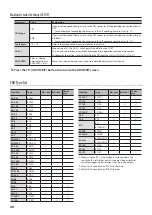
For a list of all the drum kits, use the following QR code to 

access the “TD-07 Data List” (PDF).

http://roland.cm/td-07_om

3  

Play the drums by striking the pad.

Playing with the Metronome

Here’s how you can play the drums while listening to the 

metronome.

1  

Press the [ ] 

(METRONOME) button.

The metronome turns on, and 

the button blinks in time with 

the metronome tempo.

MEMO

Alternatively, you can hold down the [ ] (ENTER) button 

and press the [ ] (METRONOME) button to turn the 

metronome on/off without switching screens.

2  

Press the [ ] (METRONOME) button once again 

to turn the metronome off.

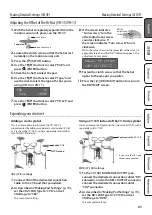
Changing how the metronome sounds

1  

In the metronome screen, use the [

C

][

A

buttons to select the item (parameter) that you 

want to set.

2  

Use the dial to change the value.
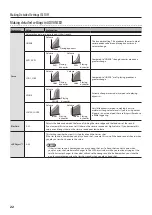
Parameter

Value

Explanation

ON/OFF

ON, OFF

Turns the metronome on/

off.

Tempo

20–260 (bpm)

Sets the tempo.

Level

-INF–+6.0dB

Sets the volume.

Beat

1–9 (beat)

Sets the number of beats 

per measure.

Rhythm

ˇ

 (half note)

Sets the interval of the 

metronome.

¸

 (quarter notes)

˙

 (eighth notes)

¯

 (eighth note 

triplets)

˜

 (sixteenth notes)

Pan

L30–CTR–R30

Sets the stereo position.

Sound

TYPE1–TYPE15

Sets the sound of the 

metronome.

LED Sync

ON, OFF

Specifies whether the 

[ ] (METRONOME) button 

blinks in time with the 

metronome (ON) or does 

not blink (OFF).

3  

Press the [

] (DRUM KIT) button to return to 

the DRUM KIT screen.

Summary of Contents for TD-07

Page 1: ...hone 11 Connecting via a Cable to the MIX IN Jack 11 Connecting Wirelessly via Bluetooth 11 Customizing a Drum Kit KIT EDIT 12 Editing the Sound of Each Pad INSTRUMENT 13 Adjusting the Drum Kit s Volu...

Page 2: ...d Tom Tom 1 Tom 2 These are usually mounted above the bass drum Floor tom Tom 3 Sometimes called a bass tom it either stands on its own legs or is mounted on a stand Ride cymbal Usually mounted on the...

Page 3: ...ed in jazz and bossa nova Using the snare Head shot Hit only the head of the pad This is the most common method to play the snare Rim shot Strike the head and the rim of the pad simultaneously A sound...

Page 4: ...will not work Edge sensor Using the hi hat In an acoustic drum set the hi hat consists of two cymbals placed facing each other vertically on a hi hat stand When you press the pedal the two cymbals wil...

Page 5: ...OME button Allows you to sound the metronome or to make settings for the tempo or beat The button will blink in time with the metronome Playing with the Metronome p 7 VOLUME button Adjust the volume i...

Page 6: ...plified speakers and turn off their power 2 Long press the L POWER button The power turns off You must turn off the power by pressing the L POWER button If you turn off the power by disconnecting the...

Page 7: ...n blinks in time with the metronome tempo MEMO Alternatively you can hold down the ENTER button and press the METRONOME button to turn the metronome on off without switching screens 2 Press the METRON...

Page 8: ...h the beat sounded by the metronome 120 GOOD 1 3 SNR ___ _ _ ___ This ends when the specified time has elapsed and the strike timing is evaluated Finished EXIT SCORE 100 If the tempo of your strikes i...

Page 9: ...he interval for which the metronome will alternate between Sounding and Quiet Parameter Value Explanation Quiet Of the measures specified by Measures this setting specifies the length of the measures...

Page 10: ...and will then return to half notes this change in rhythms will be repeated 1 In the CHANGE UP screen press the ENTER button A two measure count in is played when you start MEMO If you decide to stop m...

Page 11: ...smartphone 5 Tap TD 07 AUDIO that appears in the smartphone s Bluetooth DEVICES field TD 07 and smartphone are paired When pairing is completed a display like the following appears smartphone TD 07 AU...

Page 12: ...y of effects to the overall drum kit You can specify the amount of effect for each pad p 16 KIT NAME Edit the name of the drum kit MIDI NOTE Specifies the MIDI note number that is transmitted or recei...

Page 13: ...ess of the hi hat does not change regardless of how much you press the hi hat pedal Pitch 1 100 100 Pitch of the pad sound Decay 1 1 100 Decay length of the pad sound Parameter Value Explanation H R L...

Page 14: ...o return to the DRUM KIT screen Adjusting theTonal Character of Each Pad PAD EQ Here s how to adjust the tonal character of each pad pad equalizer 1 Press the KIT EDIT button 2 Use the C A buttons to...

Page 15: ...he template name might not match the effect Also if the default settings of the template do not match the current values an is shown for the template setting If you changed the template when the is sh...

Page 16: ...ame the currently selected drum kit 1 Press the KIT EDIT button 2 Use the C A buttons to select KIT NAME and press ENTER button The KIT NAME screen appears KIT NAME D 07 Controller Explanation C A but...

Page 17: ...Y ENTER Kit01 Kit03 7 Press the ENTER button A confirmation message appears Sure CANCEL OK EXIT ENTER If you decide to cancel press the EXIT button 8 Press the ENTER button The drum kit is copied Rese...

Page 18: ...your smartphone that supports Bluetooth MIDI such as GarageBand As an example we explain how to make settings for an iPhone Registering the smartphone pairing 1 Place the smartphone that you want to...

Page 19: ...l need to make these settings if you expand the pads of your drum set or if you connect pads of a different type When you specify the PAD type the parameters such as Threshold ADVANCED with the except...

Page 20: ...an make more detailed adjustments for the pad 5 Press the DRUM KIT button to return to the DRUM KIT screen PADType list Used Pad Type Rim shot Bell shot Choke play KD A22 KDA22 KD 200 KD200 KD 140 KD1...

Page 21: ...djust HH offset 80 OK EXIT 9 Fasten the clutch screw so that the hi hat opens to the amount you prefer 10 Press the DRUM KIT button to return to the DRUM KIT screen Expanding your drum set Adding a cr...

Page 22: ...maintain strong volume levels If you re using a drum trigger as an external pad these settings will produce reliable triggering RimGain 0 3 2 Adjusts the balance between the force of striking the rim...

Page 23: ...o longer occurs If this value is raised excessively the sound of pad B will tend to drop out when pad A and pad B are struck simultaneously ScanTime 0 4 0ms Trigger signal detection time Scan Time Sin...

Page 24: ...s ON or not transmitted OFF SysEx Rx OFF ON Specifies whether system exclusive messages are received ON or not received OFF 4 Press the DRUM KIT button to return to the DRUM KIT screen Making System S...

Page 25: ...sion information is shown 3 Press the DRUM KIT button to return to the DRUM KIT screen Restoring the Factory Settings The Factory Reset operation returns all data and settings stored in the TD 07 to t...

Page 26: ...uld the pad sensitivity be lowered Adjust the pad sensitivity Sens p 19 If you expanded the pads or replaced a pad with a different type of pad is the pad type specified correctly Adjust the pad type...

Page 27: ...device list shows TD 07 AUDIO In your smartphone s settings temporarily remove the registration of the TD 07 AUDIO Bluetooth device turn the Bluetooth function off and then on again and execute pairin...

Page 28: ...low these sounds to become a nuisance others nearby When disposing of the packing carton or cushioning material in which this unit was packed you must observe the waste disposal regulations that apply...

Page 29: ...ply AC adaptor DC 12 V Current Draw 250 mA Dimensions 185 W 36 D 177 H mm 7 5 16 W 1 7 16 D 7 H inches Weight excluding AC adaptor 407 g 15 oz Accessories Setup Guide Owner s Manual Leaflet USING THE...

Page 30: ......

Reviews: