background image

28

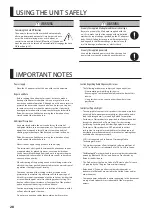
USING THE UNIT SAFELY

IMPORTANT NOTES

 WARNING

Concerning the Auto Off function

The power to this unit will be turned off automatically 

after a predetermined amount of time has passed since 

it was last used for playing music, or its buttons or 

controls were operated (Auto Off function). If you do not 

want the power to be turned off automatically, disengage the Auto 

Off function (p. 24).

 WARNING

Use only the supplied AC adaptor and the correct voltage

Be sure to use only the AC adaptor supplied with the 

unit. Also, make sure the line voltage at the installation 

matches the input voltage specified on the AC adaptor’s 

body. Other AC adaptors may use a different polarity, or 

be designed for a different voltage, so their use could 

result in damage, malfunction, or electric shock.

Use only the supplied power cord

Use only the attached power cord. Also, the supplied 

power cord must not be used with any other device.

Power Supply

•  Place the AC adaptor so that the side with text is downward.

Repairs and Data

•  Before sending the unit away for repairs, be sure to make a 

backup of the data stored within it; or you may prefer to write 

down the needed information. Although we will do our utmost to 

preserve the data stored in your unit when we carry out repairs, 

in some cases, such as when the memory section is physically 

damaged, restoration of the stored content may be impossible. 

Roland assumes no liability concerning the restoration of any 

stored content that has been lost.

Additional Precautions

•  Any data stored within the unit can be lost as the result of 

equipment failure, incorrect operation, etc. To protect yourself 

against the irretrievable loss of data, try to make a habit of 

creating regular backups of the data you’ve stored in the unit.

•  Roland assumes no liability concerning the restoration of any 

stored content that has been lost.

•  Never strike or apply strong pressure to the display.

•  This instrument is designed to minimize the extraneous sounds 

produced when it’s played. However, since sound vibrations 

can be transmitted through floors and walls to a greater degree 

than expected, take care not to allow these sounds to become a 

nuisance others nearby.

•  When disposing of the packing carton or cushioning material in 

which this unit was packed, you must observe the waste disposal 

regulations that apply to your locality.

•  The rubber portion of the striking surface is treated with a 

preservative to maintain its performance. With the passage of 

time, this preservative may appear on the surface as a white stain, 

or reveal how the pads were struck during product testing. This 

does not affect the performance or functionality of the product, 

and you may continue using it with confidence.

•  Continuous playing may cause dis-coloration of the pad, but this 

will not affect the pad’s function.

•  Do not use connection cables that contain a built-in resistor.

Caution Regarding Radio Frequency Emissions

•  The following actions may subject you to penalty of law.

•  Disassembling or modifying this device.
•  Removing the certification label affixed to the back of this 

device.

•  Using this device in a country other than where it was 

purchased

Intellectual Property Right

•  The copyright of content in this product (the sound waveform 

data, style data, accompaniment patterns, phrase data, audio 

loops and image data) is reserved by Roland Corporation.

•  Purchasers of this product are permitted to utilize said content 

(except song data such as Demo Songs) for the creating, 

performing, recording and distributing original musical works.

•  Purchasers of this product are NOT permitted to extract 

said content in original or modified form, for the purpose of 

distributing recorded medium of said content or making them 

available on a computer network.

•  ASIO is a trademark and software of Steinberg Media 

Technologies GmbH.

•  This product contains eParts integrated software platform of 

eSOL Co.,Ltd. eParts is a trademark of eSOL Co., Ltd. in Japan.

•  The 

Bluetooth

®

 word mark and logos are registered trademarks 

owned by Bluetooth SIG, Inc. and any use of such marks by 

Roland is under license.

•  This Product uses the Source Code of μT-Kernel under T-License 

2.0 granted by the T-Engine Forum (www.tron.org).

•  Roland and V-Drums are either registered trademarks or 

trademarks of Roland Corporation in the United States and/or 

other countries.

•  Company names and product names appearing in this document 

are registered trademarks or trademarks of their respective 

owners.

Summary of Contents for TD-07

Page 1: ...hone 11 Connecting via a Cable to the MIX IN Jack 11 Connecting Wirelessly via Bluetooth 11 Customizing a Drum Kit KIT EDIT 12 Editing the Sound of Each Pad INSTRUMENT 13 Adjusting the Drum Kit s Volu...

Page 2: ...d Tom Tom 1 Tom 2 These are usually mounted above the bass drum Floor tom Tom 3 Sometimes called a bass tom it either stands on its own legs or is mounted on a stand Ride cymbal Usually mounted on the...

Page 3: ...ed in jazz and bossa nova Using the snare Head shot Hit only the head of the pad This is the most common method to play the snare Rim shot Strike the head and the rim of the pad simultaneously A sound...

Page 4: ...will not work Edge sensor Using the hi hat In an acoustic drum set the hi hat consists of two cymbals placed facing each other vertically on a hi hat stand When you press the pedal the two cymbals wil...

Page 5: ...OME button Allows you to sound the metronome or to make settings for the tempo or beat The button will blink in time with the metronome Playing with the Metronome p 7 VOLUME button Adjust the volume i...

Page 6: ...plified speakers and turn off their power 2 Long press the L POWER button The power turns off You must turn off the power by pressing the L POWER button If you turn off the power by disconnecting the...

Page 7: ...n blinks in time with the metronome tempo MEMO Alternatively you can hold down the ENTER button and press the METRONOME button to turn the metronome on off without switching screens 2 Press the METRON...

Page 8: ...h the beat sounded by the metronome 120 GOOD 1 3 SNR ___ _ _ ___ This ends when the specified time has elapsed and the strike timing is evaluated Finished EXIT SCORE 100 If the tempo of your strikes i...

Page 9: ...he interval for which the metronome will alternate between Sounding and Quiet Parameter Value Explanation Quiet Of the measures specified by Measures this setting specifies the length of the measures...

Page 10: ...and will then return to half notes this change in rhythms will be repeated 1 In the CHANGE UP screen press the ENTER button A two measure count in is played when you start MEMO If you decide to stop m...

Page 11: ...smartphone 5 Tap TD 07 AUDIO that appears in the smartphone s Bluetooth DEVICES field TD 07 and smartphone are paired When pairing is completed a display like the following appears smartphone TD 07 AU...

Page 12: ...y of effects to the overall drum kit You can specify the amount of effect for each pad p 16 KIT NAME Edit the name of the drum kit MIDI NOTE Specifies the MIDI note number that is transmitted or recei...

Page 13: ...ess of the hi hat does not change regardless of how much you press the hi hat pedal Pitch 1 100 100 Pitch of the pad sound Decay 1 1 100 Decay length of the pad sound Parameter Value Explanation H R L...

Page 14: ...o return to the DRUM KIT screen Adjusting theTonal Character of Each Pad PAD EQ Here s how to adjust the tonal character of each pad pad equalizer 1 Press the KIT EDIT button 2 Use the C A buttons to...

Page 15: ...he template name might not match the effect Also if the default settings of the template do not match the current values an is shown for the template setting If you changed the template when the is sh...

Page 16: ...ame the currently selected drum kit 1 Press the KIT EDIT button 2 Use the C A buttons to select KIT NAME and press ENTER button The KIT NAME screen appears KIT NAME D 07 Controller Explanation C A but...

Page 17: ...Y ENTER Kit01 Kit03 7 Press the ENTER button A confirmation message appears Sure CANCEL OK EXIT ENTER If you decide to cancel press the EXIT button 8 Press the ENTER button The drum kit is copied Rese...

Page 18: ...your smartphone that supports Bluetooth MIDI such as GarageBand As an example we explain how to make settings for an iPhone Registering the smartphone pairing 1 Place the smartphone that you want to...

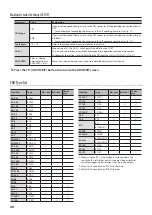
Page 19: ...l need to make these settings if you expand the pads of your drum set or if you connect pads of a different type When you specify the PAD type the parameters such as Threshold ADVANCED with the except...

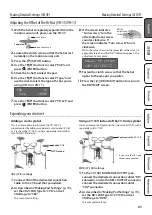
Page 20: ...an make more detailed adjustments for the pad 5 Press the DRUM KIT button to return to the DRUM KIT screen PADType list Used Pad Type Rim shot Bell shot Choke play KD A22 KDA22 KD 200 KD200 KD 140 KD1...

Page 21: ...djust HH offset 80 OK EXIT 9 Fasten the clutch screw so that the hi hat opens to the amount you prefer 10 Press the DRUM KIT button to return to the DRUM KIT screen Expanding your drum set Adding a cr...

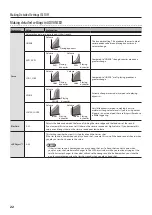
Page 22: ...maintain strong volume levels If you re using a drum trigger as an external pad these settings will produce reliable triggering RimGain 0 3 2 Adjusts the balance between the force of striking the rim...

Page 23: ...o longer occurs If this value is raised excessively the sound of pad B will tend to drop out when pad A and pad B are struck simultaneously ScanTime 0 4 0ms Trigger signal detection time Scan Time Sin...

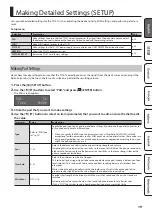
Page 24: ...s ON or not transmitted OFF SysEx Rx OFF ON Specifies whether system exclusive messages are received ON or not received OFF 4 Press the DRUM KIT button to return to the DRUM KIT screen Making System S...

Page 25: ...sion information is shown 3 Press the DRUM KIT button to return to the DRUM KIT screen Restoring the Factory Settings The Factory Reset operation returns all data and settings stored in the TD 07 to t...

Page 26: ...uld the pad sensitivity be lowered Adjust the pad sensitivity Sens p 19 If you expanded the pads or replaced a pad with a different type of pad is the pad type specified correctly Adjust the pad type...

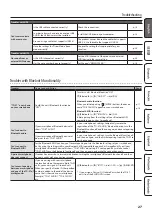
Page 27: ...device list shows TD 07 AUDIO In your smartphone s settings temporarily remove the registration of the TD 07 AUDIO Bluetooth device turn the Bluetooth function off and then on again and execute pairin...

Page 28: ...low these sounds to become a nuisance others nearby When disposing of the packing carton or cushioning material in which this unit was packed you must observe the waste disposal regulations that apply...

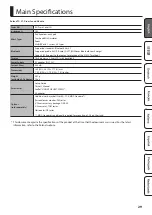
Page 29: ...ply AC adaptor DC 12 V Current Draw 250 mA Dimensions 185 W 36 D 177 H mm 7 5 16 W 1 7 16 D 7 H inches Weight excluding AC adaptor 407 g 15 oz Accessories Setup Guide Owner s Manual Leaflet USING THE...

Page 30: ......

Reviews: