


4
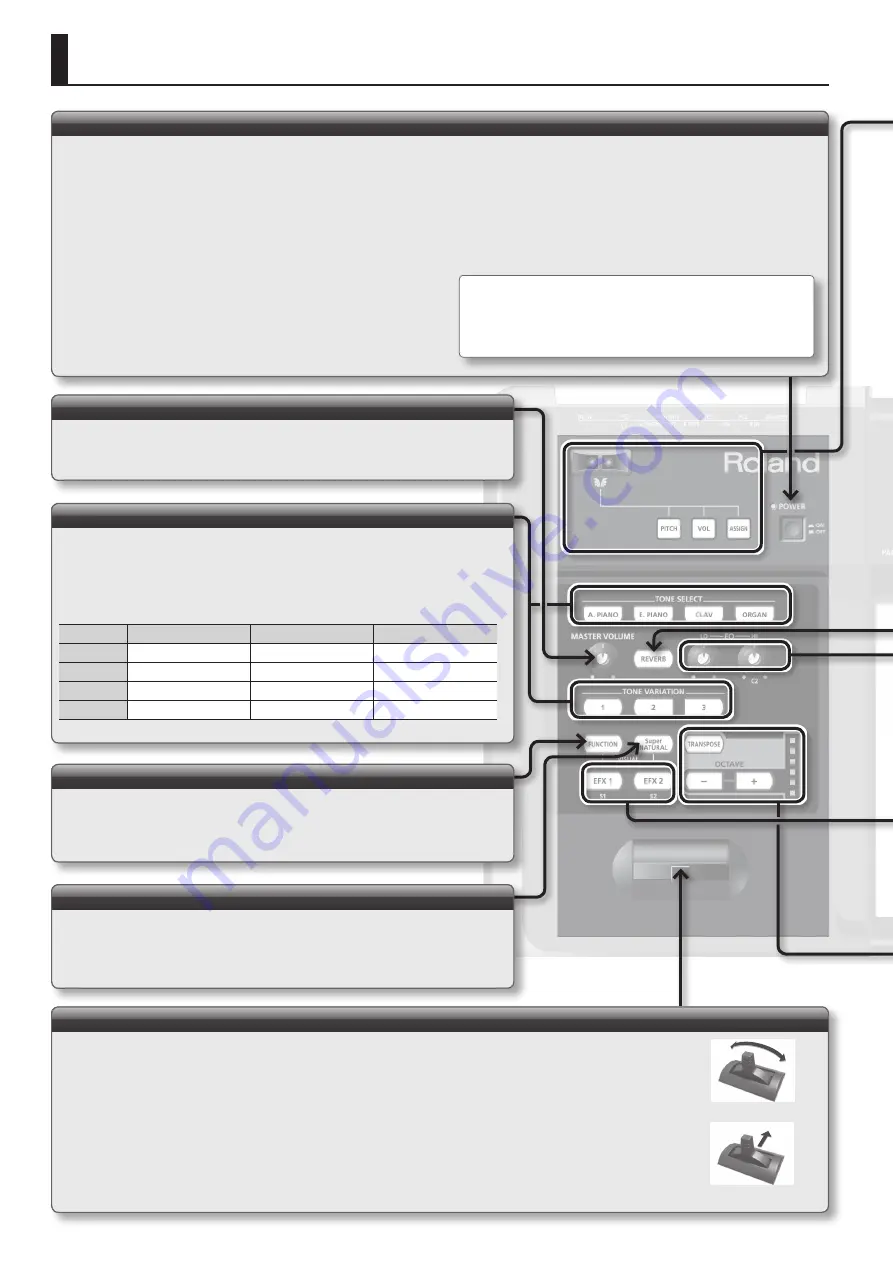
Panel Descriptions
[POWER] switch
[TONE SELECT], [TONE VARIATION] button
Selecting tones
1.
Press the [TONE SELECT] buttons to select the tone group .
2.
Press the [TONE VARIATION] buttons to select a variation .
Group
Variation 1
Variation 2
Variation 3
A . PIANO
CONCERT GRAND
BRIGHT PIANO
CONCERT MONO
E . PIANO
PURE VINTAGE
TINE EP
WURLY
CLAV
COMBINATION
MEDIUM
BRILLIANT
ORGAN
JAZZ ORGAN
ROCK ORGAN
FULL DRAW
[Pitch Bend/Modulation] lever
Changing the pitch of a sounding note (Pitch Bend)
Moving the lever toward the left while you play will lower the pitch, and moving it toward the right will raise the pitch. This
effect is called “pitch bend.”
Applying modulation to a sounding note (Modulation)
Moving the lever away from yourself will apply vibrato. This effect is called “modulation.”
* The effect obtained when you move the lever may differ according to the tone being used. Additionally, the effect applied by moving the lever
is predetermined for each tone, and cannot be changed.
[MASTER VOLUME] knob
Adjusting the volume
Turn the knob right to increase the volume, or left to lower it.
[FUNCTION] button
Changing settings
Use this button when you want to adjust the keyboard touch, or to make pedal
assignments. For details, refer to “Changing Settings (FUNCTION Mode)” (p. 7).
[SuperNATURAL] button
In Piano mode this will remain lit, and pressing it will not do anything.
This button is used only when you’ve connected a “SuperNATURAL compatible sound
module” in Controller mode. For details, refer to “Using the RD-64 as a MIDI Controller
Keyboard (Controller Mode)” (p. 2)
Modulation effect
Pitch bend effect
Turning the power on
*
Once everything is properly connected (p. 6), be sure to follow the procedure below to turn
on their power. If you turn on equipment in the wrong order, you risk causing malfunction or
equipment failure.
* This unit is equipped with a protection circuit. A brief interval (a few seconds) after turning the
unit on is required before it will operate normally.
* Before turning the unit on/off, always be sure to turn the volume down. Even with the volume
turned down, you might hear some sound when switching the unit on/off. However, this is
normal and does not indicate a malfunction.
1.
Use the [MASTER VOLUME] knob to minimize the volume .
Also completely turn down the volume of any connected audio
device and other equipment.
2.
Turn on the [POWER] switch .
3.
Turn on the power to connected external devices .
4.
Adjust the volume of the RD-64 and connected external devices .
Turning off the power
1.
Use the [MASTER VOLUME] knob to minimize the volume .
2.
Turn off the power to connected external devices .
3.
Turn off the [POWER] switch .
* With the factory settings, the RD-64 will automatically be switched off
four hours after you stop playing or operating the unit.
If you don’t want the unit to turn off automatically, change the “AUTO OFF”
setting to “OFF” as described on p. 8.
Summary of Contents for RD-64
Page 1: ...Digital Piano Owner s Manual...
Page 2: ......
Page 16: ...MEMO...
Page 17: ...For EU Countries For China...
Page 19: ...5 1 0 0 0 3 0 0 6 3 0 2...


