background image

22

Making the Power Automatically Turn Off 

After a Time 

(Auto Off)

1. 

Press the

 [MENU] button

.

2. 

Use the

 [1] knob

 to select 

“SYSTEM,”

 and then press the


[ENTER] button

.

You can also make this selection by using the 

PAGE [ ] [ ] buttons


instead of the

 [1] knob

.

3. 

Use the

 [1] knob

 to select 

“Auto Off”

 and use the

 [2] knob

 to 

change the setting.

If you don’t want the unit to turn off automatically, choose 

“OFF”


setting.

Parameter

[1] knob

Value

[2] knob

Auto Off

OFF, 30 [min], 240 [min] 

4. 

To save the setting, press the

 [WRITE] button

.

The save page appears.
If you decide to cancel, press the

 [EXIT] button

.

5. 

To execute, press the

 [ENTER] button

.

Returning to the Factory Settings 

(Factory Reset) 

Here’s how the settings that you edited and saved on the JUPITER-Xm 

can be returned to their factory-set condition.

*  When you execute this operation, all saved settings including the sound 

parameters will be lost.

*  If you will later need the current settings, be sure to use the backup 

function (p. 19) to save the current settings before you restore the 

factory settings.

1. 

Press the

 [MENU] button

.

2. 

Use the

 [1] knob

 to select 

“UTILITY,”

 and then press the


[ENTER] button

.

You can also make this selection by using the 

PAGE [ ] [ ] buttons


instead of the

 [1] knob

.

3. 

Use the

 [1] knob

 to select 

“FACTORY RESET,”

 and then press 

the

 [ENTER] button

.

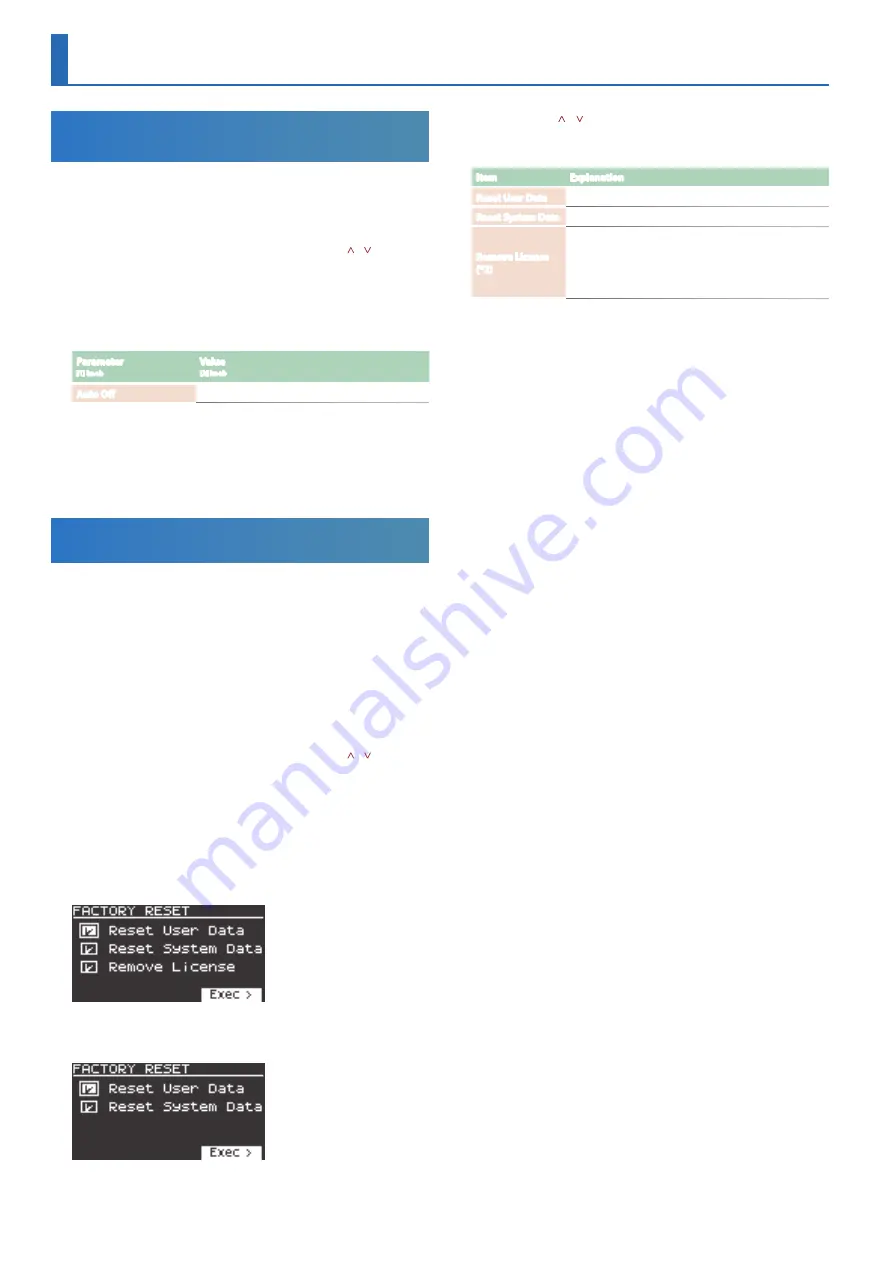
The FACTORY RESET screen appears.

If a sound pack or wave expansion is installed or 

imported

If a sound pack or wave expansion is not installed or 

imported

4. 

Use the 

PAGE [ ] [ ] buttons

 to select the item to execute, 

and press the

 [ENTER] button

 to select its check box.

Press

 [ENTER] 

again to clear the check box.

Item

Explanation

Reset User Data

Initializes the scenes and user tones (* 1).

Reset System Data

Initializes the system settings (* 1).

Remove License 

(*2) 

Initializes the user license and wave expansion. Initializing 

the user license lets you import/install a sound pack or 

wave expansion that was downloaded with a different 

user license.

*  This deletes the currently installed wave expansion.

*  1   Performing these operations erases any of the relevant data you have 

edited after purchase.  

To save the current settings, be sure to use the backup function (p. 

19) before you restore the unit to its factory settings.

*  2   This is displayed if a sound pack or wave expansion is installed. 

For more details on user licenses, see the 

“Sound Pack/Wave Expansion 

Installation Manual”

 (PDF).

5. 

Press the 

cursor [>] button

.

A confirmation message appears.
If you decide to cancel, press the

 [EXIT] button

.

6. 

To execute, use the

 [2] knob

 to select 

“OK,”

 and then press 

the

 [ENTER] button

.

The 

display

 indicates 

“Completed. Turn off power.”

7. 

Turn the power of the JUPITER-Xm off and then on again.

*  Never turn off the power or disconnect the USB flash drive during a 

process, such as while the 

“Executing…”

 display is shown.

Settings for the Entire Unit

Summary of Contents for Jupiter-Xm

Page 1: ...ad from the Web 5 5 Reference Manual This explains all functions of the unit 5 5 Parameter Guide This explains parameters of the unit 5 5 Sound List This lists the sounds that are built into the unit...

Page 2: ...e Notes Monophonic 15 Layering the Same Tone to Thicken the Sound Unison 15 Preventing Dynamics Changes inYour Performance Velocity Off 15 Smoothly Changing the Pitch Portamento 15 Using the Bluetooth...

Page 3: ...nthesizer tone to each part 1 4 and a rhythm tone to part 5 Certain sound engines models can be assigned only to part 1 I ARPEGGIO Based on an analysis of your keyboard performance this plays an optim...

Page 4: ...lay the keys 3 OSC TYPE knob Selects the oscillator waveform PITCH knob Adjusts the pitch of the oscillator LEVEL knob Adjusts the volume of the oscillator MOD knob Adjusts the depth of modulation RIN...

Page 5: ...e filter cutoff frequency to vary according to the key that you play If this knob is turned toward the right the cutoff rises for higher notes If it is turned toward the left the cutoff falls for high...

Page 6: ...ch Moving the wheel toward yourself lowers the pitch Moving it away from yourself raises the pitch When you release your hand from the wheel it returns to the center MOD wheel This applies vibrato Whe...

Page 7: ...of the mic input MIC IN jack Connect a dynamic microphone or electret microphone mono here Pin assignment of MIC IN jack 1 GND 2 HOT 3 COLD 1 GND 2 HOT 3 COLD TIP HOT RING COLD SLEEVE GND I OUTPUT L R...

Page 8: ...a while after being powered on before it begins operating 2 Switch on power to the connected equipment and raise the volume to an appropriate level The power to this unit will be turned off automatica...

Page 9: ...For the part that s set as the current part you can use the panel knobs to edit the tone On off settings for each part Press the 6 10 buttons to switch the parts on off Tone switches for each part Mo...

Page 10: ...registered in the model bank 3 Use the 2 knob to select a tone You can use the 1 knob to move rapidly MEMO The models registered in the model banks can be assigned freely 1 Hold down the MODEL BANK b...

Page 11: ...tomize the arpeggio 1 Turn the I ARPEGGIO TYPE knob to select the type With the factory settings changing the type will specify a suitable sound TONE and volume PART LEVEL If you want to keep the curr...

Page 12: ...before 3 times before Loads the recorded data from three passes before Command Explanation 4 times before Loads the recorded data from four passes before A pass means the length of the arpeggio patte...

Page 13: ...ect Step Mode 4 Make sure that the PART button is lit and then use the 1 5 buttons to select the part that you want to use STEP data 5 Use the 2 knob to turn Step Mode ON 6 Repeat steps 4 5 to turn St...

Page 14: ...C FILTER and AMP can be modulated at a rate specified by the LFO p 4 to create vibrato by modulating the pitch or tremolo by modulating the volume ENVELOPE The OSC FILTER and AMP each have an envelope...

Page 15: ...ttons Transposing the Keyboard in Semitone Steps Transpose 1 Hold down the TRANSPOSE button and press the OCTAVE DOWN UP button To return to the original state hold down the TRANSPOSE button and press...

Page 16: ...operation Saving the System Settings System Write p 23 10 Press the MENU button when you re finished making settings Connecting an Already Paired Mobile Device 1 Turn on the Bluetooth function of the...

Page 17: ...s device name that will be shown in the Bluetooth connected app Set to OFF JUPITER Xm Audio JUPITER Xm MIDI default Set to 1 JUPITER Xm Audio 1 JUPITER Xm MIDI 1 5 If you want to save the setting exe...

Page 18: ...ked up by the mic causing the vocoder to not work as you intend In this case adjust the microphone sensitivity so that it is less likely to pickup noise 1 Press the MENU button 2 Use the 1 knob to sel...

Page 19: ...ystem effects 1 Press the MENU button 2 Use the 1 knob to select UTILITY and then press the ENTER button You can also make this selection by using the PAGE buttons instead of the 1 knob 3 Use the 1 kn...

Page 20: ...hen press the ENTER button You can also make this selection by using the PAGE buttons instead of the 1 knobs 4 Use the 1 knob to select IMPORT EXPORT and then press the ENTER button 5 Use the 1 knob t...

Page 21: ...AND SOUND folder on your USB flash drive Never turn off the power or disconnect the USB flash drive during a process such as while the Executing display is shown Exporting a step edit pattern Here s h...

Page 22: ...T screen appears If a sound pack or wave expansion is installed or imported If a sound pack or wave expansion is not installed or imported 4 Use the PAGE buttons to select the item to execute and pres...

Page 23: ...nob Explanation USB In Lev 0 127 Adjusts the audio input level of the USB COMPUTER port USB Out Lev 0 127 Adjusts the audio output level to the USB COMPUTER port AuxIn BT InLev 0 127 Adjusts the input...

Page 24: ...ransmitted ON or not be transmitted OFF Tx Bank OFF ON Specifies whether bank select messages will be transmitted ON or not be transmitted OFF Parameter 1 knob Value 2 knob Explanation Tx Edit OFF ON...

Page 25: ...e polarity of the pedal connected to the HOLD jack Ctrl Source SCENE SYS Specifies whether the function assigned to the pedal connected to the CTRL jack follows the setting of the currently selected s...

Page 26: ...Keyboard 37 Keys compact type with velocity Power Supply DC 12 V AC adaptor AA type Ni MH batteries sold separately x 8 Current Draw 1 500 mA Expected battery life under continuous use Rechargeable ni...

Page 27: ...or other work whether in whole or in part and distribute sell lease perform or broadcast it without the permission of the copyright owner Do not use this product for purposes that could infringe on a...

Reviews: