11
Using the HS-5
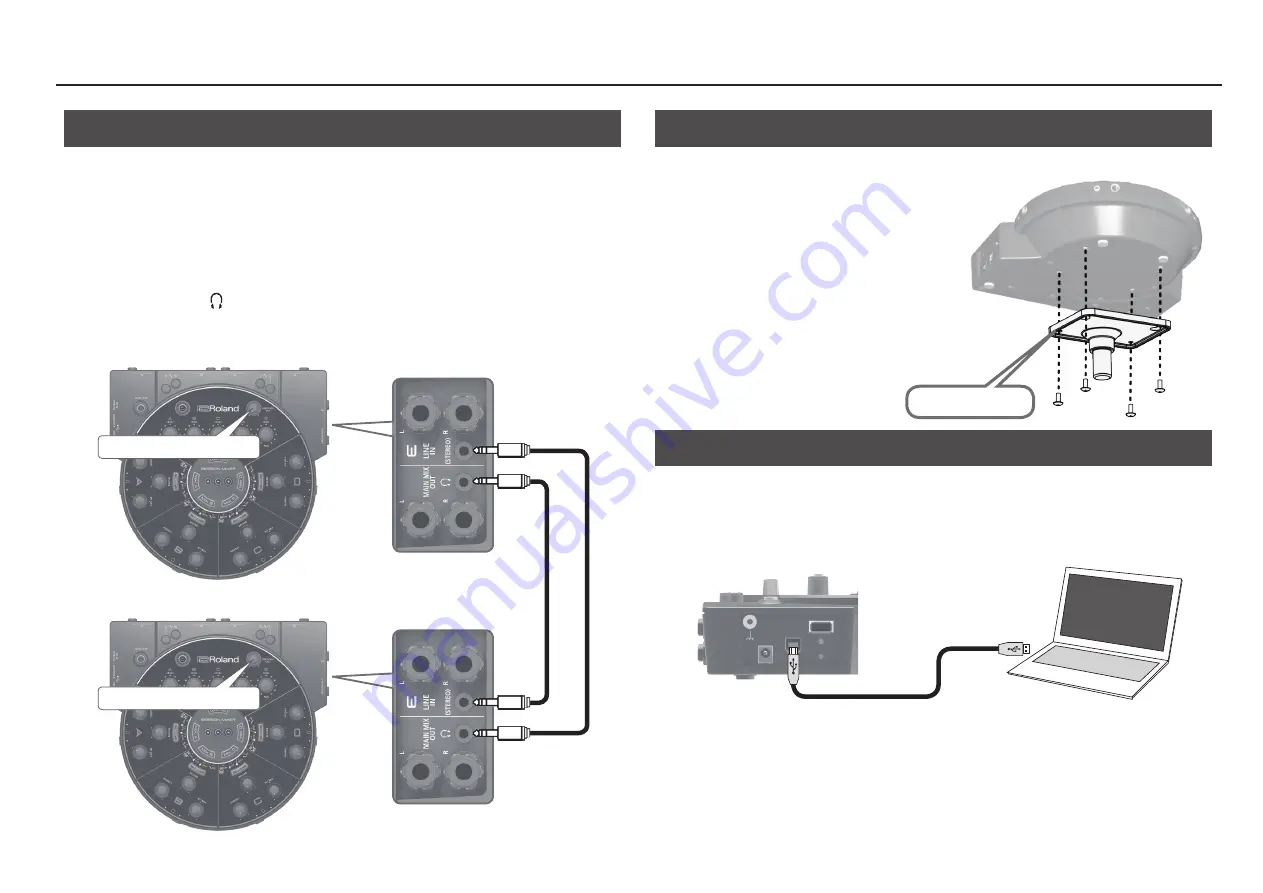
Connecting Two HS-5 Units
You can connect two HS-5 units so that up to eight people can perform simultaneously.
1
On the bottom of each HS-5 unit, turn the [LINK] switch ON.
* When the [LINK] switch is ON, the [MAIN MIX OUT] knob is disabled.
* When the [LINK] switch is OFF, the [MAIN MIX OUT] knob is enabled. Since high volumes may occur
depending on the settings of the knobs, you should turn down the [MAIN MIX OUT] knob before you
turn the [LINK] switch OFF.
2
Using two stereo-mini cables, connect the section E STEREO jack (input) of each unit to
the MAIN MIX OUT
headphone jack (output) of the other unit.
* The output from the second HS-5 is input by mixing it into section E.
[MAIN MIX OUT] knob
[MAIN MIX OUT] knob
Mounting on a Stand
You can mount the HS-5 on a stand (sold separately: PDS-10) for use.
1
Use the screws on the bottom of the HS-5 to
attach it to the PDS-10 stand holder as shown
in the illustration.
2
Attach the stand holder to the PDS-10, and
fasten it.
* For details on how to assemble the PDS-10 and
how to attach the stand holder, refer to the PDS-10
owner’s manual.
* Do not use the screws that are included with the
pad stand.
Connecting to a Computer
You can use a commercially available USB 2.0 cable to connect the HS-5 to your computer, and use
recording/playback software (DAW) on your computer to record your performance. This allows you to
record sections A–E as individual tracks (multi-track recording), or to record the mixed sound of sections
A–E (MAIN MIX).
In addition to recording, you can also use the HS-5 to hear stereo songs or audio that’s played back from
your computer.
* You must install the USB driver before connecting the HS-5 to your computer. Download the USB
driver from the Roland website. For details, refer to Readme.htm which is included in the download.
Roland website : http://www.roland.com/support/
* For details on DAW settings and recording procedure, refer to the owner’s manual of your DAW.
Stand holder
Summary of Contents for HS-5
Page 15: ...15 ...


