background image

103

MFX/IFX Parameters

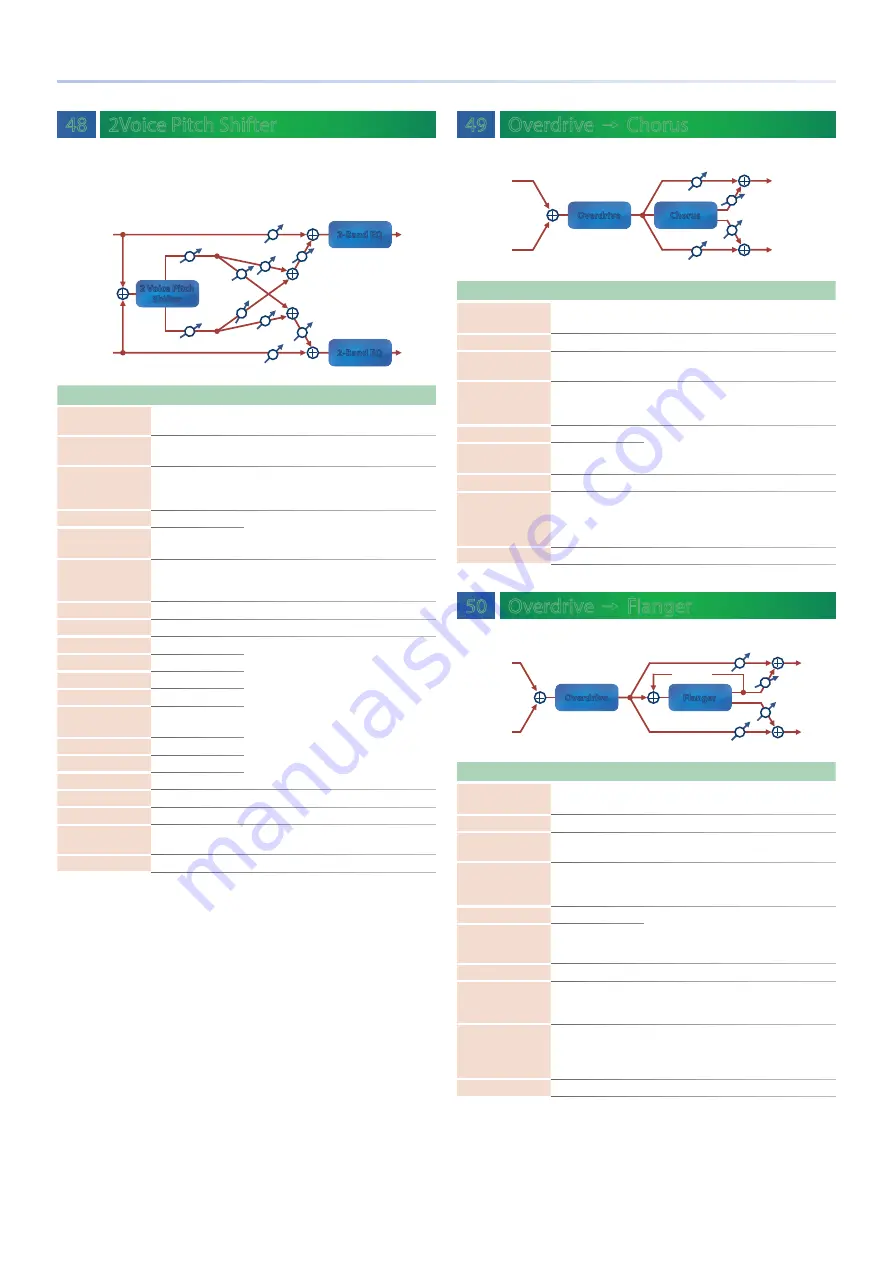
48  2Voice Pitch Shifter

Shifts the pitch of the original sound. This 2-voice pitch shifter has two 

pitch shifters, and can add two pitch shifted sounds to the original 

sound.

Pan 1 R

R out

L out

Balance W

Balance W

Balance D

L in

2 Voice Pitch 

Shifter

2 Voice Pitch 

Shifter

2-Band EQ

2-Band EQ

2-Band EQ

2-Band EQ

Balance D

Level 1

Pan 1 L

Pan 2 L

Pan 2 R

Level 2

R in

Parameter

Value

Explanation

Pitch1 Coarse

-24–+12 [semi]

Adjusts the pitch of Pitch Shift 1 in semitone 
steps.

Pitch1 Fine

-100–+100 [cent]

Adjusts the pitch of Pitch Shift Pitch 1 in 
2-cent steps.

Pitch1 Delay 

(sync sw)

OFF, ON

If this is ON, the rate synchronizes with the 
tempo of the rhythm.

&

  “TEMPO” (p. 52)

Pitch1 Delay 

(msec)

1–1300 [msec]

Adjusts the delay time from the direct sound 
until the Pitch Shift 1 sound is heard.

Pitch1 Delay 

(note)

Note

&

 “Note” (p. 120)

Pitch1 Feedback

-98–+98 [%]

Adjusts the proportion of the pitch shifted 
sound that is fed back into the effect. 
Negative (-) settings will invert the phase.

Pitch1 Pan

L64–63R

Stereo location of the Pitch Shift 1 sound

Pitch1 Level

0–127

Volume of the Pitch Shift 1 sound

Pitch2 Coarse

-24–+12 [semi]

Settings of the Pitch Shift 2 sound.
The parameters are the same as for the Pitch 
Shift 1 sound.

Pitch2 Fine

-100–+100 [cent]

Pitch2 Delay 

(sync sw)

OFF, ON

Pitch2 Delay 

(msec)

1–1300 [msec]

Pitch2 Delay 

(note)

Note

&

 “Note” (p. 120)

Pitch2 Feedback

-98–+98 [%]

Pitch2 Pan

L64–63R

Pitch2 Level

0–127

Low Gain

-15–+15 [dB]

Gain of the low range

High Gain

-15–+15 [dB]

Gain of the high range

Balance

D100:0W–D0:100W

Volume balance between the direct sound (D) 
and the pitch shifted sound (W)

Level

0–127

Output Level

49  Overdrive 

0

 Chorus

L in

R in

Overdrive

Overdrive

Chorus

Chorus

L out

R out

Balance W

Balance W

Balance D

Balance D

Parameter

Value

Explanation

Overdrive Drive

0–127

Degree of distortion
Also changes the volume.

Overdrive Pan

L64–63R

Stereo location of the overdrive sound

Chorus Pre Delay

0.0–100 [msec]

Adjusts the delay time from the direct sound 
until the chorus sound is heard.

Chorus Rate 

(sync sw)

OFF, ON

If this is ON, the rate synchronizes with the 
tempo of the rhythm.

&

  “TEMPO” (p. 52)

Chorus Rate 

(Hz)

0.05–10.00 [Hz]

Frequency of modulation

Chorus Rate 

(note)

Note

&

 “Note” (p. 120)

Chorus Depth

0–127

Depth of modulation

Chorus Balance

D100:0W–D0:100W

Adjusts the volume balance between the 
sound that is sent through the chorus (W) 
and the sound that is not sent through the 
chorus (D).

Level

0–127

Output Level

50  Overdrive 

0

 Flanger

L out

R out

Flanger

Flanger

Balance W

Feedback

Balance W

Balance D

Balance D

Overdrive

Overdrive

L in

R in

Parameter

Value

Explanation

Overdrive Drive

0–127

Degree of distortion
Also changes the volume.

Overdrive Pan

L64–63R

Stereo location of the overdrive sound

Flanger Pre Delay

0.0–100 [msec]

Adjusts the delay time from the direct sound 
until the flanger sound is heard.

Flanger Rate 

(sync sw)

OFF, ON

If this is ON, the rate synchronizes with the 
tempo of the rhythm.

&

  “TEMPO” (p. 52)

Flanger Rate 

(Hz)

0.05–10.00 [Hz]

Frequency of modulation

Flanger Rate 

(note)

Note

&

 “Note” (p. 120)

Flanger Depth

0–127

Depth of modulation

Flanger Feedback

-98–+98 [%]

Adjusts the proportion of the flanger sound 
that is fed back into the effect. Negative (-) 
settings will invert the phase.

Flanger Balance

D100:0W–D0:100W

Adjusts the volume balance between the 
sound that is sent through the flanger (W) 
and the sound that is not sent through the 
flanger (D).

Level

0–127

Output Level

Summary of Contents for Groovebox MC-707

Page 1: ...Reference Manual 01 2019 Roland Corporation ...

Page 2: ...topping Playing Tracks Pads 1 8 22 Muting a Track Pads 9 16 22 Using Cue Mode 22 Stopping Playing Tracks Pads 1 8 22 Using the Cue Function Pads 9 16 22 Using Clip Mode 22 Switching Clips 22 Making Clip Mode Settings 22 Using Note Mode 22 Playing 23 DRUM PAD MUTE 23 Making Note Mode Settings 23 Using Chord Mode 23 Playing 23 Editing a Chord 23 Scatter Mode 24 Using the Pads to Apply the Effect 24 ...

Page 3: ...ing PAD EDIT 47 Initializing an Instrument INIT INST 47 LOOPER Track 48 Making Looper Settings 48 Playback Settings 48 Editing the Sample s Waveform Playback Region and Time Stretch Settings 48 MFX Editing 49 Editing the Sample Name 49 Editing a Clip s Settings 50 Tone Tracks or Drum Tracks 50 LOOPER 50 Assigning Parameters to the Knobs KNOB ASSIGN 51 Operating the Unit 51 Returning Parameter Valu...

Page 4: ...LFO2 70 STEP LFO1 STEP LFO2 71 PARTIAL EQ 72 OUTPUT 72 CONTROL 72 MATRIX CONTROL 73 MFX 74 MFX CTRL 74 Drum Kit Tone Parameters Drum 75 SOUND 75 MFX 75 KIT MFX CTRL 75 DRUM COMP1 6 75 PAD CTRL 75 PAD EQ 75 INST COMMON 76 INST WAVE 76 INST PENV 77 INST FILTER 78 INST FENV 78 INST AENV 79 Total Effect Parameters 80 COMP 80 EQ 80 MFX 80 EQ Part 1 4 81 DELAY 81 Delay Parameters 81 REVERB 82 Reverb Par...

Page 5: ...etting that you can specify for each clip SCENE 1 4 button The combination of clips being played back by the tracks of the MC 707 is called a scene You can recall a stored scene by pressing a SCENE 1 4 button By holding down the SHIFT button and pressing a SCENE 1 4 button you can recall scenes 5 8 To store the current settings as a scene long press the SCENE button in which you want to store the ...

Page 6: ...Section 2 Display Shows necessary information for various operations C1 C4 knob Necessary functions are assigned to these knobs depending on the operation You can also press the C1 C4 knobs SOUND button Accesses the sound browser screen By holding down the SHIFT button and pressing the SOUND button you can access the sound settings screen For details refer to Simple Sound Editing p 41 CLIP button ...

Page 7: ... or play back properly on the unit F EXT IN These are audio input jacks EXT IN L MONO R jacks You can connect a dynamic microphone or an instrument here Connect a microphone to the L MONO jack MIC LINE switch Set this switch appropriately for the device that s connected This switches the gain of the L MONO jack G SEND L R jacks RETURN L R jacks These jacks let you connect an external effect unit a...

Page 8: ... hear some sound when switching the unit on off However this is normal and does not indicate a malfunction 1 Power on your equipment in the order of MC 707 0 connected equipment 2 Power on the connected equipment and raise the volume to an appropriate level Turning Off the Power 1 Power off your equipment in the order of connected equipment 0 MC 707 ...

Page 9: ...um Kit MFX Setting MFX Setting Clip Setting Clip 2 Clip 16 Type Drum Drum Kit MFX Setting MFX Setting Clip 1 MFX Setting Clip Setting Looper Sample Looper Setting Clip 2 Clip 16 Type Looper Type None Types of track and their internal structure Reverb Chorus Delay Multi Effect Compressor Equalizer Track Mix Track 1 8 Track 1 8 TOTAL Effect Setting System Setting Save Load Tone Drum Kit Preset SD Ca...

Page 10: ... the clip and information and settings for the clip Looper sample This is the audio data played by the looper Looper setting This contains settings that specify how the looper sample is played MFX This contains effect MFX settings Phrase This contains data that creates changes in the sound MOTION 1 Alternatively you can use the track s settings instead of the clip s settings What Is the Browser Th...

Page 11: ...tton It might take some time for the project to be loaded If the project has been edited a confirmation message appears When loading is completed you return to the home screen 5 Press the START STOP button The project plays Changing the Clips that Play 1 The HOME screen appears 2 Use the cursor buttons to select the clip that you want to play 3 Press the ENTER button to reserve playback for the cl...

Page 12: ...D card 3 When you use the cursor buttons to select a project the clips inside it are shown Clips of the same type as the track type of the currently selected track are shown 4 Use the cursor buttons to select the clip that you want to import and then press the ENTER button The clip is imported Importing might take some time When importing is completed you return to the home screen ...

Page 13: ...Reference Section ...

Page 14: ... of the current track the clip number and clip name G Level meter Shows the output volume of each track If a stop reservation stop at the next switch occurs in a track this is shown with a mesh overlay H Command This area shows the commands that can be executed to edit a clip or a track Editing a Track or Clip C4 Knob p 14 Selecting a Clip 1 Use the cursor buttons to move the cursor to the clip th...

Page 15: ...een You can t overwrite a clip onto a looper clip Delete the clip first and then copy You can t copy a looper clip if there is insufficient memory Either delete unneeded looper clips or execute LOOPER OPTIMIZE p 55 Renaming a Clip RENAME Here s how to edit the clip name that s shown in the lower left of the home screen If you want to use the clip in another project when importing this is used as t...

Page 16: ...rts to the state in which it was last saved in the project If you decide to cancel use the cursor buttons to select CANCEL and then press the ENTER button Deleting DELETE Here s how to delete the selected clip 1 Use the cursor buttons to select the clip that you want to delete 2 Use the C4 knob to select DELETE and then press the C4 knob A confirmation message appears 3 Use the cursor buttons to s...

Page 17: ...e s how to protect or delete project files on the SD card 1 Press the PROJECT button 2 Use the cursor buttons to select MANAGE and then press the ENTER button The PROJECT FILE MANAGE screen appears Projects for which a lock symbol are shown are protected and cannot be overwritten or deleted 3 Use the cursor button to select FILE and use the cursor buttons to select a project file 4 Use the cursor ...

Page 18: ...cifies the input level from the USB PC IN port PC Pan L128 127R Specifies the pan of the USB PC IN port COLOR tab Here you can specify the color of each pad mode For details refer to Pad Operations PAD MODE p 22 Parameter Value Explanation PAD Note Color 1 Specifies the color of pads used for PAD MODE NOTE performance PAD OCT Color Specifies the color of pads used for PAD MODE NOTE octave Play Cli...

Page 19: ...d command Saving a Project Here s how to save the project to the SD card 1 Press the PROJECT button MEMO You can also save by holding down the SHIFT button and pressing the FUNC button 2 Use the Cursor buttons to select WRITE and then press the ENTER button The PROJECT NAME screen appears 3 Use the cursor buttons to edit the project name Operating the Unit Explanation Cursor buttons Selects the ch...

Page 20: ... use the cursor buttons to select CANCEL and then press the ENTER button MEMO You can also execute by pressing the C4 knob once again 5 With the track that you want to delete selected press the ENTER button The TRACK TYPE SELECT screen appears 6 Use the cursor buttons to select type and then press the ENTER button The track is created and you return to the home screen Making Track Settings 1 Hold ...

Page 21: ...igh frequency range EQ High Frequency 20 16000 Hz Frequency of the high range MIDI tab Here you can switch on off the output of MIDI messages from the sequencer to each port Parameter Value Explanation TX MIDI OUT1 OFF ON Enables output to the rear panel MIDI OUT 1 connector TX MIDI OUT2 OFF ON Enables output to the rear panel MIDI OUT 2 connector Tx USB MIDI OFF ON Enables output to the rear pane...

Page 22: ...in to clear Changing a pad s color Making Project Settings p 18 Using Clip Mode When you press the PAD MODE button CLIP the pads switch to Clip mode This mode lets you use the pads to play stop clips Switching Clips Of the 16 lines in track the pads show two adjacent lines You can use the 1 16 buttons to switch the lines that are shown 1 9 2 10 3 11 4 12 5 13 6 14 7 15 8 16 1 Press the PAD MODE CL...

Page 23: ... button and press the NOTE button The NOTE MODE SETTING screen appears PAD tab These are settings related to pad performance Parameter Value Explanation OCTAVE 5 5 Specifies the octave for pad performance TRANSPOSE 6 6 Specifies the key transpose for pad performance PAD VELO LINEAR EXP LOG FIX10 127 Specifies the velocity sensitivity of the pads You can also specify a fixed value TR REC tab Parame...

Page 24: ...de is selected Using the Pads to Apply the Effect 1 Press a pad The effect is applied while you hold down the pad The effect differs for each pad When you take your hand off the pad it returns to the previous state Using the SCATTER Button to Apply the Effect 1 While in Scatter mode press the SCATTER button Step mode is selected While you hold down the SCATTER button the effects specified for the ...

Page 25: ...olumn at right ALL Show all ALPHA Sort in alphabetical order TRACK 1 8 Filter by track Shows the clips 3 Select a clip Use the cursor buttons to move between items PROJECT SOURCE CLIP 4 Press the ENTER button The clip is imported and you return to the home screen MEMO 5 5 You can t import a clip of a different track type 5 5 If you want to use the sound of the import source clip in a tone or drum ...

Page 26: ...whose sound you want to change If you re in Clip mode select a clip 2 Press the SOUND button The menu screen appears 3 Use the cursor buttons to select PROJECT and then press the ENTER button Now you can use the sound browser Shows the projects Sorts or filters the clips in the right column ALL Show all TRACK 1 8 Show only the selected track of the project Lists the sounds samples When you press t...

Page 27: ...epends on the track type TONE track DRUM track kit DRUM track INST LOOPER track Loading a preset sound PRESET Loading a sound from a project on the SD card PROJECT Loading a sample from a project on the SD card PROJECT Loading a sample file from the SD card WAVE FILE ...

Page 28: ... input for the specified pitch Changing the Measure Settings 1 Hold down the SHIFT button and press the MEASURE button The MEASURE EDIT screen appears In the MEASURE EDIT screen you can make settings for the clip s notes Parameter Value Explanation STEP LEN 1 128 Specifies the length of the clip SCALE 1 8 1 16 1 32 1 4T 1 8T 1 16T Specifies the resolution of the clip 1 8 eighth notes 1 16 sixteent...

Page 29: ...VENT NOTE Specifies the note C2 knob VELOCITY Adjusts the velocity C3 knob START Adjusts the start timing of the note C4 knob LENGTH Specifies the length of the note If the same note exists at the distance to which the note was extended it cannot be extended further MOTION tab Here you can make settings related to Motion Parameter Value Explanation FILTER OFF 0 127 Adjust the motion value for each...

Page 30: ...127 MOD FX Tab Parameter Explanation Controller NOTE 1 2 tab VEL Adjusts the velocity C1 knob START Adjusts the timing at which the start note begins C2 knob MUTE Adjusts the probability that a mute note will sound C3 knob SUB STEP Specifies a sub step C4 knob NOTE 2 2 tab END Specifies the end timing of the end note C1 knob By holding down the CLEAR button and pressing the currently selected step...

Page 31: ...g the First Step you can make a mid way step play as the first step 1 Press the PAD MODE NOTE button The pads are in Note mode 2 Hold down the SHIFT button and press the MOTION REC button Step Setting mode is selected 3 Hold down the SHIFT button and press the step button that you want to specify as the First Step The First Step is specified the First Step is lit orange and the playback region is ...

Page 32: ...ording 1 Hold down the SHIFT button and press the INPUT button 2 Select the audio source that you want to record Audio source to record Explanation EXT Record audio from the EXT IN jacks If you pressed the INPUT button to make it light turn the VALUE dial to adjust the volume PC If the input from a USB connected computer is assigned to the MC 707 s PC IN you can record from it Switch the USB outpu...

Page 33: ...antize During Recording 1 Press the QUANTIZE button Quantization is switched on off Specifying Playback Quantization 1 Hold down the SHIFT button and press the QUANTIZE button The QUANTIZE SETTING screen appears MEMO You can also access the QUANTIZE SETTING screen by long pressing the QUANTIZE button Parameter Value Explanation INPUT QTZ INPUT QUANTIZE OFF ON Specifies whether quantization is appl...

Page 34: ...ton Deleting the Motion of a Specific Knob 1 While holding down the MOTION ON button turn the knob whose Motion you want to delete The Motion of the specified knob is deleted Editing Motion In the EDIT STEP screen you can edit the Motion for each step 1 While holding down the SHIFT button press a step button The EDIT STEP screen appears 2 Press the cursor button to select the MOTION tab Step 3 Use...

Page 35: ...DESIGNER you can input Motion data that changes smoothly in time This function is a convenient way to create effects such as ducking side chain 1 Select the Motion that you want to edit Switching the Motion that s edited or viewed by the step buttons p 34 2 In the EDIT STEP screen press the FUNC button The screen indicates UTILITY MOTION DESIGNER 3 Use the C1 C4 knobs to adjust the parameters that...

Page 36: ...bination of playback clips The scene is applied at the next timing interval of the master clock By holding down the SHIFT button and pressing a SCENE 1 4 button you can recall SCENE 5 8 Storing a Scene By long pressing a SCENE button you can store the current combination of playback clips By holding down the SHIFT button and long pressing a SCENE 1 4 button you can store to SCENE 5 8 Saving and Re...

Page 37: ...END EFFECTS EDIT screen appears Edit the parameters of the selected effect Total Effect Parameters p 80 Use the cursor buttons to select the effect that you want to edit Turn the effect on off and select the type of the effect that you want to use Use the cursor keys to select the check box located beside the effect name and press ENTER to add a symbol For details refer to Total Effect Parameters ...

Page 38: ...screen appears C D E A B A PAD You can use the C1 C4 knobs to edit the parameters shown in the bottom of the screen Press the FUNC button to switch between parameters to edit Parameter Value Explanation GRAIN Default 1 16 Modifies the grain played for each step and the timing at which it plays HOLD OFF x1 x16 Repeatedly plays the range of steps specified by SIZE for the specified number of times R...

Page 39: ...k of another step you can turn this ON so that the step whose timing overlaps is muted However the step for which this is turned ON is not muted 1 ORANGE YELLOW GREEN BLUE PURPLE PINK WHITE SKYBLUE P YELLOW P BLUE P PINK L RED L ORANGE L YELLOW L GREEN P GREEN L SKYBLUE L BLUE L PURPLE REVERSE Parameter Value Explanation SIZE 1 16 Specifies the range of steps to which the effect is applied MUTE OF...

Page 40: ...e operation of ATK TIME resulting in silence GRAIN Parameter Value Explanation GRAIN Default 1 16 Lets you change the grains played back by each step Editing MFX Edit the parameters of the selected effect MFX IFX Parameters p 84 Turn the effect on off and select the type of effect to use To turn the effect on add a symbol to the check box located beside the effect name Parameter Explanation MFX Ty...

Page 41: ... PCM Sync Sound is produced by the wave specified by the PCM Sync Wave Number SuperSAW Sound is produced by SuperSAW Noise White noise is produced Parameter Value Explanation GROUP TYPE Wave Group Type INT SAMP INT When OSC TYPE is PCM the internal waveforms of the MC 707 are used SAMP When OSC TYPE is PCM the waveforms loaded into the project are used BANK Wave Bank A B C Specifies the bank A C t...

Page 42: ... wave RND Random wave TRP Trapezoidal wave S H Sample and Hold wave changes the LFO value once every cycle CHS Sine wave modified by a VSIN chaos wave The amplitude of a sine wave is randomly changed once every cycle VSIN Modified sine wave The amplitude of the sine wave is randomly varied once every cycle STEP A waveform generated from data specified by LFO Step 1 16 This produces a fixed pattern...

Page 43: ...s internally with the 12 dB setting If you specify 24 dB the simultaneous polyphony will be less than when 12 dB is selected AMP Here you can make amp envelope settings Parameter Value Explanation ATTACK T1 0 1023 Specifies the time over which the initial value changes to the maximum value after the key is pressed DECAY T3 0 1023 Specifies the time over which the SUSTAIN value is reached following...

Page 44: ...responding partial on off For details refer to Parameter List p 61 UTILITY window Here you can copy or initialize a partial You can also initialize a tone 1 Press the FUNC button The UTILITY screen appears 2 Use the cursor buttons to switch menu items Menu Explanation PARTIAL COPY Copies a partial Use the C1 C4 knobs to make settings and press the ENTER button to execute PARTIAL INITIALIZE Initial...

Page 45: ...tton to access the pad edit menu Here you can exchange or edit sounds You can use the C1 C4 knobs to perform simple editing of the sound B COMP DRUM COMP track only If you select COMP and then press the ENTER button the compressor setting screen appears Six channels of compressors can be applied to one and only one of the drum tracks When you create the track specify whether it will have these com...

Page 46: ...parameter that you want to edit Use the cursor buttons or the C1 C2 knobs to switch categories Use the cursor buttons or the C3 knob to select the parameter that you want to edit and use the C4 knob to edit the value Parameter List p 61 If sample is selected as the WAVE GROUP TYPE you can move the cursor to Wave Number and press the ENTER button to edit the waveform Editing a Sample SAMPLE EDIT He...

Page 47: ...ttings 1 Use the cursor buttons to select PAD EDIT and then press the ENTER button The DRUM PAD SETTING screen appears Pad settings are maintained even if you change instruments EQ tab Here you can make EQ settings for the pad For details refer to Drum Kit Tone Parameters Drum PAD EQ p 75 CTRL tab Here you can edit the control parameters For details refer to Drum Kit Tone Parameters Drum PAD CTRL ...

Page 48: ...rove the audio quality If an unnatural impression results when pitch shift or time stretch is used to create a large amount of change lowering this value might improve the result Reverse OFF ON OFF The sample plays forward ON The sample plays backward PITCH tab Parameter Value Explanation Pitch Chromatic 24 24 Specifies the pitch in semitone steps maximum 2 octaves This setting can also be made in...

Page 49: ...lue Explanation MFX Type Turns MFX on off and selects the type of MFX that is used To turn MFX on add a symbol to the check box located beside the effect name MFX IFX Parameters p 84 MFX parameters Edit the parameters of the selected MFX MFX IFX Parameters p 84 Level 0 127 Specifies the MFX output volume Specifies the MFX depth when applying MFX or specifies the volume of the original sound when n...

Page 50: ...y Bend Mute OFF MUTE Disables bend Tone only Step Length 1 128 Specifies the length of the clip Parameter Value Explanation Scale 1 8 1 16 1 32 1 4T 1 8T 1 16T Specifies the step resolution 1 8 eighth notes 1 16 sixteenth notes 1 32 thirty second notes 1 4T quarter note triplets 1 8T eighth note triplets 1 16T sixteenth notes triplets Direction FWD REV FWD REV INV RND Specifies how the sequence pl...

Page 51: ...y Specifies the time from when the attack is completed until the volume decays Larger values lengthen the time over which the volume decays and smaller values shorten the time Release Tone Drum only Specifies the time from when the key is released until the sound becomes inaudible Larger values produce a longer decay and smaller values make the sound crisper Vib Rate Tone only Adjusts the vibrato ...

Page 52: ...E and STEP LENGTH Master Clock Settings 1 Hold down the SHIFT button and press the TEMPO button Parameter Value Explanation TEMPO 40 00 300 00 This is the tempo of the entire project In this page you can also use the VALUE dial to change the tempo SCALE 1 8 1 16 1 32 1 4T 1 8T 1 16T Specifies the resolution 1 8 eighth notes 1 16 sixteenth notes 1 32 thirty second notes 1 4T quarter note triplets 1...

Page 53: ...evice to the SEND RETURN jacks and use it as part of the MC 707 s effects 1 Connect your effect unit to the SEND RETURN jacks External Effect 2 Hold down the SHIFT button and press the INPUT button The input output settings are displayed 3 Use the cursor buttons to select the SEND RETURN tabs and make settings Parameter Value Explanation SEND tab POS OFF PC TRACK1 8 DELAY REVERB SCATTER MIXOUT Spe...

Page 54: ...planation MIDI Sync AUTO INT MIDI USB Specifies the tempo source If this is AUTO the tempo automatically synchronizes to MIDI clock if MIDI clock is being input via the MIDI IN connector or the USB port If this is INT the tempo specified on the MC 707 is used MIDI Sync Out1 MIDI Sync Out2 OFF ON Specifies whether clock start and stop messages are transmitted ON or are not transmitted OFF to the de...

Page 55: ...de to cancel use the cursor buttons to select CANCEL and then press the ENTER button 4 As directed in the screen turn the power off and then on again Optimizing the Internal Memory LOOPER OPTIMIZE As samples are loaded into the looper and then deleted the free space in memory can become fragmented so that the available space cannot be used efficiently By using Looper Optimize you can optimize the ...

Page 56: ...age mode 1 Make sure that the USB cable is not inserted in the MC 707 2 Hold down the SHIFT button and press the KNOB ASSIGN button The UTILITY MENU screen appears 3 Use the cursor buttons to select STORAGE MODE and then press the ENTER button The MC 707 is now in Storage mode 4 Insert the USB cable and connect it to your computer 5 Before disconnecting use your computer to perform the appropriate...

Page 57: ...ip setting screen In the home screen select the clip for which you want to make settings then hold down the SHIFT button and Press the CLIP button below the C2 knob To access the clip sequence setting screen Press the MEASURE or button Adjusting the Mix Sound Operation Operation To adjust the volume of the sound Hold down the SEL button of the corresponding track and Turn the C1 knob To adjust the...

Page 58: ...ller Values and Parameter Editing Operation Operation To specify the parameter operated by the total effect knobs Hold down the REVERB DELAY or MULTI button that you want to assign and Turn the FX PRM or FX DEPTH knob To view the value of a knob Hold down the SHIFT button and Move the knob To change the parameter value more greatly Turn the C1 C2 C3 C4 knob or the VALUE knob To adjust the pad velo...

Page 59: ...w Playing Please Stop the Sequencer This operation cannot be executed because playback is in progress Stop playback and then execute the operation Abort File can t open The wave file could not be opened The file or SD card that you attempted to load might be damaged Abort File format error The sample file format is not supported by the MC 707 The MC 707 supports 32 96 kHz 16 bit and 24 bit mono st...

Page 60: ... 707 can transmit and receive MIDI clock F8 to synchronize its tempo MC 707 Computer USB MIDI IN USB MIDI OUT Synchronizing with a TR 8S The MC 707 can synchronize with a TR 8s by connecting the units via a commercially available MIDI cable TR 8S MIDI OUT MIDI IN MC 707 ...

Page 61: ...ch is turned ON When you press the next key while still holding down the previous key legato performance the pitch changes smoothly The way in which the change occurs depends on the Legato Retrigger Interval Parameter Value Explanation Legato Retrigger Interval 0 12 OFF When LegatoSwitch is enabled and you play legato this specifies whether retriggering occurs 0 12 or does not occur OFF If this is...

Page 62: ...analog synthesizer The partial 1 oscillator is reset at intervals of partial 2 s pitch cycle This is effective only if OSC Type is VirtualAnalog or PCM Sync RING Implements the ring modulator function that is provided by an analog synthesizer The output sound of partial 2 is multiplied with partial 1 XMOD XMOD2 Implements the cross modulation function that is provided by an analog synthesizer The ...

Page 63: ...to the playing velocity and the Velocity Range Lower Upper and Velocity Fade Lower Upper settings 5 5 If this is RANDOM or CYCLE each partial is sounded randomly or cyclically 5 5 In the case of RANDOM or CYCLE when Structure 1 2 3 4 has a setting other than OFF partials 1 and 2 3 and 4 are sounded as a pair either randomly or in alternation 5 5 In the case of RANDOM or CYCLE velocity has no effec...

Page 64: ...Level ASSIGN 0 127 Specifies the send level to delay Rev Send Reverb Send Level ASSIGN 0 127 Specifies the send level to reverb Coarse Tune ASSIGN 48 48 Shifts the pitch in units of a semitone Fine Tune ASSIGN 50 50 Finely adjusts the pitch in units of one cent Mono Poly MONO POLY TONE Choose MONO if you want the tone assigned to the part to play monophonically choose POLY if you want to play it p...

Page 65: ... Brs Ens Brs Wind Flute Sax Recorder Vox Scat Syn Lead Syn Brs Syn Pad Bell Pad Poly Key Syn FX Syn Seq Phrase Pulse Beat Grv Hit Sound FX Drums Perc Stack Zone Selects the category of the tone OSC Parameter Value Explanation OSC Type Specifies the oscillator type PCM PCM is used The wave of the number specified by the Wave Group and Wave Number L R is used VA A numerically calculated analog model...

Page 66: ...apsed Note off Delay time Note on No Partial Delay HOLD Although the partial begins to play after the time specified in the Partial Delay Time parameter has elapsed if the key is released before the time specified in the Partial Delay Time parameter has elapsed the partial is not played Note off Delay time Note on No sound played KEY OFF NORMAL Rather than being played while the key is pressed the...

Page 67: ...t it to be slowed down set this to a negative value Time Keyfollow 100 100 Use this setting if you want the pitch envelope times Time 2 Time 4 to be affected by the keyboard location Based on the pitch envelope times for the C4 key positive value will cause notes higher than C4 to have increasingly shorter times and negative value will cause them to have increasingly longer times Higher values wil...

Page 68: ...quency of the 6 dB high pass filter This parameter is effective when Filter Type is VCF Parameter Value Explanation Cutoff 0 1023 Selects the frequency at which the filter begins to have an effect on the waveform s frequency components With LPF LPF2 LPF3 selected for the TVF Filter Type parameter lower cutoff frequency settings reduce a tone s upper harmonics for a more rounded warmer sound Higher...

Page 69: ...pe Switch is ON only Level 3 Sustain has an effect AMP Parameter Value Explanation Level 0 127 Sets the volume of the partial This setting is useful primarily for adjusting the volume balance between partials Velocity Curve FIXED 1 7 Selects one of the following seven curves that determine how keyboard dynamics will affect the volume Set this to FIXED if you don t want the volume of the partial to...

Page 70: ...e per cycle LFO value is changed CHS Chaos wave VSIN Modified sine wave The amplitude of a sine wave is randomly varied once each cycle STEP A waveform generated by the data specified by LFO Step 1 16 This produces stepped change with a fixed pattern similar to a step modulator Tempo Sync Sw LFO1 LFO2 OFF Set this ON if you want the LFO rate to synchronize with the tempo ON Rate Note LFO1 LFO2 1 6...

Page 71: ...yclically change the location of the sound image Phase Position LFO1 LFO2 Specifies the LFO s starting phase value when Key Trigger is ON This has no effect if Waveform is RND S H or CHS 0 1 cycle 1 1 4 cycle 2 1 2 cycle 3 3 4 cycle STEP LFO1 STEP LFO2 Parameter Value Explanation Step Length LFO1 LFO2 1 16 This is effective if Waveform is STEP Specifies the step size that is looped Step 1 16 LFO1 ...

Page 72: ... be output Chorus Level Send 0 127 Specifies the level of the signal sent to the chorus for each partial Reverb Level Send 0 127 Specifies the level of the signal sent to the reverb for each partial CONTROL Parameter Value Explanation Envelope Mode NO SUS SUSTAIN If this is set to SUSTAIN the Envelope Level 3 is held from when the envelope Time 3 has elapsed until note off When note off occurs the...

Page 73: ... a part confirm that any MIDI messages used for the Matrix Control will be received If the MC 707 is set up such that reception of MIDI messages is disabled then the Matrix Control will not function Destination 1 4 MATRIX CONTROL 1 4 Selects the partial parameter that is to be controlled when using the Matrix Control The following parameters can be controlled When not controlling parameters with t...

Page 74: ...n the type of the effects you selected in MFX Type MFX IFX Parameters p 84 MFX CTRL Parameter Value Explanation Control 1 4 Source Specifies the MIDI message that will control the corresponding MFX CONTROL parameter OFF MFX will not be used CC01 31 Controller number 1 31 CC33 95 Controller number 33 95 BEND Pitch Bend AFT Aftertouch SYS CTRL1 4 Use the controller that is assigned by the System Con...

Page 75: ...63R Adjusts the stereo location of the key Delay Send Level 0 127 Adjusts the amount of delay for each key Reveb Send Level 0 127 Adjusts the amount of reverb for each key Mute Group OFF 1 31 On an actual acoustic drum set an open hi hat and a closed hi hat sound can never occur simultaneously To reproduce the reality of this situation you can set up a Mute Group The Mute Group function allows you...

Page 76: ...rtial to change depending on the force with which you press the keys Set this to a positive value to have the changes in partial volume increase the more forcefully the keys are played to make the partial play more softly as you play harder set this to a negative value INST WAVE Parameter Value Explanation Wave Group Type INT When OSC TYPE is set to PCM the waveforms built into the MC 707 are used...

Page 77: ... Velocity Range Low 1 127 Specifies the lower limit Lower and upper limit Upper of the velocities that will sound the Wave Make these settings when you want to play different Waves depending on your keyboard dynamics Velocity Range Up 1 127 Velocity Fade Low 0 127 Specifies the degree to which the Wave is sounded by notes played more softly than Velocity Range Low If you don t want the tone to sou...

Page 78: ...on t want the Cutoff frequency to be affected by the keyboard velocity 1 2 3 4 5 6 7 Cutoff Velocity Sens 100 100 Use this parameter when changing the cutoff frequency to be applied as a result of changes in playing velocity Specify a positive value if you want the cutoff frequency to raise when you play strongly or a negative value if you want it to lower Parameter Value Explanation Resonance 0 1...

Page 79: ... 4 If you want Time 4 to be speeded up for quickly released notes set this parameter to a positive value If you want it to be slowed down set this to a negative value Env Time 1 4 0 1023 Specify the AMP envelope times Time 1 Time 4 Higher settings lengthen the time until the next volume level is reached For example Time 2 is the time over which Level 1 will change to Level 2 Env Level 1 3 0 1023 S...

Page 80: ... the frequency at which the low frequency band LOW and mid frequency band MID are divided Split Freq Hi Specifies the frequency at which the high frequency band HIGH and mid frequency band MID are divided EQ Parameter Value Explanation Switch OFF ON Specifies whether the master EQ an equalizer applied to the entire sound generator of the MC 707 is used ON or not used OFF EQ Input Gain 24 24 dB Adj...

Page 81: ...l 0 127 Volume of the noise produced by chorus DELAY This is a stereo delay Parameter Value Explanation Delay sync sw OFF ON If this is ON the delay synchronizes with the tempo Delay msec Delay note 1 1300 msec Adjusts the delay time from the direct sound until the delay sound is heard Note Note p 120 Feedback 98 98 Adjusts the proportion of the delay sound that is fed back into the effect Negativ...

Page 82: ...s the types of reverb Reverb Switch OFF ON Switches the reverb on off Reverb Level 0 127 Specifies the output level of the sound with reverb applied Reverb Parameters Edit the parameters of the selected reverb type The available parameters differ depending on the type of reverb you selected in Reverb Type Reverb Parameters INTEGRA Parameter Value Explanation Type 01 ROOM1 02 ROOM2 03 HALL1 04 HALL...

Page 83: ...sts the density of the early reflections ER Level 0 99 Adjusts the volume of the early reflections EQ Low Freq 0 04 1 00 kHz Frequency of the low range EQ Low Gain 24 12 dB Gain of the low frequency range EQ Mid Freq 0 25 9 99 kHz Adjusts the amount of mid frequency boost cut EQ Mid Gain 24 12 dB Specifies the reference frequency of the mid frequency range EQ Mid Q 0 2 9 0 Specifies the width of t...

Page 84: ...i effects 45 LOFI Compress page 102 46 Bit Crusher page 102 Pitch effects 47 Pitch Shifter page 102 48 2Voice Pitch Shifter page 103 Combination effects 49 Overdrive 0 Chorus page 103 50 Overdrive 0 Flanger page 103 51 Overdrive 0 Dalay page 104 52 Distortion 0 Chorus page 104 53 Distortion 0 Flanger page 104 54 Distortion 0 Delay page 104 55 OD DS 0TouchWah page 105 56 OD DS 0 AutoWah page 105 57...

Page 85: ...150 4000 5000 6300 8000 Hz Frequency of the middle range 2 Mid2 Gain 15 15 dB Gain of the middle range 2 Mid2 Q 0 5 1 0 2 0 4 0 8 0 Width of the middle range 2 Set a higher value to narrow the range to be affected High Freq High Frequency 2000 2500 3150 4000 5000 6300 8000 10000 12500 16000 Hz Frequency of the high range High Gain 15 15 dB Gain of the high range Level 0 127 Output Level 02 Spectru...

Page 86: ...equency 50 56 63 71 80 90 100 112 125 Hz Center frequency at which the lower range will be boosted Boost Gain 0 12 dB Center frequency at which the lower range will be boosted Boost Width WIDE MID NARROW Width of the lower range that will be boosted Low Gain 15 15 dB Gain of the low range High Gain 15 15 dB Gain of the high range Level 0 127 Output Level 05 Super Filter This is a filter with an ex...

Page 87: ...EQ 2 Band EQ Enhancer Enhancer Mix Mix Parameter Value Explanation Sens 0 127 Sensitivity of the enhancer Mix 0 127 Level of the overtones generated by the enhancer Low Gain 15 15 dB Gain of the low range High Gain 15 15 dB Gain of the high range Level 0 127 Output Level 08 Auto Wah Cyclically controls a filter to create cyclic change in timbre L in L out R out R in Auto Wah Auto Wah 2 Band EQ 2 B...

Page 88: ...mulator Simulates the speaker type and microphone settings used to record the speaker sound L in L out R out R in Speaker Speaker Speaker Speaker Parameter Value Explanation Speaker Type Cabinet Diameter in inches and number of the speaker Microphone SMALL 1 Small open back enclosure 10 Dynamic SMALL 2 Small open back enclosure 10 Dynamic MIDDLE Open back enclosure 12 x 1 Dynamic JC 120 Open back ...

Page 89: ...mount of feedback Cross Feedback 98 98 Adjusts the proportion of the phaser sound that is fed back into the effect Negative settings will invert the phase Mix 0 127 Level of the phase shifted sound Low Gain 15 15 dB Gain of the low range High Gain 15 15 dB Gain of the high range Level 0 127 Output Level 12 Phaser 2 This simulates an analog phaser of the past It is particularly suitable for electri...

Page 90: ... sync sw OFF ON If this is ON the rate synchronizes with the tempo of the rhythm TEMPO p 52 Parameter Value Explanation Rate Hz 0 05 10 00 Hz Modulation rate Rate note Note Note p 120 Depth 0 127 Depth of modulation Resonance 0 127 Amount of feedback Mix 0 127 Level of the phase shifted sound Pan L64 63R Stereo location of the output sound Low Gain 15 15 dB Gain of the low range High Gain 15 15 dB...

Page 91: ... 15 15 dB Gain of the high range Level 0 127 Output Level 20 Slicer By applying successive cuts to the sound this effect turns a conventional sound into a sound that appears to be played as a backing phrase This is especially effective when applied to sustain type sounds L in L out R out R in Slicer Slicer Slicer Slicer Parameter Value Explanation Step 01 16 0 127 Level at each step Rate sync sw O...

Page 92: ...y speaker with the low end boosted further This effect features the same specifications as the VK 7 s built in rotary speaker L in R in Rotary Rotary L out R out 2 Band EQ 2 Band EQ 2 Band EQ 2 Band EQ Parameter Value Explanation Speed SLOW FAST Rotational speed of the rotating speaker SLOW Slow FAST Fast Brake OFF ON Switches the rotation of the rotary speaker When this is turned on the rotation ...

Page 93: ...e LFO has the same phase for left and right It produces a metallic resonance that rises and falls like a jet airplane taking off or landing A filter is provided so that you can adjust the timbre of the flanged sound R out L out 2 Band EQ 2 Band EQ 2 Band EQ 2 Band EQ Balance W Balance W Feedback Feedback Balance D Balance D L in Flanger Flanger Flanger Flanger R in Parameter Value Explanation Filt...

Page 94: ...N If this is ON the rate synchronizes with the tempo of the rhythm TEMPO p 52 Step Rate Hz 0 10 20 00 Hz Rate period of pitch change Step Rate note Note Note p 120 Low Gain 15 15 dB Gain of the low range High Gain 15 15 dB Gain of the high range Balance D100 0W D0 100W Volume balance between the direct sound D and the flanger sound W Level 0 127 Output Level 26 Hexa Chorus Uses a six phase chorus ...

Page 95: ...with the tempo of the rhythm TEMPO p 52 Rate Hz 0 05 10 00 Hz Frequency of modulation Rate note Note Note p 120 Depth 0 127 Depth of modulation Phase 0 180 deg Spatial spread of the sound Low Gain 15 15 dB Gain of the low range High Gain 15 15 dB Gain of the high range Balance D100 0W D0 100W Volume balance between the direct sound D and the chorus sound W Level 0 127 Output Level 29 Overdrive Thi...

Page 96: ... sound input to Input I on a Marshall 1959 This is a trebly sound suited to hard rock MS1959II This models the sound input to Input II on a Marshall 1959 MS1959I II This models the sound of connecting inputs I and II on a Marshall 1959 in parallel lt creates a sound with a stronger low end than I SLDN LEAD This models a Soldano SLO 100 This is the typical sound of the eighties METAL 5150 This mode...

Page 97: ...d Level 0 127 Output Level 33 Compressor Flattens out high levels and boosts low levels smoothing out fluctuations in volume L in L out R out R in Compressor Compressor 2 Band EQ 2 Band EQ Compressor Compressor 2 Band EQ 2 Band EQ Parameter Value Explanation Attack 0 124 Sets the time from when the input exceeds the Threshold until the volume starts being compressed Release 0 124 Adjusts the time ...

Page 98: ...ld time Balance D100 0W D0 100W Volume balance between the direct sound D and the effect sound W Level 0 127 Output Level 37 Delay This is a stereo delay When Feedback Mode is NORMAL R out L out 2 Band EQ 2 Band EQ 2 Band EQ 2 Band EQ Balance W Balance W Feedback Feedback Balance D Balance D L in Delay Delay Delay Delay R in When Feedback Mode is CROSS R out L out 2 Band EQ 2 Band EQ 2 Band EQ 2 B...

Page 99: ...h of modulation Phase 0 180 deg Spatial spread of the sound Low Gain 15 15 dB Gain of the low range High Gain 15 15 dB Gain of the high range Balance D100 0W D0 100W Volume balance between the direct sound D and the delay sound W Level 0 127 Output Level 39 3Tap Pan Delay Produces three delay sounds center left and right R out L out 2 Band EQ 2 Band EQ 2 Band EQ 2 Band EQ Balance W Center Tap Bala...

Page 100: ...of the Delay Time parameters can be set to a note length based on the selected tempo You can also set the panning and level of each delay sound R out L out Balance W Balance W Balance D L in Multi Tap Delay Multi Tap Delay 2 Band EQ 2 Band EQ 2 Band EQ 2 Band EQ Balance D Delay 1 Feedback Delay 2 Delay 3 Delay 4 R in Parameter Value Explanation Delay 1 Time sync sw OFF ON If this is ON the rate sy...

Page 101: ...ut into the tap delay until the delay sound is heard Delay 3 Time note Note Note p 120 Delay 3 Feedback 98 98 Proportion of the delay sound that is to be returned to the input of the tap delay negative values invert the phase Delay HF Damp 200 250 315 400 500 630 800 1000 1250 1600 2000 2500 3150 4000 5000 6300 8000 BYPASS Hz Frequency at which the hi frequency content of the tap delay sound will ...

Page 102: ...is increased Post Filter Type OFF LPF HPF Selects the type of filter applied to the sound after it passes through the Lo Fi effect OFF No filter is used LPF Cuts the frequency range above the Cutoff Freq HPF Cuts the frequency range below the Cutoff Freq Parameter Value Explanation Post Filter Cutoff 200 250 315 400 500 630 800 1000 1250 1600 2000 2500 3150 4000 5000 6300 8000 Hz Basic frequency o...

Page 103: ...0 127 Output Level 49 Overdrive 0 Chorus L in R in Overdrive Overdrive Chorus Chorus L out R out Balance W Balance W Balance D Balance D Parameter Value Explanation Overdrive Drive 0 127 Degree of distortion Also changes the volume Overdrive Pan L64 63R Stereo location of the overdrive sound Chorus Pre Delay 0 0 100 msec Adjusts the delay time from the direct sound until the chorus sound is heard ...

Page 104: ...us D Level 0 127 Output Level 53 Distortion 0 Flanger L out R out Flanger Flanger Balance W Feedback Balance W Balance D Balance D Distortion Distortion L in R in Parameter Value Explanation Distortion Drive 0 127 Degree of distortion Also changes the volume Distortion Pan L64 63R Stereo location of the overdrive sound Flanger Pre Delay 0 0 100 msec Adjusts the delay time from the direct sound unt...

Page 105: ... Gain 15 15 dB Gain of the low range High Gain 15 15 dB Gain of the high range Level 0 127 Output Level 56 OD DS 0 AutoWah Auto Wah Auto Wah Overdrive Distortion Overdrive Distortion Amp Simulator Amp Simulator 2 Band EQ 2 Band EQ L out R out Pan L Pan R L in R in Parameter Value Explanation Drive Switch OFF ON Turns overdrive distortion on off Drive Type OVERDRIVE DISTORTION Type of distortion Dr...

Page 106: ... Amp Volume 0 127 Volume and amount of distortion of the amp Pre Amp Master 0 127 Volume of the entire pre amp Pre Amp Gain LOW MIDDLE HIGH Amount of pre amp distortion Pre Amp Bass 0 127 Tone of the bass mid treble frequency range Pre Amp Middle 0 127 Pre Amp Treble 0 127 Parameter Value Explanation Speaker Sw OFF ON Selects whether the sound will be sent through the speaker ON or not OFF Speaker...

Page 107: ... Master 0 127 Volume of the entire pre amp Pre Amp Gain LOW MIDDLE HIGH Amount of pre amp distortion Pre Amp Bass 0 127 Tone of the bass mid treble frequency range Pre Amp Middle 0 127 Pre Amp Treble 0 127 Parameter Value Explanation Speaker Sw OFF ON Determines whether the signal passes through the speaker ON or not OFF Speaker Type Cabinet Diameter in inches and number of the speaker Microphone ...

Page 108: ...ZZ A fuzz sound with rich harmonic content Pre Amp Volume 0 127 Volume and amount of distortion of the amp Pre Amp Master 0 127 Volume of the entire pre amp Pre Amp Gain LOW MIDDLE HIGH Amount of pre amp distortion Pre Amp Bass 0 127 Tone of the bass mid treble frequency range Pre Amp Middle 0 127 Pre Amp Treble 0 127 Parameter Value Explanation Speaker Sw OFF ON Determines whether the signal pass...

Page 109: ...Pre Amp Gain LOW MIDDLE HIGH Amount of pre amp distortion Pre Amp Bass 0 127 Tone of the bass mid treble frequency range Pre Amp Middle 0 127 Pre Amp Treble 0 127 Parameter Value Explanation Speaker Sw OFF ON Determines whether the signal passes through the speaker ON or not OFF Speaker Type Cabinet Diameter in inches and number of the speaker Microphone SMALL 1 Small open back enclosure 10 Dynami...

Page 110: ...z Frequency of modulation Chorus Rate note Note Note p 120 Chorus Depth 0 127 Depth of modulation Parameter Value Explanation Chorus Balance D100 0W D0 100W Adjusts the volume balance between the sound that is sent through the chorus W and the sound that is not sent through the chorus D Speaker Type LINE OLD NEW WURLY TWIN Type of speaker If LINE is selected the sound will not be sent through the ...

Page 111: ...en the original sound is heard to when the delay sound is heard Delay Time note Note Note p 120 Parameter Value Explanation Delay Accel 0 15 Speed at which the current delay time changes to the specified delay time when you change the delay time This affects the speed of pitch change as well as the delay time Delay Feedback 98 98 Adjusts the proportion of the delay sound that is fed back into the ...

Page 112: ... Negative settings will invert the phase Delay HF Damp 200 250 315 400 500 630 800 1000 1250 1600 2000 2500 3150 4000 5000 6300 8000 BYPASS Hz Adjusts the frequency above which the delay sound fed back to the effect is filtered out BYPASS no cut Delay Balance D100 0W D0 100W Adjusts the volume balance between the sound that is sent through the delay W and the sound that is not sent through the del...

Page 113: ...el 0 127 Output Level 71 Chorus 0 Flanger L out R out Balance D Flanger Flanger Balance D Balance W Balance W Feedback Balance D Chorus Chorus Balance W Balance W Balance D L in R in Parameter Value Explanation Chorus Pre Delay 0 0 100 msec Adjusts the delay time from the direct sound until the chorus sound is heard Chorus Rate sync sw OFF ON If this is ON the rate synchronizes with the tempo of t...

Page 114: ... Roland s DIMENSION D SDD 320 It provides a clear chorus sound L in L out R out R in SDD 320 SDD 320 2 Band EQ 2 Band EQ 2 Band EQ 2 Band EQ Parameter Value Explanation Mode 1 2 3 4 1 4 2 4 3 4 Switches the mode Low Gain 15 15 dB Gain of the low range High Gain 15 15 dB Gain of the high range Level 0 127 Output Level 75 2Tap Pan Delay R out L out Balance W Balance W Balance D Balance D L in Double...

Page 115: ...Set a higher value to narrow the range to be affected M Mid3 Frequency 200 250 315 400 500 630 800 1000 1250 1600 2000 2500 3150 4000 5000 6300 8000 Hz Frequency of the middle range 3 M Mid3 Gain 12 00 12 00 dB Gain of the middle range 3 M Mid3 Q 0 5 1 0 2 0 4 0 8 0 Width of the middle range 3 Set a higher value to narrow the range to be affected Parameter Value Explanation M High Frequency 2000 2...

Page 116: ...e distortion adding overtones to give more depth to the sound L out L in Odd Overtone Generator Odd Overtone Generator Even Overtone Generator Even Overtone Generator R in R in Odd Overtone Generator Odd Overtone Generator Even Overtone Generator Even Overtone Generator Parameter Value Explanation Odd Level 0 400 Raising the value adds odd order overtones Even Level 0 400 Raising the value adds ev...

Page 117: ...eaker simulation OD Drive 0 127 Degree of distortion Also changes the volume Level 0 127 Output Level 82 DJFX Looper Loops a short portion of the input sound You can vary the playback direction and playback speed of the input sound to add turntable type effects R out L out Speed Control Speed Control Loop Sw Loop Sw Loop Sw Loop Sw L in Delay Delay Delay Delay R in Parameter Value Explanation Leng...

Page 118: ...put Level 85 Warm Saturator This is a variety of saturator and is distinctive for its warmer sound Balance W Balance D Balance D Pre Filter Pre Filter Overdrive Overdrive Post Filter1 3 Post Filter1 3 Pre Filter Pre Filter Low High Low High Low High Low High Overdrive Overdrive Post Filter1 3 Post Filter1 3 L in L out R out R in Parameter Value Explanation EQ Low Frequency 20 16000 Hz Input filter...

Page 119: ...filter LPF HPF The filter type is automatically switched according to the Filter Tone parameter value Filter Tone 0 255 Frequency at which the filter operates Filter Color 0 255 Filter resonance level Higher values more strongly emphasize the region of the operating frequency Filter Slope 12 24 36 dB Amount of attenuation per octave 12 dB gentle 24 dB steep 36 dB extremely steep Filter Gain 0 12 d...

Page 120: ...e Sixteenth note triplet Dotted thirty second note Sixteenth note Eighth note triplet Dotted sixteenth note Eighth note Quarter note triplet Dotted eighth note Quarter note Half note triplet Dotted quarter note Half note Whole note triplet Dotted half note Whole note Double note triplet Dotted whole note Double note ...

Page 121: ...C SOURCE TRACK 1 8 REC SOURCE MIXOUT External effect DELAY DELAY SEND RETURN External effect REVERB REVERB SEND RETURN External effect External effect Scatter in out External effect Scatter in out Scatter in out Scatter in out MIXOUT USB IN MIX PHONES USB IN TRACK1 USB IN TRACK8 IN Ch 19 20 IN Ch 3 4 IN Ch 1 2 IN Ch 17 18 OUT Ch 5 6 OUT Ch 3 4 OUT Ch 1 2 USB MIX SELECT PRE T FX USB MIX SELECT POST...

Reviews: