background image

9

Adjusting the Brilliance (Brilliance)

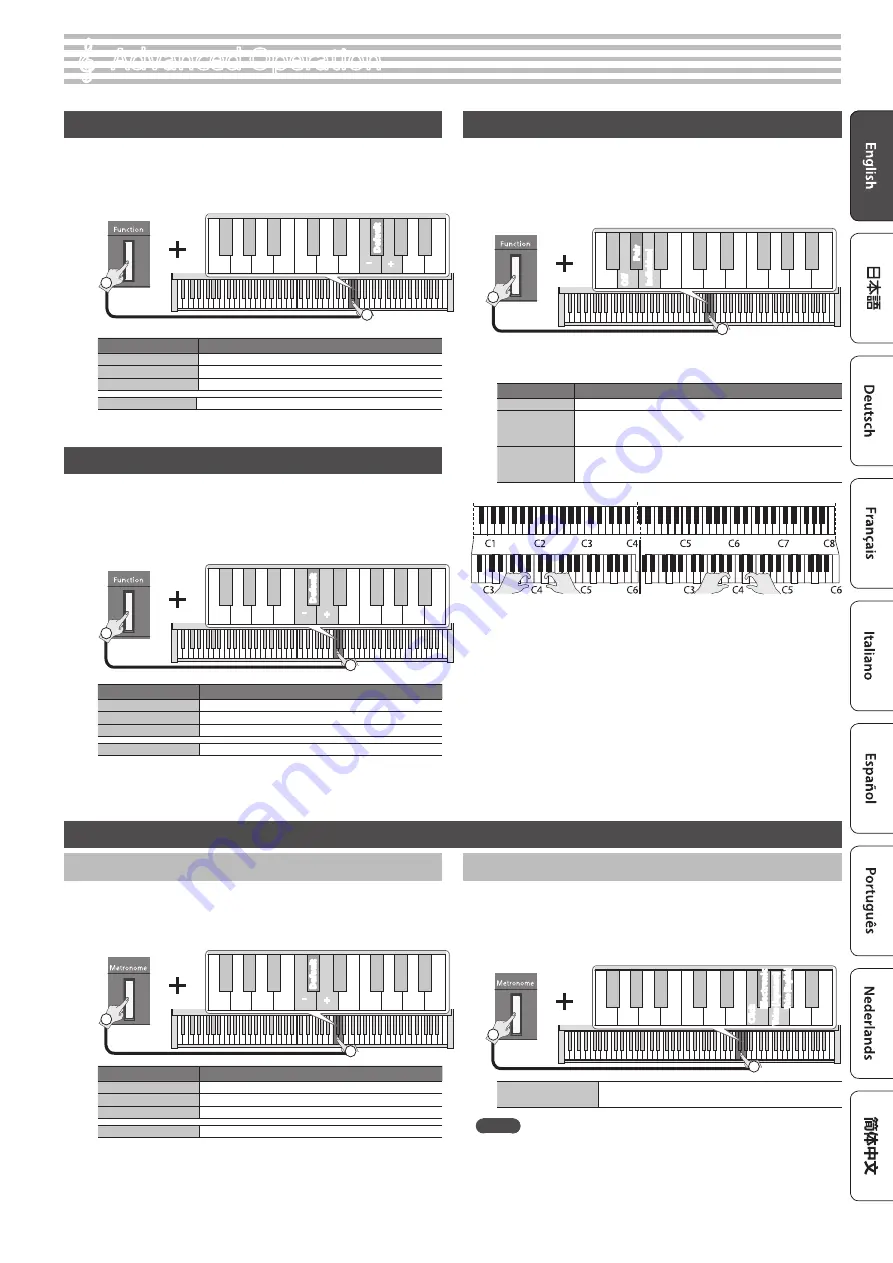
Here’s how to adjust the brilliance of the sound (3 levels).

1  

Hold down the [Function] button, and use the F5, F#5, or G5 

keys of the keyboard to adjust the brilliance.

Default

C5

2

1

+

Hold down

Key to press

Explanation

F5

Changes the brilliance value by -1.

F#5

Sets the brilliance value to the default value (0).

G5

Changes the brilliance value by +1.

Range of setting

-1–+1 (default: 0)

Adjusting the Reverberation (Ambience)

You can adjust the depth of the acoustical ambience that simulates 

performing in a concert hall.

1  

Hold down the [Function] button and use the C5, C#5, or D5 

keys of the keyboard to adjust the ambience depth.

1

Hold down

Default

C5

2

+

Key to press

Explanation

C5

Changes the ambience value by -1.

C#5

Sets the ambience value to the default value (1).

D5

Changes the ambience value by +1.

Range of setting

0–10 (default: 1)

Dividing the Keyboard for Two People (Twin Piano)

You can divide the keyboard into left and right sections so that two people 

can play the same pitch ranges.

1  

Hold down the [Function] button and use the G4, G#4, or A4 

keys of the keyboard to adjust how Twin Piano is heard.

1

Hold down

C5

2

Off

Pair

Individual

The keyboard will be divided into left and right sections, with 

“middle C” located in the center of each section.

Value

Explanation

Off

The same keyboard setting as a conventional acoustic piano.

Pair

The sound will be heard from the right as you play toward the 

right of the keyboard, and from the left as you play toward the 

left.

Individual

Notes played in the right area will be heard from the right 

speaker, and notes played in the left area will be heard from the 

left speaker.

*  The left and right sections will have the same tone (Piano). Twin Piano 

will be cancelled when you push one of the Tone buttons.

*  The damper pedal applies only to the right section.
*  When using the KPD-70, the soft pedal operates as the damper pedal 

for the left section, and the sostenuto pedal applies only to the right 

section.

° 

Advanced Operation

Convenient Metronome Functions

Adjusting the Volume of the Metronome

You can adjust the volume of the metronome.

1  

Hold down the [Metronome] button and use the C5, C#5, or D5 

keys of the keyboard to adjust the volume of the metronome.

1

Hold down

Default

C5

2

+

Key to press

Explanation

C5

Changes the metronome volume by -1.

C#5

Sets the metronome volume to the default value (5).

D5

Changes the metronome volume by +1.

Range of setting

1–10 (default: 5)

Changing the Metronome’s Tone

You can change the tone of the metronome.

1  

Hold down the [Metronome] button and use the F5, F#5, 

G5, or G#5 keys of the keyboard to adjust the tone of the 

metronome.

1

Hold down

Elec

tr

onic

Click

Voic

e (

Japanese)

Voic

e (English)

F5

2

Value

Click, Electronic, Voice (Japanese), Voice (English), 

(default: Click) 

MEMO

If “0” is selected as the time signature and “Voice” is selected as the 

metronome tone, it is heard at a time signature of 4/4.

Summary of Contents for FP-30X

Page 1: ...Sounding a Count Before Playback Recording Count In 10 Outputting Sound Both from Headphones and Internal Speakers Speaker Auto Mute 11 Formatting a USB Flash Drive 11 Saving the Settings Memory Back...

Page 2: ...ounds five steps 0 default value Hold down 0 0 Mix balance for Dual Mix balance for Split Either of the lit Tone buttons 2 1 C5 Making Settings for Each Function Function To make function settings hol...

Page 3: ...arts Recording Your Performance Here s how to record a song Before you begin select the sound that you want to record 1 Press the t button To cancel recording press the t button once again 2 Play the...

Page 4: ...mmodates a stereo 1 4 plug Use the jack that fits the plug of your headphones Headphones 1 1 KS 12 Adjust the height of the stand to the lowest position Adjust the width of the stand so that the rubbe...

Page 5: ...Cord Place the AC adaptor so the side with the indicator see illustration faces upwards The indicator will light when you plug the AC adaptor into an AC outlet Pedal 1 jack Connect the included damper...

Page 6: ...by this unit 2 Hold down the Function button for at least five seconds Long press Pairing begins 3 Turn on the Bluetooth function of the mobile device 4 Tap FP 30X Audio that is shown in the Bluetooth...

Page 7: ...g Piano Designer iOS Android This app lets you customize the piano sound to your taste It provides touch based editing within the app for the various elements of the sound Apps can be downloaded from...

Page 8: ...le device with the desired pianos When you make this setting an ID number is added to the end of the device name shown on the mobile device e g FP 30X Audio1 1 Power off the piano 2 While holding down...

Page 9: ...nal acoustic piano Pair The sound will be heard from the right as you play toward the right of the keyboard and from the left as you play toward the left Individual Notes played in the right area will...

Page 10: ...he octave shift value by 1 C 6 Sets the octave shift value to the default value 0 D6 Changes the octave shift value by 1 Range of setting 3 3 default 0 Changing the Pitch of theTone in Octave Steps Oc...

Page 11: ...buttons are lit the operation is complete 4 Turn the power off then on again Saving the Settings Memory Backup This piano remembers the settings that are saved automatically even when the power is tur...

Page 12: ...IDI transmit channel MIDI uses sixteen channels 1 16 By connecting this piano to another MIDI device and setting both devices to the same MIDI channel you can play sounds or switch sounds on that devi...

Page 13: ...nging is more obtrusive if the ambience is applied heavily so you may be able to minimize it by decreasing the ambience p 9 If you don t hear this in headphones It is likely that there is some other r...

Page 14: ...any pen or other implement and do not stamp or place any marking on the instrument Ink will seep into the surface lines and become unremovable Do not affix stickers on the keyboard You may be unable t...

Page 15: ...D x 36 11 16 H inches Weight 14 8 kg 32 lbs 11 oz with music rest 23 0 kg 50 lbs 12 oz with KSC 70 KPD 70 and music rest Accessories Owner s Manual Leaflet USING THE UNIT SAFELY Music Rest AC Adaptor...

Page 16: ...92 Adagio 58 Largo 46 Presto 184 Allegro 132 Allegretto 108 Lento 60 Andantino 80 Andante 72 Typical tempo Metronome Volume Metronome tone Enter tempo numerically Change the time signature p 3 p 9 p...

Page 17: ...Internal Song Music Book 1 Elevations 2 Reflection...

Page 18: ...4 3 4 3 j C playful F Allegro oca 140 C6 G7 C Dm G9 Am C G F rit C G G C a tempo F A C G F6 Dm7 j j C G poco rit j j C P a tempo Elevations Original...

Page 19: ...j j j C j j Cmaj7 J J j Am j j j C B J j J C J j J Cmaj7 J j J Am J j J C B Poco slower j Fmaj7 F expressivo j j j C G G j Fmaj7 j j Gsus4 G j C Pi mosso Dm A Fmaj7...

Page 20: ...j C E F6 Am7 J j j F A j j b b b j A b maj7 f rit b b Fm6 j C G F a tempo j G j G j Fmaj7 J j G rit J J j C playful Tempo I J J Cmaj7 j Am...

Page 21: ...b b b j Fm6 poco rit b a tempo j C G expressivo j Gsus4 G j Fmaj7 j C G G j j b b j A b maj7 Pi mosso j j b j Bb 6 j j b b j b Ab maj7 j j b b j Bb 6 poco rit j C...

Page 22: ...c c j j j C F Moderate oca 112 j j j j j j j j Am j j j j F F6 j j Fmaj7 Dm7 j j j C j j j j j j j F G j j F A G7 B Reflection Original...

Page 23: ...j j j C j j j j j j j j Am G B j j n j F m7 b5 F poco rit w w a tempo j j j C j j j b j b Eb 6 b j j j j C j j j b j b E b 6 b j poco rit w j C w w w w w w w w...

Page 24: ...2020 Roland Corporation...

Reviews: