background image

26

Sampling Menu

5  

If you want to apply an effect to the input, press the 

[Input EFX]

 button to turn it on.

The button lights. For more about the input effects, refer to 

“Input 

Setting”

 (p. 8).

Sampling

1  

Press the 

[Sampling]

 button.

The Sampling Menu screen appears (you can also access this via the 

Menu).

2  

Press the 

[L1]

 (Sampling) button.

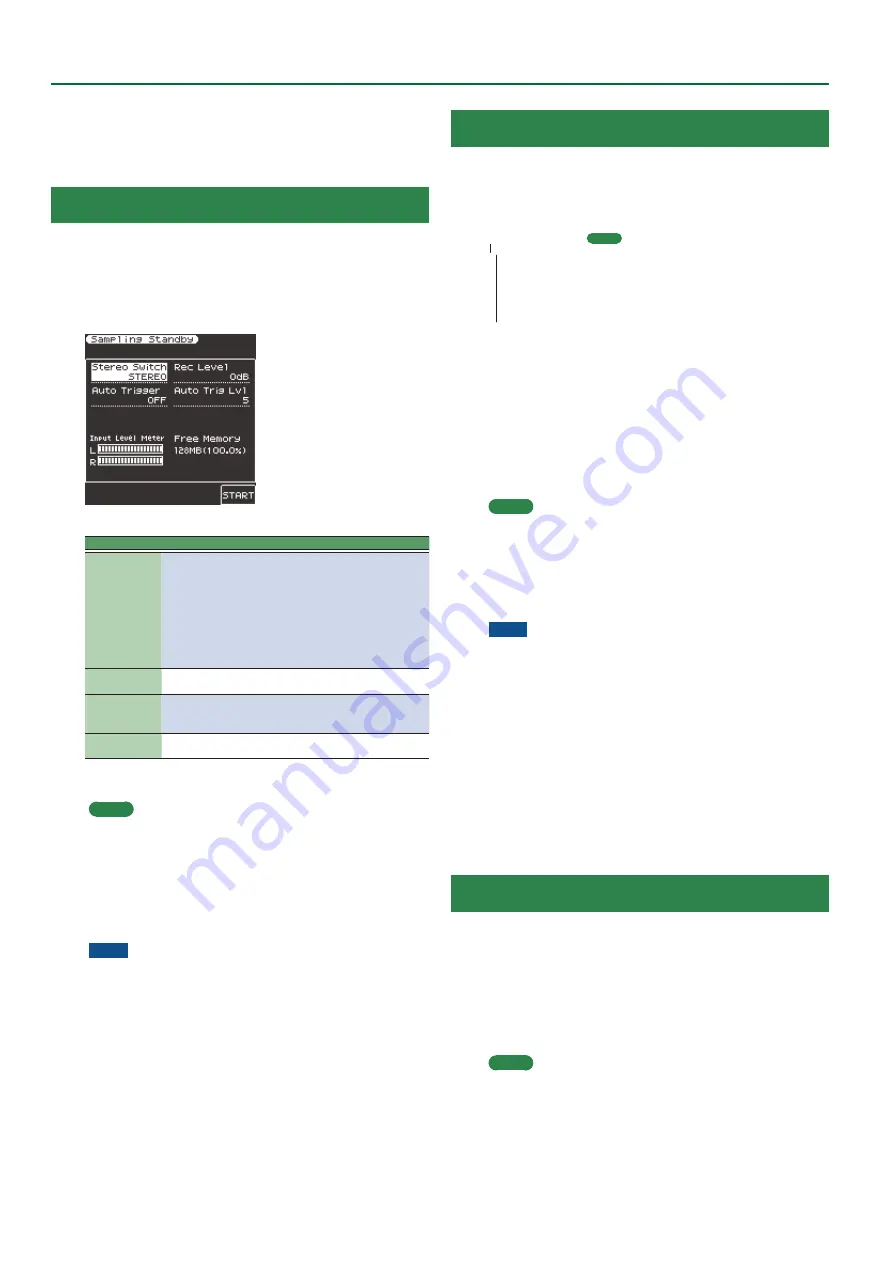
The Sampling Standby screen appears.

Input Level Meter

The input level is shown. Use the in-

put volume to adjust the input level 

so that the sound does not distort.

Free memory capacity

The display shows the amount of 

free memory in which samples can 

be saved. If the memory capacity is 

used up during sampling, sampling 

ends.

Parameter

Value

Explanation

Stereo Switch

Mono, Stereo

Specify whether sampling is done in stereo 

or monaural.
Mono sampling takes only half the amount 

of memory.

MONO: 

 The sound is sampled as a single 

waveform. The left and right chan-

nels of stereo sound are mixed.

STEREO: 

 The sound is sampled as two 

waveforms, L and R.

Auto Trigger

ON, OFF

If Auto Trigger is ON, sampling starts auto-

matically when sound input is detected.

Auto Trig Level

1–10

If Auto Trig is ON, specify the volume at 

which sampling starts.
1–10 (1 is the minimum)

Rec Level

-24, -18, -12, -6, 

0 dB

Rec level

3  

Press the 

[F5]

 (Start) button to start sampling.

MEMO


5

If Auto Trigger is ON, sampling starts automatically when input is 

detected.


5

Depending on the Auto Trigger Level setting, the beginning of 

the sound might be cut off. In this case, lower the Auto Trigger 

Level setting.

4  

Press the 

[F5]

 (Stop) button to stop sampling.

The Sample Edit screen appears.

NOTE

The sampled data is discarded if you select another sample 

without saving the sampled data. Be sure to save important 

samples.

Importing Samples

Audio files (WAV format, 44.1 kHz/16-bit only) can be imported from 

a USB flash drive into the E-A7.

1  

Place the audio files on your USB flash drive in the 

following folder structure.

MEMO

Create a folder named 

“IMPORT”

 and place the files to be import-

ed in that folder.
If you use the E-A7 to format a USB flash drive, an 

“IMPORT”

 folder 

is created.

(Root)
 –IMPORT
    –TEST1.wav
    –TEST2.wav
    –TEST3.wav
    –TEST4.wav
    –TEST5.wav

2  

Connect the USB flash drive to the E-A7.

3  

Press the 

[Sampling]

 button.

The Sampling Menu screen appears (you can also access this via the 

Menu).

4  

Press the 

[L2]

 (Sample Import) button.

The audio files inside the IMPORT folder are listed.

5  

Use the direct buttons to select the file that you want to 

import.

MEMO

You can select multiple files.
If you select 

[F1]

 (Select All), all of the files are selected. Press the 

button again to clear the selection of all files.

6  

Press the 

[Enter]

 button.

The E-A7 imports the selected file(s). When import is completed, the 

Sample List screen appears.

NOTE


5

Import may take several minutes if you’re importing multiple files 

or if the file size is large. Never turn off the power while the screen 

indicates 

“Executing   ”


5

Import is not possible if sample memory is full.


5

If there is insufficient free memory for Sample Import, a message 

asks whether you want to Optimize.


5

When you compare the original sampled or imported sound 

to the sound that’s played back by the E-A7, you may notice a 

difference in the character of the sound.
This is due to the settings of the E-A7; the character of the sound 

may be affected by settings such as the effect settings of each 

part, or the compressor and EQ settings of the Mastering Tools.


5

In order for an imported sound to be played from the keyboard, it 

must first be edited.

Sample Editing

1  

Press the 

[Sampling]

 button.

The Sampling Menu screen appears (you can also access this via the 

Menu).

2  

Press the 

[R1]

 (Sample List) button.

The Sample List screen appears.

3  

Use the direct buttons to select the sample that you 

want to edit.

MEMO

By using the direct buttons to select a sample and pressing the 

[F3]

 (Preview) button, you can audition that sample.

4  

Press the 

[Option]

 button.

The Sample Option screen appears.

5  

Use the direct buttons to select 

“Edit ”

Summary of Contents for E-A7

Page 1: ...Reference Manual 01 Copyright 2015 ROLAND CORPORATION ...

Page 2: ...xported User Drum Kits UDK Import 37 Increasing the Amount of Free Sample Memory 38 Truncating a Sample 38 Sample Clean Up 38 Optimizing Sample Memory 38 Style Composer 39 What Are Style 39 Using the Style Composer 39 Initializing a Style Initialize 39 Getting Ready to Record 40 Recording a Track 41 Returning a Recorded Track to the State Prior to Recording UNDO 42 Saving Your Style 42 Muting Trac...

Page 3: ... create user sounds User Tones User Drum Kits Units of Sound Tone Tones are the units of sound with which you perform Tones that you created by editing the built in tones or by loading a waveform User Sample you created using the sampling function are called User Tones Drum Kit A drum kit is a group of percussion instrument sounds In a drum kit a different percussion instrument sound is played by ...

Page 4: ...program contains references to these items of data For style song and phrase data the user program remembers the location and name of that data For example if after saving a user program you then rename delete or move a style the user program will no longer be able to reference the style data that it originally used If a user program references style data from a USB flash drive that style data can...

Page 5: ... parts About the Styles The E A7 can generate interactive accompaniments based on the style you select Styles are assigned to the Style buttons by category and each Style button is also divided into sub categories In addition to using the internal styles you can also create your own original styles Style Composer p 39 Style data is a collection of accompaniment patterns called divisions each consi...

Page 6: ... 3 Preset Memory 5 5 Music Assistant 5 5 Preset Tone Drum Kit 5 5 Preset Style Non rewritable memory Wave related User Sample Memory 5 5 Sample Wave PresetWave Memory 5 5 Preset Internal Wave Non rewritable memory Internal Storage The memory that lets you store data inside the E A7 is called Internal Storage This holds user programs sets UPS user styles User Tone settings and user drum kit setting...

Page 7: ...nction setting screen p 55 Lyrics Allow lyric data to be displayed on the E A7 limited to SMF or mp3 files that contain lyric data p 56 Mastering Tools Adjust the compressor and equalizer that are applied to the output MIDI Make MIDI related settings File Utility Perform operations on the files that are saved in the E A7 s internal storage and external storage p 66 Utility Perform operations for t...

Page 8: ...e OFF ON Bass Inv OFF ON Scale Tune OFF ON Exp Pedal OFF ON Ctrl Pedal OFF ON Assign Sw OFF ON Pad OFF ON 5 5 If the UPG Lock button is enabled lit parameters that are turned on will be locked 5 5 If you long press one of the Style category buttons the Style is temporarily locked If you long press one of the Tone category buttons Tone Lower Octave and Key Touch are temporarily locked If you long p...

Page 9: ... up to five sets of parameters that are controlled when you move the lever horizontally or vertically The AsgnLeverSet parameter specifies which set is assigned to the assignable lever Parameter Value Explanation AsgnLeverSet 1 5 Select the parameter settings 1 5 that you want to assign to the assignable lever Parameter Value Explanation Set1 Horizon Set2 Horizon Set3 Horizon Set4 Horizon Set5 Hor...

Page 10: ... 1st Note Off Playback starts at the very beginning of the song file which may contain a few silent bars 2nd Bar Causes playback to start from measure 2 of the selected Standard MIDI File 1st Note This is basically the same as the above except that playback starts on the first note of the selected song UPG NextSong At the end of the current song the next song in the UPG List starts automatically I...

Page 11: ...h The E A7 provides one multi effect MFX for the keyboard parts For each part you can specify whether the MFX is applied Parameter Value MFX Switch Off On KeyTouch velocity sensitivity Here you can make settings for the keyboard touch Parameter Value Explanation Key Touch Curve High Medium Low Fixed High Select this setting for max imum expressiveness Even small variations of the force with which ...

Page 12: ...of the keyboard Off finally means that the part does not respond to Hold messages Control Pedal This parameter allows you to specify whether the control pedal effect is applied to each part Parameter Value Control Pedal Off On Assignable Lever Horizontal This parameter allows you to specify for each keyboard part how it should respond to left right movements of the assignable lever Parameter Value...

Page 13: ... the highest point of the attack down to the sustain level Parameter Value Decay 64 63 NOTE Percussive sounds usually have a sustain level of 0 Piano and guitar sounds are in this category Holding the keys for a long time will have little effect on the duration of the notes you are playing even if you select a high value here Release This parameter adjusts the time over which the sound will decay ...

Page 14: ...ons or the Balance Value knob when the LED is unlit to edit the value The following parameters are available Solo Allows you to solo the selected part which means that all other style parts are switched off Parameter Value Solo Off On Part Switch Turns each part on off Parameter Value Part Switch Off On Expression Pedal Select Off if you don t need pedal expression for the selected part This means...

Page 15: ...ved bars is at the end of a chorus or the bridge Your E A7 allows you to faithfully reproduce these anomalies using this function This does not change style playback right away Only when a fill in or another VARIATION pattern starts will the Fill in Half Bar function be activated and play half the number of beats of the accompaniment pattern you selected Fill Rit Fill Ritardando The FILL RIT funct...

Page 16: ...reshold 0 127 The following parameters are valid for the 2nd tone Level Allows you to set the level of the Melody Intelligent part to ensure that the harmonies blend in with the rest Parameter Value Level 0 127 Expression Pedal This parameter allows you to specify whether or not the Melody Intelligent part should respond to movements of the optional expression pedal you connected and change its vo...

Page 17: ... sounding until you play other notes in the left keyboard area This function is only available while the SPLIT button lights If you select Off the LWR part stops sounding as soon as you release all keys in the left area ScaleTune Switch This parameter can be selected using MENU 0 User Program Edit 0 Scale Tune Switch Parameter Value Explanation Upper1 Upper2 Upper3 Off On Select On if the Scale Tu...

Page 18: ...ited scale tuning in Scale Memory A scale tuning that you ve edited can be saved in a user program or in Scale Memory 1 3 To recall a scale tuning that you ve saved press a Scale Memory button to make the button light 1 Tune the notes to your liking see p 17 2 Press and hold the Scale Memory button I III that corresponds to the memory where you wish to save your tuning settings 3 Wait until all th...

Page 19: ...nues playing repeatedly Sync Switch Off On If this is On the phrase starts at the begin ning of measure divisions in the Arranger or SMF Sync Start Off On If this parameter set ON Style and SMF playback start then also begins to ring Phrase at the same time While Style and SMF stop Pads what this param set ON is blinking Selecting a Phrase If you select the Phrase parameter the Phrase List screen ...

Page 20: ...t Tone Tone Name Tone name Time Signature 1 16 1 4 4 4 Sets the time signature selectable only if Rec Mode is set to New Measure Length Off 1 16 Specifies the number of measures in the phrase If this is Off the measure length is set automatically according to the length that you record up to 16 measures Count In Off 1Meas 2Meas Wait Note Specifies how long the count in should be before recording s...

Page 21: ...ssign the selected Scale Tune see p 17 setting to the three Upper parts Scale Lower Allows you to assign the selected Scale Tune see p 17 setting to the Lower part Change Upper Allows you to switch off the UPPER 1 part and activate the UPPER 2 part and vice versa NOTE If neither UPPER1 or UPPER2 buttons are on when you first press the Assign Switch button one of them is activated UPG Up Allows you...

Page 22: ...e Scale Tune to equal tem perament Scale Memory 1 3 Recalls Scale Memory I III ScaleTune C B Turns on off the Scale Tune setting of each note Lever Set 1 5 Assigns the parameter specified by the Assignable Lever Setting Set 1 5 to the assignable lever You can reach the Assignable Lever Setting via Menu button Global Tap Tempo Changes the tempo of the current style or song according to the inter va...

Page 23: ...it One Touch 1 4 button to make it go dark The One Touch function is canceled and you return to the settings prior to using the One Touch memory Locking OneTouch Memories Settings OneTouch Lock Several settings can be locked so that they do not change when you select a One Touch memory 1 Press the Menu button 2 Use the direct buttons to select Global 3 Use the direct buttons to select One Touch Lo...

Page 24: ...e that you saved is selected as the Style NOTE If you recall a different One Touch memory while editing a One Touch memory the state of your editing is lost Copying a User Program or OneTouch Memory to Another OneTouch Memory Copying a User Program to a OneTouch Memory Here s how to copy user program settings to a One Touch memory 1 With no One Touch memory selected i e when all of the One Touch 1...

Page 25: ...or import is saved as a user sample A multisample is a set of different samples assigned to each note of the keyboard p 28 Save Reference Save Reference ObtainingWaveforms Here s how you can directly sample audio waveform data from a mic or external audio playback device connected to the E A7 s INPUT jacks Alternatively you can import a WAV format file from a USB flash drive into User Sample Memor...

Page 26: ...e following folder structure MEMO Create a folder named IMPORT and place the files to be import ed in that folder If you use the E A7 to format a USB flash drive an IMPORT folder is created Root IMPORT TEST1 wav TEST2 wav TEST3 wav TEST4 wav TEST5 wav 2 Connect the USB flash drive to the E A7 3 Press the Sampling button The Sampling Menu screen appears you can also access this via the Menu 4 Press...

Page 27: ...Level Adjusts the volume of the sample 0 127 MEMO A sample or multisample can be played from the keyboard while you edit it In this case the sample or multisample is assigned to the UP1 part The sound will be affected by the effect settings of the UP1 part by the Split status and by the on off status of the other parts 7 To save the sample press the Write button A screen appears in which you can n...

Page 28: ...on select No to return to the page where you can specify the save destination NOTE If there is a multisample in the save destination the original multisample is overwritten The multisample is created and the multisample list appears Use the multisample to create a user tone or user drum kit p 29 p 33 MEMO You can access the multisample list via the Sampling Menu screen Multisample Editing 1 Press ...

Page 29: ...power select another tone or enter the sample or multisample edit screen the changes you made are lost If you want to keep the changes you made you must save the settings Check the tone list to see whether you can edit a tone How a tone is structured A tone is the unit of sound used for performing Each tone consists of up to four partials Each partial can be turned on off individually allowing you...

Page 30: ...tton A screen appears in which you can name the user tone Assigning Names Owner s Manual p 16 If you decide to cancel press the Exit button 6 Press the F5 Exec button 7 Use the direct buttons and function buttons to select the save destination 8 Press the Enter button A confirmation message appears 9 To save select Yes If you want to change the save destination select No to return to the page wher...

Page 31: ...F2 LPF3 Type of filter OFF Filter is not used LPF Low Pass Filter Cuts the frequency region above the cutoff making the sound more mellow BPF Band Pass Filter Cuts the sound leaving only the region near the cutoff This is useful for creating sounds with a distinctive character HPF High Pass Filter Cuts the frequency region below the cutoff This is useful for creating percussion instrument sounds w...

Page 32: ...o Apply the LFO Apply the LFO gradually after the key is pressed FADE MODE ON IN DELAY TIME Time from when the keyboard is played until the LFO begins to be applied FADE TIME Time over which the LFO amplitude will reach the maximum after the DELAY TIME has elapsed Apply the LFO immediately when the key is pressed and then gradually begin to decrease the effect FADE MODE ON OUT DELAY TIME Time that...

Page 33: ...the amount of free memory and then import once again MEMO Place the files you want to import in the My UST folder of the USB flash drive If there is no My UST folder in External Storage USB flash drive you can either use the E A7 to format the USB flash drive or create a folder named My UST User Drum Kit The E A7 lets you use user samples or multisamples to create your own original drum kit User D...

Page 34: ...setting if you want to use keyboard playing strength to switch between waves Parameter Parameter Explanation Inst Coarse Tune C 1 G9 Selects the pitch of the note that will sound the drum instrument The default value is 60 C4 Edit this value if you have selected a sample or multisample and want it to sound at a different key For details on other parameters refer to User Drum Kit Parameters p 35 6 ...

Page 35: ...the brightness or thick ness of the sound Item Pa rameter Value Explanation TVF Filter Type OFF LPF BPF HPF PKG LPF2 LPF3 Type of filter OFF Filter is not used LPF Low Pass Filter Cuts the frequency region above the cutoff making the sound more mellow BPF Band Pass Filter Cuts the sound leaving only the region near the cutoff This is useful for creating sounds with a distinctive character HPF High...

Page 36: ...e shot waveforms contain the entire duration of the sound from the attack until it decays to silence Some of these waveforms capture a complete sound such as a percussion instrument but there are also many at tack component sounds such as the hammer strike of a piano or the fret noise of a guitar Loop These are sounds with a long decay or sustaining sounds Looped waveforms will repeatedly play a p...

Page 37: ... file name was changed the original tone names are displayed Since you won t be able to tell the original tone names we recommend that you not change the file name when exporting 5 5 When you export the samples and multisamples remain in the E A7 The data is copied and saved on the USB flash drive If you want to increase the amount of free memory export the data then delete unneeded user drum kits...

Page 38: ...ute Clean Up Never turn off the power while the screen indicates Executing Optimizing Sample Memory Optimize is an operation that rearranges the vacant areas that are fragmented in memory allowing the memory to be used optimally 1 Press the Sampling button The Sampling Menu screen appears you can also access this via the Menu 2 Press the L4 Optimize button A confirmation message appears 3 Use the ...

Page 39: ...division or press s to stop Arranger playback The E A7 provides four programmable looped divisions VARIATION 1 4 Looped divisions do not select other divisions when they are finished because they never end they keep playing until you select another division by hand or by foot One shot divisions One shot patterns or Divisions are only played once and then select a looped division or stop the Arrang...

Page 40: ...alue buttons to select the Division you want to record Intro Main Fill or Ending 3 Press the REC button The display changes to 4 Use the direct buttons to select the parameter whose setting you want to change and use the Value buttons or Balance knob when the LED is unlit to change the value Parameter Value Explanation Rec Track Adrm Abas Acc1 Acc2 Acc3 Acc4 Acc5 Acc6 This parameter allows you to ...

Page 41: ...one part and copy it to up to three Modes each The sign means that more than one pattern will be recorded Every style pattern must have a set length Setting the Measure Length value now will help you avoid a lot of confusion once you start recording The Arranger tends to add blank bars at the end of a track which is usually due to the fact that you stopped recording a little late i e after the las...

Page 42: ... buttons to select a track The field below the TRACK parameter shows the name of the Tone or Drum Kit assigned to the selected track 2 Press the F1 Mute button An M appears next to the track you have just muted 3 Press the F1 Mute button again to switch off the mute function the M disappears NOTE This mute setting only applies to the Style Composer page During normal Arranger playback all tracks t...

Page 43: ...Erase allows you to selectively delete data either within a specified range of measures beats or clocks or from the entire track s When Data Type is set to All Erase substitutes the required number of rests for the data you delete so that you end up with the equivalent number of blank measures If you also want to eliminate the measures themselves use Delete see below When you execute Erase the per...

Page 44: ... From Bar To CPT See page 43 You can press the F4 Prev button to audition the copy source data However auditioning is not possible if All is selected for Track or Division 2 Press the F1 Dest button to access the copy destination settings page Parameter Value Explanation Track Adrm Acc6 ALL Allows you to select the track you wish to edit Select ALL only to replace all tracks Mode Major Minor 7th A...

Page 45: ...e opera tion applies to all tracks Mode Major Minor 7th Allows you to select the Mode to be edited Division Intro 1 4 Main 1 4 Fill 1 4 End 1 4 Use this parameter to select the Division you want to edit From Bar To CPT See page 43 Bias 99 99 Allows you to specify by how much the velocity values should change Select a positive value to increase the velocity the value is added to the velocity value ...

Page 46: ...he original data value i e the value that is being used right now by the selected track s for From For To specify the new value that should replace the From value These are what we call absolute changes you don t add or subtract values you replace them with other values This system is only available for messages that allow you to select sounds or sound banks Inc Dec Expression Reverb Chorus Panpot...

Page 47: ...length In most cases you will probably work with multiples of q notes i e 120CPT because 120CPT represent one beat of an X 4 bar 1 4 2 4 3 4 4 4 etc Mode Major Minor 7th M m M 7 M m 7 m 7 Choose the Modes to which the new length setting should apply You can also switch on two or all three button icons If you set Track to ALL all three Modes are selected automatically and that cannot be changed Spe...

Page 48: ... needed but they also need to be reset to 0 to avoid unpleasant surprises About the Note messages As stated above note messages comprise a note number a velocity value and a Gate Time value The range for note numbers is 0 C 127 G9 Velocity messages can be set anywhere between 1 extremely soft and 127 The value 0 cannot be entered because it would effectively switch off the note About Alteration Mo...

Page 49: ... destination for the selected event s Parameter Value Explanation To Bar To Beat To CPT See page 43 Specifies the position to which the first event in chronological order of the selected group should be shifted 2 Press the F5 Exec button the selected event s are moved NOTE 5 5 If the position to which you move the selected event already contains other events the moved event is added at the end of ...

Page 50: ...erb Works a lot like an echo effect and thus repeats the sounds Pan Delay This is a stereo version of the above delay effect It creates repetitions that alternate between the left and right channels Chorus Type Chorus broadens the spatial image of the sound and creates a stereo impression You can choose from 8 types of chorus Parameter Explanation Original The song uses its own programmed chorus s...

Page 51: ...setting only applies to the selected instrument and thus not necessarily to the entire track NOTE In the case of the drums you can mute two instrument groups Drum Mute and Perc Mute see below separately Parameter Value Mute T Drum Mute D Off On Solo Switches off all instruments except the selected instrument Parameter Value Solo Off On Perc Mute D Suppresses or adds the percussion sounds used by t...

Page 52: ...Value Decay 127 127 NOTE Percussive sounds usually have a sustain level of 0 Piano and guitar sounds are in this category Holding the keys for a long time will have little effect on the duration of the notes you are playing even if you select a high value here Release T This parameter adjusts the time over which the sound will decay after the note is released until it is no longer heard The cutoff...

Page 53: ...e Balance Value knob when the LED is unlit to edit the value Parameter Value Explanation Inst All Drum Set Instruments Select the drum instrument you want to edit Parameters for the selected instrument Mute Off On Suppress or add the selected instrument Solo Off On Switch off all instruments except the selected instrument Volume 127 127 Use this parameter to set the volume of the selected drum ins...

Page 54: ...ted MEMO When you execute Freeze the following parameters are written into the data 5 5 Volume 5 5 Reverb 5 5 Chorus 5 5 Panpot 5 5 Octave 5 5 Velocity SavingYour New Style or Song SMF Version 1 With the Instrument screen shown in the left screen press the Option button 2 Use the direct buttons to select Save 3 Use the direct buttons and function buttons to select the save destination Button Expla...

Page 55: ...esponding button Variation 1 4 lights and the following mark is selected 6 To assign the next marker repeat steps 3 5 7 Press the s button to stop song playback 8 To delete a marker use the function buttons to select Mark Off The indicator of the corresponding button Variation 1 4 goes dark Saving a SongThat Contains Markers 1 Specify a marker location in the song Creating Deleting Markers p 55 2 ...

Page 56: ...a song that contains lyrics data 2 Press the Menu button The Menu screen appears 3 Use the direct buttons to select R3 Lyrics The lyrics screen appears In the case of an SMF file the chords of the song are also shown MEMO Press the F5 Zoom button to magnify the lyrics Press the button once again to return to the original size ...

Page 57: ... are two crossover frequencies you can set High between the Mid and High ranges and Low between the Mid and Low ranges Split Low 80 100 150 200 250 315 400 500 630 800 Hz High Mid Low Because Attack Release Threshold Ratio and Level are the same for each band we will only discuss them once As you see each of the three frequency ranges has its own set of parameters that allow you to specify their b...

Page 58: ...ated LOW FREQ 50 80 100 150 200 250 300 400 Hz Allows you to set the cutoff frequency of the low band this is a shelving filter LOW GAIN 15 15 dB Use this parameter to set the level of the selected Low frequency MID FREQ 200 8000 Hz Allows you to set the cutoff frequency of the middle band this is a peaking filter MID GAIN 15 15 dB Use this parameter to set the level of the selected Mid frequency ...

Page 59: ...ransmitted to the MIDI OUT socket or USB COMPUTER port and hence to external MIDI instruments When a parameter is modified inside a part the display shows Loading a MIDI Set The MIDI Set environment contains two options with preset settings All you need to do is select them to restore the default settings for the sections or aspects in question In addition there are 8 MIDI Set memories where you c...

Page 60: ...ernal MIDI instrument or computer The maximum possible transposition is four octaves up 48 or down 48 Each step represents a semi tone Parameter Value Rx Shift 48 0 48 Rx Limit Low Limit High Limit Low and Limit High allow you to set the note range to be received If not all note messages received on a given MIDI channel should be played by the selected E A7 part narrow down the range Parameter Val...

Page 61: ... used to synchronize external MIDI devices See below Basic The parameters of this group affect the E A7 s Basic channel The Basic channel is used to receive and transmit Program Change and Bank Select messages for selecting Performances as well as for the reception and transmission of other kinds of messages that are not directly related to a specific MIDI channel See page 62 Style The parameters ...

Page 62: ...yle playback waits for a start message to start playback at its own tempo When it receives a stop message playback stops External clock messages are ignored Basic The following parameters are located on the display page that can be selected using MENU 0 MIDI 0 Edit System 0 Basic The Basic channel is used to receive and transmit Program Change and Bank Select messages for selecting Performances as...

Page 63: ...on of the currently active style Be aware however that only sending CC00 and CC32 messages without a program change has no effect NOTE When you select another style on your E A7 it transmits a CC00 CC32 PC cluster on the Style channel which you could record using an external sequencer Tx Switches the transmission of MIDI messages on the Style channel on or off Parameter Value Tx Off On Tx Channel ...

Page 64: ...lue you set will be used for all notes sent to MIDI OUT USB COMPUTER Parameter Value Tx Velocity On 1 127 Tx SysEx Use this parameter to specify whether On or not Off the E A7 should send SysEx messages Such messages are not standardized so that each manufacturer can use them ad lib for temporary or permanent changes to the way a part behaves Effects parameters for instance can only be changed via...

Page 65: ...f On Save MIDI Set This function allows you to save your changes to a User memory for quick recall This function can be selected using the WRITE button while the MIDI page is displayed 1 Edit the desired MIDI parameters 2 Press the WRITE button The display changes to 3 Use the direct buttons to select the MIDI set location User1 User8 in which you want to save the MIDI set 4 Press the F5 Exec butt...

Page 66: ...tons to select Copy 3 Use the direct buttons to select the file or folder that you want to copy MEMO By selecting multiple files or folders you can copy them in a single operation If you select F1 Select All all files in the list are selected Press the button again to clear the selection 4 Press the Enter button 5 Use the direct buttons to select the copy destination folder 6 Press the Enter butto...

Page 67: ...will not occur Using your computer or File Utility move the BACKUP file from the USB flash drive to somewhere other than the root folder of the USB flash drive and then execute Backup once again 5 5 If there is a large amount of sample data Backup might take several tens of minutes Never turn off the power while the display indicates Executing Restoring Saved Data from USB Memory Back into the E A...

Page 68: ...68 Backing Up or Initializing Data Utility The Utility screen appears 3 Use the direct buttons to select Version The Version screen appears ...

Page 69: ...e E A7 when it is powered off but this is not a malfunction Q The E A7 no longer produces sound when I connect it to a PC A When you connect the E A7 to a PC and start a DAW the MIDI Local parameter might automatically be turned Off If this setting is Local Off the E A7 will produce sound in response to MIDI messages from an external device but will not produce sound in response to its built in ke...

Page 70: ...er a valid file name The selected file uses char acters that cannot be used on the E A7 Rename the file The file name is too long Rename in less than 10 characters The phrase file name is too long Rename the phrase file name to ten characters or less Too many events The SMF file size is too large it contains too much data The file exceeds the size of data that the E A7 can han dle Do not use this ...

Reviews: