background image


40


Recording Your Performance


It’s easy to record your own performances.

You can play back a recorded performance to check your playing, or perform along with a recorded performance.


Getting ready to record


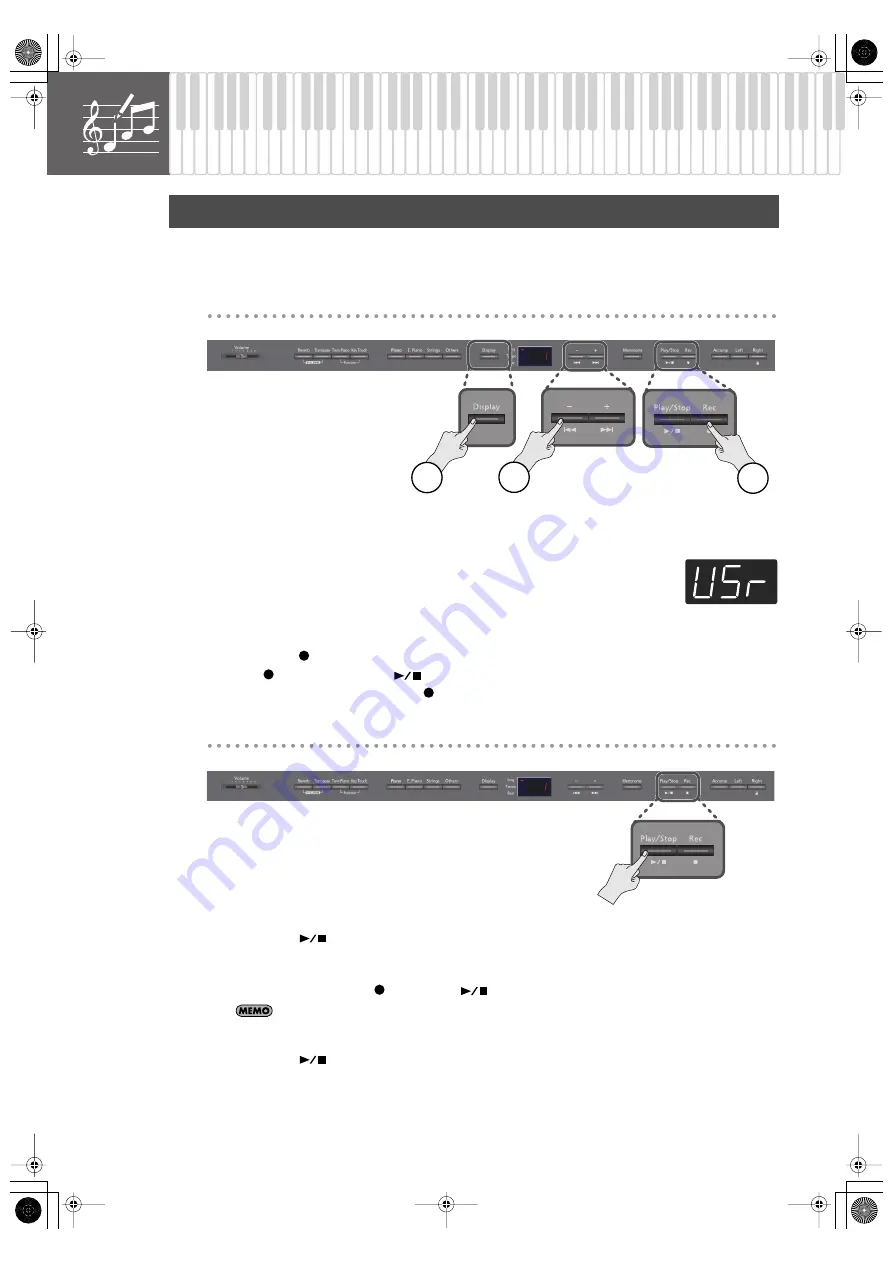
fig.Panel


1.


Press the [Display] button a number of times so the Song indicator will light.


2.


Press the [-] button a number of times so the display will indicate “USr.”


3.


Select the tone that you want to use for performing (p. 22).


If desired, sound the metronome (p. 23).


4.


Press the [

] button.


The [

] button will light, the [

] button will blink, and the DP990F will enter recording-standby mode.

If you decide not to record, press the [

] button once again.


Starting/stopping recording


fig.Panel


1.


Press the [

] button or play the keyboard.


A two-measure count will be heard (the measure number will be shown as “-2” then “-1” in the display), and 
then recording will start.

When recording starts, the [

] button and [

] button will light.


A count sound will not sound if you initiated recording by playing the keyboard.


2.


Press the [

] button.


Recording will stop. 


Recording Your Keyboard Performance

1

2

4

DP990F_e.book 40 ページ 2010年1月14日 木曜日 午後11時29分

Summary of Contents for DP-990F

Page 1: ... 5 1 0 0 0 1 3 6 2 1 0 1 ...

Page 2: ... other countries Before using this unit carefully read the sections entitled USING THE UNIT SAFELY p 8 and IMPORTANT NOTES p 11 These sections provide important information concerning the proper operation of the unit Additionally in order to feel assured that you have gained a good grasp of every feature provided by your new unit Owner s manual should be read in its entirety The manual should be s...

Page 3: ...with the metronome p 23 Check your own performance Recording your performance p 40 Play together with your family Dividing the keyboard for two person performance Twin Piano p 29 Use your digital piano to Enjoy N N DP990F_e book 4 ページ 2010年1月14日 木曜日 午後11時29分 ...

Page 4: ...Headphones p 21 Play using different sounds Play using different sounds Performing with various sounds p 22 Performing with various sounds p 22 Night time or early morning lessons Using the Headphones p 21 Play using different sounds Performing with various sounds p 22 Select and listen to the song you want to play Listening to songs p 36 Playing back songs on external media p 61 Now I can play it...

Page 5: ...ey Touch 27 Performing with Two Layered Tones Dual Play 28 Dividing the Keyboard for Two person Performance Twin Piano 29 Changing the Way in Which the Sound is Heard Twin Piano Mode 30 Playing Different Tones in the Left and Right Sides of the Keyboard Split Play 31 Changing the Tones of the Left and Right Zones 32 Changing the Keyboard s Split Point 33 Transposing the Keyboard Transpose 34 Disab...

Page 6: ...Connecting to Other Devices 59 Connecting a Media 59 Installing the CD Drive 59 Installing the Floppy Disk Drive 59 Connecting USB Memory 59 Initializing the Memory 60 Changing the External Memory Setting External Memory Mode 60 Playing Back Songs on External Media 61 Adjusting the Volume of an Audio File or Music CD 62 Changing the Tempo of an Audio File or Music CD 62 Changing the Playback Pitch...

Page 7: ...combination with an amplifier and headphones or speakers may be capable of producing sound levels that could cause permanent hearing loss Do not operate for a long period of time at a high volume level or at a level that is uncomfortable If you experience any hearing loss or ringing in the ears you should immediately stop using the unit and consult an audiologist Do not allow any objects e g flamm...

Page 8: ...em components may result The unit and the AC adaptor should be located so their location or position does not interfere with their proper ventilation Always grasp only the plug on the AC adaptor cord when plugging into or unplugging from an outlet or this unit At regular intervals you should unplug the AC adaptor and clean it by using a dry cloth to wipe all dust and other accumulations away from ...

Page 9: ...he stool if the bolts holding the stool legs are loose If the bolts are loose immedi ately re tighten them using the supplied tool Never insert your hand into the gap the metal height adjustment mechanism under the seat lid Doing so may cause your hand to be pinched or injured Always keep the following small parts that may be removed out of the reach of small children to avoid accidental ingestion...

Page 10: ...kers decals or the like to this instrument Peeling such matter off the instrument may damage the exterior finish Depending on the material and temperature of the surface on which you place the unit its rubber feet may discolor or mar the surface You can place a piece of felt or cloth under the rubber feet to prevent this from happening If you do so please make sure that the unit will not slip or m...

Page 11: ...liability concerning such loss of data Use a reasonable amount of care when using the unit s buttons sliders or other controls and when using its jacks and connectors Rough handling can lead to malfunctions When connecting disconnecting all cables grasp the connector itself never pull on the cable This way you will avoid causing shorts or damage to the cable s internal elements To avoid disturbing...

Page 12: ...o not connect or disconnect USB memory while it is being read from or written to i e while the USB memory access indicator will blink Carefully insert the USB memory all the way in until it is firmly in place Never touch the External Memory connector Also avoid getting the terminals dirty USB memories are constructed using precision components handle the USB memories carefully paying particular no...

Page 13: ...ere you can make settings for the sounds and make changes in a variety of the instrument s functions p 52 Tone buttons Here you can select the sound you ll hear when you play the keyboard p 22 Display button Switches the content of the display Displays the song number the metronome s tempo or time signature p 23 Indicators These indicate the content shown in the display Song indicator The display ...

Page 14: ... AC adaptor here p 16 Pedal connector Connect the pedal cord of the dedicated stand to this connector p 16 MIDI Out In connectors You can connect these to external MIDI devices to transfer performance data p 67 Input jacks L Mono R Here you can connect an audio device or another electronic musical instrument and listen to the connected device through the DP990F s speakers p 65 Output jacks L Mono ...

Page 15: ...tion matches the input voltage specified on the AC adaptor s body Other AC adaptors may use a different polarity or be designed for a different voltage so their use could result in damage malfunction or electric shock Depending on the circumstances of a particular setup you may experience a discomforting sensation or perceive that the surface feels gritty to the touch when you touch this device or...

Page 16: ...nds 2 Close the blind and open the music rest as shown in the figure Closing the Lid 1 When closing the lid be sure to close the music rest and open the blind fig lidclose1 2 Grasp and gently lower the lid with both hands fig lidclose2 Adult supervision is recommended whenever small children use the unit If you need to move the piano make sure the lid is closed first to prevent accidents In additi...

Page 17: ...ng the keyboard This unit is equipped with a protection circuit A brief interval a few seconds after power up is required before the unit will operate normally Always make sure to have the volume level turned down before switching on power Even with the volume all the way down you may still hear some sound when the power is switched on but this is normal and does not indicate a malfunction 3 Use t...

Page 18: ... use the Volume slider to adjust the headphone volume 1 Turn the Volume slider to adjust the overall volume Adjust the volume while you play the keyboard to produce sound Turning the knob toward the right will increase the volume and turning it toward the left will decrease the volume Adjusting the Sound s Volume Max Min DP990F_e book 19 ページ 2010年1月14日 木曜日 午後11時29分 ...

Page 19: ...of the sympathetic vibration p 56 Sostenuto Pedal center pedal The notes you are pressing when this pedal is depressed will be sustained Soft Pedal left pedal This pedal is used to make the sound softer Playing with the soft pedal depressed produces a sound that is not as strong as when otherwise played with the equivalent strength This is the same function as the left pedal of an acoustic piano T...

Page 20: ...hole in the bottom left of the DP990F refer to the figure above 2 Turn the headphone hook wing nut to secure the headphone hook Do not hang anything other than headphones on the headphone hook Doing so may damage the instrument or the hook Cautions when Using Headphones To prevent damage to the cord s internal conductors avoid rough handling When using headphones mainly try to handle either the pl...

Page 21: ... that do not produce sound For details on the tones refer to Tone List p 75 Button Description Piano button Selects a variety of instruments including grand pianos honky tonk pianos and historical instruments E Piano button Selects various electric piano sounds used in pop or rock as well as the sound of instruments played using mallets Strings button Selects the sounds of string instruments such ...

Page 22: ...tronome will sound The Metronome button will blink red and green according to the currently selected time signature red indicates the strong beats and green indicates the weak beats You can press the Metronome button once again to stop the metronome Changing the Metronome s Tempo fig Panel 1 Press the Metronome button The metronome will sound 2 Press the or button Correspondence between beat and t...

Page 23: ...nly the weak beats will sound If you record your performance it will be recorded with the time signature you specify here When you play back a song the metronome s time signature will be set to the time signature of that song You can t change the metronome s time signature while a song is playing Indicate Beat Indicate Beat 2 2 6 4 0 4 Only weak beats will be sounded 7 4 2 4 3 8 3 4 6 8 4 4 9 8 5 ...

Page 24: ...r Performance Count in A series of sounds rhythmically played to indicate the tempo before a song starts is called a count in If you sound a count in it will be easier for you to synchronize your own performance to the tempo of the playback fig Panel 1 Press the Metronome button The metronome will sound 2 Press the button A two measure count sound will be produced before the song starts playing Me...

Page 25: ...ed setting will return to its previous value when you turn off the power If you wish you can have this setting be retained even while the power is turned off p 18 You can t specify the depth of the reverb effect independently for each sound Reverb is applied at the same depth for each sound The depth of the reverb effect for the song that s playing will not change The reverb effect is not applied ...

Page 26: ...Description Fixed The sound plays at one set volume regardless of the force used to play the keys Extra Light This setting produces the lightest keyboard touch Light You can achieve fortissimo ff play with a less forceful touch than medium so the keyboard feels lighter This setting makes it easy to play even for children Medium This sets the standard keyboard touch You can play with the most natur...

Page 27: ...tave p 54 When you press a damper pedal while using Dual play the effect will apply to both tone 1 and tone 2 but you may change this so that the effect applies to only one tone p 56 You can change the volume balance of the two tones p 55 Dual play is not available if Split play or Twin Piano are turned on For some combinations of sounds the effect is not applied to tone 2 and this may affect how ...

Page 28: ...ls and the tone will change to the following settings fig Panel When you press the Twin Piano button a number of times the Twin Piano function will turn off and the Twin Piano button will go out Since some effects p 26 will no longer be applied if Twin Piano is turned on this may change the sound of the tone Dividing the Keyboard for Two person Performance Twin Piano Twin Piano Grand Piano 1 Grand...

Page 29: ... left hand keyboard zone will be heard more loudly from the left speaker than from the right speaker 2 Individual The sound of the right hand keyboard zone will be heard only from the right speaker The sound of the left hand keyboard zone will be heard only from the left speaker The reverb effect will be turned off For some tones the sound may not be split between left and right If you play in the...

Page 30: ... number of times so the Split screen will appear When Split is turned on the keyboard settings will be as follows fig Panel Press the Twin Piano button a number of times to turn off Split play the Twin Piano button will go out Playing Different Tones in the Left and Right Sides of the Keyboard Split Play Split Point Power up default F 3 C1 D1 E1 F1 G1 A1 B1 A0 B0 C2 C3 C4 C5 C8 B7 Left hand Tone R...

Page 31: ...different tone is selected Changing the left hand tone fig Panel 1 Hold down the Twin Piano button and press a tone button The number of the tone currently selected for the left hand zone are shown 2 While holding down the Twin Piano button press the or button A different tone is selected You can change the pitch of the left hand sounds in steps of an octave p 54 2 1 1 2 DP990F_e book 32 ページ 2010年...

Page 32: ... original state when you turn off the power If you wish you can have this setting be remembered even while the power is turned off p 58 C1 B1 B6 A0 C2 C3 C4 C5 C6 C7 C8 Factory default F 3 The key belongs to the left hand section Split Point Range in which you can specify the split point B1 B6 How the Split Point is shown When indicating the key that is the split point the display shows the note n...

Page 33: ...se button and press both of the or buttons simultaneously You can use the Transpose button to turn the Transpose function on off if the transposition setting is other than 0 The DP990F allows you to transpose both the keyboard and the song or just the keyboard or just the song p 54 With the factory settings the keyboard and the song will be transposed together If the Transpose Mode p 54 is set to ...

Page 34: ...button for a while Panel Lock will be activated To cancel Panel Lock once again hold down the Right button for a while Panel Lock will also be cancelled when you turn off the power If you activate Panel Lock while a song is playing or being recorded playback or recording will stop You can t activate Panel Lock while in Function mode p 52 Disabling the Buttons Panel Lock DP990F_e book 35 ページ 2010年1...

Page 35: ...ayed to its end playback will stop To pause the playback press the button once again The next time you press the button playback will resume from where you paused For details on the names of the internal songs refer to Internal Song List p 78 Playing Back Songs 1 2 3 Fast forward and rewind Operation Button To beginning of next song Press the button To beginning of current song Press the button Fa...

Page 36: ...rt muted you can skip the introduction The mute setting will be cancelled when you switch songs Playing Parts Individually Performance parts and tracks Each part is assigned to the track buttons as shown in the illustration Muting You can mute a specific part so that it will not be heard The Accomp button will not light if you ve selected a song that does not contain an accompaniment Right hand pa...

Page 37: ... or turn off the power You can adjust the volume at which the song plays This is helpful when you want to adjust the volume balance between your keyboard playing and the song playback for example when you re practicing along with a song fig Panel 1 Hold down the button and press the or button The volume of song playback is shown while you hold down the button The song playback volume is reset to 1...

Page 38: ...ld down the Transpose button the Playback Transpose setting is displayed If the value is anything other than 0 the Transpose button will be lit The transposition setting will return to 0 when you select a different song If you hold down the Transpose button and press both of the buttons simultaneously the setting will return to its original value 0 You can use the Transpose button to turn the Play...

Page 39: ...etronome p 23 4 Press the button The button will light the button will blink and the DP990F will enter recording standby mode If you decide not to record press the button once again Starting stopping recording fig Panel 1 Press the button or play the keyboard A two measure count will be heard the measure number will be shown as 2 then 1 in the display and then recording will start When recording s...

Page 40: ...rformance you must save it to internal memory p 43 or to USB memory p 63 You won t be able to play back another song if there is an unsaved performance You ll need to either delete p 42 or save p 43 your performance before playing another song 1 2 If the following indication appears The confirmation message shown at right will appear if you attempt to select another song while the previously recor...

Page 41: ...button will blink If you decide not to erase the performance press the button 2 Press the button The recorded performance will be erased If you hold down the button while pressing a track button the performance of only that track will be erased A recorded performance will be erased when you turn off the power Erasing Your Recorded Performance 1 2 DP990F_e book 42 ページ 2010年1月14日 木曜日 午後11時29分 ...

Page 42: ... want to save a song from internal external memory to external internal memory select the song that you want to save fig Panel Getting ready to save 1 Hold down the Twin Piano button and press the Key Touch button The display will indicate Fnc and you ll be in Function mode p 52 2 Hold down the Display button and use the buttons to make the display indicate SAv 3 When you take your finger off the ...

Page 43: ... the number of the unwanted song 2 Press the button The display will indicate Sur and the button and button will blink If you decide not to save the song press the button 3 Press the button The song will be saved Never turn off the power while the screen indicates SAv 4 Press the Twin Piano button or the Key Touch button You will exit Function mode You can t select another song if the recorded per...

Page 44: ...ady to delete 1 Hold down the Twin Piano button and press the Key Touch button The display will indicate Fnc and you ll be in Function mode p 52 2 Hold down the Display button and use the button to make the display indicate dEL 3 When you take your finger off the Display button the display will indicate Int If Int is not displayed press the button 4 Press the button The screen will allow you to se...

Page 45: ...e button The display will indicate Sur and the button and button will blink If you decide not to delete the song press the button 2 Press the button The selected song will be deleted 3 Press the Twin Piano button or the Key Touch button You will exit Function mode Never turn off the power while the screen indicates dEL 1 3 1 2 DP990F_e book 46 ページ 2010年1月14日 木曜日 午後11時29分 ...

Page 46: ...e button for any track that you don t want to record so it s not lit Your performance can be recorded separately to the relevant track buttons Advanced Recording Methods 1 2 3 4 Recorded performances and the track buttons The performances you record are assigned to the track buttons as follows Conventional performance using the entire keyboard to play a single tone Dual play Twin Piano p 29 Split ...

Page 47: ...nal recording fig Panel 1 Press the button You ll return to the beginning of the recorded performance 2 Press the button The button will light the button and the button of the track to be recorded will blink and the DP990F will enter recording standby mode If you decide not to record press the button once again 3 Press the button of the track that you want to record so it s blinking If you decide ...

Page 48: ...e recorded performance will play back Press the button once again to stop playback Your recorded performance will be lost when you turn off the power If you want to keep your recorded performance you must save it to internal memory p 43 or USB memory p 63 You can t play back another song if a recorded performance exists Erase or save your recorded performance and then play back the desired song p ...

Page 49: ...our recorded performance will be the tempo of the song you selected for recording When you record a performance that you play along with a song it will be recorded with the time signature of that song Getting ready to record fig Panel 1 Press the button The button will light the button will blink and the DP990F will enter recording standby mode If you decide to cancel recording press the button on...

Page 50: ...Recording will stop Listening to the recorded performance fig Panel 1 Press the button You ll return to the beginning of the recorded performance 2 Press the button The recorded performance will play back Press the button once again to stop playback Your recorded performance will be lost when you turn off the power If you don t want to lose your recorded performance you must save it to internal me...

Page 51: ...display will indicate Fnc and you ll be in Function mode Selecting the setting that you want to edit fig Panel 1 While holding down one of the blinking buttons press the or button to select the setting that you want to edit The name of the setting is shown in the display while you hold down the button When you release the button the value of the setting will be shown Basic Operation in Function Mo...

Page 52: ...value when you turn off the power For some settings you can specify that they retain their edited state even when you turn off the power p 58 For details on the settings that can be saved in this way refer to Parameters Stored in Memory Backup p 79 Selecting the setting that you want to edit 3 1 Button Function Page Reverb Brilliance p 54 Transpose Transpose Mode p 54 Octave Shift p 54 Dual Balanc...

Page 53: ...e to the same pitch of the Upper Tone in Split play Others Tempo Mute p 57 Local Control p 68 MIDI Transmit Channel p 68 Composer MIDI Out p 68 V LINK Transmit Channel p 70 Track Assign p 57 Recommended Tone p 62 Mute Volume p 57 CD Audio Type p 58 Display Save a Song p 43 Deleting a Song p 45 Initializing the Memory p 60 Accomp External Memory Mode p 60 Left Memory Backup p 58 Right Factory Reset...

Page 54: ...Instruments Master Tuning Setting Master tuning value 15 3 40 0 66 2 415 3 Hz 440 0 Hz 466 2 Hz Using a Piano s Unique Tuning Stretch Tuning Setting Description On This tuning curve expands the bass and treble ends somewhat It is suitable for performances such as piano solos OFF This is the standard tuning curve This is suitable for when using Dual play p 28 or when playing in an ensemble with oth...

Page 55: ...also select the part to which the effect is to be applied Specifying the Temperament Key Piano Sound Settings Producing Sympathetic Resonance When You Press the Damper Pedal Damper Resonance Setting Description OFF 1 10 The resonance volume decreases as the value is lowered while raising the value increases the volume of the Damper Resonance The Damper Resonance function is not active when the val...

Page 56: ...ets you play a specific part at a reduced volume and use it as a guide for your playing When you turn off the power the track mute volume will be reset to 0 Changing How the Pedals Work Center Left Pedal Function Function Description Sostenuto Sets function to Sostenuto pedal Selectable only for the center pedal Soft pedal Sets function to soft pedal Selectable only for the left pedal Start stop T...

Page 57: ... DP990F When you execute Factory Reset all stored settings will be erased and returned to the factory settings This function will not erase the songs from internal memory or external memory such as separately sold USB memory If you want to erase internal memory or external memory such as USB memory refer to Initializing the Memory p 60 1 Enter Function mode choose Fct p 52 2 To execute Factory Res...

Page 58: ... Use a USB memory sold by Roland We cannot guarantee operation if any other USB memory is used Connecting a Media Device What you can do CD drive Play back music CDs SMF music files and songs from a VIMA CD ROM VIMA TUNES sold by Roland Floppy disk drive Play back SMF music files and save performance data USB memory Play back SMF music files save performance data and play back audio files Installi...

Page 59: ...ory will be erased Once the memory has been initialized the following screen will appear In some cases when USB memory is connected to the external memory connector it may take longer for data to be loaded or data may fail to be loaded successfully If this occurs you may be able to solve the problem by changing the external memory setting 1 Enter Function mode choose UMd fig aaaa 2 Press the or bu...

Page 60: ...ed Select a song that s inside a folder 1 Press the Display button a number of times so the Song indicator is lit 2 Press the button If there are folders they are indicated as shown at the right 3 Press the button The first song in the folder will be selected If the folder contains no songs or if the first song is selected when you press the button the right display will appear Here you can press ...

Page 61: ...ing Center Cancel may affect the tonal character You can connect a commercially available USB CD drive to the DP990F and play back separately sold CD ROMs created for the VIMA VIMA TUNES p 80 Songs on VIMA CD ROM VIMA TUNES are programmed with recommended tones suitable for each song When you select a song from a VIMA CD ROM VIMA TUNES recommended tones will be assigned to the DP990F s E Piano Str...

Page 62: ...hich no song has been saved If the dot in the lower right of the display is lit a song has already been saved in that number If you want to erase an unwanted song and replace it with the newly saved song select the number of the unwanted song Saving the Song 1 Press the button The display will indicate Sur If you decide not to save the song press the button 2 Press the button The song will be save...

Page 63: ... in which you can select the delete destination number will appear 3 Press the or button to select the delete destination Deleting the song 1 Press the button The display will indicate Sur If you decide not to delete the song press the button 2 Press the button The selected song will be deleted Never turn off the power while the display indicates dEL You can t select another song if the recorded p...

Page 64: ... connected audio device The sounds from the connected audio device are played by the DP990F Adjust the volume by using the controls of your audio device Turning Off the Power 1 Turn the volume all the way down on the DP990F and on the audio device you re about to connect 2 Turn off the DP990F 3 Turn off the connected audio device Connecting to Audio Equipment Caution when making audio connections ...

Page 65: ...Adjust the volume level on the DP990F and the connected speakers When you play the DP990F s keyboard the sound is played from the connected speakers Turning Off the Power 1 Turn the volume all the way down on the DP990F and on the speakers you re about to connect 2 Turn off the connected speakers 3 Turn off the DP990F Connecting Speakers to the DP990F and Outputting Sounds Output jacks 1 4 plug In...

Page 66: ...ce 5 Adjust the volume level on the DP990F and the connected MIDI device 6 You should also set the MIDI transmit channel as needed For details on the MIDI transmit channel refer to MIDI Transmit Channel Settings MIDI Transmit Channel p 68 Connecting to MIDI Devices Connecting a MIDI Sequencer to the DP990F What s MIDI MIDI short for Musical Instrument Digital Interface was developed as a universal...

Page 67: ...P990F will receive all sixteen channels 1 16 1 Enter Function mode choose Ch p 52 2 Press the or button to edit the setting When set to OFF none of the data describing what you play on the keyboard will be transmitted When Composer MIDI Out is On you can send performance data recorded with the DP990F to a connected MIDI device or computer 1 Enter Function mode choose Out p 52 2 Press the or button...

Page 68: ...eakers or other devices always turn down the volume and turn off the power on all devices before making any connections In order to make connections to your computer you must install MIDI driver software on your computer For details refer to the owner s manual for your MIDI interface Use a USB MIDI interface cable to connect the USB connector of your computer to the MIDI connectors of the DP990F f...

Page 69: ...n no sound is produced when you press any of the twelve keys at the left end of the keyboard To cancel V LINK hold down the Reverb button and press the Transpose button Here s how to specify the channel on which messages used to control video will be sent 1 Enter Function mode choose vLn p 52 2 Use the or button to edit the setting Using the V LINK Function V LINK V LINK is a function that allows ...

Page 70: ... devices connected to more than one AC power outlet If you connect external devices be sure to connect them to the same AC outlet Device connected to the Input jacks have insufficient volume Could you be using a connection cable that contains a resistor Use a connection cable that does not contain a resistor No sound No sound Could the DP990F s volume or the volume of the connected equipment be tu...

Page 71: ... piano and this may give the impression of reverberation even if you ve defeated the Reverb effect The sound of the higher notes suddenly changes from a certain key On an acoustic piano the approximately one and a half octaves of notes at the top of the keyboard will continue sounding regardless of the damper pedal These notes also have a somewhat different tonal character DP990F faithfully simula...

Page 72: ...ormat be played Audio files of the following format can be played back File extension WAV 16 bit linear 44 1 kHz sampling rate Is the filename extension MID Files with other filename extensions cannot be handled as song data Song tempo becomes unstable When playing a song from USB memory the tempo may become unstable if there is an excessive amount of performance data Can t record play back Can t ...

Page 73: ...lay back the song by pressing the button again This audio format is not supported Please use 44 1 kHz 16 bit linear WAV format audio files The internal memory capacity of the DP990F is full The DP990F cannot deal with the excessive MIDI data sent from the external MIDI device Reduce the amount of MIDI data sent to the DP990F A MIDI cable has been disconnected Connect it properly and securely A MID...

Page 74: ...Gt 28 Jazz Guitar 29 AcousticBass 30 A Bass Cymbl 31 FingeredBass 32 BrassSection 33 Alto Sax 34 Tenor Sax GM2 35 STANDARD Set 36 ROOM Set 37 POWER Set 38 ELEC Set 39 ANALOG Set 40 JAZZ Set 41 BRUSH Set 42 ORCH Set 035 042 are drum sets 43 SFX Set 44 Piano 1 45 Piano 1w 46 Piano 1d 47 Piano 2 48 Piano 2w 49 Piano 3 50 Piano 3w 51 Honky tonk 52 Honky tonk w 53 E Piano 1 54 Detuned EP 1 55 Vintage E...

Page 75: ... Oboe 188 English Horn 189 Bassoon 190 Clarinet 191 Piccolo 192 Flute 193 Recorder 194 Pan Flute 195 Bottle Blow 196 Shakuhachi 197 Whistle 198 Ocarina 199 Square Lead1 200 Square Lead2 201 Sine Lead 202 Saw Lead 1 203 Saw Lead 2 204 Doctor Solo 205 Natural Lead 206 SequencedSaw 207 Syn Calliope 208 Chiffer Lead 209 Charang 210 Wire Lead 211 Solo Vox 212 5th Saw Lead 213 Bass Lead 214 Delayed Lead...

Page 76: ...To select the next sound release the or button then press it again 282 Car Stop 283 Car Pass 284 Car Crash 285 Siren 286 Train 287 Jetplane 288 Starship 289 Burst Noise 290 Applause 291 Laughing 292 Screaming 293 Punch 294 Heart Beat 295 Footsteps 296 Gun Shot 297 Machine Gun 298 Laser Gun 299 Explosion No Name DP990F_e book 77 ページ 2010年1月14日 木曜日 午後11時29分 ...

Page 77: ...29 To The Spring Edvard Hagerup Grieg 30 Valse op 64 2 Fryderyk Franciszek Chopin 31 Radetzky Marsch Johann Baptist Strauss 32 Träumerei Robert Alexander Schumann 33 Moments Musicaux 3 Franz Peter Schubert 34 Prèlude op 28 15 Fryderyk Franciszek Chopin 35 Harmonious Blacksmith Georg Friedrich Händel 36 Ungarische Tänze 5 Johannes Brahms 37 Türkischer Marsch Ludwig van Beethoven 38 Nocturne No 2 Fr...

Page 78: ... p 56 String Resonance p 56 Key Off Resonance p 56 Damper Pedal Part p 56 MIDI Transmit Channel p 68 V LINK Transmit Channel p 70 Track Assign p 57 CD Audio Type p 58 Reverb On Off Depth p 26 Split Point p 33 Twin Piano Mode p 30 Key Touch p 27 Settings stored immediately whenever a change is made Memory Backup procedure not needed External Memory Mode p 60 DP990F_e book 79 ページ 2010年1月14日 木曜日 午後11...

Page 79: ...provide a way to go beyond the limitations of proprietary designs and standardize the MIDI capabilities of sound generating devices Sound generating devices and music files that meets the General MIDI standard bears the General MIDI logo Music files bearing the General MIDI logo can be played back using any General MIDI sound generating unit to produce essentially the same musical performance Gene...

Page 80: ...6 5 in semitones Playback Transpose with Audio CD Audio File 6 5 in semitones Effects Reverb Off 10 levels Only for Piano Tones Damper Resonance Off 10 levels String Resonance Off 10 levels Key Off Resonance Off 10 levels Only for Organ Tones Rotary Speaker Effect Slow Fast Recorder Tracks 3 tracks Songs Recorder section 1 song Internal Memory Max 99 songs Note Storage Approx 30 000 notes Control ...

Page 81: ... Speaker box Display 7 segments 3 characters LED Control Volume Pedal Damper capable of continuous detection Soft capable of continuous detection function assignable Sostenuto function assignable Other Function Panel Lock V LINK Connectors DC inlet Input jacks L Mono R Output jacks L Mono R MIDI connectors In Out Phones jack Stereo x 2 External Memory connector Power Consumption 24 W Dimensions 1 ...

Page 82: ... 14 Individual 30 Initializing 60 Initializing the Memory 54 Input jack 15 K Key 53 Key Off Resonance 53 56 79 Key Touch 27 79 Key Touch button 14 L Left pedal 20 Left Pedal Function 53 Local Control 54 68 M Master Tuning 53 55 79 Memory Backup 54 58 Metronome 23 Metronome button 15 MIDI 67 MIDI Out In connector 15 MIDI Sequencer 67 MIDI Sound Module 67 MIDI Transmit Channel 54 68 79 Music CD 62 M...

Page 83: ...55 79 Temperament Key 53 56 79 Tempo Mute 54 57 Tone button 14 Track Assign 54 57 79 Track button 15 Tracks 37 Transpose 34 Transpose button 14 Transpose Mode 53 54 79 Twin Piano 29 Twin Piano button 14 Twin Piano Mode 30 79 U USB Memory 59 V VIMA TUNES 80 V LINK 70 V LINK Transmit Channel 54 70 79 Volume slider 14 X XG lite 80 DP990F_e book 84 ページ 2010年1月14日 木曜日 午後11時29分 ...

Page 84: ...For EU Countries For China DP990F_e book 85 ページ 2010年1月14日 木曜日 午後11時29分 ...

Page 85: ...e equipment and receiver Connect the equipment into an outlet on a circuit different from that to which the receiver is connected Consult the dealer or an experienced radio TV technician for help This device complies with Part 15 of the FCC Rules Operation is subject to the following two conditions 1 this device may not cause harmful interference and 2 this device must accept any interference rece...

Page 86: ...ribuidora De Instrumentos Musicales J E Olear y ESQ Manduvira Asuncion PARAGUAY TEL 595 21 492147 PERU Audionet Distribuciones Musicales SAC Juan Fanning 530 Miraflores Lima Peru TEL 511 4461388 TRINIDAD AMR Ltd Ground Floor Maritime Plaza Barataria Trinidad W I TEL 868 638 6385 URUGUAY Todo Musica S A Francisco Acuna de Figueroa 1771 C P 11 800 Montevideo URUGUAY TEL 02 924 2335 VENEZUELA Instrum...

Page 87: ... 5 1 0 0 0 1 3 6 2 1 0 1 ...

Reviews: