background image

rletech.com

WiNG-MGR v2 User Guide

27

3

  Web Interface

3.1.4 

Refresh

Click this icon to force a refresh of the status page. 

3.1.5 

System Information

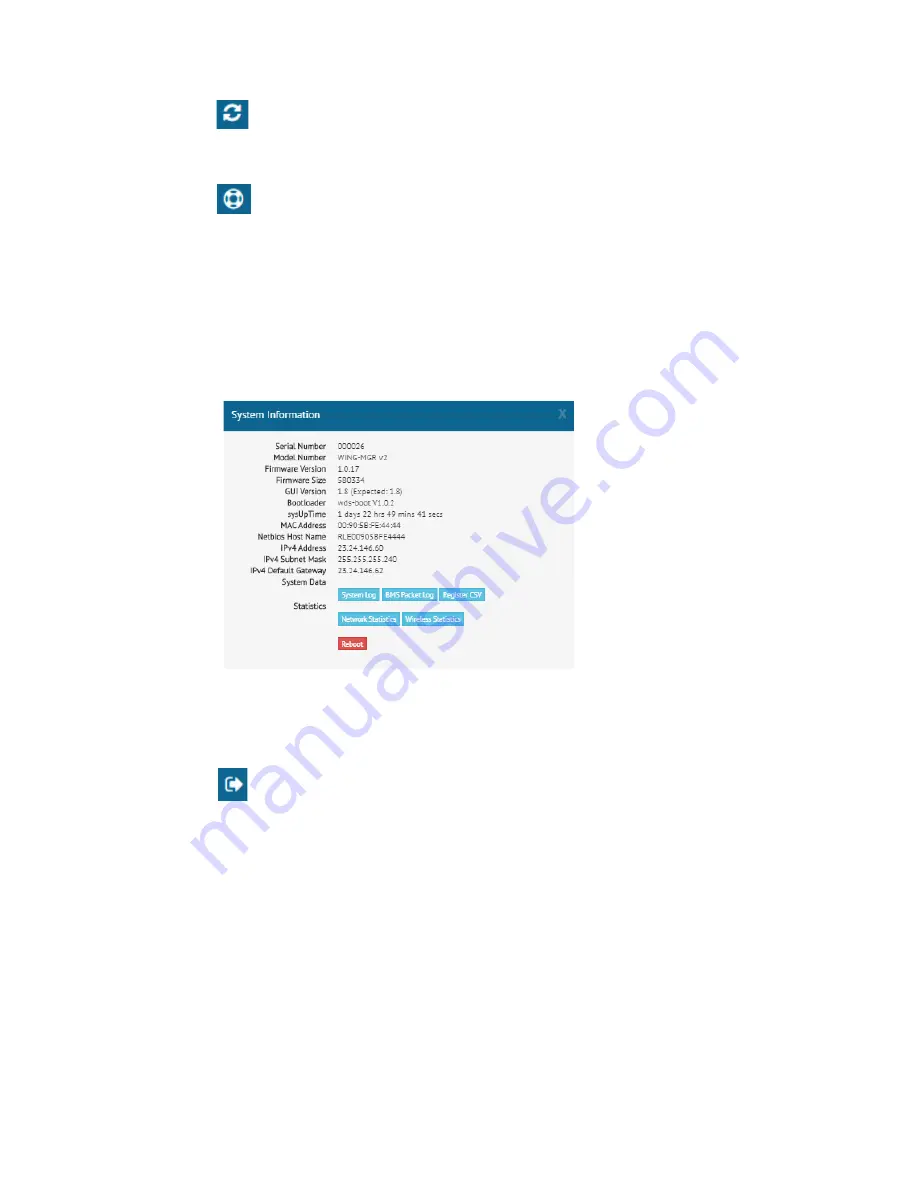
This pop up window displays a variety of information specific to your device in a singular 

location. Direct links to the system log, BMS packet log, network and wireless metrics, and 

the register list are also available from this modal. 

There is also a button in this modal that allows the unit to be rebooted. The reboot button is 

available only to users with System Administrator access to the unit.

If you need to contact RLE’s technical support team, you’ll be asked for the information found 

in the system information modal window. 

Figure 3.6

System Information

3.1.6 

Sign In/Out

Use this option to sign into and out of the WiNG-MGR user interface.

Summary of Contents for WiNG-MGR v2

Page 1: ...User Guide WiNG System WiNG MGR v2 WiNG RXT www rletech com RLE Technologies 800 518 1519 User Guide Version 05 22 Documented Using Firmware Version 1 2 0 ...

Page 2: ...stered trademark and SeaHawk Falcon and Raptor are trademarks of Raymond Lae Engineering Inc The products sold by Raymond Lae Engineering Inc are subject to the limited warranty limited liability and other terms and conditions of sale set forth at rletech com Revision History Rev No Date 10 20 October 2020 05 21 May 2021 05 22 May 2022 ...

Page 3: ...ase visit our website rletech com Technical Support Personal assistance is available Monday through Friday from 8 00 a m to 5 00 p m MST A request for assistance may be sent to support rletech com Otherwise please call us directly at 800 518 1519 The following information is located on the bottom of each WiNG MGR unit Please have this information available whenever a technical support call is plac...

Page 4: ...4 WiNG MGR v2 User Guide 800 518 1519 ...

Page 5: ...Set the IP Address via USB Connection 20 Deploy Your Sensors 21 Use the Sensor Discovery Wizard 21 Manually Launch Sensor Auto Discovery 21 Set Notification Parameters For Your Sensors 21 Global Sensor Settings 22 Individual Sensor Configuration 22 Sensor Mounting Tips 22 3 Web Interface 23 Header Icons 25 Alarm Bell 25 Relay Output Status 25 Sensor Discovery Wizard 25 Refresh 27 System Informatio...

Page 6: ... for the WiNG MGR 70 Function 03 Read Output Registers 70 Function 06 Preset Single Register Function 16 Preset Multiple Registers 71 RTU Framing 72 5 WiNG RXT 73 Add A WiNG RXT Range Extender To Your System 73 Safety Precautions 73 A Communications Objects 75 B Update Firmware 79 Load the Application Firmware 80 Load the Firmware Using TFTP 80 C Alternate Channel Pair Communications 83 WiNG Senso...

Page 7: ...re 3 8 Individual Sensor Page Readings Tab 29 Figure 3 9 Individual Sensor Page Wireless Network Metrics Tab 30 Figure 3 10 Individual Sensor Page Activity History Tab 30 Figure 3 11 Individual Sensor Page Sensor Configuration Tab 31 Figure 3 12 Individual Sensor Page Sensor Objects Tab 34 Figure 3 13 Wireless Network Metrics Page 35 Figure 3 14 Alarms Page 36 Figure 3 15 Map Page 37 Figure 3 16 I...

Page 8: ... 5 WiNG RXT 73 A Communications Objects 75 B Update Firmware 79 Figure B 1 Admin Menu Firmware Tab Configuration File Download 79 Figure B 2 Admin Menu Firmware Page Firmware File Upload 80 C Alternate Channel Pair Communications 83 Figure C 1 Sensor Channel Pair Button 83 D Troubleshooting 87 E Technical Specifications 91 ...

Page 9: ...5 Configuration Options 47 Table 3 12 Modbus Configuration Options 48 Table 3 13 BACnet Configuration Options 49 Table 3 14 DNS Configuration Options 50 Table 3 15 SMTP Configuration Options 51 Table 3 16 Email Configuration Options 52 Table 3 17 SNMP Configuration Options 53 Table 3 18 XML Configuration Options 55 Table 3 19 Firmware Configuration Options 56 Table 3 20 Sensor Configuration Option...

Page 10: ...v2 User Guide 800 518 1519 C Alternate Channel Pair Communications 83 D Troubleshooting 87 E Technical Specifications 91 Table E 1 WiNG MGR Technical Specifications 91 Table E 2 WiNG RXT Technical Specifications 92 ...

Page 11: ... Modbus RTU BACnet IP and BACnet MS TP signals 1 2 Indicators The LEDs on the WiNG MGR indicate the status of a variety of actions 5 1 2 4 3 8 6 7 LED Label Description 1 RX A The WiNG MGR is receiving information over antenna A 2 RX B The WiNG MGR is receiving information over antenna B 3 TX RX C The WiNG MGR is either receiving or transmitting information over antenna C 4 Diagnostic Used for cus...

Page 12: ... the alternate 868MHz channel set 6 RO1 RO2 The relay output is activated 7 USB RX TX USB Receive Transmit status LED 8 Status System status LED 9 RS485 RX TX RS485 Receive Transmit status LED LED Label Description Table 1 1 WiNG MGR LED Indicators Item Description Antenna A RP SMA connector Antenna B RP SMA connector Antenna C RP SMA connector USB USB mini B connector RO 1 Relay output 1 NC NO C ...

Page 13: ... button 15 seconds Yellow Once light turns yellow release button to reset the Username and password Hold button 30 seconds Red Once light turns red release button to reset the Username password and IP address Hold button 45 seconds Off Once light turns off release button to perform a full factory reset of the unit Table 1 3 Reset Button Functions Status Indicator Figure SW1 1 Not used SW1 2 EIA 48...

Page 14: ...14 WiNG MGR v2 User Guide 800 518 1519 1 System Overview ...

Page 15: ...GR put the wall mount tabs in place and reapply the screws Mount the device securely in the desired location If you would prefer to mount the WiNG MGR on a 35mm DIN rail a WiNG MGR DRM bracket is also available sold separately Remove the screws from the sides of the WiNG MGR slide the unit into the bracket and reapply the screws Snap the device securely onto the DIN rail You will hear the bracket ...

Page 16: ...eaded insert ground terminal to a suitable Earth ground 2 Plug the provided wall adapter into the barrel at P1 and a UPS outlet The wall adapter has a five foot 1 524m power cord 3 If you re providing your own power supply connect 24VDC to the unit through the power terminal block Figure 2 1 Power Supply and Grounding Connections Grounding PEM Power unit through EITHER the terminal block or barrel...

Page 17: ...tions now Your wiring may look similar to the connections shown here Figure 2 2 Wired Relay Output Connection 2 3 Connectivity 2 3 1 RJ45 Ethernet Connection The WiNG MGR has an internal 10 100BASE T Ethernet port that is used for configuration The Ethernet port supports Web browser access email SMTP BACnet secondary Modbus server and SNMP Use an Ethernet cable to connect the device directly to a ...

Page 18: ...a Modbus server over an EIA 485 2 wire hardware connection as shown in Figure 2 5 When using the EIA 485 port for Modbus RTU communication RLE Technologies recommends an 18AWG shielded twisted pair stranded copper wire for the connection using no more than 2000 feet 609 6m of wire at this specification If longer runs are needed please contact RLE Technologies Figure 2 5 EIA 485 Connection ...

Page 19: ... s network before the WiNG MGR can communicate over the network There are two ways to set the WiNG MGR s IP address via the web browser or via the EIA 232 interface 2 4 1 Set the IP Address Using a Web Browser Attention If you have not set an IP address before consult your IT Department for support NOTE The default IP address for the WiNG MGR is 10 0 0 188 The default Subnet Mask is 255 255 255 0 ...

Page 20: ...ser name and password as stated above to verify network access to the device 2 4 2 Set the IP Address via USB Connection To use the USB interface 1 Contact your IT Department to obtain an available IP address Subnet Mask and default Gateway 2 Use a USB Mini cable to connect the WiNG MGR to a terminal or PC running terminal emulation software HyperTerminal Terra Term PuTTY etc 3 Set the appropriate...

Page 21: ...auto discovery differs from the sensor discovery wizard in a few ways First and foremost you have to manually turn sensor auto discovery on and off Under normal operating conditions sensor auto discovery should be turned OFF If you do not turn sensor auto discovery off the WiNG MGR will continue to attempt to locate new sensors this can contaminate your list of active sensors with sensors that do ...

Page 22: ...sors one at a time Use the directions found in section 3 2 1 Individual Sensor Pages on page 29 and configure the parameters sensor by sensor Remember to click the Save Changes button on each page to apply the settings 2 7 Sensor Mounting Tips The electronics in WiNG sensors are not waterproof WiNG sensors need to be mounted in a safe location where they will not come into contact with water or co...

Page 23: ...To set the IP address see section 2 4 Communication Set the IP Address on page 19 Use the Dashboard to access and view the data collected and managed by the WiNG MGR Figure 3 1 Dashboard Navigation Option Description Header Icons Detailed in Header Icons on page 25 Left Side Navigation Left Side Navigation items each have their own documented section within this chapter Table 3 1 Dashboard Navigat...

Page 24: ... table of sensors in this section note that each heading has a set of arrows next to it These arrows allow you to sort the data in this table by that column in either ascending or descending order For instance if you click on the arrows next to the Serial Number heading the arrow pointing up gets much darker and all the data in the table is sorted by the Serial Number field from lowest to highest ...

Page 25: ...vides a quick way to view the status of the WiNG MGR s relay outputs Click the X in the upper right corner of the box to close the modal window Figure 3 2 Relay Output Status 3 1 3 Sensor Discovery Wizard The WiNG MGR is equipped with a Sensor Discovery Wizard Run the wizard when you need to install or locate new sensors The wizard will discover available sensors and enter them into the Sensors pa...

Page 26: ... the Close button to close the modal and return to the Sensors page of the website Figure 3 5 Close the Sensor Discovery Wizard The selected sensors will be added to the system and will appear at the end of the list of sensors on the dashboard Confirm the placement of all the new sensors in the sensor list From this point you have two options a Use the sensor s serial number to locate it in the li...

Page 27: ...etwork and wireless metrics and the register list are also available from this modal There is also a button in this modal that allows the unit to be rebooted The reboot button is available only to users with System Administrator access to the unit If you need to contact RLE s technical support team you ll be asked for the information found in the system information modal window Figure 3 6 System I...

Page 28: ...notes the sensor s current status Arrows next to each column heading allow the data to be sorted in ascending or descending order by that column Figure 3 7 Sensors Page Attribute Description The sensor s specific number This number is uneditable and is assigned by the WiNG MGR Name A unique name configurable for each sensor The sensor s name a is link Click on the sensor s name to go to the that s...

Page 29: ...table options are as follows 3 2 1 1 Readings This page tells you the current reading of the sensor and its battery life There is a trend chart on this page and links that allow you to download the trended data and view the sensor s log archive Sensor logging is configured in the Admin Sensors menu and is detailed in section 3 7 3 Sensors on page 58 Figure 3 8 Individual Sensor Page Readings Tab 3...

Page 30: ...ower of the signal This number will always be a negative value and is provided for both channels used by each sensor If there is a range extender in use it will also report the received signal strength from the sensor to the range extender To maximize the performance of this system get the RSSI value as close to zero as you can RSSI range correlates to signal strength as follows 30 to 70 Excellent...

Page 31: ...ration will not be updated and saved Figure 3 11 Individual Sensor Page Sensor Configuration Tab Option Description General Info Sensor Name Enter a name for this sensor Location Enter the sensor s physical location Alarm Notifications Temp Over Enter a high temperature alarm threshold if the temperature rises above this value a high temperature alarm is generated Temp Under Enter a low temperatur...

Page 32: ...otifications Temp Over Enter a high temperature warning threshold if the temperature rises above this value a high temperature warning is generated Temp Under Enter a low temperature warning threshold if the temperature drops below this value a low temperature warning is generated Humidity Over Enter a high humidity warning threshold if the humidity rises above this value a high humidity warning i...

Page 33: ... formulas below adjust the offset values appropriately to fine tune your WiNG ANLG sensor s accuracy For 4 20mA sensors Offset Sensor low range Sensor high range value sensor low range value 4 Example Temperature sensor with a sensing range of 5 120 F Offset 5 120 5 4 23 75 For 0 5V and 0 10V sensors Offset Sensor low range Example Temperature sensor with a sensing range of 5 120 F Offset 5 Footer...

Page 34: ...User Guide 800 518 1519 3 Web Interface 3 2 1 5 Sensor Objects This page denotes the individual Modbus BACnet and SNMP objects provided for this particular sensor Figure 3 12 Individual Sensor Page Sensor Objects Tab ...

Page 35: ...nal Strength Indicator It represents the received power of the signal This number will always be a negative value and is provided for both channels used by each sensor If there is a range extender in use it will also report the received signal strength from the sensor to the range extender To maximize the performance of this system get the RSSI value as close to zero as you can RSSI range correlat...

Page 36: ...e sensors has returned to normal since the alarm or warning was reported this will be noted in the table as well Each sensor s name is a link Click this link to visit the individual sensor s status and configuration page Here you can view the sensor s logged data as well as edit and configure the sensor s settings and alarm and warning thresholds Figure 3 14 Alarms Page ...

Page 37: ... map The values will be color coded to indicate normal warning or alarm Mouse over the reading on the map to see which sensor is providing the specific reading Click the icon next to the Sensor Map text to pop the map out into a new browser tab Complete instructions for creating this map are found in section 3 6 5 Mapping on page 44 Figure 3 15 Map Page ...

Page 38: ...ame of the WiNG MGR and the contact and location information for this particular WiNG MGR You can also look here to find the unit s serial number model number MAC address and the version of firmware currently running on the unit Figure 3 16 Identity Page Option Description System Name Enter a name unique to this particular WiNG MGR System Contact Designate a technical contact for this unit System ...

Page 39: ...gnate whether the WiNG MGR will communicate via IPv4 IPv6 or both IPv4 Settings Configure these fields if the WiNG MGR is communicating via IPv4 Static Address The WiNG MGR is shipped with a default IP address of 10 0 0 188 Contact your IT Department for an appropriate IP address if you wish to change this field If you would prefer to use DHCP set this field to 0 0 0 0 to enable DHCPv4 Default IP ...

Page 40: ...P If you do choose to enable DHCP DHCP will override any static options you configure IPv6 Click the Enable button to enable IPv6 IPv6 Mode Choose the appropriate IPv6 mode Auto Obtains the IP address using SLAAC Stateless Address Autoconfiguration Static Allows you to manually enter a static IPv6 Address Link Local Only Uses the Link Local IP address and does not enable a Global IPv6 Address Pack...

Page 41: ...he onboard clock manually do so here Click the Save Changes button to save all modifications Date Enter the current date in mm dd yy format Time Entered the current time in hh mm ss format The clock is in 24 hour format not 12 hour format so ensure the hour is a two digit number between 01 and 24 NTP If you configure NTP settings they will override anything you have manually configured for the Onb...

Page 42: ...t your location Default setting Second Sunday March DST End Date Set the day DST ends at your location Default setting First Sunday November Update Interval This interval tells the WiNG MGR how often it should access the NTP server you designated and synchronize its time with the NTP server If you enter a 0 in this field it disables this feature which also disables NTP Default setting 0 disabled O...

Page 43: ...relay a latching alarm relay or a power summary relay The power summary option can be used to indicate basic status for the WiNG MGR Relay will ACTIVATE when the unit has powered on and no sensors are in alarm Relay will DE ACTIVATE on a power loss or any alarm condition sensor value in alarm low battery alarm or sensor offline alarm Modbus support is provided for the relay outputs Read the relay ...

Page 44: ...ion Option Description Mapped Points Table This table shows all the sensors currently included on the map Sensor The name of the sensor is a link that takes you directly to that individual sensor s page data and configuration page within the web interface X Pos and Y Pos Use these fields to fine tune the location of the sensor on the map X Pos adjusts the point horizontally Y Pos adjusts the point...

Page 45: ... map in the desired location You can either do this manually by adjusting the numbers in the Mapped Sensors table or click the Edit Graphically icon for each sensors and move them on the map If you choose the Edit Graphically option a The map will launch in a new tab The point you have chosen to edit is detailed in the fields at the top of the map and is also represented in a blue box with a red h...

Page 46: ...you would like the box around the sensor s data to be a different size adjust the Min Size X and Y values The square will not resize itself to be smaller than the font you ve selected 4 If you ve added multiple sensors they will all stack up in the upper left corner of the map Repeat step 3 clicking on each one to turn it blue highlighted and then place it appropriately on the map 5 Once all of yo...

Page 47: ...e the necessary options here Figure 3 22 EIA 485 Configuration Option Description Port Function Select an output type for the EIA 485 port either Modbus Server or BACnet MSTP Default Modbus Server Unit Station ID Set a unit station ID from 1 254 Set the unit station ID to 0 disable EIA 485 port communications Default 0 disabled Baud Rate The baud rate is selectable 9600 19200 or 38400 Choose the a...

Page 48: ...fier here Figure 3 23 Modbus Configuration Option Description Modbus TCP Unit ID This designator is used for Modbus RTU over an Ethernet connection The default unit identifier is 0 which disables this feature To enable this option enter a TCP address from 1 254 in this field In most instances the identifier is typically set at 1 Default 0 disabled Table 3 12 Modbus Configuration Options ...

Page 49: ...Add any additional details about the device up to 38 characters Location Designate the physical location of the unit UDP Port Enter a 0 to specify port 47808 0xBAC0 as the UDP port If another port is specified by your application enter that value here Default 0 47808 Register as Foreign Device at IPv4 IP address of the master device with which you re trying to communicate Requires a BBMD for forei...

Page 50: ...tch to designate whether you want to use an IPv4 or IPv6 DNS server Default setting IPv4 Primary DNS Enter the IP address for the primary DNS server as provided by your internet service provider Default setting 0 0 0 0 Secondary DNS Enter the IP address for the secondary DNS server as provided by your internet service provider Default setting 0 0 0 0 Table 3 14 DNS Configuration Options ...

Page 51: ...configured address Mail Server SMTP Enter the URL of your SMTP server Username Default setting Blank Password Default setting Blank Access Type Default setting Disabled Authentication Default setting None SMTP Port The default of 0 will automatically change based on the Access Type to either 25 unencrypted 587 STARTTLS or 465 TLS Default setting 0 Port 25 Email Stats Refer to this field to see how...

Page 52: ...d text in the subject line of any outgoing email messages Mail Sender Address Any email messages sent by the WiNG MGR will come from this valid email address Mail Recipients Email alerts can be sent to four recipients Enter up to four unique email addresses here If you would like a message to be sent to a distribution group you can use the email address of the distribution group in one of these fi...

Page 53: ...System Contact Designate a system contact who is responsible for the WiNG MGR System Location Enter the address of the WiNG MGR s physical location V1 V2C Community Names When communicating via SNMP V1 V2 identify devices that receive Traps and or Syslog messages from the WiNG MGR and communicate with the WiNG MGR over the network Get Read Enter the appropriate community name Set Write Enter the a...

Page 54: ...device uses SNMPv3 data will populate in this field SNMPv3 User Name Enter a unique name for each SNMPv3 user Access Mode Choose from the following No Auth Auth MD5 No Priv Auth MD5 Priv DES Auth MD5 Priv AES Auth SHA No Priv Auth SHA Priv DES Auth SHA Priv AES A user name is needed for No Authentication and a user name and password are required for Authentication and Privacy Authentication access...

Page 55: ...Right click the Download File button on this page and select Save Link As or Save Target As to download this data as an XML file You can then take that file and import it into a spreadsheet for viewing logging and analyzing Figure 3 29 XML Page Option Description XML Options Download Sensor XML File Click this link to download sensor information as an xml file Table 3 18 XML Configuration Options ...

Page 56: ...is not compatible with a WiNG MGR v2 and WiNG MGR v2 firmware CANNOT be loaded onto a WiNG MGR v1 System Administration Upload A Configuration File Use this menu option to upload a system configuration file to the WiNG MGR This is a particularly useful option if you re configuring more than one WiNG MGR and would like them to have the same settings or if you ve updated the firmware on your unit an...

Page 57: ...tings click this button Check the Reset TCP IP checkbox to reset the IP address to the default of 10 0 0 188 otherwise your network configuration settings will not be reset NOTE Clicking the Reset Factory Default button will overwrite all system and sensor settings you have established within the WiNG MGR and will erase all logged data within the unit Exit to Bootloader Click this link to access t...

Page 58: ... turn sensor auto discovery on Click the Save Changes button to activate sensor auto discovery Through sensor discovery the WiNG MGR discovers new sensors transmitting within its range The WiNG MGR loads the newly detected sensors the next available sensor position in the table on the Sensors tab of the web interface Once you have located all your sensors return to this page and turn sensor auto d...

Page 59: ...on settings will transfer but the sensor names and locations will upload Download Sensor CSV File Download a CSV file that shows all sensors configured in the WiNG MGR Delete Sensors Delete Selected Sensors If you wish to delete some sensors monitored by the WiNG MGR without deleting all the sensors use this option Enter the range of sensors you wish to delete and click the Delete button If you wi...

Page 60: ...C Alternate Channel Pair Communications on page 83 While it s not a difficult process there are quite a few steps involved because you do need to make sure all the components of your system the manager sensors and range extenders are all operating on the correct channel pairs Figure 3 32 Radios Page Attribute Description Settings Radios A B Anaren Radios A and B communicate with the WiNG sensors D...

Page 61: ... will only receive packets from the WiNG RXTs it is bound to and the WiNG RXT s channel pair can only be configured by the WiNG MGR that it is bound to Default Enabled Broadcast Manager Frequency Channel Pair If you wish to change the channel pair on which your system is communicating refer to Appendix C Alternate Channel Pair Communications on page 83 Default Channel pair 1 Range Extender Frequen...

Page 62: ... page of the user interface and then return to this global settings page all the values in the alarm fields will have reverted back to zeros Figure 3 33 Alarms Page Option Description Clear All Alarms Click this button to clear all active alarms on this WiNG MGR Re Alarm Function The WiNG MGR will re send an alarm after a point has been in alarm for a certain number of hours Select a re alarm time...

Page 63: ...nced Check the box to activate the option and enter a time interval Offline Delays Users can designate how many minutes must pass before the WiNG MGR considers the sensor offline Check the box to activate the option and enter a time interval Global Warning Settings There is a checkbox next to each individual alarm setting Check this box to apply that particular setting to each sensor in the system...

Page 64: ...rning is generated Check the box to activate the option and enter a humidity value Warning Delays The number of seconds that pass between the time a temperature or humidity reading goes into a warning state and the time that warning is announced Check the box to activate the option and enter a time interval Option Description Table 3 22 Alarms Configuration Options ...

Page 65: ...ration Username Each user that will log into the WiNG MGR needs their own unique username Enter a username in this field Password Assign a password for this username If you re configuring User 1 Admin you ll also have to verify the password Privilege Select which level of access this user will have View Only This user can view pages within the web interface but cannot make any changes to settings ...

Page 66: ...the drop down menu to enable or disable RADIUS authentication IP Version Designate the IP version for communications Server IP Address Enter the IP address of the RADIUS or LDAP server Radius Secret Enter the RADIUS secret The secret is used between the RADIUS client and the RADIUS server to encrypt passwords The secret is administered by the server and must be known to the client Table 3 24 Radiu...

Page 67: ... hour Delete User Cache Click the button to delete the cached data Server Test Enter your data and click the button to test the usernames and passwords Radius Username Enter a username to test Radius Password Enter a password to test Last Server Test Results The results from the server and the authorization level will be displayed Option Description Table 3 24 Radius Configuration Options ...

Page 68: ...ed an HTTPS certificate and key to do this Contact your IT department for more information about your HTTPS certificate and key Loaded Certificate This section provides details about the certificate currently loaded into the WiNG MGR Loaded Key Info This section provides details about the data key currently loaded into the WiNG MGR Certificate in Use If a certificate is in use it will be indicated...

Page 69: ...nsmission The WiNG MGR supports only the RTU mode of transmission with 8 data bits no parity and one stop bit Every Modbus packet consists of four fields Unit ID Field Function Field Data Field Error Check Field Checksum 4 1 1 1 Unit ID Address Field The unit ID address field is one byte in length and identifies the device involved in the transaction A valid address range is between 1 and 254 The ...

Page 70: ...he WiNG MGR This section outlines the registers with the name and a brief description of each 4 2 1 Function 03 Read Output Registers To read the WiNG MGR s parameter values the master must send a Read Output Registers request packet The Read Output Registers request packet specifies a start register and the number of registers to read The start register is numbered from zero 40001 zero 40002 one ...

Page 71: ... 40003 Serial Number WiNG sensor serial number uint32 Hex ASCII 40004 40012 Sensor Name Descriptive text sensor name uint16 Hex ASCII 40013 Converted Data 1 First data value converted by the WiNG MGR int12 40014 Converted Data 2 Second data value converted by the WiNG MGR int16 40015 40016 Converted Data 3 Third data value converted by the WiNG MGR int32 40017 Battery Level Battery voltage in cent...

Page 72: ...onds to Function Code 4 with six bytes of hexadecimal data and ends with CRC16 checksum Register Values 40001 0000 hex 40002 0000 hex 40003 0001 hex Unit ID Function Code Count Bytes of Data Register Data Msb Lsb Register Data Msb Lsb Register Data Msb Lsb CRC 16 Lsb CRC 16 Msb 02 04 06 00 00 00 00 00 01 B5 A3 Table 4 5 Response Sample ...

Page 73: ...nas A and B can be close together but to avoid signal interference they need to be as far away from antenna C as your installation will allow Extend the leader cables on the antennas to their fullest lengths and secure the antennas as far away from the WiNG MGR and has high off the ground as possible Access the WiNG MGR s web interface and navigate to the Admin Radio Configuration page Radio C nee...

Page 74: ...74 WiNG MGR v2 User Guide 800 518 1519 5 WiNG RXT ...

Page 75: ... the values presented in Reading 2 and Reading 3 will vary depending on the type of sensor with which you are working The table presents specific communications objects for sensor 1 Looking at the table we have bolded the numerical changes to help you see there is a pattern to the Register Instance and OID assignments and a direct connection between the sensor number and the communications objects...

Page 76: ... the last digit n is replaced with the sensor s sensor number Sensor Value Modbus Register BACnet Instance SNMP OID 1 ID 40001 int16 n a 1 3 6 1 4 1 3184 1 15 2 2 1 2 1 Serial Number 40002 uint32 n a 1 3 6 1 4 1 3184 1 15 2 2 1 3 1 Name 40004 int16 n a 1 3 6 1 4 1 3184 1 15 2 2 1 4 1 Reading 1 Temp deg x 10 40013 int16 ai 101 1 3 6 1 4 1 3184 1 15 2 2 1 6 1 Reading 2 Humidity RH or Digital Input 4...

Page 77: ...184 1 15 2 2 1 6 n 1 3 6 1 4 1 3184 1 15 2 2 1 6 28 1 3 6 1 4 1 3184 1 15 2 2 1 7 n 1 3 6 1 4 1 3184 1 15 2 2 1 7 28 1 3 6 1 4 1 3184 1 15 2 2 1 8 n 1 3 6 1 4 1 3184 1 15 2 2 1 8 28 1 3 6 1 4 1 3184 1 15 2 2 1 9 n 1 3 6 1 4 1 3184 1 15 2 2 1 9 28 1 3 6 1 4 1 3184 1 15 2 2 1 10 n 1 3 6 1 4 1 3184 1 15 2 2 1 10 28 1 3 6 1 4 1 3184 1 15 2 2 1 11 n 1 3 6 1 4 1 3184 1 15 2 2 1 11 28 1 3 6 1 4 1 3184 1 ...

Page 78: ...78 WiNG MGR v2 User Guide 800 518 1519 ...

Page 79: ...le and save it in a safe location Figure B 1 Admin Menu Firmware Tab Configuration File Download Once firmware is updated the WiNG MGR should return to its normal functionality In very rare instances the WiNG MGR s configuration data all the system configuration and sensor information loaded onto the unit may become corrupted during the firmware update If the configuration files do become corrupte...

Page 80: ...n must be exited and then erased To do this navigate to the WiNG MGR s configuration menu Once here click on the Exit to Bootloader button Once exited you will get a bootloader web page at the IP address of the unit Next click on the Erase Flash button The Flash application will be erased Note To erase the flash a special username and password are required The username is fds all lowercase and the...

Page 81: ...he first firmware file to the WiNG MGR It may take 10 seconds for the firmware upload to begin Do the same with the second firmware file 5 After one minute refresh the WiNG MGR s web page Notice that the Flash field now contains the latest firmware Click the Start Application button to reboot the unit ...

Page 82: ...82 WiNG MGR v2 User Guide 800 518 1519 ...

Page 83: ...ate via channel pair 1 You can determine on which channel pair your sensor s are communicating by looking at the status LED on the front of the sensor enclosure This LED blinks randomly once every 10 20 seconds If the LED blinks blue the sensor is communicating on channel pair 1 If the LED blinks green the sensor is communicating on channel pair 2 C 1 1 Change the Sensor s Channel Pair 1 Hold the ...

Page 84: ...nnel pair on which your manager is communicating The System LED on the front of the WiNG MGR serves as an indicator in the same manners as LED on the front of the sensors You can determine on which channel pair your WiNG MGR is communicating by looking at the System LED on the front of the enclosure This LED blinks randomly once every 10 20 seconds If the LED blinks blue the WiNG MGR is communicat...

Page 85: ...ossible Access the WiNG MGR s web interface and navigate to the Admin Radio Configuration page Radio C needs to be on in order for the WiNG MGR to communicate with the WiNG RXT Just like WiNG MGRs and WiNG sensors the WiNG RXT can communicate on different channel pairs By default it is set to communicate on channel pair 1 The System LED on the front of the unit indicates on which channel pair it i...

Page 86: ...86 WiNG MGR v2 User Guide 800 518 1519 C Alternate Channel Pair Communications ...

Page 87: ...the lower left hand terminal block on the WiNG MGR If no voltage is present at terminal block check the circuit breaker or power supply that powers the WiNG MGR If voltage is present at the power supply continue to step 2 2 Contact RLE Technologies for further troubleshooting You cannot view the WiNG MGR s home page 1 Verify that the WiNG MGR is powered up and running You will see lights on the RJ...

Page 88: ...f the Sensor Discovery Wizard has run sensors still do not appear work your way through the following steps 1 If the sensor is not visible on the WiNG MGR s home page look at the top of the sensor and see if the LED is blinking If you do not see a blink check the sensor s batteries If you do see it blink continue to step 2 2 Verify the sensor s serial number Make sure you re looking for the correc...

Page 89: ... to be working It may have a battery problem Check the battery s voltage if the sensor begins to show inconsistent or unreliable results As battery power degrades the sensor may report data outside the bounds of reasonable readings If this occurs replace the battery When you replace the battery replace it with a 3 6V lithium battery NOT a standard alkaline AA cell Also make sure you replace it wit...

Page 90: ...90 WiNG MGR v2 User Guide 800 518 1519 D Troubleshooting ...

Page 91: ...a bits 1 stop bit Protocols TCP IP HTML SNMP IPv4 IPv6 HTTP HTTPS TLS1 2 V1 V2C V3 Modbus EIA 485 Modbus Server Modus TCP IP Modbus Server TCP IP transmission protocol BACnet IP ASHRAE STD 135 2004 Annex J BACnet MS TP EIA 485 Wireless Communications Frequency Range 868 870MHz 902 928MHz Max Number of Wireless Sensors Per Manager RLE recommends not exceeding 250 sensors per WiNG MGR 400 sensors pe...

Page 92: ...85ºC Mounting 19 Rack Mount or Wall Mount Dimensions 9 7 W x 4 8 D x 1 8 H 24 6cmW x 12 2cmD x 4 6cmH Weight 2 7lb 1 23kg Certifications ETL listed CE conforms to UL 61010 1 EN 61010 EN 61000 3 2 EN61000 3 3 ETSI EN 301 489 1 ETSI EN 301 489 3 IEC61326 1 certified to CSA C22 2 61010 FCC X7J A11072401 MCQ XB900HP and 47CFR 15B IC 8975A A11072401 1846A XB900HP and ICES 003 RoHS compliant Power 5VDC ...

Page 93: ...ng Altitude 15 000ft 4572m max Storage Temperature 4ºF to 185ºF 20ºC to 85ºC Mounting Freestanding wall mount included Dimensions 4 5 W x 4 8 D x 1 6 H 11 4cmW x 12 2cmD x 4 1cmH Weight 1 2lb 0 534kg Certifications ETL listed CE conforms to UL 61010 1 EN 61010 EN 61326 1 EN 301489 1 certified to CSA C22 2 NO 61010 1 RoHS compliant FCC ID X7J A11072401 and MCQ XB900HP IC 8975A A11072401 and 1846A X...

Page 94: ...94 WiNG MGR v2 User Guide 800 518 1519 E Technical Specifications ...

Reviews: