Chapter 7 Setting the Operation Conditions
136
Setting the Operation Conditions
[Admin.]
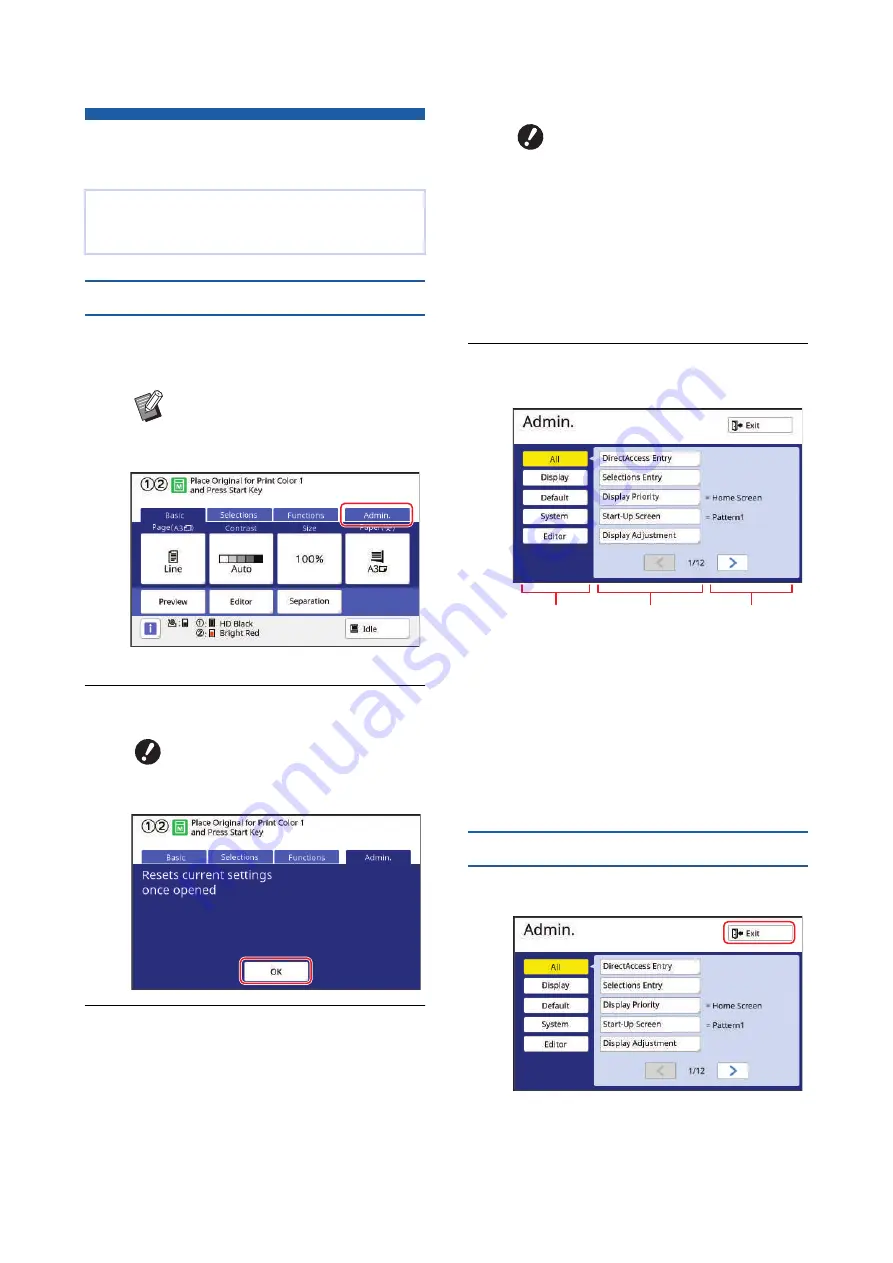
Displaying the [Admin.] screen
1
Touch [Admin.] in the basic
screen.
The [Admin.] tab screen is displayed.
2
Touch [OK].
3
Enter the administrator PIN.
The administrator PIN is the same as this
machine’s serial number at the time of factory
shipment. You can check this machine’s serial
number in [Functions] - [System Info].
You can change the administrator PIN. For
details, see “Changing the user information”
(
4
Touch the button of the item that
you want to set.
1
Display access buttons
Touching a button allows you to filter the
items to be displayed by category.
2
Item buttons
Some buttons display a setting screen when
they are touched, and other buttons switch
between on and off when they are touched.
3
Description
For some items, the current settings are dis-
played.
Exiting the [Admin.] screen
1
Touch [Exit].
The basic screen is displayed.
You can change the default values and set the sys-
tem control-related settings in order to make this
machine more convenient for use.
B
If the [Admin.] tab is not displayed,
consult your dealer or authorized
service representative.
B
Touch [OK] to reset the functions
set in RISO Print/Link/Scanning
mode.
B
For security purposes, do not use
the factory shipment PIN as is.
Change it to your own PIN.
B
If the authentication settings
have been deleted, the authenti-
cation screen will not be dis-
played.
B
If the authentication method is
set to [USB Flash Drive] or [IC
Card], the corresponding input
screen is displayed.
1
2
3
Summary of Contents for MH 9350
Page 21: ...Chapter 1 19 1 About This Machine ...
Page 31: ...29 2 Chapter 2 Basic Operations ...
Page 53: ...51 3 Chapter 3 Functions for Master Making ...
Page 97: ...95 4 Chapter 4 Functions for Printing ...
Page 109: ...107 5 Chapter 5 Useful Functions ...
Page 130: ...Chapter 5 Useful Functions 128 ...
Page 131: ...129 6 Chapter 6 Functions for Scanning ...
Page 137: ...135 7 Chapter 7 Setting the Operation Conditions ...
Page 159: ...157 8 Chapter 8 RISO Console ...
Page 165: ...163 9 Chapter 9 Replacing Consumables ...
Page 177: ...175 10 Chapter 10 Maintenance ...
Page 181: ...179 11 Chapter 11 Troubleshooting ...
Page 205: ...203 12 Chapter 12 Appendix ...
Page 215: ...Chapter 12 Appendix 213 12 V View edit 48 W WAKE UP key 23 Z Zoom 71 ...


