background image

17 - 2

CZ180 / CV1860 Rev. 1.0

CHAPTER 17:  OTHER CAUTIONS

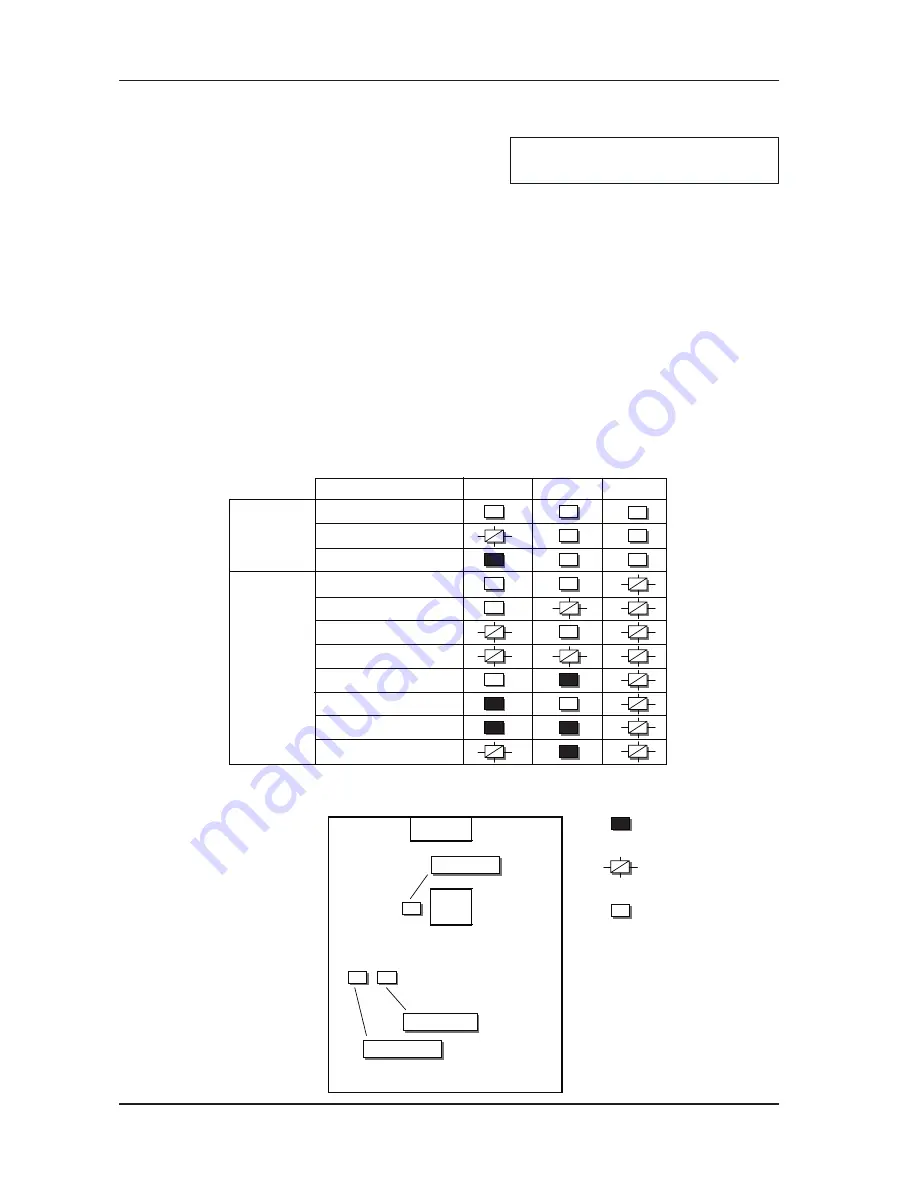
: BLINK

: OFF

: ON

Name of the LEDs on PCB

GREEN 1

GREEN 2

ERROR

Firmware ready to download

Firmware being downloaded

Firmware downloading completed

CF card set incorrectly

Machine data not found

Incorrect data

Download failure

Incorrect data size

File system error

Other error

Mechanical communication error

NORMAL
DOWNLOADING
CONDITION

ERROR
CONDITIONS

LED LOCATION

CF card

slot

ERROR

GREEN 1

GREEN 2

LED

LED

LED

H8

Mechanical
Control PCB

1.  Machine Firmware Downloading (Mechanical Control PCB)

Downloading Procedure

1)  Turn OFF the machine power.
2)  Remove the Rear Cover. (M3x8 screws; 5 pcs)

3)  Insert the CF card containing the correct machine firmware into the CF card slot of the Mechanical 

control PCB.  The CF card needs to be put in a card adopter before the insertion.

4)  Turn ON the machine power and let the firmware download automatically.
5)  Confirming that the downloading ended in success, turn OFF the machine power and remove 

the CF card from the PCB slot.  The confirmation of the downloading process can be made by 

watching the three LEDs shown on the chart below.

6)  Put back the Rear Cover on the machine to complete the downloading procedure.

Precaution in firmware downloading

1)  If the version number of the firmware now on the machine is identical with the one in the CF card, 

the downloading process will not take.  The red ERROR LED blinks and nothing happens.   In this 

case, turn OFF the machine power and remove the CF card.   Turn the machine power back ON 
and resume normal operation with the existing machine firmware.

The method given below is for CZ180.
The method is different for CV1860.

RISO Inc. Technical Services & Support


US.RISO.COM

Summary of Contents for CV1860 Series

Page 1: ...ng or recording of the information is strictly prohibited without the consent of a member of RISO International Group RISO KAGAKU CORPORATION JAPAN RISO INC U S A RISO EUROPE LIMITED U K RISO HONG KON...

Page 2: ...Chapter 5 SECOND PAPER FEED Chapter 6 PRINTING PRESSURE Chapter 7 PAPER EJECTION Chapter 8 PRINT DRUM Chapter 9 MASTER CLAMPING Chapter 10 MASTER REMOVAL Chapter 11 ORIGINAL SCANNING Chapter 12 MASTE...

Page 3: ...ovides procedures for removing and installing major components Following these procedures will minimize machine malfunctions This information and format will also increase technical representatives aw...

Page 4: ...180 8 CV1860 10 Inkless Drum CZ180 13 Inkless Drum CV1860 14 RISORINC Printer Control Board 15 7 External Cover Removal 18 Front Cover 18 Rear Cover 18 Master Removal Upper Cover 18 Scanner Unit Cover...

Page 5: ...0 series This manual provides procedures for removing and installing major components Following these procedures will minimize machine malfunctions This information and format will also increase techn...

Page 6: ...machine before plugging or unplugging the electrical connectors or when connecting a Meter 2 Always connect electrical connectors firmly I To avoid electrical failure The connectors must be connected...

Page 7: ...parts 2 Distinguish between parts which are being replaced and those which will be reused 3 When replacing screws etc be sure to use the specified sizes Assembly and Installation Unless specified othe...

Page 8: ...and transmitting types Magnetic sensors use Hall ICs which react to the magnetic force in magnets Always turn off the power before plugging or unplugging sensor connectors Interrupt types Actuator typ...

Page 9: ...ensation allowed 4 Those with radiant heat sources and any locations in the direct path of air from air conditioners or heaters 5 Any poorly ventilated location 6 Dusty atmosphere 7 Any tilted locatio...

Page 10: ...NANCE 015 26128 008 Drum Shaft JIG 021 16007 005 Spring Screen 2 pieces required Cut the ring end to make into hook as shown on the photograph and attach wire tie bar on the other end 5 JIGs RISO Inc...

Page 11: ...on of Stabilizers depending on the stand type referring to the illustration in the left Installation of the Printer Voltage Setting Only for CZ100 installing in 100 120V countries 1 Remove the Rear Co...

Page 12: ...r Ejection Wing 7 Remove the Shock Absorbing Sheet from the Disposal Unit Shock Absorbing Sheet Tapes Shock Absorbing Sheet Shock Absorbing Sheet When pulling out the Drum after the above installation...

Page 13: ...1 10 CZ180 CV1860 Rev 1 0 CHAPTER 1 MAINTENANCE CV1860 RISO Inc Technical Services Support US RISO COM...

Page 14: ...1 11 CZ180 CV1860 Rev 1 0 CHAPTER 1 MAINTENANCE RISO Inc Technical Services Support US RISO COM...

Page 15: ...1 12 CZ180 CV1860 Rev 1 0 CHAPTER 1 MAINTENANCE RISO Inc Technical Services Support US RISO COM...

Page 16: ...der drum in the printer 3 Start the test mode Note If the error code No d04 534 appears on the control panel remove the Print cylinder drum and then check the ink cartridge and the Jumper wireharness...

Page 17: ...1 14 CZ180 CV1860 Rev 1 0 CHAPTER 1 MAINTENANCE Inkless Drum CV1860 RISO Inc Technical Services Support US RISO COM...

Page 18: ...1 15 CZ180 CV1860 Rev 1 0 CHAPTER 1 MAINTENANCE RISORINC Printer Control Board RISO Inc Technical Services Support US RISO COM...

Page 19: ...1 16 CZ180 CV1860 Rev 1 0 CHAPTER 1 MAINTENANCE RISO Inc Technical Services Support US RISO COM...

Page 20: ...1 17 CZ180 CV1860 Rev 1 0 CHAPTER 1 MAINTENANCE RISO Inc Technical Services Support US RISO COM...

Page 21: ...over M3x8 screws 4 pcs 3 Detach the Scanner Unit Cover M3x8 screws 4 pcs Master Removal Lower Cover 1 Turn OFF the machine cover and remove the Master Disposal Box 2 Detach the Master Removal Lower Co...

Page 22: ...ss when leading the Power Switch Wire Harness out through the Handle Mounting Bracket B Precaution in Assembly 1 To prevent the wire harness from getting damaged place the wire harness from the Copy C...

Page 23: ...Unit Side Frame and the Rear Stay are both mounted on the machine using JIGs at the factory using screws which cannot be loosened or removed using regular screw drivers These special screws should ne...

Page 24: ...Sectional Diagram 2 2 Operation Outline 3 3 Outline of Paper feeding Printing and Paper ejection Operations 3 4 Master removal operation 4 5 Master making operation 4 6 Master loading operation 4 7 M...

Page 25: ...against the print drum for printing 4 Paper ejection section Removes the printed paper from the print drum using the separator and sends it to the paper receiving tray 5 Print drum Supplies ink from...

Page 26: ...sent from the first paper feed area contacts the timing roller and guide roller and stops temporarily This causes slight buckling of the paper 3 The timing roller and guide roller start rotating feed...

Page 27: ...r disposal box 3 The motion of the compression plate starts pressing the master into the master disposal box 5 Master making operation 1 The image sensor scans the original and the thermal print head...

Page 28: ...2 CZ180 CV1860 Rev 1 0 CHAPTER 2 MACHINE SUMMARY MEMO RISO Inc Technical Services Support US RISO COM...

Page 29: ...2 CZ180 CV1860 Rev 1 0 CHAPTER 2 MACHINE SUMMARY 7 Machine Specification 1 CZ180 RISO Inc Technical Services Support US RISO COM...

Page 30: ...l Master making Time Approx 37 sec for A4 portrait 100 reproduction ratio Printing Area Max 251 mm 357 mm Print Reproduction Ratio 100 reproduction ratio Standard reproduction ratio enlargement 141 12...

Page 31: ...2 CZ180 CV1860 Rev 1 0 CHAPTER 2 MACHINE SUMMARY 2 CV1860 RISO Inc Technical Services Support US RISO COM...

Page 32: ...2 CZ180 CV1860 Rev 1 0 CHAPTER 2 MACHINE SUMMARY RISO Inc Technical Services Support US RISO COM...

Page 33: ...2 10 CZ180 CV1860 Rev 1 0 CHAPTER 2 MACHINE SUMMARY MEMO RISO Inc Technical Services Support US RISO COM...

Page 34: ...n Drive 2 2 Main Motor Safety Switch 2 3 Print Drum Positions 3 4 Print Drum Locking Mechanism 3 DISASSEMBLY 4 1 Intermediate Gear 4 2 Main Motor Unit 6 3 Drum Safety Switch 7 ADJUSTMENT 8 1 Position...

Page 35: ...r gear via Intermediate gear in the between 2 Main Motor FG Sensor The FG sesnor on the Main motor checks the Main motor rotation speed and Drum angle position 2 Main Motor Safety Switch 1 Following f...

Page 36: ...is pulled out or pushed into the machine 4 Print Drum Locking Mechanism 1 The Print drum is designed to unlock only when it is at Position B 2 At any other Drum positions the flange around the Drum ma...

Page 37: ...Remove the Intermediate gear out from the machine through the drum opening in front of the machine Precaution in Assembly 1 Match the Eye markings between the Drum main gear and Intermediate gear Ref...

Page 38: ...e front of the machine Intermediate gear Positioning marks Drum main gear View from the back of the machine Hole for Allen wrench View from the back of the machine Print drum Positioning marks Main ge...

Page 39: ...and release hand from the Pressure lever assembly slowly as not to injure your hands 7 Carefully remove the Pressure spring 8 Remove the Spring from the Sector gear 9 Disconnect the connectors from th...

Page 40: ...ver M3x8 screws 5 pcs 3 Swing open the PCB bracket M3x8 screws 4 pcs 4 Disconnect the connector from the Drum safety switch 5 Remove mounting screw of the Drum safety switch bracket and remove the bra...

Page 41: ...ment is completed repeat the adjustment procedure until the Position B adjustment is correctly make Precaution in Adjustment 1 Basically the machine is designed to have the Position B adjusted correct...

Page 42: ...al of Pickup roller and Scraper roller 8 5 Removal of Stripper pad 9 6 Removal of Upper limit sensor 10 7 Removal of Lower limit sensor 11 8 Removal of Elevator motor unit 12 9 Removal of Paper feed c...

Page 43: ...til the Scraper plate assembly blocks the light path of the Upper limit sensor The Elevator motor is activated intermittently during the printing job to keep the Upper limit sensor light path blocked...

Page 44: ...d clutch activates to rotate the Scraper roller and Pickup roller The Paper feed clutch turns OFF after the print drum rotates for a given angle after the Paper sensor detects the leading edge of the...

Page 45: ...of paper into the machine The Stripper pad has a spring underneath which pushes the Stripper pad against the Pickup roller to separate the top sheet from the rest The Stripper unit has a pressure adju...

Page 46: ...aster disposal box and detach the following parts Front cover M3x8 screws 6 pcs Rear cover M3x8 screws 5 pcs Master removal lower cover M3x8 screws 4 pcs 2 Remove the rollers from the front and rear 3...

Page 47: ...OFF the machine power 2 Remove the Front cover M3x8 screws 3 pcs 3 Unplug the wire harness connector of the Paper detection sensor cut off the wire band and gently pull the wire harness towards the Pa...

Page 48: ...ng hooks 2 Match the positioning pins and positioning holes when attaching the Paper feed tray cover 3 Wire the Paper detection sensor wire harness in correct path and make sure to attach new wire ban...

Page 49: ...from the Pickup roller shaft 2 Remove the plastic clip which holds the Pickup roller in place 3 Slide out the Pickup roller from the Pickup roller shaft Precaution in Assembly 1 Both the Scraper and...

Page 50: ...hine power 2 Remove both the Scraper and Pickup roller 3 Remove the Stripper pad mount carefully not to damage the Stripper spring located underneath 4 Detach the Stripper pad from the Stripper pad mo...

Page 51: ...Detach the Upper limit sensor from the bracket and disconnect the wire harness connector Precaution in Assembly 1 Match the positioning pins and positioning holes when attaching the Upper limit sensor...

Page 52: ...y up using Test Mode No 708 Elevator motor activation in the up direction 2 Pull the Print drum out of the machine turn OFF the machine power and remove the Rear cover M3x8 screws 5 pcs 3 Unplug the w...

Page 53: ...llowing parts Front cover M3x8 screws 6 pcs Rear cover M3x8 screws 5 pcs 3 Swing open the PCB Bracket on the rear of the machine M3x8 screws 4 pcs 4 Remove the Elevator springs from front and rear 5 U...

Page 54: ...M3x8 screws 4 pcs 3 Disconnect the wire harness connector of the Paper feed clutch 4 Remove the E ring from the Pickup shaft and slide the Paper feed clutch off the Pickup shaft 5mm dia E ring 1 pc Pr...

Page 55: ...roller and Scraper roller Upper limit sensor Paper feed clutch 3 Remove E ring 8mm dia 1 pc from the Pickup shaft on the drive side of the machine and remove the Metal bushing 4 Remove the E ring 8mm...

Page 56: ...vator spring brackets M3x6 screws 2 pcs 3 Remove the Pickup shaft support bracket M3x6 screw 1 pc 4 Remove the Elevator rollers from the front and rear Elevator frame assemblies 6mm dia E rings 4 pcs...

Page 57: ...4 FIRST PAPER FEED Elevator roller Guide roller assembly Elevator frame F assembly Guide plate connector Pickup shaft bracket Elevator spring bracket rear Upper limit sensor Guide plate RISO Inc Techn...

Page 58: ...it Paper feed clutch Pickup roller shaft assembly Elevator motor unit Guide plate 2 Unplug the wire harness connector of the Paper sensor from the Guide plate 3 Detach the Guide plate upper assembly f...

Page 59: ...comes too weak This may result in paper not feeding at all 2 Paper Feed Clutch OFF Angle Adjustment 1 Perform printing and confirm that the paper is fed smoothly into the second paper feed area 2 If t...

Page 60: ...VE 4 Activate Test Mode No 705 Paper sensor sensitivity automatic adjustment 5 Press the C key of the numeric keypad on the machine operation panel 6 Then change the Test Mode number to No 722 Paper s...

Page 61: ...4 20 CZ180 CV1860 Rev 1 0 CHAPTER 4 FIRST PAPER FEED MEMO RISO Inc Technical Services Support US RISO COM...

Page 62: ...rtical Printing Position Mechanism 2 DISASSEMBLY 4 1 Load Spring 4 2 Timing Cam 4 3 Guide Roller Assembly 5 4 Vertical Print Positioning Base Unit 6 5 Vertical Print Positioning Pulse Motor 7 6 Sector...

Page 63: ...nting during the first paper feed action the Guide roller comes down to make contact with the Timing roller Then the second paper feed action starts by the Timing roller and Guide roller sending the p...

Page 64: ...SECOND PAPER FEED Guide roller Timing Cam Timing gear Vertical print positioning lever assembly Timing gear spring Intermediate gear Timing lever assembly Main cam Guide roller spring RISO Inc Techni...

Page 65: ...Load spring from the Timing roller Precaution in Assembly 1 Do not make mistake in the direction of the Load spring during the assembly 2 Timing Cam REMOVAL 1 Turn OFF the machine power and remove Rea...

Page 66: ...Timing lever assembly M4x8 screw 1 pc 5 Remove E ring and metal bushing which can be seen after removing the Timing lever assembly from the Guide roller spindle shaft 8mm dia E ring 1 pc 6 Remove E ri...

Page 67: ...screws 4 pcs 3 Remove the Sector gear spring 4 Disconnect the wire harness connectors of the Vertical print positioning HP sensor and Vertical print positioning pulse motor 5 Remove E ring from the Ca...

Page 68: ...ng from the Cam follower arm and remove the Cam follower arm from the Sector gear 6mm dia E ring 1 pc 6 Remove Mounting screw of the Vertical print positioning base unit and remove the unit M4x6 screw...

Page 69: ...the PCB bracket on the rear of the machine M3x8 screws 4 pcs 3 Remove following parts Timing cam 6mm dia E ring 1 pc Vertical print positioning base unit 4 Remove the Sector gear spring and detach th...

Page 70: ...t positioning base unit Paper feed clutch Sector gear Guide roller assembly 2 Remove E ring from spur gear and detach spur gear from the shaft 6mm E ring 1 pc 3 Remove E ring from Timing roller on bot...

Page 71: ...f the Sector gear 4 If the eye marking do not match remove Timing cam from the Timing roller shaft 6mm dia E ring 1 pc 5 Lift the Timing lever assembly and mount the Timing cam back on the Timing roll...

Page 72: ...S SECTION CONTENTS MECHANISM 2 1 Press Mechanism 2 DISASSEMBLY 3 1 Pressure Roller 3 2 Pressure Solenoid 4 3 Pressure Lever Assembly 5 4 Pressure Roller Assembly 6 ADJUSTMENT 7 1 Pressure lever assemb...

Page 73: ...to prevent the Clamp plate from hitting against the Pressure roller The Pressure solenoid stays activated ON all through the printing job to keep the Solenoid lever down away from the Pressure lever a...

Page 74: ...power 2 Remove the mounting screw of the Pressure roller from the Pressure roller bracket through a hole on the machine frame under the Drum opening on the operator side of the machine 3 Slide the Pre...

Page 75: ...the Pressure lever assembly from the Solenoid lever by pushing down the Solenoid lever while pulling on the Pressure lever assembly 4 Carefully remove the Pressure spring 5 Disconnect the wire harness...

Page 76: ...s 4 Being careful not to injure yourself use your hand to push on the Pressure lever and push the Solenoid lever down to unhook the both from each other 5 Pay caution not to injure yourself remove the...

Page 77: ...sure lever assembly 2 Remove C ring from both ends of Pressure shaft assembly and detach Metal bushing from the both ends 14mm dia C ring 2 pcs 3 Slide the Pressure shaft assembly towards to the rear...

Page 78: ...mbly 8 Place a 3mm Allen wrench or 3mm thick plate between the Pressure cam and Cam follower and hook a thinner Allen wrench in the hole on the end of the Pressure shaft to rotate the shaft 9 Rotate t...

Page 79: ...6 CZ180 CV1860 Rev 1 0 CHAPTER 6 PRESS SECTION MEMO RISO Inc Technical Services Support US RISO COM...

Page 80: ...eparation Mechanism 3 DISASSEMBLY 4 1 Suction unit 4 2 Suction Fan 4 3 Paper Ejection Motor 5 4 Paper ejection motor FG sensor 6 5 Suction belt 6 6 Paper receiving sensor 8 7 Separation fan unit 9 8 S...

Page 81: ...the Paper separation fan and Separator 2 Paper Ejection Suction fan pulls the paper separated from the Drum on to the Suction unit The Transfer belts on the Suction unit driven by Paper ejection motor...

Page 82: ...on the Drum comes close to the Separator the Separator cam which is attached on the Intermediate cam pushes the Separator away from the Drum 2 Separator Release Lever When the Drum is being pulled out...

Page 83: ...ng it out M3x6 screws 2 pcs Precaution in Assembly 1 In mounting the Suction unit back on the machine hook the leading edge of the unit correctly on the metal angle inside the machine 2 Suction Fan RE...

Page 84: ...n face cover M3x6 screws 4 pcs 6 Unplug the wire harness connector of the Paper ejection motor 7 Remove the mounting screws of the Paper ejection motor and detach the motor M3x5 screws 2 pcs Precautio...

Page 85: ...ach the sensor 5 Suction belt REMOVAL 1 Turn OFF the machine power and remove following parts Paper ejection cover M3x6 screws 2 pcs Suction unit M3x6 screws 2 pcs 2 Detach the left and right Paper ej...

Page 86: ...7 CZ180 CV1860 Rev 1 0 CHAPTER 7 PAPER EJECTION SECTION Suction unit top plate Suction belt Suction unit Suction unit top plate RISO Inc Technical Services Support US RISO COM...

Page 87: ...right Paper ejection wings Thumb screws 1 each 3 Unhook the Timing belt from the motor 4 Remove the Driven shaft assembly 5 Detach the Suction face cover M3x6 screws 4 pcs 6 Turn over the Suction unit...

Page 88: ...caution in Assembly 1 Make sure to hook the leading edge of the Separation fan unit on the mount when mounting the unit back on the machine 8 Separation fan REMOVAL 1 Turn OFF the machine power and re...

Page 89: ...move E ring on the front end of the Separator shaft and remove the Metal bushing 6mm dia E ring 1 pc 7 Slide the Separator shaft to the rear and remove the mounting screw of Separator lever and detach...

Page 90: ...Rev 1 0 CHAPTER 7 PAPER EJECTION SECTION Separator lever Separator shaft Separator springs Separator shaft Release arm Separator Release lever Release arm Release lever RISO Inc Technical Services Su...

Page 91: ...er M3x8 screws 6 pcs Rear cover M3x8 screws 5 pcs Paper ejection cover M3x6 screws 2 pcs Suction unit M3x6 screws 2 pcs 2 Remove mounting screws from Paper receiving tray lock plates front rear and de...

Page 92: ...nter of the prints make an adjustment by bringing the Drum to Position B Then turn OFF the machine power and remove the Rear cover M3x8 screws 5 pcs 3 Open the PCB Bracket on the rear of the machine M...

Page 93: ...7 14 CZ180 CV1860 Rev 1 0 CHAPTER 7 PAPER EJECTION SECTION MEMO RISO Inc Technical Services Support US RISO COM...

Page 94: ...echanism 2 5 Drum Idling Mechanism 2 DISASSEMBLY 4 1 Ink Bottle Guide 4 2 Ink Bottle Set Switch 4 3 RF PCB 5 4 Inking Motor 6 5 Drum Set Sensor 7 6 Drum Screen 8 7 Drum Body 9 8 Ink Sensor PCB 10 9 Dr...

Page 95: ...by hand in the opposite direction 4 Ink Supply Mechanism While the Drum is being rotated by the Main motor if the amount of ink within the Drum reduces and the Ink sensor no longer touches the bead o...

Page 96: ...8 CZ180 CV1860 Rev 1 0 CHAPTER 8 PRINT DRUM Intermediate gear Main gear Main motor Inking motor Overflow sensor Squeegee roller Driving shaft Ink sensor RISO Inc Technical Services Support US RISO COM...

Page 97: ...m cover M3x8 screws 4 pcs 3 Remove the Bottle switch cover M3x8 screws 2 pcs 4 Detach the Ink bottle guide M3x8 screws 3 pcs 5 Unplug the Bottle set switch wire harness 2 Ink Bottle Set Switch REMOVAL...

Page 98: ...the Bottle switch cover M3x8 screws 2 pcs 4 Unplug the RF PCB wire harness 5 Remove the Antenna holder and Spring stepped screws 2 pcs 6 Carefully release the hooks on the Antenna holder and remove th...

Page 99: ...bracket M3x8 screws 2 pcs 8 Remove the Ink intake nozzle bracket M3x8 screws 3 pcs 9 Remove the Ink bottle base M3x8 screws 4 pcs 10 Remove the Grip handle M4x8 screws 4 pcs 11 Unplug the Inking motor...

Page 100: ...nd remove the sensor Precaution in Assembly 1 In mounting back the Inking motor use a wire harness band of about 100mm in length and fix the RF wire harness firmly on the Holder bracket This is to pre...

Page 101: ...Screen hanger and Screen assembly from the Drum M4x8 screws 4 pcs Precaution in Assembly 1 Do not fold the Screen The Screen is no longer useful if a crease is made 2 The mounting screws should be ma...

Page 102: ...The Drum body should be attached onto the Drum with the F engrave to the front of the Drum The arrow marks on the Drum body should meet with the arrow mark on the Drum flange surface The first two sc...

Page 103: ...orm or bend the sensor needles 2 If the needles are bent straighten then out by hand before installing the Ink sensor PCB back on the Drum 3 The Clamp plate base assembly should be pushed towards the...

Page 104: ...ting screws of the Inking motor to detach the Inking motor M4x10 screws 2 pcs 13 Remove the Ink pump base M3x8 screws 2 pcs 14 Unplug the Ink sensor wire harness connector 15 Remove the Ink sensor ass...

Page 105: ...8 12 CZ180 CV1860 Rev 1 0 CHAPTER 8 PRINT DRUM Rear frame Side channel Rear frame Drum support R Set screw IB lock Cap screw Front frame Drum support F RISO Inc Technical Services Support US RISO COM...

Page 106: ...he position of the Ink sensor relay wire harness to the Support frame and Rear support plate 5 Make sure that the Ink sensor relay wire harness does not have any slack in the area indicated by the dot...

Page 107: ...en the front and rear Shaft joints slide them inside and lift the Center shaft out of the Drum assembly M4x4 set screws 2 pcs 7 Remove the Driving shaft M3x8 screws 2 pcs 8 Remove the Rear frame M3x8...

Page 108: ...8 15 CZ180 CV1860 Rev 1 0 CHAPTER 8 PRINT DRUM Shaft joint Center shaft Front frame Squeegee roller Driving shaft Squeegee roller Rear frame RISO Inc Technical Services Support US RISO COM...

Page 109: ...3x8 screws 3 pcs 6 Unplug the Bottle set switch wire harness 7 Remove the Holder bracket M3x8 screws 2 pcs 8 Remove the Ink intake nozzle bracket M3x8 screws 3 pcs 9 Remove the Ink bottle base M3x8 sc...

Page 110: ...the Drum This will cause light prints to come out in the beginning of a print job 3 Ink blocking plate position adjustment ADJUSTMENT FRONT 1 Remove the Drum out of the machine and remove following p...

Page 111: ...8 18 CZ180 CV1860 Rev 1 0 CHAPTER 8 PRINT DRUM MEMO RISO Inc Technical Services Support US RISO COM...

Page 112: ...AMP UNIT CONTENTS MECHANISM 2 1 Clamp Unit Home Position Movement 2 2 Clamp Plate Master Release Movement 2 3 Clamp Plate Master Clamp Mechanism 3 DISASSEMBLY 4 1 Clamp Unit 4 2 Clamp Motor 5 3 Clamp...

Page 113: ...move the arms until the light path of the sensor becomes blocked 2 Clamp Plate Master Release Movement When the START button is pressed for confidential or regular master making the Drum rotates to Po...

Page 114: ...open arm is pushed down to open the Clamp plate The Clamp motor stops and waits for the master material The Load pulse motor on the Master making unit sends given length of the master material towards...

Page 115: ...ws 5 pcs 2 Open the PCB bracket on the rear of the machine M3x8 screws 4 pcs 3 Unplug the wire harness connectors of the Clamp motor and Clamp sensor 4 Remove the mounting screws of the Clamp unit and...

Page 116: ...5 pcs Clamp unit M3x6 screws 3 pcs 2 Remove E ring from the Clamp gear and detach the gear 4mm dia E ring 1 pc 3 Detach the Clamp motor M3x5 screws 2 pcs Precaution in Assembly 1 When mounting the Cl...

Page 117: ...M3x6 screws 3 pcs 2 Remove E ring from the Clamp gear and detach the gear 4mm dia E ring 1 pc 3 Rotate the Clamp cam and move the actuator plate out from the Clamp sensor 4 Detach the Clamp sensor Pr...

Page 118: ...isposal Box Set Mechanism 5 DISASSEMBLY 6 1 Master Removal Unit 6 2 Master Removal Sensor 9 3 Master Removal FULL Sensor 9 4 Master Compression HP Sensor 10 5 Master Removal Motor FG Sensor 10 6 Maste...

Page 119: ...the Master compression plate is already at home position Compressing motor is activated to rotate the Master compression plate down until the actuator disk on the Master compression plate blocks the...

Page 120: ...The motor stops and completes the home positioning movement when the actuator disk escapes from the light path of the Master compression HP sensor 3 When the Master compression plate is at a halfway p...

Page 121: ...amp open arm and Master release arm are lifted to closes the Clamp plate and the Master release bar The master release movement is completed when the light path of the Clamp sensor becomes open and th...

Page 122: ...detection sensor does not detect Master compression plate at all during the disposed master compressing movement the machine assumes that the Master disposal box is full 6 Master Disposal Box Set Mech...

Page 123: ...rews 4 pcs Scanner unit cover M3x8 screws 4 pcs 2 Open the PCB bracket on back of the machine M3x8 screws 4 pcs 3 Unplug the Master disposal wire harness connector 4 Remove the Housing stay A M3x6 scr...

Page 124: ...PTER 10 MASTER REMOVAL Master removal upper assembly Housing stay A Master removal upper assembly Master removal bottom assembly Print drum Paper feed tray unit View from the TOP RISO Inc Technical Se...

Page 125: ...e top Precaution in Assembly 1 When wiring the Master removal unit wire harness the blue colored wire harness should be wired in the manner explained below 2 Wire the blue colored wire harness through...

Page 126: ...emoval sensor 3 Then detach the sensor by removing the mounting screw M3x6 screw 1 pc 3 Master Removal FULL Sensor REMOVAL 1 Turn OFF the machine power and remove the Master removal upper cover M3x8 s...

Page 127: ...screws 2 pcs 2 Remove the Gear cover front M3x6 screws 2 pcs 3 Remove the mounting bracket M3x6 screw 1 pc 4 Remove the sensor by unhooking the legs and unplugging the wire harness connector 5 Master...

Page 128: ...ssion motor is removed REMOVAL 1 Turn OFF the machine power and remove the Master removal upper cover M3x8 screws 2 pcs 2 Remove the Gear cover rear M3x6 screws 2 pcs 3 Remove the gear 4 Unplug the wi...

Page 129: ...cs 2 Remove the Gear cover rear M3x6 screws 2 pcs 3 Remove the Gear and Gear 35 6mm dia E ring 1 pc M3x12 screw 1 pc 4 Remove the Gear cover front M3x6 screws 2 pcs 5 Remove 2 pcs of Gears and the Bel...

Page 130: ...ession plate together with the Compression shaft 6mm dia E ring 2 pcs 8 Remove Compression spring from the Master compression plate M3x6 screws 2 pcs 9 Remove the mounting screws of the Master compres...

Page 131: ...T 1 Turn OFF the machine power and remove following parts Master removal upper cover M3x8 screws 2 pcs Gear cover front M3x6 screws 2 pcs Gear cover rear M3x6 screws 2 pcs 2 Remove the Pulley shaft st...

Page 132: ...ng from the Master removal roller upper slide the metal bushing and remove the Master removal roller upper 4mm dia stopper ring 1 pc 5 Slide the Master removal roller upper out through the O ring belt...

Page 133: ...screw of the Master removal hook and detach the Master removal hook from the Master removal assembly lower M3x10 screws 2 pcs Precaution in Assembly 1 The wire harness of the Master loading sensor sho...

Page 134: ...Master removal assembly lower M3x6 screws 2 pcs 2 Being careful of the Roller lower spring remove four E rings from the Spring plate and remove the Spring plate 3 Remove the O ring belts MASTER REMOV...

Page 135: ...r feed tray turn OFF the machine power and remove following parts Master removal lower cover M3x8 screws 4 pcs Rear cover M3x8 screws 5 pcs 2 While keeping the Master removal unit opened unplug the wi...

Page 136: ...er 6 2 AF Stripper Solenoid 8 3 Original Detection Sensor 9 4 Original IN Sensor 9 5 Stripper Roller 10 6 Original Pickup Roller 11 7 Original Stripper Pad 12 8 Read Pulse Motor 14 ADJUSTMENT 15 1 AF...

Page 137: ...FF to finish the Original loading movement 2 Original Scanning Mechanism 1 The Drum starts to rotate after the original loading action is completed At the same time the Read pulse motor activates to r...

Page 138: ...age senser Shutter Original feed arm Original pickup roller Stripper roller Original IN sensor Original detection sensor Image sensor Shutter Original feed arm Read pulse motor Original pickup roller...

Page 139: ...Dust prevention sponge Spacer Frame Photo conductor LED Scanner glass Cover glass Original Lens 3 Image Scanning Mechanism 1 The image scanning is done by a contact image scanner CIS which emits gree...

Page 140: ...11 CZ180 CV1860 Rev 1 0 CHAPTER 11 SCANNING SECTION MEMO RISO Inc Technical Services Support US RISO COM...

Page 141: ...the wire harness from the Image scanner Precaution in Assembly 1 In mounting the Image scanner back on the AF unit the Image scanner should be pushed towards the rear of the machine and towards the Ma...

Page 142: ...11 SCANNING SECTION Image sensor Scanner glass CIS spacer Scanner guide plate assembly Image sensor AF cover set sensor Original IN sensor Scanner guide plate assembly Scanner glass RISO Inc Technica...

Page 143: ...cs Scanner unit cover M3x8 screws 4 pcs 2 Unplug the wire harness connector of the AF stripper solenoid 3 Open the Master making unit and remove the mounting screws of the AF stripper solenoid to deta...

Page 144: ...on sensor form the Scanning guide plate assembly 4 Original IN Sensor REMOVAL 1 Turn OFF the machine power and remove following parts Master removal upper cover M3x8 screws 2 pcs Scanner upper frame c...

Page 145: ...re harness connector of Original IN sensor and Original detection sensor 4 Remove the Scanning guide plate assembly M3x6 screws 4 pcs 5 Remove E ring from the Original stripper roller shaft and remove...

Page 146: ...ove the Scanning guide plate assembly M3x6 screws 4 pcs 5 Remove E ring from the Shutter shaft assembly and being careful of the Spring remove the Shutter shaft assembly 3mm dia E ring 1pc 6 Remove th...

Page 147: ...assembly being careful not to loose the screw M3x6 screw 1 pc 4 Remove the Original stripper pad bracket being careful not to loose the screw M3x6 screw 1 pc 5 Detach the Original stripper bracket fr...

Page 148: ...g B Original feed shaft pin Spring A Original feed arm Spring B The Original feed shaft pin holds Spring A and Spring B while the U shaped portion of the Original feed arm goes through Original feed p...

Page 149: ...llowing parts Master removal upper cover M3x8 screws 2 pcs Scanner upper frame cover M3x8 screws 4 pcs Scanner unit cover M3x8 screws 4 pcs 2 Remove the Timing belt 3 Unplug the wire harness connector...

Page 150: ...the center fold 4 If the center line of the printed image is out of the range from the center fold of the paper make adjustment using following test mode Test Mode No 0380 AF Horizontal Scan Position...

Page 151: ...11 16 CZ180 CV1860 Rev 1 0 CHAPTER 11 SCANNING SECTION MEMO RISO Inc Technical Services Support US RISO COM...

Page 152: ...e Motor Assembly 8 5 Load Pulse Motor Assembly 9 6 Master Positioning Sensor Assembly 10 7 Cutter Guide Assembly 11 8 Master End Sensor 11 9 Write Roller 12 10 Master stocker roller bottom 13 11 Load...

Page 153: ...sitioning sensor Cutter motor Write pulse motor Load pulse motor TPH Write roller Master loading roller Master stocker roller bottom Load roller lower Master stocker roller top Load roller upper MECHA...

Page 154: ...aster material the machine displays a panel message to inform the operator to replace the master roll 3 Master Cutter Mechanism 1 The master cutting is done by a Cutter unit in which a Cutter blade di...

Page 155: ...de in the following sequence 1 With the start of the master making the Write pulse motor sends the master material forward The leading edge of the master material is detected by the Master positioning...

Page 156: ...he Front cover from the machine M3x8 screws 6 pcs 2 Unplug the wire harness connector of the Master making unit safety switch remove the mounting screw and remove the switch assembly M3x6 screws 2 pcs...

Page 157: ...H ground wire M3x6 screw 1 pc 2 Remove the TPH support plate M3x6 screw 1 pc 3 Slide the TPH all the way towards the Master roll holder and release the two hooks on the TPH assembly from the stay 4 Ro...

Page 158: ...Drum from the machine turn OFF the machine power and remove the Front cover from the machine M3x8 screws 6 pcs 2 Unplug the wire harness connector of the RF Tag Antenna 3 Open the Master making upper...

Page 159: ...ss of the Write pulse motor by releasing the wire harness from the wire saddle 3 Removing the mount screws remove the Write pulse motor assembly together with the Timing belt M3x6 screws 2 pcs Precaut...

Page 160: ...M3x8 screws 5 pcs 2 Open the PCB bracket on the back of the machine M3x8 screws 4 pcs 3 Unplug the wire harness connector of the load pulse motor 4 Remove the mounting screws and remove the Load puls...

Page 161: ...the Scanner unit cover M3x8 screws 4 pcs 4 Remove the Housing stay A M3x6 screws 2 pcs 5 Open the Master making upper unit By removing the Housing stay A in the previous step the unit will open wider...

Page 162: ...t and unplug two wire harness connectors M3x6 screw 1 pc 8 Remove the Cutter guide assembly M3x6 screws 2 pcs Master end sensor assembly 8 Master End Sensor 1 Remove the Master removal upper cover M3x...

Page 163: ...ne power and remove following parts Front Cover M3x6 screws 6 pcs Write pulse motor assembly M3x6 screws 2 pcs 2 Remove the Write roller pulley M3x6 screw 1 pc 3 Remove the Guide plate by removing two...

Page 164: ...ter making upper unit By removing the Housing stay A in the previous step the unit will open wider 7 Remove following parts Master positioning sensor bracket M3x6 screw 1 pc Unplug the wire harness co...

Page 165: ...ousing stay A M3x6 screws 2 pcs 6 Open the Master making upper unit By removing the Housing stay A in the previous step the unit will open wider 7 Remove following parts Load pulse motor assembly 3x6...

Page 166: ...nner unit cover M3x8 screws 4 pcs 5 Remove the Housing stay A M3x6 screws 2 pcs 6 Open the Master making upper unit By removing the Housing stay A in the previous step the unit will open wider 7 Remov...

Page 167: ...he machine power and remove following parts Front Cover M3x6 screws 6 pcs Write pulse motor assembly M3x6 screws 2 pcs 2 Unplug the two wire harness connectors of the Cutter unit 3 Remove the mounting...

Page 168: ...de on the master The length should be 20mm plus or minus 1mm 3 If the measured length is out of the range use Test Mode No 0543 Master Clamp Range Adjustment to make an adjustment Adjustable range 100...

Page 169: ...e Elongation and Shrinkage 1 Use Test Mode No 0081 to make master and prints 2 Check the master making elongation or shrinkage by measuring from the top horizontal line to the 32nd horizontal line fro...

Page 170: ...5 Paper Jam Error Display Method 6 6 Detailed List of Panel Messages 7 1 Serviceman Call Errors Pxx 7 2 Jam Errors Axx 13 3 Option Errors Bxx 16 4 Consumable Errors Cxx 18 5 Set Check Errors Dxx 19 6...

Page 171: ...0 1 5 2 0 Error Type Error Point Example P01 520 Main Motor Lock Error Type Indicates what type of error has occurred Error Point Indicates where the error has occurred 1 Error Type Error Point Examp...

Page 172: ...Master Making 7 Job Separator 8 Paper Feed 9 Paper Ejection 7 4 5 1 9 8 2 6 3 2 Example T01 529 Main Motor Lock While pressing the asterisk key the display keeps changing between Error Type and Error...

Page 173: ...isposal box is full Consumable Error Ink bottle is empty Consumable Error No paper on paper feed tray d xx Set Error One or more of the set switch or sensor is in OFF state E xx Warning Another type o...

Page 174: ...1xx Scanning Scanner AF Unit Image Processing 2xx Master Making 3xx Master Removal 4xx Paper Feed Paper Ejection 5xx Print Drum 6xx Print Adjustments Printing Position Density 7xx Options KeyCard Cou...

Page 175: ...odes The two digit error type number which follows after the J is the sum of the Corresponding Values for each of these A code errors Pressing the asterisk key on the operation panel will display the...

Page 176: ...ay Press Reset Key or turn OFF and ON the power Error Point Error Conditions 400 Both the upper and lower limit sensors are ON at the same time 401 Overload current was detected in the elevator motor...

Page 177: ...x System Error Press Reset Key If Recovery has Failed Call Service To reset display Press Reset Key after correcting the ink overflow condition No ink on the ink overflow sensor Error Point Error Cond...

Page 178: ...the master compres sion motor rotates in the reverse direction 305 Master compression HP sensor does not go ON within 1 second after the master compression mo tor operates in the return direction 306...

Page 179: ...onds after the cutting movement started 233 Cutter stop position switch does not go OFF even after 500 milliseconds after the cutter HP movement started 234 Cutter HP switch does not go ON even after...

Page 180: ...C NET D hardware error Description P93 xxx System Error Press Reset Key If Recovery has Failed Call Service To reset display Turn the power OFF and ON Error Point Error Conditions 932 No reply from t...

Page 181: ...MCTL PCB side 071 Communication error between SH PCB and MCTL PCB 07 on MCTL PCB side 072 Communication error between SH PCB and MCTL PCB 08 on MCTL PCB side 073 Communication error between SH PCB an...

Page 182: ...error Description A02 xxx Master Loading Error Pull Out Print Cylinder and Discard Master To reset display Pull out the print cylinder and set it back Error Point Error Conditions 509 Master loading...

Page 183: ...ection error Error Point Error Conditions 411 Paper ejection sensor was ON when the paper should have left the paper ejection sensor 417 Paper ejection sensor was ON at the start of machine operation...

Page 184: ...n the master making unit or when the machine goes into idle condition 213 Master material is not set in position when the machine goes into idle condition Error Type A34 Requesting for the master to b...

Page 185: ...paper tape in Job Separator Error Point Error Conditions 722 With the Tape separation function set ON no tape detected in the job separator when the start key is pressed 723 No tape remains in job sep...

Page 186: ...nection and Power Supply for Linked Printer To reset display Press Reset Key and check the network cable and linked printer Error Point Error Conditions 917 Communication error on the network 920 Erro...

Page 187: ...ed from the master roll 240 Master remaining amount is zero from the RF Tag information 253 Masterless error was detected twice consecutively on one same master roll Error Type C03 Master disposal box...

Page 188: ...erted in the machine Error Type D02 Incorrect print drum Description D02 xxx Wrong Type Print Cylinder Installed Replace with Correct Type To reset dis play Set correct print drum in the machine Error...

Page 189: ...opened Master making unit safety switch is OFF Error Type D13 Rear cover not closed Description D13 xxx Rear Cover of Main Body is Off Call Service To reset display Close the rear cover of the machin...

Page 190: ...R 13 PANEL MESSAGE Error Type D23 AF Cover Not Closed Description D23 xxx Close the AF Cover To reset display Close the AF cover Error Point Error Conditions 177 The AF cover is opened RISO Inc Techni...

Page 191: ...No Master on Print Cylinder Drum Make a New Master To reset dis play Make a new master with an original Error Point Error Conditions 015 There is no master on the print drum at the start of printing...

Page 192: ...t dis play Enter the required parameter value Following six 6 Error Types are backed up in memory and these error messages cannot be reset by turning OFF the power The cause for the message must be so...

Page 193: ...13 24 CZ180 CV1860 Rev 1 0 CHAPTER 13 PANEL MESSAGE MEMO RISO Inc Technical Services Support US RISO COM...

Page 194: ...2 List of the Test Modes 3 1 System Panel Test Modes 3 2 Imaging Scanning Test Modes 6 3 Master making Master disposal Test Modes 9 4 Paper feed and Paper ejection Test Modes 12 5 Print drum Print ad...

Page 195: ...s the Reset Key for one second to escape out from the Test Mode The Reset Key must be pressed for 1 second to escape out from the Test Mode only when the ma chine is in the standby mode of the test mo...

Page 196: ...nt 18 dots Creates Test pattern B4 18 dots 0087 Paper Feed Test continuous feeding Prints continuously The Speed key is enabled If the rear cover safety switch is OFF the operation begins when the rea...

Page 197: ...nance call message 0114 Maintenance Count Clear printing Maintenance Call copy count clear Clears the printing maintenance call message No Data check Details 0124 Machine Serial Number 1 Displays the...

Page 198: ...scription Selects the type of image for the continuous master making printing operation by Test Mode No 0090 Setting Selectable range 0 to 6 0 Image by Test Mode No 0080 1 Image by Test Mode No 0081 2...

Page 199: ...e Level Adjustment Description Sets the slice level for ABC Setting Range 8 to 8 Larger valudes for lighter print Unit 1 Default 0 0342 Shading Compensation Averaging Description Range 0 to 16 0 One t...

Page 200: ...nit 1 Default 2 0369 ABC Edge Emphasis Filter when ABC is activated Description Selects the matrix forming the halftone curve filter when ABC is activated Line Mode Density at auto Setting Range 0 to...

Page 201: ...nning speed on the AF unit Adjust the speed of AF Read Pulse Motor Setting Range 100 to 100 10 0 to 10 0 elongates the image Unit 1 0 1 Default 0 0 Rough reference in changing the elongation or shrink...

Page 202: ...0463 Write pulse motor in return direction Rotates in master returning direction counter clockwise 0464 Load pulse motor in feed direction Rotates in master feeding direction clockwise direction 0466...

Page 203: ...urn the master material back more before the write signal goes on The master making starts from closesr to the leading edge of the master material As a result the printed image position on the paper c...

Page 204: ...master and stops at the cutter stop position Description Sets the master return amout after cutter cuts the master and stops at the cutter stop position before the cutter returns to the HP position T...

Page 205: ...ensor sensitivity automatic adjustment Automatically adjusts the paper sensor sensitivity by activating the test mode with one clean sheet of white paper of which the operator normally uses 0708 Eleva...

Page 206: ...eed 2 1 19 times the drum speed 3 1 39 times the drum speed default 4 1 59 times the drum speed 0757 Paper ejection motor speed adjustment Print speed No 2 Description Speed ratio between the suction...

Page 207: ...3 Clamp home positioning action Resets the clamp unit to the home position 0884 Clamp unit cycle action 3 step cycle Make sure to bring the print drum to Position A by test mode No 0881 before activat...

Page 208: ...mber Displays the inking motor FG count value read from the ink bottle tag 1 count 0 1 ml Example For the 12 648 FG count 9 is displayed 0927 Inking motor FG count Displays up to 1 000th count number...

Page 209: ...k overflow has occurred in the print drum Setting Range 1 to 200 1 time to 200 times Unit 1 1 time Default 50 50 times 0952 Clamp unit hope position stop timing adjustment Description Sets the Clamp m...

Page 210: ...ues bring the master making image to the left Unit 1 0 1mm Default 0 0mm 1234 TPH resistance input Description Sets TPH resistance Setting Range 1200 to 2200 1200 ohm to 2200 ohm Unit 1 1 ohm Default...

Page 211: ...cription Sets number of times the Stamper stamps per one tape cut This test mode is active only for stamping action check by serviceman when using Test Mode No 3140 to check tape output This test mode...

Page 212: ...Sound Level 2 Level 1 Level 0 _ _ _ 8 AF Auto Master Making OFF ON _ _ _ _ 9 Job Separator When the unit is connected OFF ON _ _ _ _ 10 Idling OFF ON _ _ _ _ 11 Separator Fan OFF Weak 20 Medium 50 St...

Page 213: ...14 20 CZ180 CV1860 Rev 1 0 CHAPTER 14 TEST MODE MEMO RISO Inc Technical Services Support US RISO COM...

Page 214: ...80 CV1860 Rev 1 0 CHAPTER 15 ELECTRICAL COMPONENTS CHAPTER 15 ELECTRICAL COMPONENTS CONTENTS 1 Motors Fan Solenoid Clutches 2 2 Sensors 4 3 Switches Sensor 6 RISO Inc Technical Services Support US RIS...

Page 215: ...aper ejection motor Cutter motor Sparation fan Pressure solenoid Main motor Write pulse motor Clamp motor Load pulse motor Master compression motor AF read pulse motor AF stripper solenoid Elevator mo...

Page 216: ...ion motor Suction belt drive 0660 Main motor Main drive of the machine 0861 Print positioning motor Changes the vertical print position 0901 Master compression motor Master compression action in Maste...

Page 217: ...sensor Original IN sensor Original detection sensor Master removal FULL detection sensor Position A sensor Master removal jam sensor Clamp sensor Master removal motor FG sensor Master end sensor AF C...

Page 218: ...Interrupt Paper feed tray lower limit detection Vertical print positioning HP sensor Interrupt Vertical print position center detection Master removal motor HP sensor Interrupt Master removal motor sp...

Page 219: ...fety switch Cutter stop position switch Ink bottle set switch Rear cover safety switch Master removal unit safety switch Cutter HP switch Ink sensor Overflow sensor Master making unit safety switch 3...

Page 220: ...itch Print drum set detection Also acts as interlock switch 0820 Master making unit safety switch Master making unit set detection Also acts as interlock switch 1409 Cutter HP switch Cutter home posit...

Page 221: ...15 CZ180 CV1860 Rev 1 0 CHAPTER 15 ELECTRICAL COMPONENTS MEMO RISO Inc Technical Services Support US RISO COM...

Page 222: ...Control PCB PHOTOGRAPH 3 3 Connection between PCBs 4 4 Power Supply 5 5 Main Components Area 6 6 CN8 and CN12 of Mechanical Control PCB 7 7 Print Drum Area 8 8 Master Making Area 9 9 Master Removal Ar...

Page 223: ...16 CZ180 CV1860 Rev 1 0 CHAPTER 16 WIRING DIAGRAMS 1 Power Supply PCB PHOTOGRAPH RISO Inc Technical Services Support US RISO COM...

Page 224: ...AMS 2 Mechanical Control PCB PHOTOGRAPH Photograph of CZ180 Mechanical Control PCB Note CV1860 Mechanical Control PCB differs from that used on CZ180 The photograph given below is that used on CZ180 R...

Page 225: ...ring Diagram 042 50000 03 Front Area Wiring Diagram 042 50000 05 Operation Panel Wiring Diagram 042 50000 09 Panel I F Front CN8 Master Making Unit Upper Rear CN11 Main Unit Wiring Diagram 042 50000 0...

Page 226: ...GND 24V A 5 1V 03 04 02 01 Image Control PCB Power not used N C Main Motor Relay Drive Main Motor Relay 24V N C 01 02 03 04 Diagram 042 50000 07 Mechanical Control PCB CN19 CN3 CN8 CN7 PF 03 VH3P XR4P...

Page 227: ...ss 042 53004 GND Lower Limit Sensor 5V GND Vertical Centering Sensor 5V Vertical Print Positioning Pulse A Vertical Print Positioning Pulse B Vertical Print Positioning Pulse A Vertical Print Position...

Page 228: ...601 Paper Sensor Wire Harness 042 12602 HELM_ON HELD_SCK_CHG HELD_SCK HELD_RXD HELD_TXD 07 01 05 02 03 04 07 06 03 06 04 05 01 02 GND 5V 04 03 02 01 07 06 05 RF Wire Harness 042 53007 RF Antenna Wire...

Page 229: ...or Overflow Sensor VCC Overflow Sensor S GND Ink Sensor L Thermister Bottle Set Switch Wire Harness 042 17219 05 01 04 03 02 05 02 04 03 01 06 07 06 07 03 02 01 06 05 04 06 05 04 03 02 01 Drum Wire Ha...

Page 230: ...tection Sensor 5V GND Master End Sensor GND 5V Master Positioning Sensor GND GND 5V Upper Cover Set Sensor Original IN Sensor 5V GND Master Making Unit Wire Harness 042 28057 Position A Sensor 03 GND...

Page 231: ...01 05 06 04 08 09 07 11 12 10 13 14 15 16 CN7 Master Removal Unit Wire Harness 042 24102 GND Master Removal FULL Sensor 5V GND Master Compression HP Sensor 5V GND Master Removal Jam Sensor 5V GND Mast...

Page 232: ...4 Separation Fan GND N C Separation Fan PWM N C 01 02 03 04 05 06 07 08 09 10 01 02 03 04 05 06 07 08 09 10 Paper Ejection Wire Harness 042 53001 Paper Ejection Wire Harness 042 53001 Suction Unit Wir...

Page 233: ...Area 01 MECHANICAL CONTROL PCB 02 04 03 07 06 05 CZ7P Y CN1 CZ7P Y 03 05 07 06 04 01 02 PANEL PCB 042 37031 CN1 Front Wire Harness 042 53002 GND POWER GND POWER RESET PANEL_RXD PANEL_TXD 5V POWER 5V P...

Page 234: ...16 13 14 11 12 09 08 07 05 61 CN20 21 41 06 CN15 20 19 18 18 20 19 13 17 16 15 14 11 12 10 09 04 06 08 07 05 03 02 01 38 40 39 33 37 36 35 34 31 32 30 29 24 26 28 27 25 23 22 58 60 59 53 57 56 55 54...

Page 235: ...47 Suction Fan 250 Volts 24V A does not turn ON Pressure Solenoid 3 15 A Paper Feed Clutch Copy Counter Master Counter F102 24V B T98 948 Elevator Motor 250 Volts 24V B does not turn ON Clamp Motor 6...

Page 236: ...IONS CHAPTER 17 OTHER CAUTIONS CONTENTS 1 Machine Firmware Downloading Mechanical Control PCB 2 Downloading Procedure 2 Precaution in firmware downloading 2 2 Replacing the Mechanical Control PCB 3 RI...

Page 237: ...CB The CF card needs to be put in a card adopter before the insertion 4 Turn ON the machine power and let the firmware download automatically 5 Confirming that the downloading ended in success turn OF...

Page 238: ...oved from the previous PCB onto the new Mechanical Control PCB 5 Attach the new Mechanical Control PCB on the machine and insert CF card in an adopter in the slot of the PCB and download the machine f...

Page 239: ...17 CZ180 CV1860 Rev 1 0 CHAPTER 17 OTHER CAUTIONS MEMO RISO Inc Technical Services Support US RISO COM...

Page 240: ...ity Control 2 2 Drum Idling Control 2 3 Thermal Power Control on TPH 2 4 Elongation and Shrinkage Control in Master Making 2 5 Ink and Master Remaining Amount Display is Controlled 2 6 Inkless Timer C...

Page 241: ...ining on the master roll the speed of the Write pulse motor is controlled to reduce the image elongation and shrinkage in master making 5 Ink and Master Remaining Amount Display is Controlled More pre...

Page 242: ...RISO Inc Technical Services Support US RISO COM...

Page 243: ...07 Reproduction and duplication prohibited Edited and published by RISO Education Center Riso Kagaku Corporation The contents of this manual are subject to change without notice to permit product impr...

Reviews: