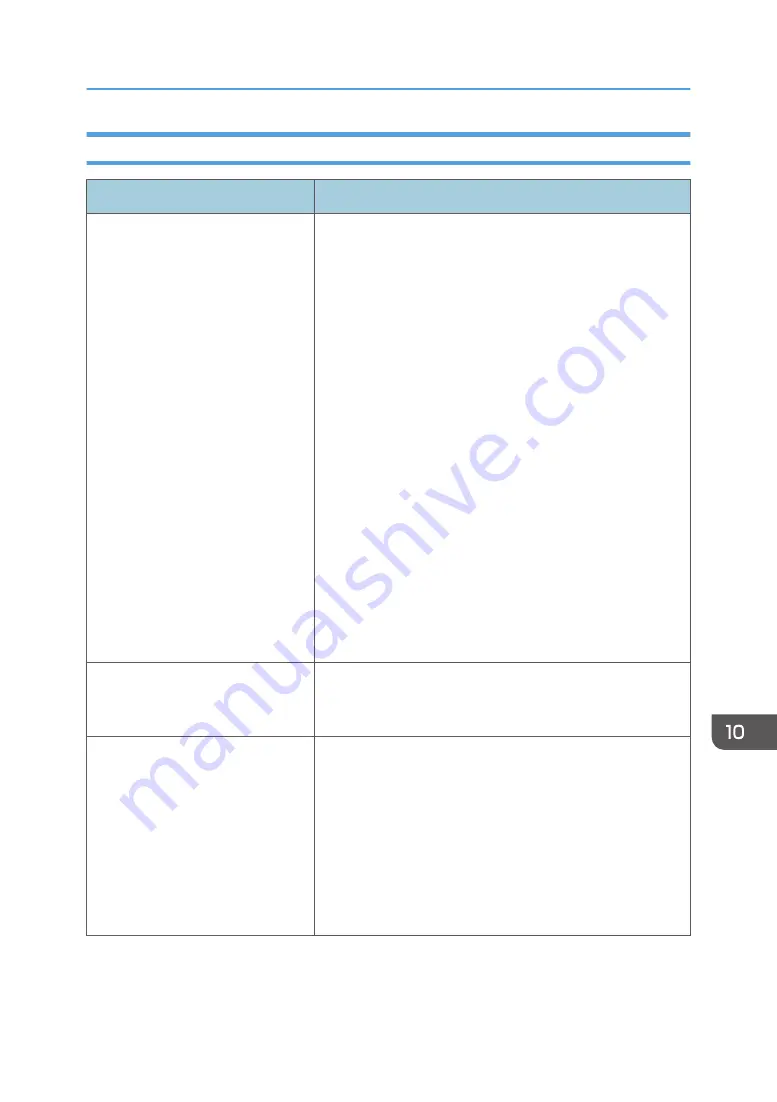
When You Cannot Print Clearly
Problem
Solution
The whole printout is blurred.
• The paper being used may be damp. Use paper that has
been stored properly. See page 63 "Supported Paper".
• Select [Level 1: Weak], [Level 2: Medium] or [Level 3:
Strong] in [Anti-Humidity Level] under [System Settings].
Note that if you select [Level 2: Medium] or [Level 3:
Strong], the first print takes longer than subsequent prints.
• If you enable [Toner Saving] under [System Settings],
printing is generally less dense.
• If you select [On] for [Economy Color] in the [Print
Quality] tab (PCL printer driver or DDST printer driver) or
under [Printer Features] (PostScript 3 printer driver), print
will be at lower density. For details, see the printer driver
Help.
• The print cartridge is almost empty. If "Replacement
Required: Toner Cartridge (X)" ("X" indicates the toner
color) appears on the screen, replace the indicated print
cartridge.
• Condensation may have occurred. If rapid change in
temperature or humidity occurs, use this machine only
after it has acclimatized.
The toner is powdery and comes
away from the paper, or the printed
image has a matt appearance.
Check if the fusing unit levers are properly set. Pull up the
fusing unit levers.
Toner smears appear on the print
side of the page.
• The paper setting may not be correct. For example,
although you are using thick paper, the setting for thick
paper may not be specified.
Check the printer driver's paper settings.
See the printer driver Help.
• Check that the paper is not curled or bent. Envelopes can
be curled easily. Flatten out the paper before loading it.
See page 48 "Loading Paper".
Printer Problems
373
Summary of Contents for SP C260SFNw
Page 2: ......
Page 14: ...5 Click the manual you want to refer to The PDF file manual opens 12...
Page 23: ...DUE207 2 1 3 Interior 1 2 3 4 5 DUE212 Guide to Components 21...
Page 46: ...Deleting characters 1 Press or C to delete characters 1 Guide to the Machine 44...
Page 126: ...4 Copying Originals 124...
Page 176: ...5 Scanning Originals 174...
Page 294: ...9 Close the Web browser 8 Configuring the Machine Using Utilities 292...
Page 340: ...5 Clean the parts indicated below DUE322 6 Close the ADF cover 9 Maintaining the Machine 338...
Page 354: ...Main unit DUE292 1 3 2 1 DUE288 2 DUE289 10 Troubleshooting 352...
Page 355: ...3 DUE290 Paper feed unit DUE320 1 1 DUE291 Removing Paper Jams 353...
Page 363: ...DUE253 5 Close the ADF Removing Paper Jams 361...
Page 419: ...Weight Less than 4 kg 8 9 lb Specifications of the Machine 417...
Page 436: ...12 Appendix 434...
Page 441: ...MEMO 439...
Page 442: ...MEMO 440 EN GB EN US EN AU M0AX 8604C...
Page 443: ...2017 2020...
Page 444: ...M0AX 8604C AU EN US EN GB EN...


