background image

SP 1000S

- 16 -

3 - Co

py

2

Confirm your choice by pressing the 

OK

 button.

Zoom setup

The 

ZOOM

 parameter allows you to reduce or enlarge an 

area of a document by choosing the origin and the zoom 
level to apply to the document, from 25 to 400 %.

 842 - ADVANCED FCT/COPY/ZOOMING

1

Enter the desired zoom level with the 
Alpanumerical keyboard or choose among 
predefined values with the buttons 

 and 

2

Confirm your choice by pressing the 

OK

 button.

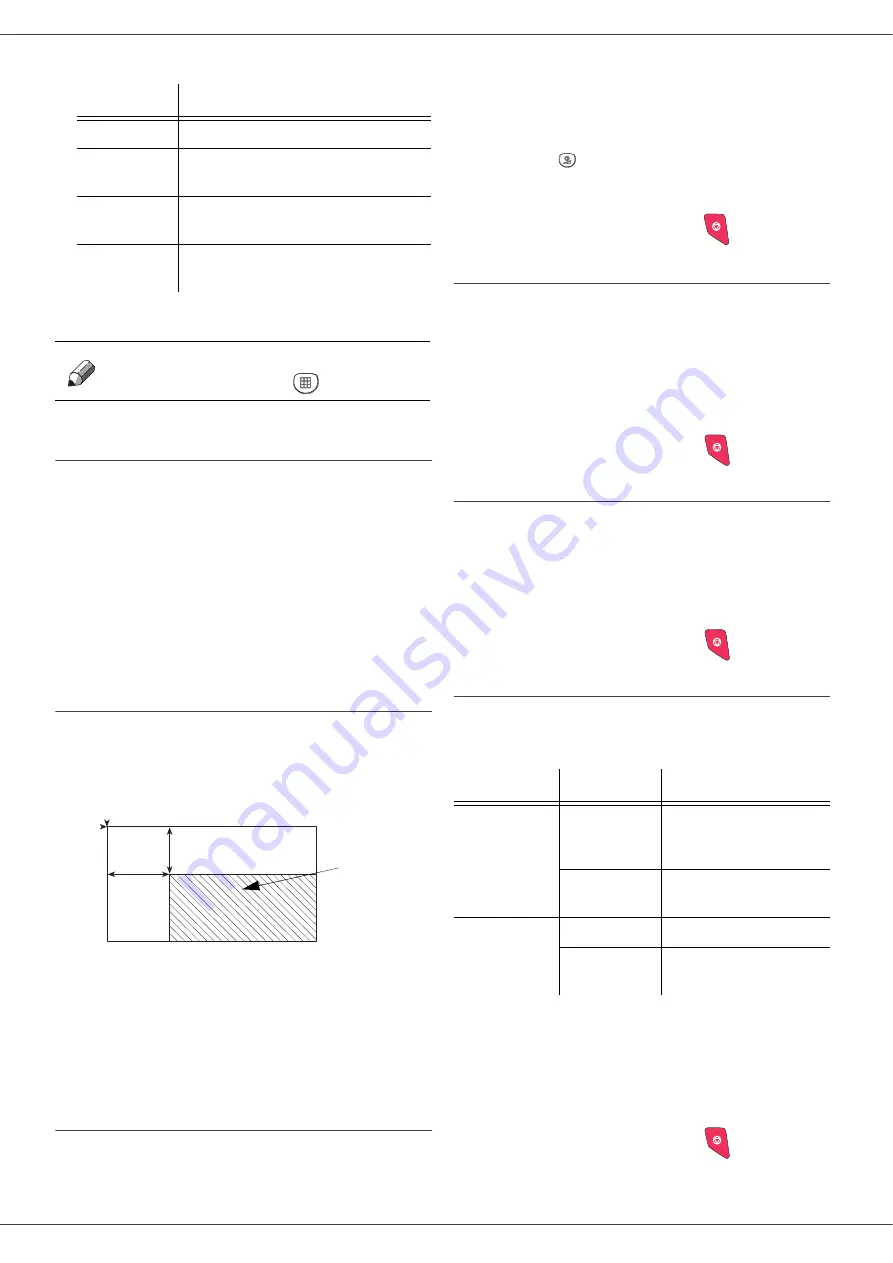
Analysis origin setup

If you want, you can change the origin of the scanner.

By entering new values for X and Y in mm (X < 210 and 
Y < 280), you move the analysed area as shown on the 
diagram below.

 843 - ADVANCED FCT/COPY/ORIGIN

1

Select the X and Y coordinates with the buttons 

 or 

.

2

Setup the desired coordinates with the digital 
keyboard or the buttons 

 and 

, confirm your 

choice by pressing on the 

OK

 button.

Contrast setup

The 

CONTRAST

 parameter allows to choose the 

photocopy contrast.

 844 - ADVANCED FCT/COPY/CONTRAST

1

Setup the desired level of contrast with the buttons 

 and 

, confirm by pressing the 

OK

 button.

2

You can also directly setup the desired contrast 
with the 

 button, press several times on this 

button until the desired setup without using the 
Menu 844.

3

Quit this menu by pressing the 

 button.

Luminosity setup

The 

LUMINOSITY

 parameter allows to lighten or darken 

your original document.

 845 - ADVANCED FCT/COPY/LUMINOSITY

1

Setup the desired brightness with the buttons 
and 

.

2

Confirm your choice by pressing the 

OK

 button.

3

Quit this menu by pressing the 

 button.

Paper type setup

 851 - ADVANCED FCT/SCAN. & PRINT/PAPER 

TYPE

1

Select the paper 

NORMAL

 or 

THICK

 that you use 

with the buttons 

 and 

.

2

Confirm your setup by pressing the 

OK

 button.

3

Quit this menu by pressing the 

button.

Paper tray selection

The 

Automatic

 selection can have two meanings  

depending on the paper format defined on the paper 
trays. The following table describes the different cases.

 852 - ADVANCED FCT/SCAN. & PRINT/TRAY 

PAPER

1

Select the default paper tray to use, 

AUTOMATIC

or 

MANUAL,

 with the buttons 

 and 

.

2

Confirm by pressing the 

OK

 button.

3

Quit this menu by pressing the 

button.

Parameter

Signification

DRAFT

Low resolution.

AUTO

Standard resolution for documents 
containing text and graphics.

QUALITY 
TEXT

Optimal resolution for documents 
containing text.

PHOTO

Optimal resolution for documents 
containing photographies.

 Note

You can also setup the resolution 

by pressing the 

 button.

y

DEBUT

 FEUILLE

FIN FEUILLE

x

Analysed area

BEGIN. OF SHEET

END OF SHEET

Default tray

Tray used for copy

Same paper 
format in the 
trays

AUTOMATIC

Selection between the 
main tray and the 
manual tray.

MANUAL

The manual tray is 
used.

Different paper 
format in the 
trays

AUTOMATIC

The main tray is used

MANUAL

The manual tray is 
used.

Summary of Contents for SP 1000S

Page 1: ...carefully before you use this machine and keep it handy for future reference For safe and correct use be sure to read the Safety Information in this manual before using the machine Operating Instruct...

Page 2: ...rgins setup 17 Left and right printing margins setup 17 Top and bottom printing margins setup 17 Format paper setup 17 Parameters Setup 18 Language 18 Technical Parameters 18 Printing the functions gu...

Page 3: ...SP 1000S II Contents Paper jam 30 Miscellaneous issues 30 Specifications 31 Physical specifications 31 Electrical specifications 31 Environmental specifications 31 Peripheral specifications 31...

Page 4: ...earthing For installation conditions and safe use precautions refer to chapter Installation page 7 Laser safety For Europe Asia This machine is considered a class 1 laser device safe for office EDP us...

Page 5: ...to Users in EEA Countries This product complies with the essential requirements and provisions of Directive 1999 5 EC of the European Parliament and of the Council of 9 March 1999 on radio equipment...

Page 6: ...000S 3 1 Security Certification Environment Licence CAUTION Changes or modifications not expressly approved by the party responsible for compliance could void the user s authority to operate the equip...

Page 7: ...or product packaging are marked with the symbol below The symbol indicates that the product must not be treated as municipal waste It must be disposed of separately via the appropriate return and col...

Page 8: ...agree to destroy all copies of the program and the associate documentation Warranty The Software is provided as is with no warranties what so ever whether expressed or implied including without limit...

Page 9: ...ed to as examples or in order to give additional information are registered trademarks of their respective owners The screenshots presented in this operating instructions have been created with Window...

Page 10: ...Terminal The section below describes the precautions to be taken when using the machine Never turn the machine off and never open the lids while printing Never use gas or flammable liquids or objects...

Page 11: ...y of the following conditions exists You spill something into the product You suspect that your product needs service or repair Your product s cover has been damaged Do not incinerate spilled toner or...

Page 12: ...uct and shall be easily accessible Rules for use symbols WARNING Indicates important safety notes Ignoring these notes could result in serious injury or death Be sure to read these notes They can be f...

Page 13: ...r Command panel Paper output Paper tray Master USB Manual paper feed setup guides USB key Smart card insertion point Fold down stopper for paper delivery connection Manual input tray Front cover Slave...

Page 14: ...844 CONTRAST Confirm with OK To access the CONTRAST settings with the shortcut method 1 Press on to access the menu 1 Enter 844 with the alphanumerical keypad to directly access the CONTRAST item ABC...

Page 15: ...feeding and should be avoided 4 When withdrawing the cassette from the main unit always hold it with both hands Handling of paper 1 Curling must be corrected before loading 2 Curls must not exceed 10...

Page 16: ...paper stack in the feed cassette 200 sheets for 80 g m paper for instance 6 Put the feed cassette back in its location Cartridge installation 1 Stand in front of the machine 2 Push the left and right...

Page 17: ...rmat corresponds to the selected format on the printer Note When using envelopes Feeding can be done only through the manual feed Recommended area should be the area which excludes 15 mm from the lead...

Page 18: ...only available in 1 Page to 1 copy mode 7 Adjust the desired origin values with the alphanumerical keyboard buttons or then confirm with the OK button 8 Choose the resolution depending on the printing...

Page 19: ...SITY parameter allows to lighten or darken your original document 845 ADVANCED FCT COPY LUMINOSITY 1 Setup the desired brightness with the buttons and 2 Confirm your choice by pressing the OK button 3...

Page 20: ...nting margins setup If you want to you can offset the lateral margins of the document towards the top or the bottom during printing 855 ADVANCED FCT SCAN PRINT TOP PRINT 1 Setup the top bottom margins...

Page 21: ...confirm with OK 2 With the buttons or modify the parameter settings by following the table below and press OK Parameter Signification 8 Eco energy Choosing the printer standby delay the printer will...

Page 22: ...for your machine at any time According to your needs you can read the counters for scanned pages printed pages Scanned pages counter To view the number of pages scanned on your machine 823 ADVANCED FC...

Page 23: ...4 Select FILE with the or buttons and confirm with OK 5 You have three possibilities to print your files ALL to print all the files located in the USB memory key Select ALL with the or buttons and con...

Page 24: ...memory key Refer to the previous chapters Save a document on a USB memory key This function allows you to digitise and save a document directly in a USB memory key 1 Place the document to be copied f...

Page 25: ...insert the installation CD ROM and close the drive 2 An installation procedure is automatically run Auto run 3 A screen titled COMPANION SUITE PRO LL appears This screen allows you to install and unin...

Page 26: ...opied on your hard drive you need to accept the proposed license agreement use the scroll bar to read the agreement entirely 10 Click on the YES button 11 Click on the NEXT button 12 The final install...

Page 27: ...you that the driver has been located Click on the NEXT button 7 A screen informs you that the software has been installed Click on the FINISH button 8 If the ADD HARDWARE assistant window appears on...

Page 28: ...CTOR Checking the connection between the PC and the multifunction machine To check if the connection between the devices is good run the MF MONITOR software from the icon located on the desktop and ch...

Page 29: ...of printed pages number of scanned pages Scan To The setup of this tab becomes the default setup for the scanner 1 Select the Scan To tab 2 Select one of the possible choices colour grayscale black a...

Page 30: ...act a signature for instance by outlining it Given your machine environment and the character recognition from your machine the OCR is done with a Drag drop of a document from the PaperPort to the Not...

Page 31: ...To set the TONER MANAGEMENT setting select 2979 SETUP TECHNICALS TONER MANAGEMENT and choose the setting Your machine comes with a current consumable management system It tells you if your toner cartr...

Page 32: ...oft cloth soaked in mild detergent Printer issues Error messages When the printer encounters any of the problems described below the corresponding message is shown on the machine display PLEASE WAIT N...

Page 33: ...paper which causes the paper jam 4 Check that the paper sheets in the paper tray are correctly placed 5 Replace the paper tray in the machine Miscellaneous issues When turning on the terminal nothing...

Page 34: ...tween 15 to 54 Type Laser on normal paper Resolution 600 dpi Speed 16 ppm maximum Preheating time 21 sec First page out time 13 sec Type Autonomous Black and White Copy speed 16 ppm maximum Resolution...

Page 35: ...B279 8651...

Reviews: