background image

English

49

English

Troubleshooting

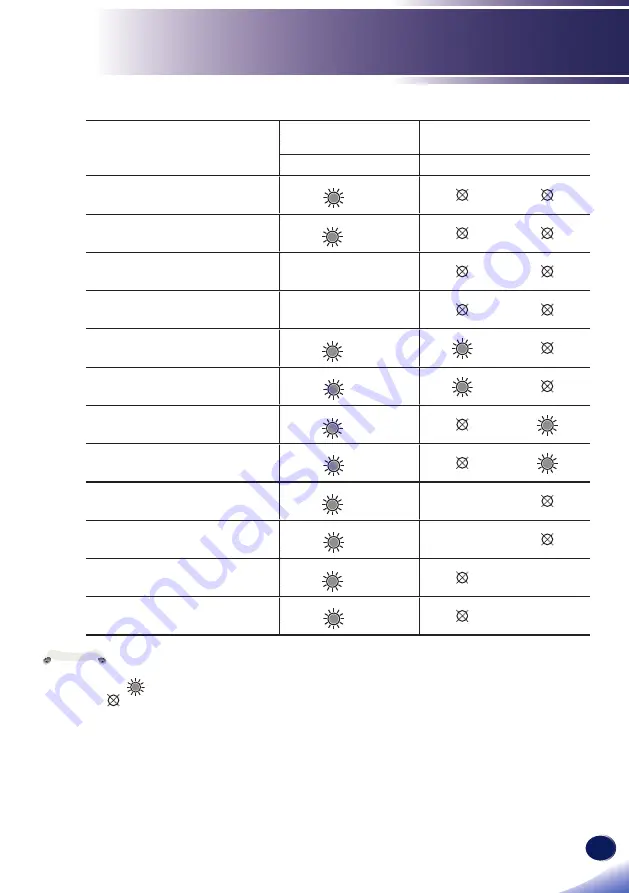
Message

POWER 

indicator

TEMP 

indicator

LAMP 

indicator

(Red/Blue)

(Red)

(Red)

Standby (Input power cord)

 (Red)

Normal (Power on)

 (Blue)

Powering up (Warming up)

Flashing Blue 

(0.5 sec)

Power off (Cooling Down)

Flashing Red 

(0.5 sec)

Temperature Error (Over 

temperature On Event)

 (Blue)

Temperature Error (Over 

temperature On Standby)

 (Red)

Lamp Error (Lamp failed On 

Event)

 (Blue)

Lamp Error (Lamp failed On 

Standby)

 (Red)

Fan Error (Fan failed On Event)

 (Blue)

Flashing  

(0.5 sec)

Fan Error (Fan failed On Standby)

 (Red)

Flashing  

(0.5 sec)

Error (Color Wheel fail / Striking 

Lamp Fail On Event)

 (Blue)

Flashing  

(0.5 sec)

Error (Color Wheel fail / Striking 

Lamp Fail On Standby)

 (Red)

Flashing  

(0.5 sec)

Problem: Indicator lighting message

Steady light => 

No light => 

Note

Summary of Contents for PJ S2240

Page 1: ...ep it handy for future reference For safe and correct use be sure to read the Precautions in this manual before using the machine Appendices Replacing the lamp Troubleshooting User Settings Basic Oper...

Page 2: ......

Page 3: ...o AV Equipment 27 Connect to AV Equipment 28 Powering On Off the Projector 29 Powering On the Projector 29 Powering Off the Projector 30 Warning Indicator 31 Adjusting the Projected Image 32 Adjusting...

Page 4: ...ke a loud popping sound If this happens the projector will not turn back on until the lamp module has been replaced To replace the lamp follow the procedures listed under Replacing the Lamp Warning Do...

Page 5: ...stalled on a wall or ceiling it may fall down and cause an injury Contact your sales or service representative if you want to install a machine on a wall or ceiling e Do not obstruct the machine s ven...

Page 6: ...out parts that could result in a fire or electric shock Never spill liquid of any kind on the product Caution Do not place or keep the projector within the reach of the children It may fall or tip ov...

Page 7: ...ith care to avoid injury and contact your sales representative for repair service Avoid any broken pieces of glass since they may cause injury In the unlikely event that the lamp ruptures thoroughly c...

Page 8: ...nformation on the thermal paper or cause deformation or warping Caution Do not use the product in a closed installation location Do not place the product in a box or in any other closed installation l...

Page 9: ...me Do not Block the slots and openings on the unit provided for ventilation Use abrasive cleaners waxes or solvents to clean the unit Use under the following conditions Extremely heat cold or humidity...

Page 10: ...eyesight 3 Do not place anything in front of the lens while the projector is operating Things placed in front of the lens may overheat and burn or start a fire If you want to temporarily stop the pro...

Page 11: ...o Part 15 of the FCC rules These limits are designed to provide reasonable protection against harmful interference in a residential installation This device generates uses and can radiate radio freque...

Page 12: ...the user s authority which is granted by the Federal Communications Commission to operate this projector LAMP S INSIDE THIS PRODUCT CONTAIN MERCURY AND MUST BE RECYCLED OR DISPOSED OF ACCORDING TO LOC...

Page 13: ...orme a la norme NMB 003 du Canada Declaration of Conformity for EU countries EMC Directive 2004 108 EC including amendments Low Voltage Directive 2006 95 EC Notice Users in EU countries CE Marking Tra...

Page 14: ...lamps in accordance with local regulations The symbol indicates that the product must not be treated as municipal waste It must be disposed of separately via the appropriate return and collection syst...

Page 15: ...ause severe internal burns in just 2 hours and can lead to death Keep new and used batteries away from children If the battery compartment does not close securely stop using the product and keep it aw...

Page 16: ...d on batteries and accumulators This symbol means that in the European Union used batteries and accumulators should be disposed of separately from your household waste In the EU there are separate col...

Page 17: ...s when viewing images using 3D glasses with projector How 3D images are viewed may vary according to the individual Do not use 3D glasses for viewing any material other than 3D images Before viewing 3...

Page 18: ...MHz PAL B D G H I M N SECAM B D G K K1 L and SDTV 480i 576i EDTV 480p 576p HDTV 720p 1080i 1080p compatible Multi Auto functions Auto detection Auto image and Auto saving the adjustments Full functio...

Page 19: ...ing is missing Projector Lens Cap 1 Remote Control with Battery please see page 23 Power Cord Carrying Bag 1 CD ROM 2 Read This First RGB Cable Read This First Due to the difference in applications fo...

Page 20: ...onnection ports 4 Ventilation inlet 5 Security chain opening 6 Speaker 7 Remote Receiver 8 Adjustable feet 9 Anti theft lock hole Kensington lock 10 Lens cap 11 Lens 12 Ventilation outlet 13 Focus rin...

Page 21: ...Service terminal 8 PC Control terminal 9 Audio 1 In terminal 10 Audio Out terminal 11 Audio 2 In terminal For Video and S Video 12 Video In terminal 1 5 6 11 15 10 1 5 6 11 15 10 3 4 11 1 2 5 9 8 7 T...

Page 22: ...or to select items or make adjustments to your selection 5 Temp indicator Indicate the inside of the projector s temperature status 6 Power indicator Indicate the projector s power status 7 Lamp indi...

Page 23: ...or or to select items or make adjustments to your selec tion 6 Auto Set Automatically adjust the RGB signal from the computer 7 Volume Increase decrease speaker volume 8 Magnify Enlarge part of the sc...

Page 24: ...vious menu See page 35 12 Enter Select or confirm settings 13 Keystone Adjust the image to compensate for distortion caused by tilting the projector 14 Aspect Use this function to choose your desired...

Page 25: ...nd put the new battery CR2025 into the battery tray 2 To ensure safe operation please observe the following precautions Never throw battery into a fire Do not ingest battery Chemical Burn Hazard Keep...

Page 26: ...ge Point the remote control toward the projector Remote Receiver when pressing any button 19 7 6m 30 horizontally 20 vertically Maximum operating range for the remote control is about 19 7 6m and 30 h...

Page 27: ...omputer please make sure the timing of the display mode is compatible with your projector See pages 52 55 Use the cables that come with the projector 1 Power cord supplied 2 HDMI DVI cable 3 RGB cable...

Page 28: ...ojector 1 Power cord supplied 2 Audio cable 3 HDMI DVI cable 4 RGB cable supplied 5 RGB cable 6 Audio cable Make sure that the power plug is fully inserted into both the projector AC inlet and the wal...

Page 29: ...e 3 Component RGB Cable 4 Component Cable 5 Video cable 6 S Video cable S Video DVD player HDTV receiver Make sure that the power plug is fully inserted into both the projector AC inlet and the wall o...

Page 30: ...ble S Video DVD player HDTV receiver Make sure that the power plug is fully inserted into both the projector AC inlet and the wall outlet The AC outlet must be near this equipment and must be easily a...

Page 31: ...ge Turn on your source computer notebook video player etc The projector will detect your source automatically Make sure that the Auto Source has been set to On Powering On Off the Projector Turn on th...

Page 32: ...0 seconds for cooling cycle and the Power indicator will flash red After cooling down the light stops flashing and then the projector will enter the standby mode If you wish to turn the projector back...

Page 33: ...has detected that the lamp is approaching its end of life Please change the lamp as soon as possible or contact your local dealer or our service center When the Temp indicator flashes red 0 5 sec on...

Page 34: ...image to fill the screen 1 Locate the adjustable foot you wish to modify on the underside of the projector 2 Rotate the adjustable ring clockwise to raise the projector or counter clockwise to lower...

Page 35: ...Focus at distances from 3 94 to 39 4 feet 1 2 to 12 0 meters RICOH PJ WX2240 Focus at distances from 3 28 to 32 8 feet 1 0 to 10 0 meters Adjusting Projection Image Size Zoom Lever Width Height Diagon...

Page 36: ...9 91 10 92 32 50 35 83 0 57 1 88 300 6 10 4 57 240 00 180 00 11 89 13 11 39 00 43 00 0 69 2 25 RICOH PJ S2240 PJ X2240 RICOH PJ WX2240 This table is for user s reference only Diagonal length inch size...

Page 37: ...enter sub menu 3 Use keys to select the desired item in the sub menu and press or Enter key to view further settings Adjust the set tings by using key or key 4 Select the next item to be adjusted in t...

Page 38: ...e For game content Natural Mode for emphasizing color reproduction User User defined settings Wall Color Use this function to obtain an optimized screen image according to the wall color The available...

Page 39: ...rease the contrast Sharpness Adjust the sharpness of the image Press the key to decrease the sharpness Press the key to increase the sharpness Saturation Adjust the color saturation of the image Press...

Page 40: ...e the image is displayed as 16 9 4 3 This format is for 4x3 input sources 16 9 This format is for 16x9 input sources like HDTV and DVD enhanced for Widescreen TV Phase Eliminate flicker from the image...

Page 41: ...ar Projection Mode Use this function to select the projector mode depending upon how the projector is mounted Front This is the default selection The image is projected straight on the screen Front Ce...

Page 42: ...able Disable the Monitor output function On Enable the Monitor Out function at projector standby status Off Disable the Monitor Out function at projector standby status Reset Return the adjustments an...

Page 43: ...e Temporarily turn off the sound Choose On to mute the sound Choose Off to turn mute off Volume Adjust the volume level Press the key to decrease the volume Press the key to increase the volume Mute f...

Page 44: ...le disable input sources Press the key to enter the sub menu and select which sources you require Press Enter to finalize the selection The projector will only search for inputs that are enabled Auto...

Page 45: ...d The message will appear 30 hours before suggested replacement of lamp Lamp Power Mode Set the brightness mode Choose Normal to increase the brightness or choose ECO to dim the projector lamp which w...

Page 46: ...e the warning message when the changing filter message is displayed If the reminder function is enabled and the usage time reached its limit a message will appear on the screen to remind you to clean...

Page 47: ...tural or felt 3D incorrect 3D Format Use this option to select the appropriate 3D format content Side by Side Use this mode for Side by side format 3D content Top and Bottom Use this mode for Top and...

Page 48: ...displayed image Press Auto Set on the remote control Adjust the computer display settings Verify the resolution setting is less than or equal to 1600 x 1200 resolution See your operating system s Help...

Page 49: ...ur graphic card to make it compatible with the product Problem Image is out of focus Adjust the Focus Ring on the projector lens Make sure the projection screen is between the required distance refer...

Page 50: ...just the image Problem Lamp burns out or makes a popping sound When the lamp reaches its end of life it will burn out and may make a loud popping sound If this happens the projector will not turn on u...

Page 51: ...r temperature On Event Blue Temperature Error Over temperature On Standby Red Lamp Error Lamp failed On Event Blue Lamp Error Lamp failed On Standby Red Fan Error Fan failed On Event Blue Flashing 0 5...

Page 52: ...eat inside Check the environmental condition Replacing the lamp the lamp is about to reach its maximum lifetime Prepare to replace it soon Fan Error the cooling system fan is not working Replacing the...

Page 53: ...e to avoid injury due to broken pieces and contact your sales representative for repair service Lamp Replacing Procedure 1 Switch off the power to the projector by pressing the button 2 Allow the proj...

Page 54: ...x 600 85 53 67 XGA 1024 x 768 60 48 36 1024 x 768 70 56 48 1024 x 768 75 60 02 1024 x 768 85 68 67 SXGA 1152 x 864 70 63 8 1152 x 864 75 67 5 1152 x 864 85 77 1 1280 x 1024 60 63 98 1280 x 1024 72 77...

Page 55: ...EIA 60 67 5 3 VGA Analog Component Signal 480i 720 x 480 59 94 29 97 27 480p 720 x 480 59 94 31 47 576i 720 x 576 50 25 27 576p 720 x 576 50 31 25 720p 1280 x 720 60 45 720p 1280 x 720 50 37 5 1080i...

Page 56: ...x 960 60 60 1280 x 960 75 75 SXGA 1400 x 1050 60 65 32 UXGA 1600 x 1200 60 75 PowerBook G4 640 x 480 60 31 5 640 x 480 66 6 67 35 800 x 600 60 37 88 1024 x 768 60 48 36 1152 x 870 75 68 68 1280 x 960...

Page 57: ...Input timing 1280 X 720P 50Hz Top and Bottom 1280 X 720P 60Hz Top and Bottom 1280 X 720P 50Hz Frame packing 1280 X 720P 60Hz Frame packing 1920 X 1080i 50 Hz Side by Side Half 1920 X 1080i 60 Hz Side...

Page 58: ...DC Data NC 5 Ground Horiz sync 13 Horiz sync Input Output Composite H V sync Input 6 Ground Red 7 Ground Green 14 Vert sync Input Output 8 Ground Blue 15 DDC CLK NC Do not connect anything 5 4 3 2 1 1...

Page 59: ...95 2 15 1 55 1 7 Dimension WxDxH 314 2 W x 223 5 D x 88 2 H mm without feet 314 2 W x 223 5 D x 101 7 H mm with feet Weight 2 6 kg I O Terminal Computer in S Video Video Service PC Control 9 pins HDM...

Page 60: ...58 English Appendices Cabinet Dimensions Unit mm 1 5 6 11 15 10 314 2 88 2 223 5 63 6 82 3 13 5 85 0 8 0 140 0 Holes for ceiling mount Screw size and max length M4 x 12 5mm...

Page 61: ...Vista Internet Explorer and PowerPoint are either a registered trademark or trademark of Microsoft Corporation in the United States and or other countries HDMI the HDMI Logo and High Definition Multi...

Page 62: ...2014 Ricoh Co Ltd...

Page 63: ...Y042 6221 AU EN US EN GB EN...

Reviews: