background image

80

English

Appendices

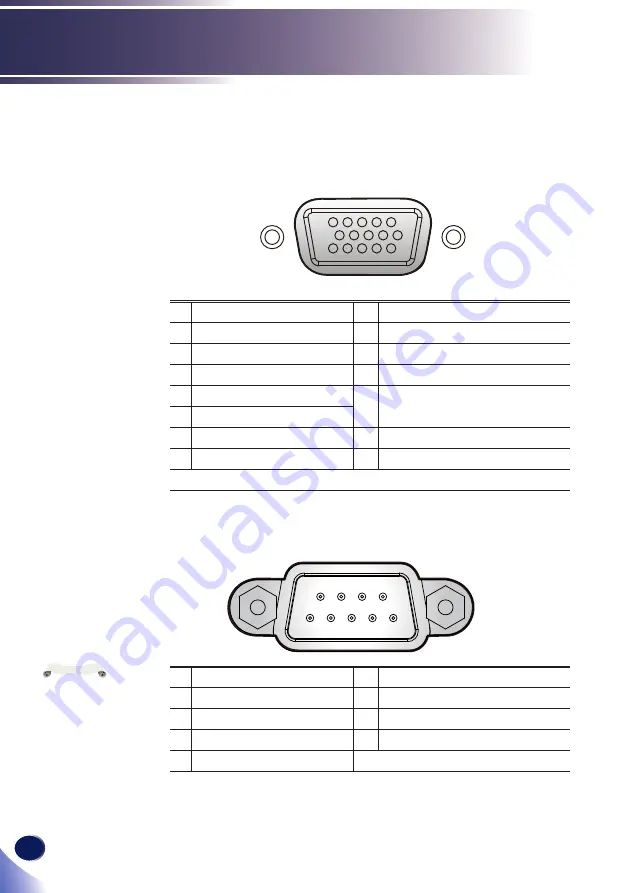
Configurations of Terminals

Terminal: Computer In 1/2 (Mini D-sub 15 

pin) [Monitor Out]

1

Red (R/Cr) Input [R Output]

9

DDC 5V [NC*]

2

Green (G/Y) Input [G Output]

10

Ground (Ver. sync.)

3

Blue (B/Cb) Input [B Output]

11

NC*

4

NC*

12

DDC Data [NC*]

5

Ground (Horiz.sync.)

13

Horiz. sync. Input [Output]

(Composite H/V sync. Input)

6

Ground (Red)

7

Ground (Green)

14

Vert. sync. Input [Output]

8

Ground (Blue)

15

DDC CLK [NC*]

* Do not connect anything.

5

4

3

2

1

10

9

8

7

6

15 14 13 12

11

 

Contact your dealer 

for control cable and 

commands.

Note

Terminal: PC Control (D-sub 9 pin)

1

NC*

6

NC*

2

TXD (Sending Data)

7

NC*

3

RXD (Receiving Data)

8

NC*

4

NC*

9

NC*

5

GND

* Do not connect anything.

5

4

3

2

1

9

8

7

6

Summary of Contents for PJ HD5450

Page 1: ...and keep it handy for future reference For safe and correct use be sure to read the Precautions in this manual before using the machine 5 LAN Control 4 User Settings 2 Introduction 3 Basic Operations...

Page 2: ......

Page 3: ...ion of Projector Image 38 Adjusting the Projector Zoom and Focus 39 Adjusting Projection Image Size 39 User Settings 42 Using the On Screen Display OSD 42 How to operate 42 Picture 43 Screen 45 Settin...

Page 4: ...ke a loud popping sound If this happens the projector will not turn back on until the lamp module has been replaced To re place the lamp follow the procedures listed under Replacing the Lamp Warning D...

Page 5: ...hat is installed on a wall or ceiling d If a machine is incorrectly installed on a wall or ceiling it may fall down and cause an injury Contact your sales or service representative if you want to inst...

Page 6: ...the product Caution Do not place or keep the projector within the reach of the children It may fall or tip over possibly causing serious injury Caution Do not stack other equipment on this product and...

Page 7: ...ith care to avoid injury and contact your sales representative for repair service Avoid any broken pieces of glass since they may cause injury In the unlikely event that the lamp ruptures thoroughly c...

Page 8: ...nformation on the thermal paper or cause deformation or warping Caution Do not use the product in a closed installation location Do not place the product in a box or in any other closed installation l...

Page 9: ...me Do not Block the slots and openings on the unit provided for ventilation Use abrasive cleaners waxes or solvents to clean the unit Use under the following conditions Extremely heat cold or humidity...

Page 10: ...eyesight 3 Do not place anything in front of the lens while the projector is operating Things placed in front of the lens may overheat and burn or start a fire If you want to temporarily stop the pro...

Page 11: ...limits for a Class B digital device pursuant to Part 15 of the FCC rules These limits are designed to provide reasonable protection against harmful interference in a residential installation This dev...

Page 12: ...he user s author ity which is granted by the Federal Communications Commission to operate this projector LAMP S INSIDE THIS PRODUCT CONTAIN MERCURY AND MUST BE RECYCLED OR DISPOSED OF ACCORDING TO LOC...

Page 13: ...555 Japan Importer Ricoh Europe PLC 20 Triton Street London NW1 3BF United Kingdom User Information on Electrical and Electronic Equipment Users in the countries where this symbol shown in this sectio...

Page 14: ...p to reduce potential impacts on the environment and human health which could otherwise result from inappropriate handling Recycling of products helps to conserve natural resources and protect the env...

Page 15: ...ries away from children If the battery compartment does not close securely stop using the product and keep it away from children If you think batteries might have been swallowed or placed inside any p...

Page 16: ...d on batteries and accumulators This symbol means that in the European Union used batteries and accumulators should be disposed of separately from your household waste In the EU there are separate col...

Page 17: ...s when viewing images using 3D glasses with projector How 3D images are viewed may vary according to the individual Do not use 3D glasses for viewing any material other than 3D images Before viewing 3...

Page 18: ...43 MHz PAL B D G H I M N SECAM B D G K K1 L and SDTV 480i 576i EDTV 480p 576p HDTV 720p 1080i 1080p compatible Multi Auto functions Auto detection Auto image and Auto saving the adjustments Full func...

Page 19: ...Cord Carrying Bag 1 CD ROM Read This First RGB Cable Read This First CR2025 3V About the CD ROM Contains an user s manual in PDF format Support languages are English Japanese and Chinese For the othe...

Page 20: ...onnection ports 4 Ventilation inlet 5 Security chain opening 6 Speaker 7 Remote Receiver 8 Adjustable feet 9 Anti theft lock hole Kensington lock 10 Lens cap 11 Lens 12 Ventilation outlet 13 Focus rin...

Page 21: ...Audio 2 In Audio Out Computer 2 In Computer 1 In PC Control Service HDMI LAN 3 4 11 1 2 5 9 8 7 The interface is subject to model s specifications Note 10 12 6 13 1 5 6 11 15 10 1 5 6 11 15 10 3 4 11...

Page 22: ...Control terminal 9 Audio 1 In terminal 1 3 10 Audio Out terminal 1 3 11 Audio 2 In terminal For Video and S Video 1 3 12 Video In terminal 3 13 LAN terminal 2 Connection Ports continue Note 1 is not...

Page 23: ...r or or to select items or make adjustments to your selection 5 Temp indicator Indicate the inside of the projector s temperature status 6 Power indicator Indicate the projector s power status 7 Lamp...

Page 24: ...ur selection 6 Auto Set Automatically synchronize the projector to the input source 7 Volume Increase decrease speaker volume 8 Magnify Enlarge part of the screen image Reduce the enlarged part of the...

Page 25: ...ystone Adjust the image to compensate for distortion caused by tilting the projector 14 Aspect Use this function to choose your desired aspect ratio for the screen 15 Power Refer to the Power On Off t...

Page 26: ...ut the new battery CR2025 into the battery tray 2 To ensure safe operation please observe the following precautions Never throw battery into a fire Do not ingest battery Chemical Burn Hazard Keep new...

Page 27: ...Range Point the remote control toward the projector Remote Receiver when pressing any button Maximum operating range for the remote control is about 19 7 6m and 30 horizontally 20 vertically in front...

Page 28: ...or works well with your computer please make sure the timing of the display mode is compatible with your projector See pages 76 79 Use the cables that come with the projector 1 Power cord supplied 2 H...

Page 29: ...timing of the display mode is compatible with your projector See pages 76 79 Use the cables that come with the projector Make sure that the power plug is fully inserted into both the projector AC inle...

Page 30: ...the projector 1 Power cord supplied 2 Audio cable 3 HDMI DVI cable 4 RGB cable supplied 5 RGB cable 6 Audio cable Make sure that the power plug is fully inserted into both the projector AC inlet and t...

Page 31: ...tible with your projector See pages 76 79 Use the cables that come with the projector 1 Power cord supplied 2 Audio cable 3 HDMI DVI cable 4 RGB cable supplied 5 RGB cable 6 Audio cable 7 LAN cable Ma...

Page 32: ...ctor See pages 76 79 Use the cables that come with the projector Make sure that the power plug is fully inserted into both the projector AC inlet and the wall outlet The AC outlet must be near this eq...

Page 33: ...e 3 Component RGB Cable 4 Component Cable 5 Video cable 6 S Video cable S Video DVD player HDTV receiver Make sure that the power plug is fully inserted into both the projector AC inlet and the wall o...

Page 34: ...ble S Video DVD player HDTV receiver Make sure that the power plug is fully inserted into both the projector AC inlet and the wall outlet The AC outlet must be near this equipment and must be easily a...

Page 35: ...ponent Cable 5 S Video cable 6 Video cable 7 Audio cable 8 Audio cable S Video DVD player HDTV receiver Make sure that the power plug is fully inserted into both the projector AC inlet and the wall ou...

Page 36: ...nd must be easily accessible Note Connect to AV Equipment Use the cables that come with the projector When HDMI input is selected only audio signal with HDMI can be output When Audio Out is connected...

Page 37: ...your source computer notebook video player etc The projector will detect your source automatically Make sure that the Auto Source has been set to On Powering On Off the Projector Turn on the projector...

Page 38: ...rate for about 30 seconds for cooling cycle and the Power indicator will flash red After cooling down the light stops flashing and then the projector will enter the standby mode If you wish to turn th...

Page 39: ...has detected that the lamp is approaching its end of life Please change the lamp as soon as possible or contact your local dealer or our service center Warning Lamp Lamp is approaching the end of its...

Page 40: ...he image to fill the screen 1 Locate the adjustable foot you wish to modify on the underside of the projector 2 Rotate the adjustable ring clockwise to raise the projector or counter clockwise to lowe...

Page 41: ...WX5460 Focus at distances from 3 28 to 36 1 feet 1 0 to 11 0 meters RICOH PJ HD5450 Focus at distances from 4 89 to 32 7 feet 1 5 to 10 0 meters Adjusting Projection Image Size Zoom Lever RICOH PJ S22...

Page 42: ...9 10 9 32 5 35 8 0 57 1 88 300 6 1 4 6 240 0 180 0 11 9 13 1 39 0 43 0 0 69 2 25 RICOH PJ S2240 PJ TS100 PJ X2240 PJ X5460 RICOH PJ WX2240 PJ WX5460 This table is for user s reference only Diagonal le...

Page 43: ...9 50 1 11 0 62 43 6 24 5 1 7 2 0 5 4 6 5 0 10 0 33 60 1 33 0 72 52 3 29 4 2 0 2 4 6 5 7 8 0 12 0 39 70 1 55 0 87 61 0 34 3 2 3 2 8 7 6 9 2 0 14 0 46 80 1 77 1 00 69 7 39 2 2 7 3 2 8 7 10 5 0 16 0 52 9...

Page 44: ...sub menu 3 Use keys to select the desired item in the sub menu and press or Enter key to view further settings Adjust the settings by using key or key 4 Select the next item to be adjusted in the sub...

Page 45: ...Game For game content Natural Mode for emphasizing color reproduction User User defined settings Wall Color Use this function to obtain an optimized screen image according to the wall color The avail...

Page 46: ...y to increase the contrast Sharpness Adjust the sharpness of the image Press the key to decrease the sharpness Press the key to increase the sharpness Saturation Adjust the color saturation of the ima...

Page 47: ...played as 4 3 When input is 16 9 above the image is displayed as 16 9 4 3 Displays 4 3 aspect ratio 16 9 Displays 16 9 aspect ratio Phase Eliminate flicker from the image displayed Use the or key to a...

Page 48: ...r Projection Mode Use this function to select the projector mode depending upon how the projector is mounted Front This is the default selection The image is projected straight on the screen Front Cei...

Page 49: ...function at projector standby status Off Disable the Monitor Out function at projector standby status Network Standby RICOH PJ X5460 PJ WX5460 PJ HD5450 only Enable Disable the network function On En...

Page 50: ...ovided from DHCP server when DHCP is set to On Subnet Mask Set subnet mask number or display subnet mask number provided from DHCP server when DHCP is set to On Gateway Set the default gateway of the...

Page 51: ...stments and settings to the factory default values Choose Yes to return the display parameters on all menus except Language and Lamp Hours Used to the factory default settings LAN Control settings als...

Page 52: ...ute the sound Choose Off to turn mute off Volume Adjust the volume level Press the key to decrease the volume Press the key to increase the volume Volume menu is not available on RICOH PJ S2240 RICOH...

Page 53: ...s the key to enter the sub menu and select which sources you require Press Enter to finalize the selection The projector will only search for inputs that are enabled Auto Power Off Min Sets the countd...

Page 54: ...e message will appear 30 hours before suggested replacement of lamp Lamp Power Mode Set the brightness mode Choose Normal to increase the brightness or choose ECO to dim the projector lamp which will...

Page 55: ...hide the warning message when the changing filter message is displayed If the reminder function is enabled and the usage time reached its limit a message will appear on the screen to remind you to cl...

Page 56: ...l or felt 3D incorrect 3D Format Use this option to select the appropriate 3D format content Side by Side Use this mode for Side by Side format 3D content Top and Bottom Use this mode for Top and Bott...

Page 57: ...0 100 when IP address is displayed as the screen above Login 1 The web browser shows a login page If you want to connect an existing network system consult the network administrator for network setti...

Page 58: ...ing when you select administrator And you can use only Control Panel when you select user 3 Enter the Password If the password setting is enabled the correct password needs to enter Default passwords...

Page 59: ...e current system status of the projector It includes Standby Warm up Power on cooling Power off and Unknown Input PJ X5460 PJ WX5460 It shows the current input source of the projector It includes Comp...

Page 60: ...ust the RGB signal from the computer Input Switch among Computer1 Computer2 Video S Video and HDMI Setting Buttons Setting is toggled On and Off by clicking the button Auto Source Search the next sign...

Page 61: ...lick Reset to return the default value 0 Sharpness Adjust sharpness by clicking or Click Reset to return the default value 0 Picture mode Select a picture mode from the drop down list Audio Volume Adj...

Page 62: ...ink password Enter the current password in current password box Default password is admin Enter a new password in both New Password box and Confirm Password box Click Apply button This projector name...

Page 63: ...set OSD menu in the projector DNS Server address can be set only in this section This is required when E mail setting is set by domain names Check DHCP when network settings are provided by DHCP serv...

Page 64: ...ink password Enter a new password in both New Password box and Confirm Password box Click Apply button Disable the password when enabled Check Disable in Administrator or User Enter the current passwo...

Page 65: ...gh The body of the mail is Over Temperture xxx xxx xxx xxx Lamp Hours Running Out An alert mail is sent when lamp life is ending The body of the mail is Lamp Hours Running out xxx xxx xxx xxx Lamp Fai...

Page 66: ...out tab to logout from this projector control web site This page will appear for 2 seconds and then jump to login page Be sure Email settings and SMTP settings are correct Email test is recommended af...

Page 67: ...8 32 bit 64bit version Pro Enterprise Windows 8 1 32 bit 64bit version Pro Enterprise Windows Server 2008 SP2 32 bit 64bit version Windows Server 2008 R2 Standard SP1 64bit version Memory size Recomm...

Page 68: ...created on the desktop Register projectors 1 Registers the projectors with Auto search Click Register Projector button Click Auto Search button This software is to control and monitor projectors manu...

Page 69: ...English 67 English LAN Control List of projectors which support PJLink are displayed in the window Projector name is displayed as until authorization if password is enable...

Page 70: ...IP address and registers the projector Enter IP address of the desired projector and click Confirm button then the projector name will be displayed After confirming the projector name click Register...

Page 71: ...esn t support the selected input source A Table of input source name in the projector and the projector management utility PJ X5460 PJ WX5460 The projector The projector Management Utility Computer 1...

Page 72: ...displayed image Press Auto Set on the remote control Adjust the computer display settings Verify the resolution setting is less than or equal to 1600 x 1200 resolution See your operating system s Help...

Page 73: ...ur graphic card to make it compatible with the product Problem Image is out of focus Adjust the Focus Ring on the projector lens Make sure the projection screen is between the required distance refer...

Page 74: ...just the image Problem Lamp burns out or makes a popping sound When the lamp reaches its end of life it will burn out and may make a loud popping sound If this happens the projector will not turn on u...

Page 75: ...r temperature On Event Blue Temperature Error Over temperature On Standby Red Lamp Error Lamp failed On Event Blue Lamp Error Lamp failed On Standby Red Fan Error Fan failed On Event Blue Flashing 0 5...

Page 76: ...amp the lamp is about to reach its maximum lifetime Prepare to replace it soon Warning Lamp Lamp is approaching the end of its useful life Replacement Suggested Fan Error the cooling system fan is not...

Page 77: ...J Replacement Lamp Type 16 for PJ WX5460 X5460 HD5450 Caution If the lamp should break handle with care to avoid injury due to broken pieces and contact your sales representative for repair service La...

Page 78: ...x 600 85 53 67 XGA 1024 x 768 60 48 36 1024 x 768 70 56 48 1024 x 768 75 60 02 1024 x 768 85 68 67 SXGA 1152 x 864 70 63 8 1152 x 864 75 67 5 1152 x 864 85 77 1 1280 x 1024 60 63 98 1280 x 1024 72 77...

Page 79: ...Analog Component Signal 480i 720 x 480 59 94 29 97 27 480p 720 x 480 59 94 31 47 576i 720 x 576 50 25 27 576p 720 x 576 50 31 25 720p 1280 x 720 60 45 720p 1280 x 720 50 37 5 1080i 1920 x 1080 60 30...

Page 80: ...75 SXGA 1400 x 1050 60 65 32 UXGA 1600 x 1200 60 75 PowerBook G4 640 x 480 60 31 5 640 x 480 66 6 67 35 800 x 600 60 37 88 1024 x 768 60 48 36 1152 x 870 75 68 68 1280 x 960 75 75 2 i Mac DV G3 1024...

Page 81: ...20P 50Hz Top and Bottom 1280 x 720P 60Hz Top and Bottom 1280 x 720P 50Hz Frame packing 1280 x 720P 60Hz Frame packing 1920 x 1080i 50Hz Side by Side Half 1920 x 1080i 60Hz Side by Side Half 1920 x 108...

Page 82: ...DC Data NC 5 Ground Horiz sync 13 Horiz sync Input Output Composite H V sync Input 6 Ground Red 7 Ground Green 14 Vert sync Input Output 8 Ground Blue 15 DDC CLK NC Do not connect anything 5 4 3 2 1 1...

Page 83: ...rvice HDMI Monitor Out Speaker Not Available 2W Lamp life Normal 4500 hours ECO 6000 hours Noise Level Typ Full 34dB A ECO 31dB A Standby Power Monitor Out Off 0 5W or less Environment Operational Tem...

Page 84: ...imension WxDxH 314 2 W x 223 5 D x 88 2 H mm without feet 314 2 W x 223 5 D x 101 7 H mm with feet Weight approx 3 0 kg I O Terminal Computer 1 In Computer 2 In PC Control 9 pins S video Video Audio 1...

Page 85: ...Unit mm 1 5 6 11 15 10 1 5 6 11 15 10 USB VGA1 IN YPbPr VIDEO VGA OUT VGA2 IN YPbPr HDMI AUDIO1 IN AUDIO OUT AUDIO2 IN S VIDEO RS 232C LAN 314 2 88 2 223 5 63 6 82 3 13 5 85 0 8 0 140 0 Holes for cei...

Page 86: ...ta Internet Explorer and PowerPoint are either a registered trademark or trademark of Microsoft Corporation in the United States and or other countries HDMI the HDMI Logo and High Definition Multimedi...

Reviews: